
Grow Peas Kitchen Garden: Imagine stepping outside your back door and harvesting fresh, sweet peas for your dinner, all from your very own kitchen garden! For centuries, cultivating peas has been a cherished tradition, dating back to ancient civilizations where they were a staple food source. From royal gardens to humble homesteads, the joy of nurturing these little green gems has always been deeply satisfying.
But let’s be honest, sometimes getting those peas to thrive can feel like a bit of a challenge. That’s where this DIY guide comes in! I’m going to share some of my favorite, tried-and-true tricks and hacks to help you grow peas kitchen garden with ease, even if you’re a complete beginner.
In today’s world, where fresh, healthy produce can be expensive and sometimes hard to find, having your own pea patch is more valuable than ever. Not only will you save money, but you’ll also have the peace of mind knowing exactly where your food comes from and how it was grown. Plus, there’s nothing quite like the taste of homegrown peas – they’re bursting with flavor and sweetness that you just can’t find in store-bought varieties. So, get ready to roll up your sleeves and let’s get growing!
Growing Peas in Your Kitchen Garden: A Comprehensive DIY Guide
Hey there, fellow gardening enthusiasts! I’m so excited to share my tried-and-true method for growing delicious, sweet peas right in your kitchen garden. Forget those bland, store-bought peas – nothing beats the taste of freshly picked, homegrown goodness. This guide will walk you through every step, from choosing the right variety to harvesting your bounty. Let’s get started!
Choosing Your Pea Variety
Before we dive into the planting process, it’s crucial to select the right pea variety for your needs and space. There are three main types of peas:
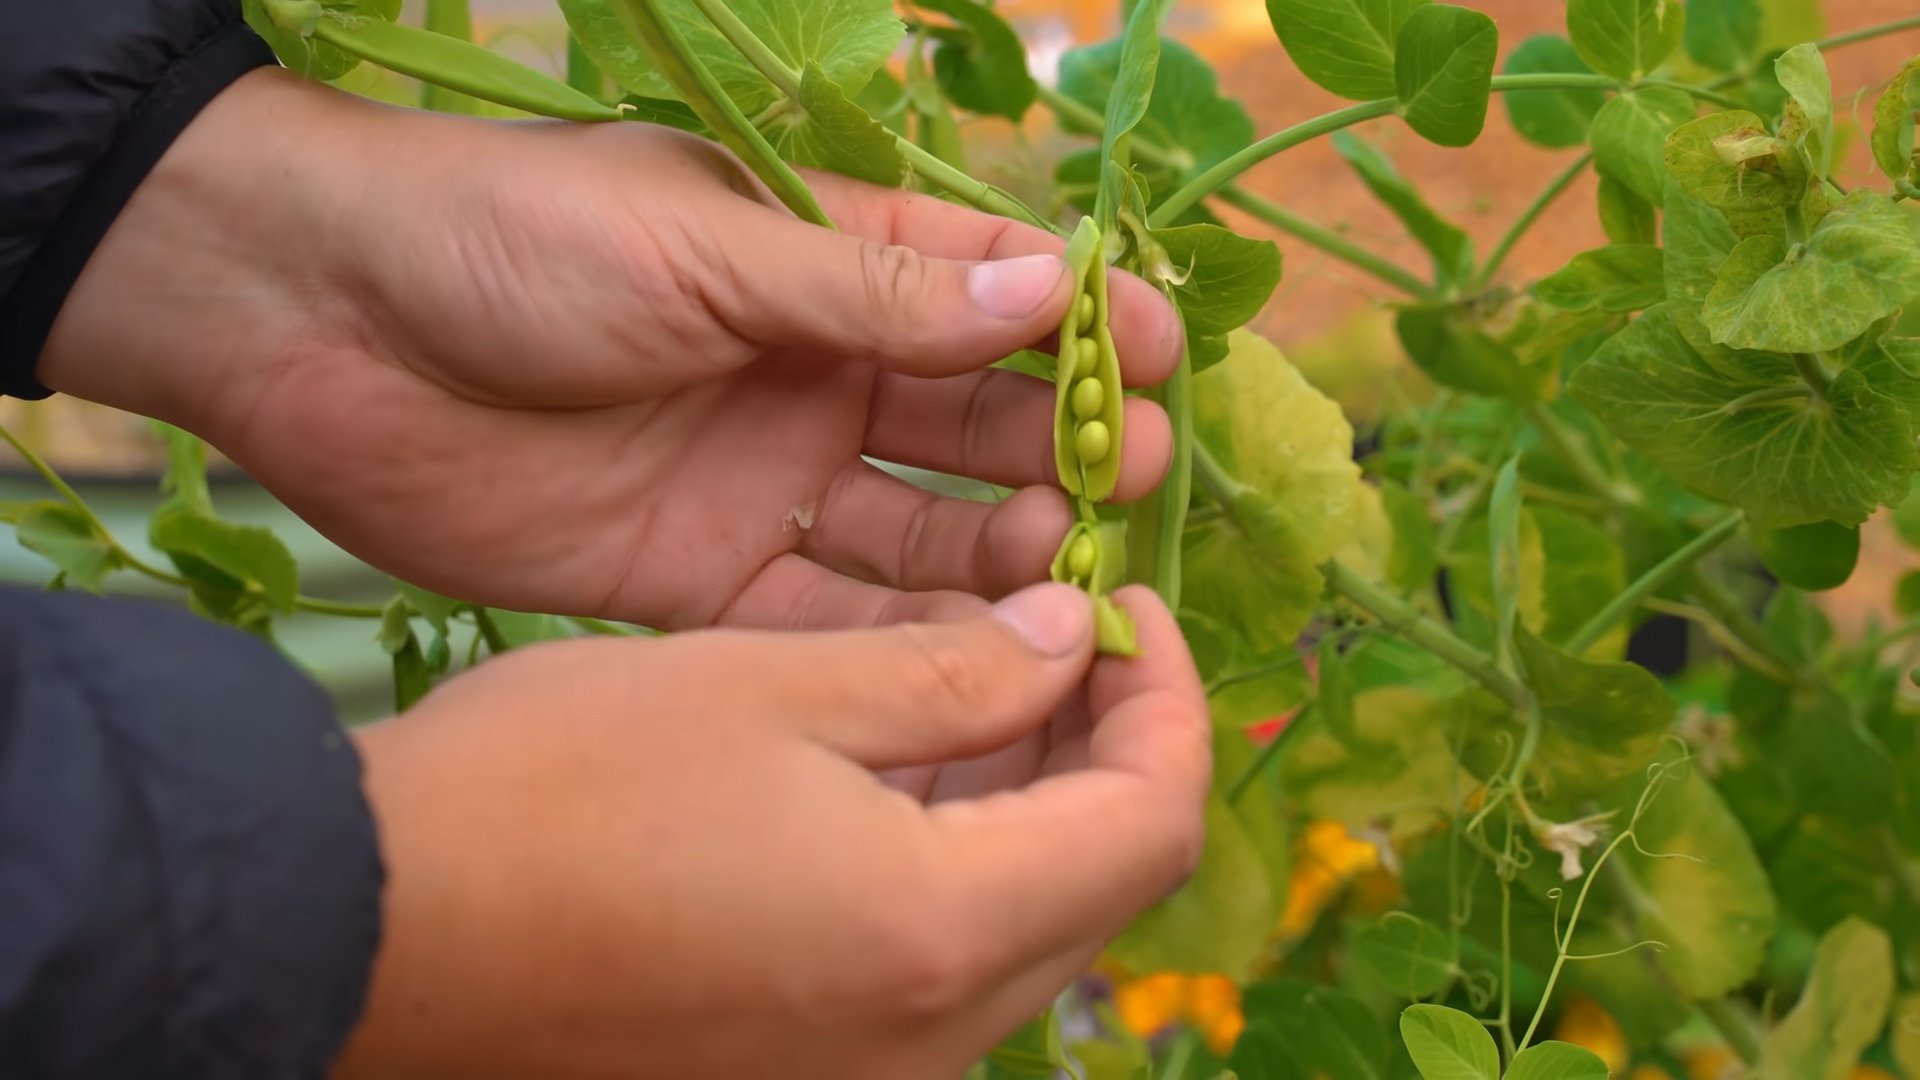
* Shelling Peas (English Peas): These are the classic peas you’re probably most familiar with. You need to remove the pods to get to the delicious peas inside. They’re known for their sweet flavor and are perfect for eating fresh, freezing, or using in recipes.
* Snap Peas: These are a game-changer! You can eat the entire pod, making them incredibly convenient and satisfyingly crunchy. They’re great for snacking, stir-fries, and salads.
* Snow Peas: Similar to snap peas, snow peas have edible pods, but they’re flatter and have smaller peas inside. They’re often used in Asian cuisine and are delicious stir-fried or steamed.
Consider the following factors when choosing your pea variety:
* Days to Maturity: This indicates how long it will take for your peas to be ready for harvest. Choose a variety that fits your growing season.
* Plant Height: Some pea varieties are bush types, while others are vining types. Vining types will require a trellis or support structure.
* Disease Resistance: Look for varieties that are resistant to common pea diseases in your area.
* Flavor Preference: Do you prefer sweet, crunchy, or a more subtle flavor?
Some of my personal favorite varieties include:
* ‘Sugar Snap’ (Snap Pea): Reliable, productive, and incredibly sweet.
* ‘Little Marvel’ (Shelling Pea): Compact plants perfect for smaller gardens.
* ‘Oregon Sugar Pod II’ (Snow Pea): High-yielding and disease-resistant.
Preparing Your Garden Bed
Peas thrive in well-drained soil that’s rich in organic matter. Here’s how to prepare your garden bed for success:
1. Choose a Sunny Location: Peas need at least 6-8 hours of sunlight per day.
2. Test Your Soil: A soil test will tell you the pH level and nutrient content of your soil. Peas prefer a slightly acidic to neutral pH (around 6.0-7.0).
3. Amend the Soil: If your soil is heavy clay or sandy, amend it with compost or well-rotted manure to improve drainage and fertility. I usually add a generous layer (2-3 inches) of compost to my pea beds.
4. Loosen the Soil: Use a garden fork or tiller to loosen the soil to a depth of at least 12 inches. This will allow the pea roots to penetrate easily.
5. Remove Rocks and Debris: Clear the area of any rocks, weeds, or other debris that could hinder growth.
6. Level the Soil: Rake the soil to create a smooth, even surface.
Planting Your Pea Seeds
Peas are cool-season crops, so they’re best planted in early spring or late summer. Here’s how to plant your pea seeds:
1. Timing is Key: Plant your pea seeds as soon as the soil is workable in the spring, usually 4-6 weeks before the last expected frost. For a fall crop, plant 6-8 weeks before the first expected frost.
2. Soak the Seeds (Optional): Soaking the pea seeds in water for 12-24 hours before planting can help speed up germination.
3. Create Furrows: Use a hoe or trowel to create furrows in the soil, about 1-2 inches deep.
4. Sow the Seeds: Sow the pea seeds about 1-2 inches apart in the furrows.
5. Cover the Seeds: Gently cover the seeds with soil and pat it down lightly.
6. Water Thoroughly: Water the planted area thoroughly to ensure good seed-to-soil contact.
7. Consider Inoculation: Pea seeds benefit greatly from inoculation with nitrogen-fixing bacteria. You can purchase inoculant powder at most garden centers. Sprinkle the inoculant on the seeds before covering them with soil. This helps the plants to fix nitrogen from the air, promoting healthy growth.
Providing Support for Your Peas
Most pea varieties, especially vining types, need support to climb. This helps to keep the plants off the ground, improving air circulation and reducing the risk of disease. Here are a few options for providing support:
* Trellis: A trellis is a sturdy structure made of wood, metal, or plastic that provides a vertical surface for the peas to climb.
* Netting: Garden netting is a lightweight and inexpensive option that can be stretched between posts or stakes.
* Pea Brush: This is a traditional method that involves using branches from trees or shrubs to create a natural support structure.
* DIY Structures: Get creative and build your own support structure using bamboo poles, twine, or other materials.
Installing the Support:
1. Choose Your Support Method: Select the support method that best suits your garden and your pea variety.
2. Install Before Planting or Shortly After: It’s best to install the support structure before planting the pea seeds or shortly after they germinate. This will prevent you from disturbing the plants later on.
3. Secure the Support: Make sure the support structure is securely anchored in the ground to prevent it from falling over.
4. Guide the Peas: As the peas grow, gently guide their tendrils towards the support structure. They will eventually start to climb on their own.
Caring for Your Pea Plants
Once your pea plants are established, here’s how to care for them:
1. Watering: Peas need consistent moisture, especially during flowering and pod development. Water deeply whenever the top inch of soil feels dry. Avoid overhead watering, as this can promote disease.
2. Weeding: Keep the garden bed free of weeds, which can compete with the peas for nutrients and water. Hand-pull weeds carefully to avoid disturbing the pea roots.
3. Fertilizing: Peas don’t need a lot of fertilizer, especially if you’ve amended the soil with compost. However, you can give them a boost with a side dressing of compost tea or a balanced organic fertilizer a few weeks after planting.
4. Pest Control: Keep an eye out for common pea pests, such as aphids and pea weevils. You can control aphids with insecticidal soap or by blasting them off the plants with a strong stream of water. Pea weevils can be controlled with row covers or by hand-picking them off the plants.
5. Disease Prevention: To prevent disease, ensure good air circulation around the plants and avoid overhead watering. If you notice any signs of disease, such as powdery mildew or leaf spot, remove the affected leaves immediately.
Harvesting Your Peas
Harvesting your peas at the right time is crucial for optimal flavor and texture.
1. Timing is Everything: The timing of the harvest depends on the type of pea you’re growing.
Hey there, fellow gardening enthusiasts! I’m so excited to share my tried-and-true method for growing delicious, sweet peas right in your kitchen garden. Forget those bland, store-bought peas – nothing beats the taste of freshly picked, homegrown goodness. This guide will walk you through every step, from choosing the right variety to harvesting your bounty. Let’s get started!
Choosing Your Pea Variety
Before we dive into the planting process, it’s crucial to select the right pea variety for your needs and space. There are three main types of peas:
* Shelling Peas (English Peas): These are the classic peas you’re probably most familiar with. You need to remove the pods to get to the delicious peas inside. They’re known for their sweet flavor and are perfect for eating fresh, freezing, or using in recipes.
* Snap Peas: These are a game-changer! You can eat the entire pod, making them incredibly convenient and satisfyingly crunchy. They’re great for snacking, stir-fries, and salads.
* Snow Peas: Similar to snap peas, snow peas have edible pods, but they’re flatter and have smaller peas inside. They’re often used in Asian cuisine and are delicious stir-fried or steamed.
Consider the following factors when choosing your pea variety:
* Days to Maturity: This indicates how long it will take for your peas to be ready for harvest. Choose a variety that fits your growing season.
* Plant Height: Some pea varieties are bush types, while others are vining types. Vining types will require a trellis or support structure.
* Disease Resistance: Look for varieties that are resistant to common pea diseases in your area.
* Flavor Preference: Do you prefer sweet, crunchy, or a more subtle flavor?
Some of my personal favorite varieties include:
* ‘Sugar Snap’ (Snap Pea): Reliable, productive, and incredibly sweet.
* ‘Little Marvel’ (Shelling Pea): Compact plants perfect for smaller gardens.
* ‘Oregon Sugar Pod II’ (Snow Pea): High-yielding and disease-resistant.
Preparing Your Garden Bed
Peas thrive in well-drained soil that’s rich in organic matter. Here’s how to prepare your garden bed for success:
1. Choose a Sunny Location: Peas need at least 6-8 hours of sunlight per day.
2. Test Your Soil: A soil test will tell you the pH level and nutrient content of your soil. Peas prefer a slightly acidic to neutral pH (around 6.0-7.0).
3. Amend the Soil: If your soil is heavy clay or sandy, amend it with compost or well-rotted manure to improve drainage and fertility. I usually add a generous layer (2-3 inches) of compost to my pea beds.
4. Loosen the Soil: Use a garden fork or tiller to loosen the soil to a depth of at least 12 inches. This will allow the pea roots to penetrate easily.
5. Remove Rocks and Debris: Clear the area of any rocks, weeds, or other debris that could hinder growth.
6. Level the Soil: Rake the soil to create a smooth, even surface.
Planting Your Pea Seeds
Peas are cool-season crops, so they’re best planted in early spring or late summer. Here’s how to plant your pea seeds:
1. Timing is Key: Plant your pea seeds as soon as the soil is workable in the spring, usually 4-6 weeks before the last expected frost. For a fall crop, plant 6-8 weeks before the first expected frost.
2. Soak the Seeds (Optional): Soaking the pea seeds in water for 12-24 hours before planting can help speed up germination.
3. Create Furrows: Use a hoe or trowel to create furrows in the soil, about 1-2 inches deep.
4. Sow the Seeds: Sow the pea seeds about 1-2 inches apart in the furrows.
5. Cover the Seeds: Gently cover the seeds with soil and pat it down lightly.
6. Water Thoroughly: Water the planted area thoroughly to ensure good seed-to-soil contact.
7. Consider Inoculation: Pea seeds benefit greatly from inoculation with nitrogen-fixing bacteria. You can purchase inoculant powder at most garden centers. Sprinkle the inoculant on the seeds before covering them with soil. This helps the plants to fix nitrogen from the air, promoting healthy growth.
Providing Support for Your Peas
Most pea varieties, especially vining types, need support to climb. This helps to keep the plants off the ground, improving air circulation and reducing the risk of disease. Here are a few options for providing support:
* Trellis: A trellis is a sturdy structure made of wood, metal, or plastic that provides a vertical surface for the peas to climb.
* Netting: Garden netting is a lightweight and inexpensive option that can be stretched between posts or stakes.
* Pea Brush: This is a traditional method that involves using branches from trees or shrubs to create a natural support structure.
* DIY Structures: Get creative and build your own support structure using bamboo poles, twine, or other materials.
Installing the Support:
1. Choose Your Support Method: Select the support method that best suits your garden and your pea variety.
2. Install Before Planting or Shortly After: It’s best to install the support structure before planting the pea seeds or shortly after they germinate. This will prevent you from disturbing the plants later on.
3. Secure the Support: Make sure the support structure is securely anchored in the ground to prevent it from falling over.
4. Guide the Peas: As the peas grow, gently guide their tendrils towards the support structure. They will eventually start to climb on their own.
Caring for Your Pea Plants
Once your pea plants are established, here’s how to care for them:
1. Watering: Peas need consistent moisture, especially during flowering and pod development. Water deeply whenever the top inch of soil feels dry. Avoid overhead watering, as this can promote disease.
2. Weeding: Keep the garden bed free of weeds, which can compete with the peas for nutrients and water. Hand-pull weeds carefully to avoid disturbing the pea roots.
3. Fertilizing: Peas don’t need a lot of fertilizer, especially if you’ve amended the soil with compost. However, you can give them a boost with a side dressing of compost tea or a balanced organic fertilizer a few weeks after planting.
4. Pest Control: Keep an eye out for common pea pests, such as aphids and pea weevils. You can control aphids with insecticidal soap or by blasting them off the plants with a strong stream of water. Pea weevils can be controlled with row covers or by hand-picking them off the plants.
5. Disease Prevention: To prevent disease, ensure good air circulation around the plants and avoid overhead watering. If you notice any signs of disease, such as powdery mildew or leaf spot, remove the affected leaves immediately.
Harvesting Your Peas
Harvesting your peas at the right time is crucial for optimal flavor and texture.
1. Timing is Everything: The timing of the harvest depends on the type of pea you’re growing.
* Shelling Peas: Harvest when the pods are plump and filled with peas. The pods should be firm but not hard.
* Snap Peas: Harvest when the pods are fully developed but still tender and crisp. The peas inside should be small and not overly mature.
* Snow Peas: Harvest when the pods are flat and the peas are barely visible. The pods should be tender and translucent.
2. Harvesting Technique: Gently snap the pods off the plant, being careful not to damage the vines.
3. Regular Harvesting: Harvest your peas regularly to encourage continued production. The more you pick, the more the plants will produce.
4. Enjoy Your Harvest: Eat your peas fresh, freeze them for later use, or use them in your favorite recipes.
Troubleshooting Common Pea Problems
Even with the best care, you may encounter some problems when growing peas. Here are a few common issues and how to address them:
* Poor Germination: This can be caused by cold soil, poor seed quality, or overwatering. Make sure the soil is warm enough before planting, use fresh seeds, and avoid overwatering.
* Yellowing Leaves: This can be caused by nutrient deficiencies, overwatering, or disease. Test your soil to identify any nutrient deficiencies and adjust your watering accordingly.
* Powdery Mildew: This is a fungal disease that can cause a white, powdery coating on the leaves. Improve air circulation around the plants and treat with a fungicide if necessary.

Conclusion
So, there you have it! Growing peas in your kitchen garden, even if you’re short on space or a seasoned gardener, is surprisingly achievable and incredibly rewarding. This DIY approach isn’t just about saving money; it’s about connecting with your food, understanding its journey from seed to table, and enjoying the unparalleled flavor of freshly harvested peas. Forget those bland, store-bought peas – the vibrant sweetness and crisp texture of homegrown peas are in a league of their own.
This method is a must-try because it empowers you to control the entire process, from choosing organic seeds to nurturing the plants with your own hands. You’ll avoid harmful pesticides and herbicides, ensuring a healthy and delicious harvest for you and your family. Plus, the act of gardening itself is incredibly therapeutic, offering a welcome escape from the stresses of daily life.
But the beauty of this DIY project lies in its adaptability. Feel free to experiment with different pea varieties. Consider trying snow peas for their edible pods, snap peas for their plump sweetness, or classic shelling peas for a traditional taste. You can also adjust the support system to suit your space and aesthetic. A simple trellis made from bamboo stakes works wonders, or you could get creative with repurposed materials like old ladders or branches.
For those with limited sunlight, consider supplementing with grow lights to ensure your peas receive the necessary energy for optimal growth. And if you’re dealing with pests, try companion planting with herbs like rosemary or mint, which naturally deter unwanted visitors.
Don’t be afraid to get your hands dirty and embrace the learning process. Gardening is all about experimentation and discovery. Even if you encounter a few challenges along the way, the satisfaction of harvesting your own peas will make it all worthwhile.
We wholeheartedly encourage you to give this DIY pea-growing trick a try. It’s a simple, affordable, and incredibly rewarding way to bring fresh, flavorful produce into your kitchen. And most importantly, it’s a fantastic way to experience the joy of gardening, even in a small space.
Once you’ve harvested your first batch of homegrown peas, we’d love to hear about your experience! Share your photos, tips, and challenges in the comments below. Let’s create a community of pea-growing enthusiasts and inspire others to embark on this delicious and fulfilling journey. What varieties did you try? What challenges did you face, and how did you overcome them? Your insights could be invaluable to fellow gardeners. Let’s cultivate a thriving community of home gardeners, one pea at a time!
Frequently Asked Questions (FAQs)
What is the best time of year to plant peas in a kitchen garden?
The ideal time to plant peas depends on your local climate. Peas are a cool-season crop, meaning they thrive in cooler temperatures. In most regions, the best time to plant peas is in early spring, as soon as the soil can be worked. This is typically 4-6 weeks before the last expected frost. You can also plant peas in the fall in areas with mild winters, about 6-8 weeks before the first expected frost. Check your local gardening resources for specific planting dates in your area.
What kind of soil is best for growing peas?
Peas prefer well-drained soil that is rich in organic matter. The ideal soil pH is between 6.0 and 7.5. Before planting, amend your soil with compost or well-rotted manure to improve its fertility and drainage. Avoid soils that are heavy clay or prone to waterlogging, as this can lead to root rot. If your soil is particularly poor, consider growing peas in raised beds or containers filled with a high-quality potting mix.
How much sunlight do peas need to grow?
Peas need at least 6-8 hours of sunlight per day to thrive. Choose a location in your kitchen garden that receives plenty of direct sunlight. If you don’t have a spot that gets full sun, try to find a location that gets at least 4-5 hours of direct sunlight and is shaded during the hottest part of the day. If you are growing peas indoors, you may need to supplement with grow lights to ensure they receive enough light.
How often should I water my pea plants?
Peas need consistent moisture to grow well. Water your pea plants regularly, especially during dry periods. Aim to keep the soil consistently moist but not waterlogged. Water deeply and less frequently, rather than shallowly and more often. This encourages the roots to grow deeper, making the plants more drought-tolerant. Check the soil moisture regularly by sticking your finger into the soil. If the top inch of soil feels dry, it’s time to water.
What kind of support do pea plants need?
Pea plants are vining plants and need a support structure to climb on. This helps to keep the plants off the ground, which improves air circulation and reduces the risk of disease. You can use a variety of support structures, such as trellises, fences, or netting. A simple trellis made from bamboo stakes or branches works well. Make sure the support structure is sturdy enough to support the weight of the mature plants. Install the support structure at the time of planting to avoid disturbing the roots later.
How do I protect my pea plants from pests and diseases?
Peas can be susceptible to a variety of pests and diseases. Common pests include aphids, pea weevils, and slugs. Common diseases include powdery mildew and root rot. To protect your pea plants, practice good garden hygiene. Remove any dead or diseased leaves promptly. Water at the base of the plants to avoid wetting the foliage, which can encourage fungal diseases. Companion planting with herbs like rosemary or mint can help to deter pests. If you encounter pests or diseases, treat them promptly with organic pest control methods or fungicides.
When are peas ready to harvest?
The time it takes for peas to mature depends on the variety and growing conditions. Generally, peas are ready to harvest about 60-70 days after planting. The pods should be plump and filled with peas. For shelling peas, the pods should be firm and the peas should be well-developed but not too large. For snow peas, the pods should be flat and tender. For snap peas, the pods should be plump and crisp. Harvest peas regularly to encourage continued production.
Can I grow peas in containers?
Yes, you can successfully grow peas in containers, making it perfect for a kitchen garden. Choose a container that is at least 12 inches deep and wide to provide enough room for the roots to grow. Use a high-quality potting mix and make sure the container has good drainage. Provide a support structure for the plants to climb on. Water regularly and fertilize with a balanced fertilizer every few weeks.
What are some good companion plants for peas?
Companion planting can help to improve the growth and health of your pea plants. Good companion plants for peas include carrots, radishes, cucumbers, lettuce, spinach, and herbs like rosemary and mint. Avoid planting peas near onions or garlic, as these can inhibit their growth.
Can I save seeds from my pea plants to plant next year?
Yes, you can save seeds from your pea plants to plant next year, but only if you are growing open-pollinated varieties. Hybrid varieties will not produce true-to-type seeds. To save seeds, allow the pods to dry completely on the plant. Once the pods are dry and brittle, shell the peas and store them in an airtight container in a cool, dry place. Label the container with the variety and date.
Leave a Comment