
Grow Purple Bush Beans Containers: Imagine stepping onto your balcony or into your backyard and harvesting vibrant, deep purple beans you grew yourself. Sounds amazing, right? For centuries, gardening has been a source of sustenance and joy, connecting us to the earth and providing fresh, healthy food. While large-scale farming feeds nations, the simple act of nurturing a plant in a container can be incredibly rewarding.
But let’s be honest, not everyone has acres of land to dedicate to a sprawling garden. That’s where container gardening comes in, and specifically, where my passion for helping you grow purple bush beans containers takes center stage! This isn’t just about pretty vegetables; it’s about accessibility. It’s about empowering you to cultivate your own food, regardless of space constraints. Whether you live in a city apartment or a suburban home with limited yard space, growing purple bush beans in containers is totally achievable.
Why purple bush beans, you ask? Well, besides their stunning color that adds a pop to any dish, they’re packed with nutrients and incredibly easy to grow. Plus, who wouldn’t want to impress their friends and family with a unique and delicious homegrown treat? In this article, I’m going to share my tried-and-true DIY tricks and hacks to help you successfully cultivate these beauties, from choosing the right container to harvesting a bountiful crop. Get ready to get your hands dirty and experience the joy of homegrown goodness!
Growing Purple Bush Beans in Containers: A Comprehensive DIY Guide
Hey there, fellow gardening enthusiasts! I’m so excited to share my experience growing gorgeous purple bush beans in containers. It’s easier than you might think, and the vibrant color adds a real pop to your garden (and your plate!). This guide will walk you through every step, from choosing the right container to harvesting your delicious, homegrown beans.
Choosing the Right Container and Soil
Before we even think about seeds, let’s talk about the foundation of our bean-growing adventure: the container and the soil.
* Container Size: Bush beans don’t need a ton of space, but they do need enough room for their roots to spread. I recommend a container that’s at least 12 inches in diameter and 12 inches deep. This gives the roots plenty of room to grow and prevents the plants from becoming root-bound.
* Drainage: This is crucial! Beans hate sitting in soggy soil. Make sure your container has plenty of drainage holes. If it doesn’t, you can easily drill some.
* Material: Plastic, terracotta, or even fabric pots work well. I personally love using fabric pots because they allow for excellent drainage and aeration.
* Soil: Forget garden soil! It’s too heavy and compacts easily in containers. Instead, opt for a high-quality potting mix. Look for a mix that’s well-draining and contains ingredients like peat moss, perlite, or vermiculite. I often amend my potting mix with compost for added nutrients.
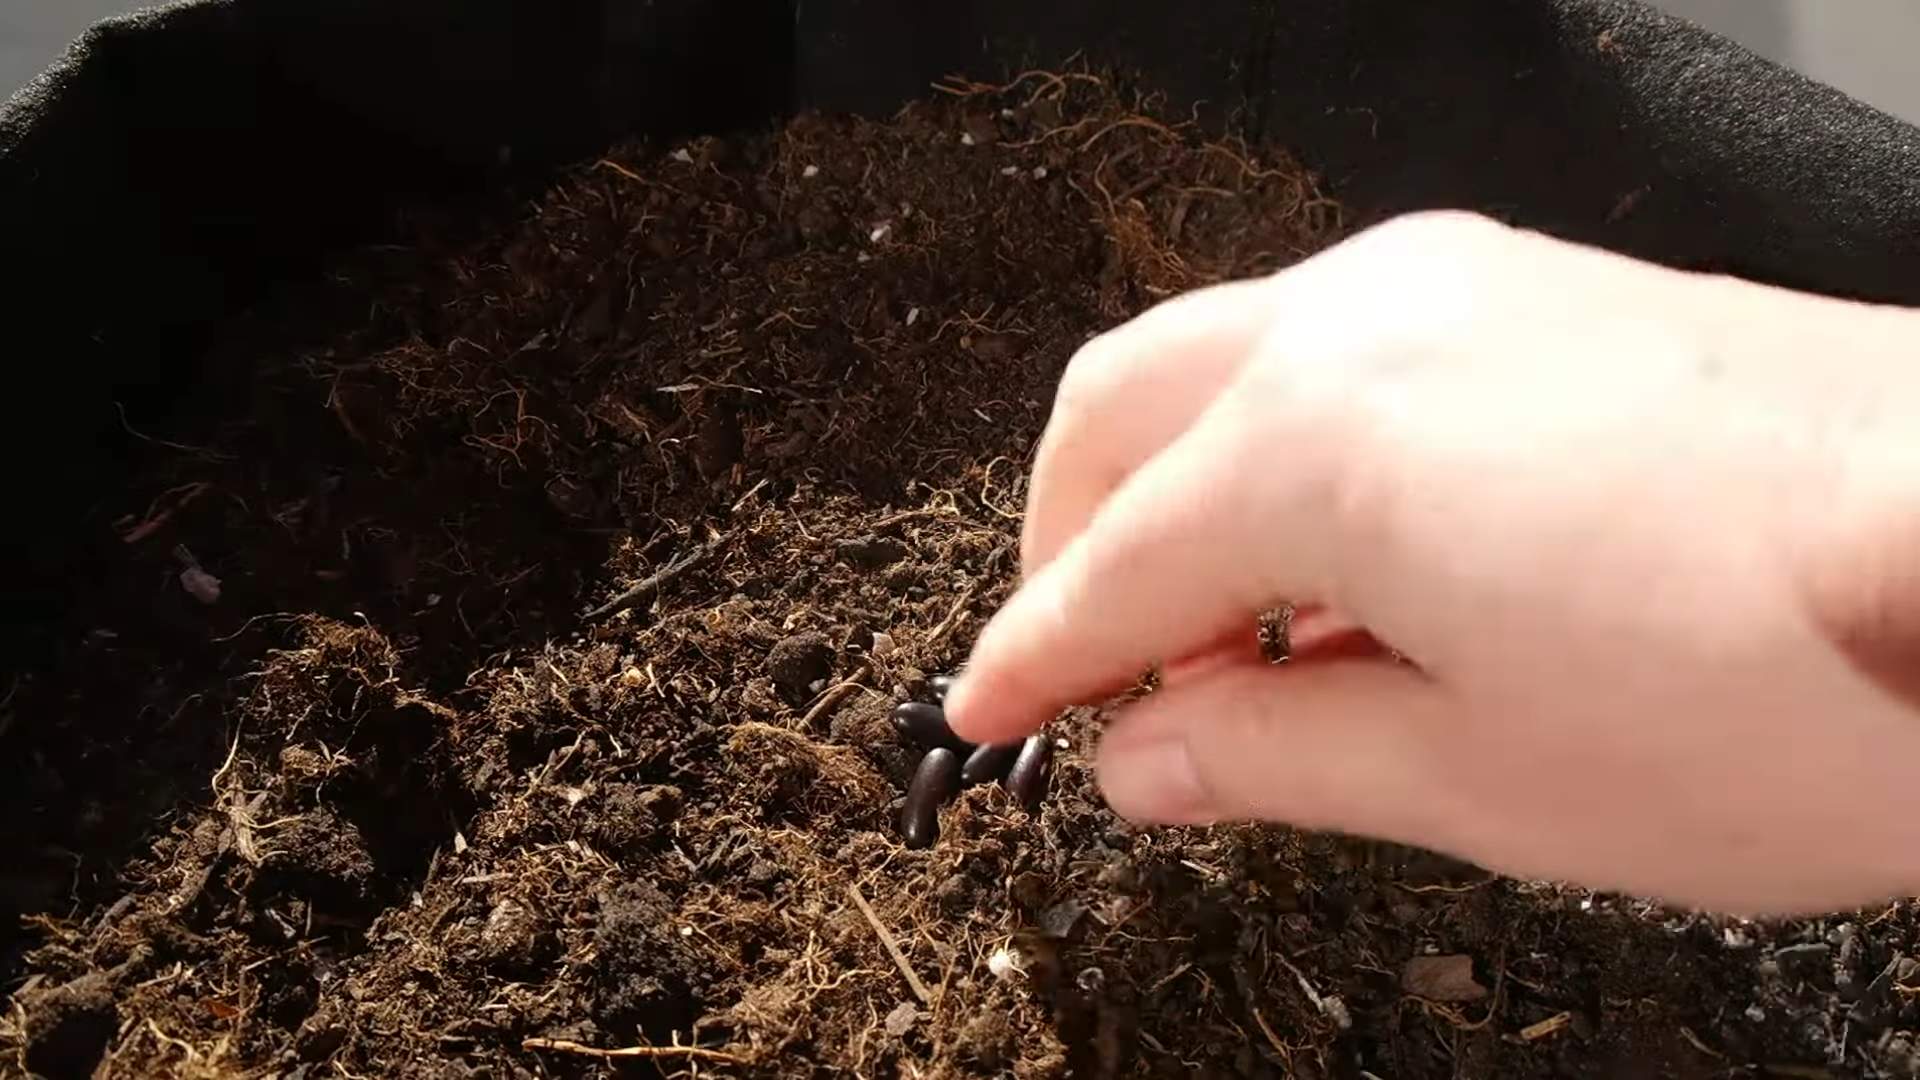
Planting Your Purple Bush Bean Seeds
Now for the fun part – planting!
1. Gather Your Supplies: You’ll need your container, potting mix, purple bush bean seeds (I love the ‘Royal Burgundy’ variety!), a trowel, and water.
2. Fill the Container: Fill your container with potting mix, leaving about an inch or two of space at the top. Gently pat the soil down to remove any air pockets.
3. Sow the Seeds: Bush beans are pretty forgiving, but I like to plant them about 1 inch deep and 2-3 inches apart. You can plant multiple seeds in a single container, just make sure they have enough space to grow.
4. Water Thoroughly: After planting, water the soil gently but thoroughly. You want the soil to be moist but not waterlogged.
5. Find a Sunny Spot: Bush beans need at least 6-8 hours of sunlight per day. Place your container in a sunny location where it will receive plenty of direct sunlight.
Caring for Your Purple Bush Bean Plants
Once your seeds have sprouted (usually within a week or two), it’s time to provide them with the care they need to thrive.
1. Watering: Water your bean plants regularly, especially during hot, dry weather. The soil should be consistently moist, but not soggy. I usually check the soil moisture level by sticking my finger about an inch into the soil. If it feels dry, it’s time to water.
2. Fertilizing: Bush beans are relatively light feeders, but they will benefit from occasional fertilization. I like to use a balanced liquid fertilizer diluted to half strength every few weeks. You can also amend the soil with compost tea.
3. Support (Optional): Bush beans are generally self-supporting, but if your plants are getting tall and leggy, you can provide them with some support. A small trellis or even a few stakes will do the trick.
4. Pest Control: Keep an eye out for common bean pests like aphids, bean beetles, and spider mites. If you spot any pests, you can try spraying them with insecticidal soap or neem oil. I prefer to use organic pest control methods whenever possible.
5. Weeding: Keep the container free of weeds, as they can compete with your bean plants for nutrients and water.
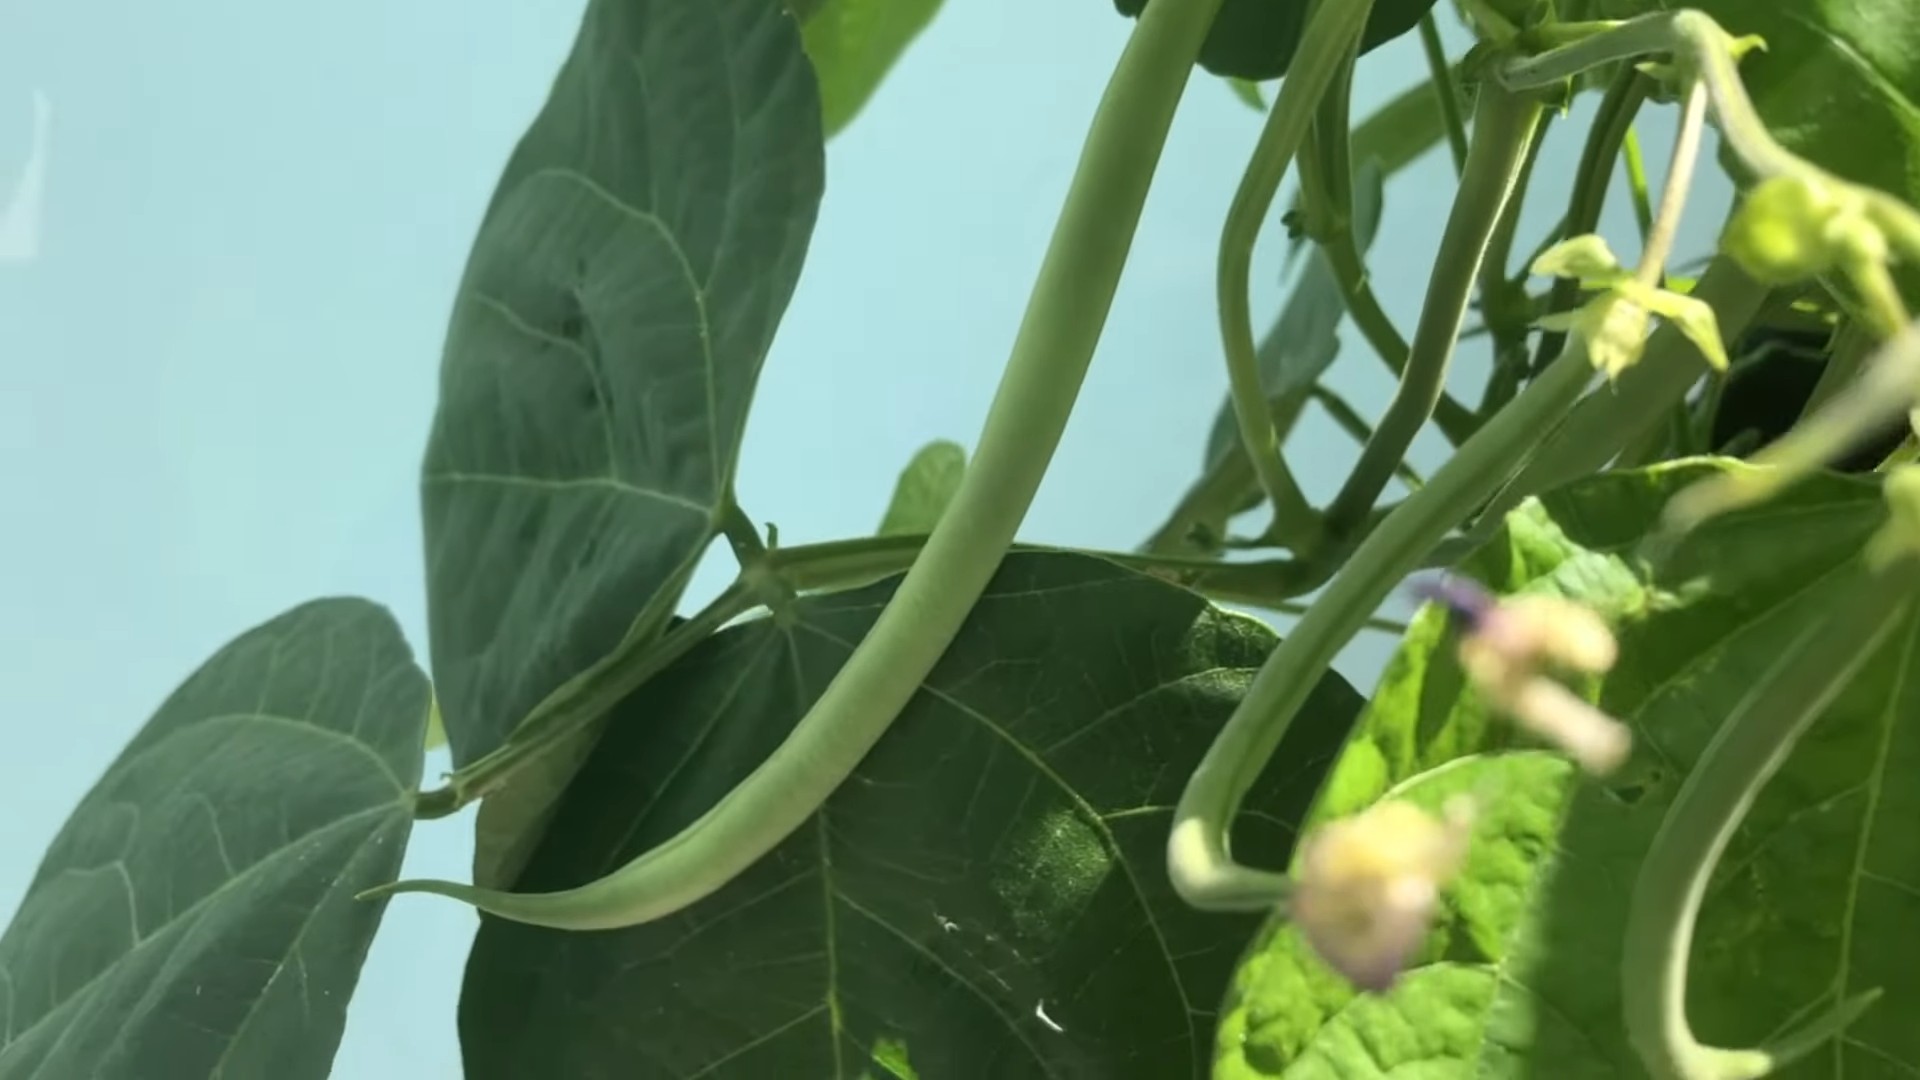
Harvesting Your Purple Bush Beans
This is the moment we’ve all been waiting for! Harvesting your homegrown purple bush beans is incredibly rewarding.
1. Timing: Bush beans are typically ready to harvest about 50-60 days after planting. The beans should be firm and plump, but not too large or tough.
2. Harvesting Technique: Gently snap the beans off the plant, being careful not to damage the stems or leaves. I like to use scissors or pruning shears for a clean cut.
3. Regular Harvesting: Harvest your beans regularly to encourage continued production. The more you harvest, the more beans your plants will produce.
4. Enjoy Your Harvest: Purple bush beans are delicious steamed, sautéed, or added to salads. They’re also a great source of vitamins and fiber.
Troubleshooting Common Problems
Even with the best care, you might encounter a few challenges along the way. Here are some common problems and how to address them:
* Yellowing Leaves: This could be a sign of overwatering, underwatering, or nutrient deficiency. Check the soil moisture level and adjust your watering accordingly. If the soil is consistently moist, you may be overwatering. If the soil is dry, you may need to water more frequently. You can also try fertilizing your plants with a balanced fertilizer.
* Lack of Flowers: This could be due to insufficient sunlight, poor soil, or extreme temperatures. Make sure your plants are getting at least 6-8 hours of sunlight per day. Amend the soil with compost or fertilizer to improve its nutrient content.
* Pest Infestations: As mentioned earlier, keep an eye out for common bean pests and treat them promptly with insecticidal soap or neem oil.
* Powdery Mildew: This fungal disease can cause a white, powdery coating on the leaves. Improve air circulation around your plants and avoid overhead watering. You can also spray the affected leaves with a fungicide.
Extending Your Bean Harvest
Want to keep those beans coming? Here are a few tips for extending your harvest:
* Succession Planting: Plant a new batch of seeds every few weeks to ensure a continuous supply of beans throughout the growing season.
* Deadheading: Remove any spent flowers or pods to encourage the plant to produce more.
* Proper Watering and Fertilizing: Consistent watering and fertilization will help keep your plants healthy and productive.
Saving Seeds for Next Year
If you want to save seeds from your purple bush beans to plant next year, here’s how:
1. Allow Some Beans to Mature: Let a few beans on the plant fully mature and dry out. The pods will turn brown and brittle.
2. Harvest the Dry Pods: Once the pods are completely dry, harvest them from the plant.
3. Shell the Seeds: Open the pods and remove the seeds.
4. Dry the Seeds: Spread the seeds out on a tray and let them dry completely for a few days.
5. Store the Seeds: Store the dried seeds in an airtight container in a cool, dark, and dry place.
Section: Enhancing Growth with Companion Planting
Companion planting is a fantastic way to boost the health and productivity of your purple bush beans. Certain plants can deter pests, improve soil conditions, or even enhance the flavor of your beans.
* Marigolds: These cheerful flowers are known for their ability to repel nematodes and other soil pests. Plant them around your bean plants to keep pests at bay.
* Nasturtiums: Nasturtiums are another great companion plant for beans. They attract aphids away from your bean plants, acting as a trap crop.
* Summer Savory: This herb is said to improve the flavor of beans and also helps to deter bean beetles.
* Carrots: Carrots and beans are a classic companion planting combination. Carrots help to break up the soil, making it easier for bean roots to grow.
* Cucumbers: Cucumbers can provide shade for bean plants during hot weather, helping to prevent them from drying out.
Section: Dealing with Specific Pests and Diseases in Detail
Let’s dive deeper into some specific pests and diseases that can affect your purple bush beans and how to tackle them effectively.
* Aphids: These tiny, sap-sucking insects can quickly multiply and weaken your bean plants. Look for clusters of aphids on the undersides of leaves and stems.
* Treatment: A strong blast of water from a hose can dislodge aphids. You can also spray them with insecticidal soap or neem oil. Introducing beneficial insects like ladybugs can also help control aphid populations.
* Bean Beetles (Mexican Bean Beetles): These beetles and their larvae can skeletonize bean leaves, causing significant damage.
* Treatment: Handpick beetles and larvae from the plants. You can also use row covers to protect your plants from infestation. Insecticidal soap or neem oil can be effective against bean beetles, but be sure to apply it to both sides of the leaves.
* Spider Mites: These tiny mites can cause stippling on bean leaves and
Conclusion
So, there you have it! Growing purple bush beans in containers is not only achievable, but it’s also a rewarding and surprisingly simple process. We’ve walked through everything from selecting the right container and soil to nurturing your plants and harvesting those vibrant, delicious beans. Why is this a must-try? Because it brings the joy of gardening to even the smallest spaces, provides you with fresh, healthy produce right at your fingertips, and adds a splash of color to your balcony, patio, or deck.
Imagine stepping outside and picking a handful of deep purple beans for your salad, stir-fry, or side dish. The taste is undeniably superior to store-bought, and the satisfaction of knowing you grew them yourself is unmatched. Plus, purple bush beans are packed with nutrients and antioxidants, making them a healthy and delicious addition to your diet.
But the benefits don’t stop there. Container gardening allows you to control the growing environment, protecting your plants from pests and diseases more easily than in a traditional garden. You can also move your containers to follow the sun or shelter them from harsh weather.
Looking for variations? Consider companion planting! Marigolds can help deter pests, while basil can improve the flavor of your beans. You could also experiment with different varieties of purple bush beans, such as ‘Royal Burgundy’ or ‘Purple Queen,’ to find your favorite. Another fun variation is to try growing them vertically using a small trellis or support structure within the container. This not only saves space but also adds visual interest. You can also try succession planting, sowing new seeds every few weeks to ensure a continuous harvest throughout the growing season.
Don’t be intimidated if you’re new to gardening. Growing purple bush beans in containers is a great way to start. It’s a forgiving process, and even if you make a few mistakes along the way, you’ll learn valuable lessons and still likely end up with a bountiful harvest.
We wholeheartedly encourage you to give this DIY trick a try. It’s a fun, educational, and delicious way to connect with nature and enjoy the fruits (or rather, vegetables!) of your labor. Once you’ve harvested your first batch of vibrant purple beans, we’d love to hear about your experience. Share your photos, tips, and challenges in the comments below. Let’s create a community of container gardeners and inspire others to grow their own food, one purple bean at a time. Remember, the key to successful container gardening, especially when you grow purple bush beans in containers, is consistent care and attention. Happy gardening!
Frequently Asked Questions (FAQ)
What size container is best for growing purple bush beans?
A container that is at least 12 inches in diameter and 12 inches deep is generally recommended for growing purple bush beans. This provides enough space for the roots to develop properly and allows for adequate drainage. You can use larger containers if you prefer, especially if you plan to grow multiple plants in the same container. Make sure the container has drainage holes to prevent waterlogging, which can lead to root rot.
What type of soil should I use for growing purple bush beans in containers?
Use a high-quality potting mix specifically formulated for containers. Avoid using garden soil, as it can become compacted in containers and doesn’t drain well. A good potting mix will be lightweight, well-draining, and rich in organic matter. You can also amend the potting mix with compost or other organic materials to improve its fertility.
How often should I water my purple bush beans in containers?
Water your purple bush beans regularly, especially during hot and dry weather. The soil should be kept consistently moist but not waterlogged. Check the soil moisture by sticking your finger about an inch into the soil. If it feels dry, it’s time to water. Water deeply, allowing the water to drain out of the drainage holes. Avoid overhead watering, as this can promote fungal diseases.
How much sunlight do purple bush beans need?
Purple bush beans need at least 6-8 hours of direct sunlight per day to thrive. Choose a location for your containers that receives plenty of sunlight. If you live in a very hot climate, you may need to provide some afternoon shade to prevent the plants from overheating.
Do I need to fertilize my purple bush beans in containers?
Yes, purple bush beans in containers benefit from regular fertilization. Use a balanced fertilizer, such as a 10-10-10 or 5-10-5, according to the package directions. You can also use an organic fertilizer, such as compost tea or fish emulsion. Fertilize every 2-3 weeks during the growing season.
How long does it take for purple bush beans to mature?
Purple bush beans typically mature in 50-60 days from planting. You can start harvesting the beans when they are about 4-6 inches long and the pods are firm and plump. Harvest regularly to encourage continued production.
What are some common pests and diseases that affect purple bush beans?
Common pests that can affect purple bush beans include aphids, bean beetles, and spider mites. You can control these pests with insecticidal soap, neem oil, or by handpicking them off the plants. Common diseases include powdery mildew and bean rust. Prevent these diseases by providing good air circulation, avoiding overhead watering, and using disease-resistant varieties.
Can I grow purple bush beans indoors?
While it’s possible to grow purple bush beans indoors, it can be challenging to provide them with enough light. You’ll need to use grow lights to supplement the natural light. Even with grow lights, the yield may be lower than if you grow them outdoors.
How do I know when to harvest my purple bush beans?
Harvest your purple bush beans when the pods are firm, plump, and about 4-6 inches long. The beans inside the pods should be small and tender. If the pods are too large or the beans inside are bulging, they may be tough and less flavorful. Harvest regularly to encourage continued production.
Can I save seeds from my purple bush beans?
Yes, you can save seeds from your purple bush beans, but keep in mind that if you grew a hybrid variety, the seeds may not produce plants that are true to type. To save seeds, allow some of the pods to dry completely on the plant. Once the pods are dry and brittle, remove the seeds and store them in a cool, dry place.
What are the benefits of growing purple bush beans?
Growing purple bush beans offers several benefits. They are a good source of vitamins, minerals, and antioxidants. They are also relatively easy to grow, even in containers. Plus, the vibrant purple color adds visual appeal to your garden and your meals. And of course, the taste of homegrown beans is far superior to store-bought ones.
How can I prevent my purple bush beans from becoming leggy?
Leggy growth in purple bush beans is often caused by insufficient sunlight. Ensure your plants receive at least 6-8 hours of direct sunlight daily. If you’re growing them indoors, use strong grow lights. Pruning can also help encourage bushier growth. Pinch off the tips of the main stems to promote branching.
My purple bush beans are flowering, but not producing beans. What could be the problem?
Several factors can contribute to this. Insufficient pollination is a common issue. Ensure there are pollinators in your area, or hand-pollinate the flowers by gently transferring pollen from one flower to another with a small brush. Extreme temperatures (too hot or too cold) can also inhibit bean production. Nutrient deficiencies can also play a role, so make sure you are fertilizing regularly with a balanced fertilizer.
Can I grow purple bush beans in hanging baskets?
While technically possible, it’s not ideal. Bush beans tend to be quite heavy when laden with beans, and a hanging basket might not provide enough support. Also, watering can be more challenging in hanging baskets, as they tend to dry out quickly. If you do try it, choose a very sturdy basket and monitor the moisture levels closely.
Are purple bush beans more nutritious than green beans?
Purple bush beans contain anthocyanins, which are powerful antioxidants that give them their vibrant color. These antioxidants are associated with various health benefits, such as reducing inflammation and protecting against certain diseases. While both purple and green beans are nutritious, purple beans offer the added benefit of these antioxidants.

Leave a Comment