
Grow Purple Corn Rooftop gardens are becoming increasingly popular, and for good reason! Imagine stepping onto your roof and harvesting vibrant, antioxidant-rich purple corn – a truly unique and rewarding experience. But let’s be honest, the thought of cultivating corn, especially purple corn, on a rooftop can seem a little daunting. That’s where this DIY guide comes in!
For centuries, purple corn has been a staple in Andean cultures, particularly in Peru, where it’s known as “Maíz Morado.” It’s not just a beautiful plant; it’s packed with anthocyanins, powerful antioxidants linked to numerous health benefits. Historically, it was used in traditional beverages and foods, celebrated for both its flavor and medicinal properties. Now, you can bring a piece of that history to your own home!
Why should you try this DIY project? Well, beyond the sheer novelty of growing purple corn on your roof, it’s a fantastic way to maximize your space, embrace sustainable living, and enjoy fresh, healthy produce. Plus, let’s face it, who wouldn’t want to impress their friends and neighbors with a rooftop cornfield? This guide will break down the process into easy-to-follow steps, offering practical tips and tricks to ensure your grow purple corn rooftop garden thrives, even if you’re a beginner. I’m excited to share my knowledge with you and help you create a stunning and productive rooftop garden!
Lila Pracht auf dem Dach: Dein eigener Purple Corn Anbau!
Hey Leute, habt ihr Lust auf ein außergewöhnliches Gartenprojekt? Ich zeige euch, wie ihr auf eurem Dach (oder Balkon!) wunderschönen, lila Mais anbauen könnt. Ja, richtig gelesen, lila! Purple Corn ist nicht nur optisch ein Hingucker, sondern auch super gesund und vielseitig verwendbar. Los geht’s!
Was du für deinen Purple Corn Garten brauchst:
* Purple Corn Samen: Die bekommt ihr online oder in gut sortierten Gärtnereien. Achtet auf Qualität!
* Große Pflanzgefäße: Mais braucht Platz! Wählt Gefäße mit mindestens 30 Litern Volumen pro Pflanze.
* Hochwertige Erde: Eine Mischung aus Gartenerde, Kompost und Sand ist ideal.
* Dünger: Mais ist ein Starkzehrer. Organischer Dünger oder spezieller Maisdünger sind perfekt.
* Gießkanne oder Schlauch: Regelmäßiges Gießen ist wichtig.
* Stützmaterial: Bei starkem Wind kann der Mais umknicken. Bambusstäbe oder ähnliches helfen.
* Geduld: Mais braucht Zeit zum Wachsen!
Schritt-für-Schritt Anleitung: Vom Samen zur lila Ernte
1. Die Vorbereitung: Samen zum Leben erwecken
1. Samen einweichen: Legt die Purple Corn Samen für 12-24 Stunden in lauwarmes Wasser. Das beschleunigt die Keimung. Ich mache das immer in einer kleinen Schüssel auf der Fensterbank.
2. Vorkeimen (optional): Ihr könnt die Samen auch vorkeimen lassen. Wickelt sie dafür in feuchtes Küchenpapier und legt sie in einen Gefrierbeutel. Nach ein paar Tagen sollten die ersten Wurzeln sprießen. Das ist aber kein Muss!
2. Die Aussaat: Ab in die Erde!
1. Gefäße vorbereiten: Füllt eure Pflanzgefäße mit der vorbereiteten Erde. Lasst oben ein paar Zentimeter Platz.
2. Samen säen: Drückt die Samen etwa 2-3 cm tief in die Erde. Achtet darauf, dass ihr mehrere Samen pro Gefäß sät, um die Bestäubung zu gewährleisten. Mais ist windbestäubt, daher ist Gruppierung wichtig. Ich säe meistens 3-4 Samen pro Topf.
3. Angießen: Gießt die Erde vorsichtig an, sodass sie gut durchfeuchtet ist. Aber Achtung: Staunässe vermeiden!
3. Die Aufzucht: Pflege für kräftige Pflanzen
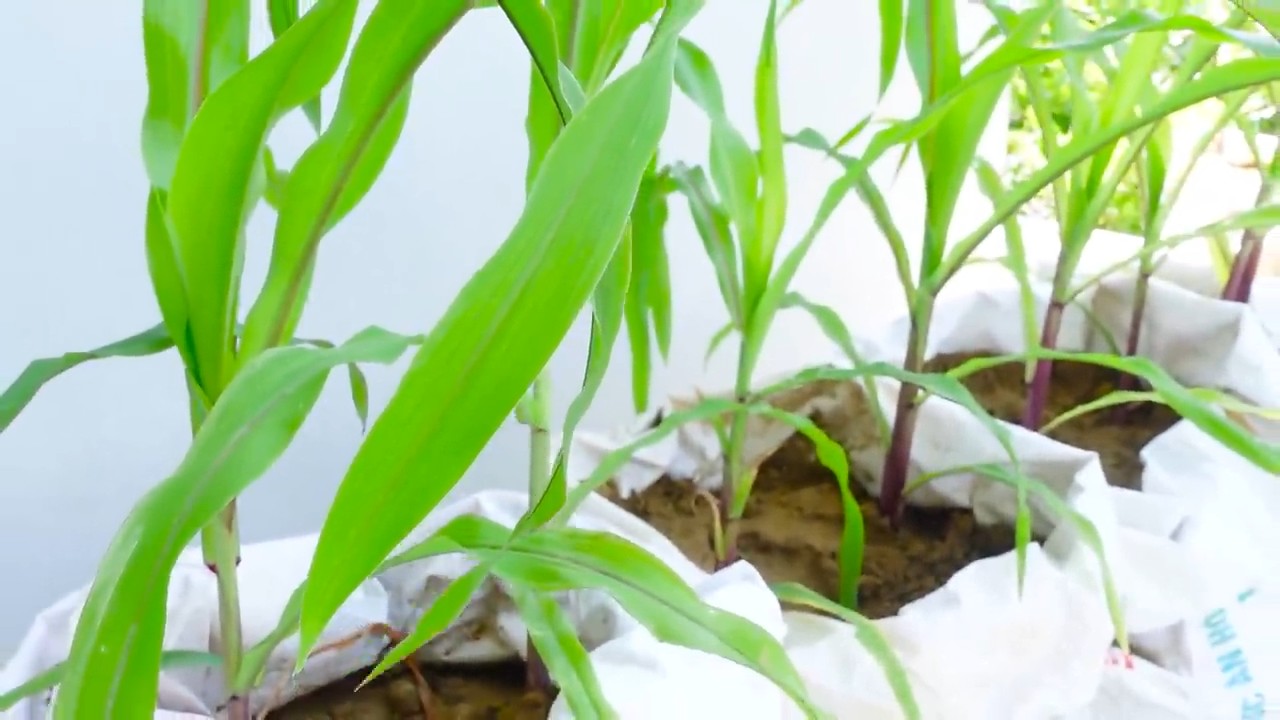
1. Standort: Stellt die Gefäße an einen sonnigen Standort. Mais liebt die Sonne! Mindestens 6 Stunden direkte Sonneneinstrahlung sind ideal.
2. Gießen: Gießt regelmäßig, besonders an heißen Tagen. Die Erde sollte immer leicht feucht sein, aber nicht nass. Ich prüfe das immer mit dem Finger.
3. Düngen: Beginnt etwa 4 Wochen nach der Keimung mit dem Düngen. Verwendet einen organischen Dünger oder speziellen Maisdünger. Haltet euch an die Dosierungsanleitung. Ich dünge alle 2-3 Wochen.
4. Ausdünnen: Wenn mehrere Pflanzen in einem Gefäß wachsen, müsst ihr sie ausdünnen. Lasst die kräftigste Pflanze stehen. Die anderen könnt ihr vorsichtig aus der Erde ziehen oder abschneiden.
5. Stützen: Wenn die Pflanzen größer werden, solltet ihr sie mit Stützmaterial stabilisieren. Bambusstäbe oder ähnliches sind ideal. Bindet die Pflanzen locker an den Stäben fest.
6. Seitentriebe entfernen: Entfernt Seitentriebe (auch “Geiztriebe” genannt), die sich unterhalb des ersten Maiskolbens bilden. Das fördert das Wachstum des Haupttriebs und der Kolben.
4. Die Bestäubung: Lila Körner entstehen
1. Hilfe bei der Bestäubung (optional): Da Mais windbestäubt ist, kann es auf dem Dach etwas schwierig sein. Ihr könnt die Bestäubung aber unterstützen, indem ihr die männlichen Blütenstände (die “Fahnen” oben an der Pflanze) vorsichtig schüttelt oder den Pollen mit einem Pinsel auf die weiblichen Blütenstände (die “Haare” am Kolben) übertragt. Das mache ich besonders gerne an windstillen Tagen.
2. Beobachten: Achtet auf die Entwicklung der Kolben. Die “Haare” werden braun und trocken, wenn die Bestäubung erfolgreich war.
5. Die Ernte: Belohnung für deine Mühe
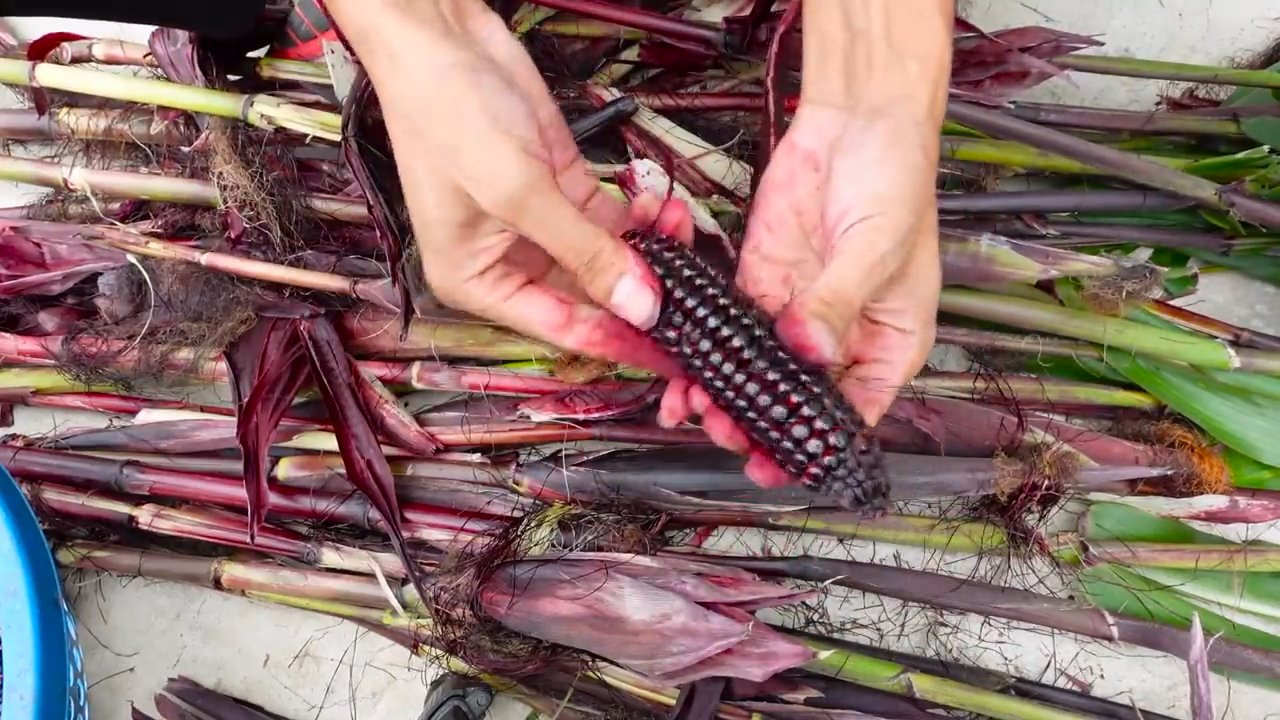
1. Reife erkennen: Die Purple Corn Kolben sind reif, wenn die Hüllblätter trocken und braun sind und die Körner prall und fest sind. Drückt vorsichtig auf die Körner. Sie sollten sich nicht mehr leicht eindrücken lassen.
2. Ernten: Brecht die Kolben vorsichtig von der Pflanze ab.
3. Trocknen: Lasst die Kolben an einem trockenen, luftigen Ort für ein paar Wochen trocknen. Das ist wichtig für die Lagerung. Ich hänge sie meistens in einem Netz auf.
4. Körner entfernen: Wenn die Kolben trocken sind, könnt ihr die Körner von den Kolben lösen. Das geht am besten mit den Händen oder einem stumpfen Messer.
5. Lagern: Lagert die getrockneten Körner in einem luftdichten Behälter an einem kühlen, trockenen Ort. So halten sie sich mehrere Monate.
Häufige Probleme und Lösungen:
* Schädlinge: Mais kann von verschiedenen Schädlingen befallen werden, wie z.B. Maiszünsler oder Blattläuse. Kontrolliert eure Pflanzen regelmäßig und bekämpft Schädlinge bei Bedarf mit biologischen Mitteln.
* Krankheiten: Auch Krankheiten wie Maisbeulenbrand können auftreten. Achtet auf gesunde Pflanzen und entfernt befallene Pflanzenteile sofort.
* Wind: Auf dem Dach kann es windig sein. Stellt sicher, dass eure Pflanzen gut gestützt sind, um ein Umknicken zu verhindern.
* Bestäubungsprobleme: Wenn die Bestäubung nicht richtig funktioniert, können die Kolben leer oder nur teilweise gefüllt sein. Unterstützt die Bestäubung, wie oben beschrieben.
Was du mit deinem Purple Corn anfangen kannst:
* Kochen: Purple Corn kann wie normaler Mais verwendet werden. Die Körner können gekocht, gegrillt oder zu Mehl verarbeitet werden.
* Backen: Purple Corn Mehl eignet sich hervorragend zum Backen von Brot, Kuchen oder Tortillas. Es verleiht den Backwaren eine schöne Farbe und einen leicht süßlichen Geschmack.
* Dekoration: Die getrockneten Kolben sind eine tolle Dekoration für den Herbst.
* Gesundheit: Purple Corn ist reich an Antioxidantien und soll entzündungshemmend wirken.
Zusätzliche Tipps für deinen Purple Corn Erfolg:
* Wähle den richtigen Standort: Ein sonniger, windgeschützter Standort ist ideal.
* Verwende hochwertige Erde: Eine gute Erde ist die Grundlage für gesunde Pflanzen.
* Dünge regelmäßig: Mais ist ein Starkzehrer und braucht ausreichend Nährstoffe.
* Gieße richtig: Die Erde sollte immer leicht feucht sein, aber nicht nass.
* Sei geduldig: Mais braucht Zeit zum Wachsen.
Ich hoffe, diese Anleitung hilft euch dabei, euren eigenen Purple Corn auf dem Dach anzubauen. Es ist ein wirklich lohnendes Projekt, das nicht nur Spaß macht, sondern auch eine tolle Ernte bringt. Viel Erfolg! Und vergesst nicht, mir eure lila Mais-Erfolge zu zeigen! Ich bin gespannt!
Conclusion
So, there you have it! Growing purple corn on your rooftop isn’t just a quirky gardening experiment; it’s a rewarding journey that connects you to ancient agricultural traditions while providing you with a unique and nutritious food source. From the vibrant stalks swaying in the breeze to the deep, jewel-toned kernels bursting with flavor, every stage of the process is a testament to the power and beauty of nature.
Why is this DIY trick a must-try? Because it’s more than just growing corn. It’s about reclaiming space, fostering sustainability, and adding a splash of color and intrigue to your urban landscape. It’s about experiencing the satisfaction of nurturing a plant from seed to harvest, knowing that you played a direct role in bringing this ancient grain to your table. And let’s be honest, who wouldn’t want to impress their friends and neighbors with their own homegrown purple corn?
But the benefits extend beyond the aesthetic and the personal. Purple corn is packed with anthocyanins, powerful antioxidants that offer a range of health benefits. By growing your own, you’re ensuring access to a fresh, unprocessed source of these vital nutrients. Plus, you’re reducing your carbon footprint by minimizing the distance your food travels.
Ready to take your rooftop garden to the next level?
Don’t be afraid to experiment! Try different varieties of purple corn to discover your favorite flavor profile. Consider companion planting with beans and squash to create a thriving, self-sustaining ecosystem. And if you’re feeling adventurous, explore different ways to use your harvest. From traditional cornmeal and tortillas to vibrant purple corn flour for baking, the possibilities are endless.
Here are a few suggestions and variations to get you started:
* **Container Size Matters:** While we’ve focused on larger containers, you can adapt this method to smaller spaces by using dwarf varieties of purple corn. Just be sure to adjust your watering and fertilizing schedule accordingly.
* **Vertical Gardening:** Maximize your rooftop space by incorporating vertical gardening techniques. Train your corn stalks to grow along trellises or fences for a stunning visual display.
* **Succession Planting:** Extend your harvest season by planting seeds in staggered intervals. This will ensure a continuous supply of fresh purple corn throughout the growing season.
* **Purple Corn Syrup:** Experiment with making your own purple corn syrup. It’s a unique and flavorful sweetener that can be used in a variety of recipes.
* **Purple Corn Tea:** Steep the dried corn silks in hot water for a soothing and antioxidant-rich tea.
We’re confident that you’ll find the experience of growing purple corn on your rooftop to be both rewarding and enriching. So, grab your seeds, prepare your containers, and get ready to embark on this exciting gardening adventure.
We encourage you to try this DIY trick and share your experiences with us! Post photos of your purple corn plants on social media using #RooftopPurpleCorn and tag us so we can see your amazing creations. We can’t wait to see what you grow! Let’s cultivate a community of urban gardeners who are passionate about sustainable food production and the beauty of purple corn.
Frequently Asked Questions (FAQ)
What exactly is purple corn and why should I grow it?
Purple corn is a variety of corn that gets its vibrant color from high levels of anthocyanins, which are powerful antioxidants. These antioxidants are linked to various health benefits, including improved heart health, reduced inflammation, and enhanced cognitive function. Growing your own purple corn allows you to access a fresh, unprocessed source of these nutrients while also enjoying the satisfaction of cultivating your own food. Plus, it’s a visually stunning plant that adds a unique touch to any garden.
Is it difficult to grow purple corn on a rooftop?
Growing purple corn on a rooftop is relatively straightforward, but it does require some planning and attention. The key is to provide the plants with adequate sunlight, water, and nutrients. Choose a sunny location on your rooftop that receives at least 6-8 hours of direct sunlight per day. Use large containers with well-draining soil and be sure to water regularly, especially during hot weather. Fertilize your plants every few weeks with a balanced fertilizer to ensure healthy growth and abundant yields. With a little care and attention, you can successfully grow purple corn on your rooftop, even if you’re a beginner gardener.
What kind of soil is best for growing purple corn in containers?
The best soil for growing purple corn in containers is a well-draining potting mix that is rich in organic matter. Avoid using garden soil, as it can become compacted in containers and hinder drainage. Look for a potting mix that contains ingredients like peat moss, perlite, and vermiculite. You can also amend your potting mix with compost or other organic materials to improve its fertility and water-holding capacity. A slightly acidic to neutral soil pH (around 6.0 to 7.0) is ideal for purple corn.
How often should I water my purple corn plants?
Water your purple corn plants regularly, especially during hot and dry weather. The frequency of watering will depend on factors such as the size of your containers, the type of soil you’re using, and the weather conditions. As a general rule, water deeply whenever the top inch of soil feels dry to the touch. Avoid overwatering, as this can lead to root rot. During periods of heavy rain, you may need to reduce your watering frequency.
What kind of fertilizer should I use for purple corn?
Purple corn benefits from regular fertilization throughout the growing season. Use a balanced fertilizer with an N-P-K ratio of around 10-10-10 or 14-14-14. Apply the fertilizer according to the package directions, typically every few weeks. You can also supplement with organic fertilizers such as compost tea or fish emulsion. Avoid over-fertilizing, as this can lead to excessive vegetative growth and reduced yields.
How long does it take for purple corn to mature?
Purple corn typically takes around 90-120 days to mature, depending on the variety and growing conditions. You’ll know your corn is ready to harvest when the silks turn brown and dry, and the kernels are plump and filled with milky liquid. You can also gently peel back the husk to check the kernels. If they are firm and have a deep purple color, they are ready to harvest.
Can I grow purple corn in a small container?
While purple corn generally thrives in larger containers, you can still grow it in smaller containers if you choose a dwarf variety. Dwarf varieties of purple corn are specifically bred to be more compact and suitable for container gardening. Just be sure to adjust your watering and fertilizing schedule accordingly, as plants in smaller containers tend to dry out more quickly and require more frequent feeding.
Are there any pests or diseases that I should be aware of?
Purple corn is generally resistant to pests and diseases, but it can be susceptible to certain problems, such as corn earworms, aphids, and fungal diseases. Inspect your plants regularly for signs of infestation or disease. If you notice any problems, take action promptly to prevent them from spreading. You can use organic pest control methods such as insecticidal soap or neem oil to control pests. For fungal diseases, ensure good air circulation and avoid overwatering.
How do I harvest and store purple corn?
To harvest purple corn, gently twist and pull the ears from the stalks. Remove the husks and silks, and then dry the ears in a well-ventilated area for several weeks. Once the ears are completely dry, you can store them in a cool, dry place for several months. You can also remove the kernels from the cobs and store them in airtight containers.
Can I save seeds from my purple corn to plant next year?
Yes, you can save seeds from your purple corn to plant next year. Choose ears that are healthy and well-formed. Allow the ears to dry completely, and then remove the kernels from the cobs. Store the kernels in a cool, dry place until planting time. Keep in mind that if you are growing multiple varieties of corn, there is a chance of cross-pollination, which could affect the characteristics of the seeds.

Leave a Comment