
Grow wheatgrass with water – sounds too good to be true, right? I thought so too, until I discovered this incredibly simple and rewarding DIY project. Forget complicated setups and expensive equipment; you can cultivate your own vibrant, nutrient-rich wheatgrass using just water! For centuries, wheatgrass has been revered for its health benefits, with roots tracing back to ancient Egypt and Mesopotamia, where it was considered sacred. Today, it’s a popular addition to smoothies, juices, and even pet food, thanks to its high concentration of vitamins, minerals, and antioxidants.
But why should you bother growing your own? Well, store-bought wheatgrass can be pricey and often lacks the freshness of homegrown. Plus, there’s something incredibly satisfying about nurturing your own food from seed to sprout. This DIY trick is perfect for anyone looking to boost their health, add a touch of green to their home, or simply enjoy a fun and easy gardening project. I’m going to show you how easy it is to grow wheatgrass with water, even if you have zero gardening experience. Get ready to unlock the secrets to this amazing superfood and enjoy the freshest, most potent wheatgrass imaginable!
Weizengras Anbauen Nur Mit Wasser: Ein Einfacher DIY-Leitfaden
Hallo liebe Pflanzenfreunde! Habt ihr Lust, euer eigenes Weizengras anzubauen, ganz ohne Erde? Es ist einfacher als ihr denkt und eine tolle Möglichkeit, frisches, gesundes Grün in eure Küche zu bringen. Ich zeige euch, wie es geht!
Was du brauchst:
* Weizensamen (am besten speziell für Weizengras, erhältlich in Bioläden oder online)
* Ein flaches Gefäß (z.B. eine Auflaufform, ein Tablett oder eine spezielle Weizengras-Anbauschale)
* Ein Sieb oder ein feinmaschiges Tuch
* Wasser (gefiltertes Wasser ist ideal, aber Leitungswasser tut es auch)
* Eine Sprühflasche
* Ein dunkler Ort (z.B. ein Schrank oder eine Schublade)
* Ein heller Ort (aber kein direktes Sonnenlicht)
Warum Weizengras Anbauen?
Weizengras ist ein echtes Superfood! Es ist reich an Vitaminen, Mineralien und Antioxidantien. Viele Leute trinken Weizengrassaft, um ihr Immunsystem zu stärken, ihren Körper zu entgiften und ihre Energie zu steigern. Und das Beste daran: Es ist super einfach, es selbst anzubauen!
Die Vorbereitung: Das A und O für erfolgreiches Weizengras
Bevor wir loslegen, ist es wichtig, die Samen richtig vorzubereiten. Das ist der Schlüssel für eine gute Keimung.
Schritt 1: Die Samen Einweichen
1. Samen abmessen: Nehmt die gewünschte Menge an Weizensamen. Ich empfehle, mit einer kleinen Menge anzufangen, um ein Gefühl dafür zu bekommen. Eine Tasse Samen reicht für eine kleine Anbauschale.
2. Gründlich spülen: Gebt die Samen in ein Sieb und spült sie unter fließendem Wasser ab. So werden Staub und eventuelle Verunreinigungen entfernt.
3. Einweichen: Füllt eine Schüssel mit reichlich Wasser und gebt die abgespülten Samen hinein. Achtet darauf, dass die Samen vollständig mit Wasser bedeckt sind.
4. Einweichzeit: Lasst die Samen 8-12 Stunden einweichen. Das Wasser wird trüb, das ist ganz normal. Durch das Einweichen werden die Samen aktiviert und die Keimung wird angeregt.
Schritt 2: Das Gefäß Vorbereiten
1. Gefäß auswählen: Wählt ein flaches Gefäß mit guter Drainage. Eine Auflaufform oder ein Tablett mit Löchern im Boden sind ideal. Wenn euer Gefäß keine Löcher hat, müsst ihr besonders aufpassen, dass sich kein Wasser staut.
2. Reinigen: Reinigt das Gefäß gründlich mit Wasser und Seife, um Bakterien und Schimmel vorzubeugen.
3. Optional: Drainage verbessern: Wenn euer Gefäß keine Löcher hat, könnt ihr eine dünne Schicht Kieselsteine oder Blähton auf den Boden legen, um die Drainage zu verbessern.
Die Keimung: Dunkelheit ist Trumpf
Jetzt geht es ans Eingemachte! Die Keimung ist eine spannende Phase, in der die Samen zum Leben erwachen.
Schritt 3: Die Samen Auslegen
1. Wasser abgießen: Gießt das Wasser von den eingeweichten Samen ab.
2. Gründlich spülen: Spült die Samen noch einmal gründlich ab.
3. Gleichmäßig verteilen: Verteilt die Samen gleichmäßig auf dem Boden eures Gefäßes. Sie sollten dicht an dicht liegen, aber nicht übereinander.
4. Befeuchten: Besprüht die Samen mit Wasser, sodass sie gut befeuchtet sind.
Schritt 4: Dunkelheit und Feuchtigkeit
1. Abdecken: Deckt das Gefäß mit einem Deckel, einem Teller oder einem feuchten Tuch ab. Das sorgt für eine hohe Luftfeuchtigkeit, die für die Keimung wichtig ist.
2. Dunkler Ort: Stellt das Gefäß an einen dunklen Ort, z.B. in einen Schrank oder eine Schublade.
3. Regelmäßig befeuchten: Besprüht die Samen ein- bis zweimal täglich mit Wasser, sodass sie immer feucht bleiben. Achtet darauf, dass sie nicht austrocknen.
4. Kontrolle: Kontrolliert die Samen täglich. Nach 2-3 Tagen sollten die ersten Keimlinge sichtbar sein.
Das Wachstum: Licht und Luft
Sobald die Keimlinge sprießen, brauchen sie Licht und Luft, um zu wachsen.
Schritt 5: Licht und Luft
1. An einen hellen Ort stellen: Sobald die Keimlinge etwa 1 cm hoch sind, könnt ihr das Gefäß an einen hellen Ort stellen. Vermeidet aber direktes Sonnenlicht, da dies die Keimlinge verbrennen kann. Ein Fensterbrett, das nicht in der prallen Sonne liegt, ist ideal.
2. Abdeckung entfernen: Entfernt die Abdeckung, damit die Keimlinge ausreichend Luft bekommen.
3. Regelmäßig befeuchten: Besprüht die Keimlinge weiterhin ein- bis zweimal täglich mit Wasser. Achtet darauf, dass der Boden immer feucht, aber nicht nass ist.
4. Drehen: Dreht das Gefäß regelmäßig, damit die Keimlinge gleichmäßig wachsen.
Schritt 6: Beobachten und Pflegen
1. Schimmelbildung vermeiden: Achtet auf Schimmelbildung. Wenn ihr Schimmel entdeckt, entfernt die betroffenen Stellen sofort und sorgt für eine bessere Belüftung.
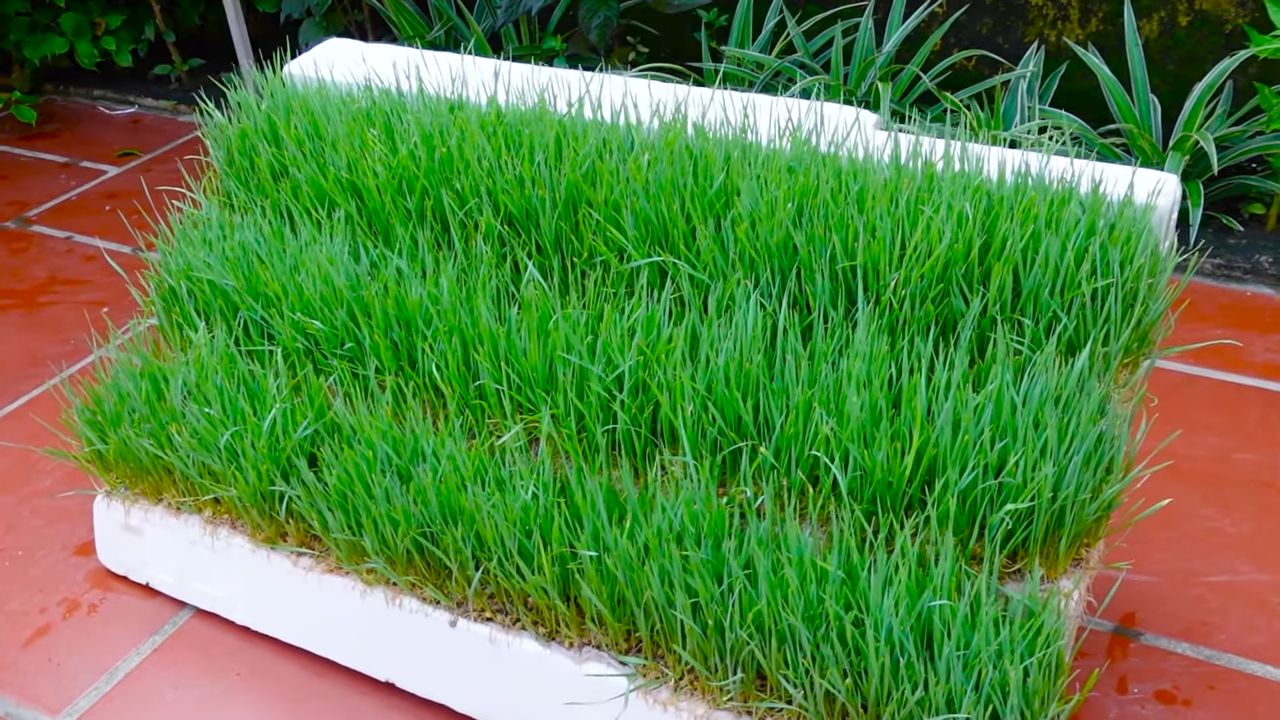
2. Geduld haben: Das Weizengras wächst relativ schnell. Nach etwa 7-10 Tagen ist es erntereif.
3. Gießen: Anstatt zu sprühen, könnt ihr nun auch vorsichtig Wasser in das Gefäß gießen, aber achtet darauf, dass sich kein Wasser staut.
Die Ernte: Der Höhepunkt eurer Arbeit
Endlich ist es soweit! Das Weizengras ist erntereif und bereit, eure Gesundheit zu unterstützen.
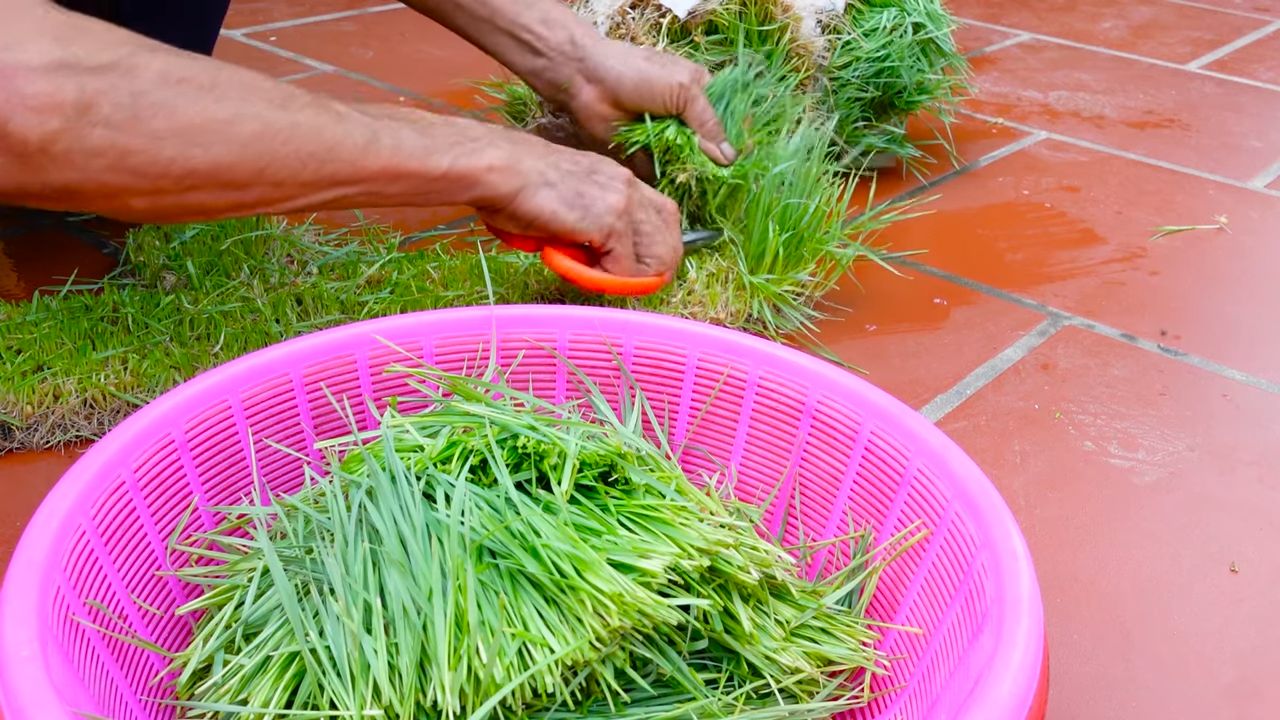
Schritt 7: Die Ernte
1. Erntezeitpunkt: Das Weizengras ist erntereif, wenn es etwa 10-15 cm hoch ist.
2. Schneiden: Schneidet das Weizengras mit einer Schere oder einem Messer knapp über dem Boden ab.
3. Gründlich waschen: Wascht das geerntete Weizengras gründlich unter fließendem Wasser ab.
4. Verarbeiten: Verarbeitet das Weizengras sofort zu Saft oder lagert es im Kühlschrank.
Die Verarbeitung: So genießt ihr euer Weizengras
Es gibt verschiedene Möglichkeiten, Weizengras zu genießen. Die beliebteste ist die Zubereitung von Saft.
Weizengrassaft zubereiten:
1. Weizengras vorbereiten: Wascht das geerntete Weizengras gründlich.
2. Entsaften: Gebt das Weizengras in einen Entsafter. Am besten eignet sich ein Slow Juicer, da er die Nährstoffe schonender extrahiert.
3. Genießen: Trinkt den frisch gepressten Weizengrassaft sofort. Er schmeckt am besten pur, kann aber auch mit anderen Säften gemischt werden.
Weitere Verwendungsmöglichkeiten:
* Smoothies: Gebt eine Handvoll Weizengras in euren Smoothie.
* Salate: Schneidet das Weizengras klein und gebt es in euren Salat.
* Dekoration: Verwendet das Weizengras als Dekoration für eure Gerichte.
Tipps und Tricks für noch besseres Weizengras
* Samenqualität: Achtet auf die Qualität der Samen. Verwendet am besten Bio-Weizensamen, die speziell für Weizengrasanbau geeignet sind.
* Wasserqualität: Verwendet gefiltertes Wasser, um Verunreinigungen zu vermeiden.
* Belüftung: Sorgt für eine gute Belüftung, um Schimmelbildung vorzubeugen.
* Erntezeitpunkt: Erntet das Weizengras, bevor es zu bitter wird.
* Mehrere Durchgänge: Ihr könnt das Weizengras mehrmals ernten, aber die Qualität nimmt nach der ersten Ernte ab.
Problemlösung: Was tun, wenn etwas schief geht
Conclusion
So, there you have it! Growing your own wheatgrass with just water is not only incredibly simple and cost-effective, but it’s also a fantastic way to bring a vibrant, healthy boost into your daily life. Forget expensive juice bar trips or pre-packaged wheatgrass shots that often lack the freshness and potency of the real deal. This DIY method puts you in complete control, allowing you to cultivate the freshest, most nutrient-rich wheatgrass possible, right in the comfort of your own home.
Why is this a must-try? Because it’s accessible to everyone, regardless of gardening experience. You don’t need a green thumb, fancy equipment, or a sprawling garden. All you need is some wheatgrass seeds, water, a tray, and a little patience. The process is surprisingly therapeutic, watching those tiny seeds sprout and transform into a lush green carpet is incredibly rewarding. Plus, you’ll be amazed at the difference in taste and vitality compared to store-bought options. The vibrant green juice you extract from your homegrown wheatgrass will be bursting with chlorophyll, vitamins, and minerals, ready to energize your body and support your overall well-being.
Looking to experiment? Consider these variations:
* Sprouting Mediums: While water works beautifully, you can also try using a thin layer of organic soil or coconut coir as a base for your seeds. This can provide additional nutrients and support for the roots, potentially leading to even more robust growth.
* Lighting: While indirect sunlight is ideal, you can also use a grow light to supplement natural light, especially during the darker months. This can help ensure consistent growth and prevent your wheatgrass from becoming leggy.
* Juicing Alternatives: Don’t limit yourself to juicing! You can also blend your wheatgrass into smoothies, add it to salads (in small amounts, due to its strong flavor), or even use it as a garnish for soups and other dishes.
* Creative Containers: While a standard tray works perfectly, feel free to get creative with your containers. Upcycle old plastic containers, use terracotta pots, or even create a tiered system for continuous harvesting.
This simple DIY wheatgrass growing technique is more than just a project; it’s an investment in your health and well-being. It’s a way to connect with nature, learn about the power of plants, and enjoy the incredible benefits of fresh, homegrown wheatgrass.
We wholeheartedly encourage you to give this a try. It’s easier than you think, and the rewards are well worth the effort. Once you’ve experienced the joy of growing your own wheatgrass and tasted the difference in freshness and vitality, you’ll never go back to store-bought again.
So, grab your seeds, prepare your tray, and get ready to embark on a journey of green goodness. And most importantly, we want to hear about your experience! Share your photos, tips, and stories with us in the comments below. Let’s create a community of wheatgrass enthusiasts and inspire others to embrace the power of homegrown health. Let us know how this **wheatgrass with water** method worked for you!
Frequently Asked Questions (FAQ)
What exactly is wheatgrass and why should I grow it?
Wheatgrass is the young grass of the common wheat plant (Triticum aestivum). It’s a nutritional powerhouse, packed with vitamins, minerals, antioxidants, and chlorophyll. Many people consume wheatgrass juice for its potential health benefits, including boosting energy levels, supporting detoxification, improving digestion, and strengthening the immune system. Growing your own ensures you get the freshest, most potent wheatgrass possible, avoiding the preservatives and potential nutrient loss associated with store-bought options.
How long does it take to grow wheatgrass with water?
Generally, it takes about 7-10 days to grow wheatgrass to a harvestable height using the water-only method. The germination process usually starts within 24-48 hours, and you’ll see significant growth within a week. The ideal height for harvesting is around 4-7 inches.
What kind of wheatgrass seeds should I use?
It’s crucial to use certified organic wheatgrass seeds specifically intended for sprouting or juicing. Avoid using wheatgrass seeds meant for planting in fields, as they may be treated with chemicals. Look for seeds that are labeled as “hard red winter wheat” or “hard white winter wheat.” These varieties are known for their high germination rates and nutrient content.
How much water should I use?
The key is to keep the seeds consistently moist but not waterlogged. Initially, soak the seeds in water for 8-12 hours. After that, rinse the seeds thoroughly with fresh water twice a day, ensuring that all the seeds are moistened. Avoid letting the seeds sit in standing water, as this can lead to mold growth.
What if mold starts to grow on my wheatgrass?
Mold growth is a common concern when growing wheatgrass. To prevent it, ensure good air circulation around the tray. Rinse the seeds thoroughly twice a day with fresh water. If you notice any mold, remove the affected areas immediately. A light dusting of food-grade hydrogen peroxide diluted with water can also help inhibit mold growth. However, if the mold is extensive, it’s best to discard the entire batch and start over.
What is the best way to harvest wheatgrass?
The best time to harvest wheatgrass is when it reaches a height of about 4-7 inches. Use clean scissors or a sharp knife to cut the grass just above the seed level. Harvest only what you need for immediate use, as wheatgrass is best consumed fresh.
How do I store harvested wheatgrass?
Harvested wheatgrass is best used immediately for optimal nutrient content. However, if you need to store it, wrap it in a damp paper towel and place it in a sealed plastic bag in the refrigerator. It will stay fresh for up to a week, but the nutrient content will gradually decrease over time.
Can I regrow wheatgrass after harvesting?
While wheatgrass can sometimes regrow after the initial harvest, the second growth is typically less vigorous and nutrient-rich. For the best results, it’s recommended to start a new batch of seeds after each harvest.
Is wheatgrass safe for everyone to consume?
Wheatgrass is generally considered safe for most people. However, some individuals may experience mild side effects such as nausea, diarrhea, or headaches, especially when first starting to consume it. It’s best to start with a small amount (about 1 ounce) and gradually increase the dosage as tolerated. People with wheat allergies or celiac disease should avoid wheatgrass. As always, consult with your healthcare provider before making any significant changes to your diet.
What are some tips for making wheatgrass juice taste better?
Wheatgrass juice has a strong, earthy flavor that some people find unpleasant. To improve the taste, try mixing it with other fruit or vegetable juices, such as apple, carrot, or cucumber juice. Adding a squeeze of lemon or lime can also help to balance the flavor. You can also blend it into smoothies with fruits like bananas, berries, or mangoes. Experiment with different combinations to find what works best for you.

Leave a Comment