
Growing bell peppers creatively doesn’t have to be a daunting task reserved for seasoned gardeners! Have you ever dreamt of plucking vibrant, juicy bell peppers straight from your own backyard, adding a burst of color and flavor to your meals? I know I have! But the thought of complicated gardening techniques might have held you back. Well, fear not, because this guide is all about unlocking the secrets to successful and fun bell pepper cultivation, even if you’re a complete beginner.
Bell peppers, originating from Central and South America, have a rich history, dating back thousands of years. They were a staple in ancient diets and gradually made their way across the globe, becoming a beloved ingredient in countless cuisines. Today, we’re not just talking about growing them; we’re talking about growing bell peppers creatively, using clever DIY tricks and hacks to maximize your yield and minimize your effort.
In today’s fast-paced world, finding moments of tranquility and connection with nature is more important than ever. Home gardening offers a fantastic escape, and mastering the art of growing your own bell peppers is incredibly rewarding. Plus, let’s be honest, store-bought peppers can sometimes lack that fresh, vibrant taste. With these simple DIY tricks, you’ll not only enjoy delicious, homegrown bell peppers but also save money and reduce your environmental footprint. So, let’s dive in and discover how to transform your garden into a bell pepper paradise!
Kreativer Paprikaanbau: Mehr als nur ein grüner Daumen!
Hallo liebe Gartenfreunde! Ich bin total begeistert, euch heute einen DIY-Hack zu zeigen, der euren Paprikaanbau auf ein ganz neues Level heben wird. Wir werden nicht nur Paprika anbauen, sondern wir werden es auf eine kreative, platzsparende und super effektive Art und Weise tun. Lasst uns gemeinsam in die Welt des vertikalen Paprikaanbaus und anderer cleverer Tricks eintauchen!
Was wir brauchen: Die Materialliste
Bevor wir loslegen, hier eine Liste der Dinge, die wir benötigen. Keine Sorge, vieles davon habt ihr wahrscheinlich schon zu Hause!
* Paprikasamen oder Jungpflanzen: Wählt eure Lieblingssorten! Ich persönlich liebe bunte Mischungen.
* Anzuchterde: Für den Start ist spezielle Anzuchterde ideal.
* Pflanztöpfe: Verschiedene Größen, je nachdem, wie ihr eure Paprika anbauen möchtet.
* Hochwertige Blumenerde: Für das spätere Umpflanzen.
* Kompost: Ein Muss für gesunde Pflanzen und reiche Ernte.
* Dünger: Spezieller Paprikadünger oder organischer Dünger.
* Pflanzstäbe oder Rankgitter: Für den Halt der Pflanzen.
* Gießkanne oder Gartenschlauch: Zum Bewässern.
* Schere oder Messer: Zum Beschneiden.
* Handschuhe: Zum Schutz eurer Hände.
* Leere Plastikflaschen (optional): Für Bewässerungstricks.
* Alte Autoreifen (optional): Für einen kreativen vertikalen Garten.
* Holzpaletten (optional): Für einen weiteren vertikalen Garten.
* Maurerkübel (optional): Für den Anbau größerer Paprikapflanzen.
* Kokosfaser (optional): Zur Verbesserung der Drainage.
* Perlit (optional): Zur Belüftung der Erde.
Phase 1: Die Anzucht – Der Grundstein für eine reiche Ernte
Die Anzucht ist super wichtig, um gesunde und kräftige Paprikapflanzen zu bekommen. Ich starte meistens schon im Februar oder März mit der Anzucht im Haus.
1. Samen vorbereiten: Ich weiche die Paprikasamen gerne über Nacht in lauwarmem Wasser ein. Das hilft ihnen, schneller zu keimen.
2. Aussaat: Füllt kleine Anzuchttöpfe mit Anzuchterde. Drückt die Erde leicht an und legt pro Topf 2-3 Samen hinein. Bedeckt die Samen mit einer dünnen Schicht Erde (ca. 0,5 cm).
3. Bewässerung: Gießt die Erde vorsichtig an. Am besten verwendet ihr eine Sprühflasche, damit die Samen nicht weggespült werden.
4. Wärme und Licht: Stellt die Töpfe an einen warmen und hellen Ort. Eine Fensterbank über der Heizung ist ideal. Ihr könnt auch eine Anzuchtlampe verwenden, um den Pflanzen ausreichend Licht zu geben.
5. Feuchtigkeit: Haltet die Erde feucht, aber nicht nass. Eine durchsichtige Folie oder ein Mini-Gewächshaus helfen, die Feuchtigkeit zu halten. Lüftet regelmäßig, um Schimmelbildung zu vermeiden.
6. Pikieren: Sobald die Keimlinge ihre ersten richtigen Blätter (nach den Keimblättern) haben, ist es Zeit zum Pikieren. Das bedeutet, dass ihr die kleinen Pflänzchen vorsichtig in größere Töpfe umpflanzt. Achtet darauf, die Wurzeln nicht zu beschädigen.
Phase 2: Der Umzug ins Freie – Paprika unter freiem Himmel
Sobald die Temperaturen steigen und keine Frostgefahr mehr besteht (meistens Mitte Mai nach den Eisheiligen), können die Paprikapflanzen ins Freie umziehen.
1. Abhärten: Bevor ihr die Pflanzen endgültig auspflanzt, solltet ihr sie langsam an die Bedingungen im Freien gewöhnen. Stellt sie tagsüber für ein paar Stunden nach draußen und holt sie abends wieder rein. Steigert die Zeit im Freien jeden Tag.
2. Standortwahl: Paprika lieben die Sonne! Wählt einen sonnigen und windgeschützten Standort.
3. Boden vorbereiten: Lockert den Boden gut auf und mischt Kompost unter. Das sorgt für eine gute Nährstoffversorgung.
4. Pflanzen: Setzt die Paprikapflanzen in ausreichend großen Abständen (ca. 40-50 cm) in die Erde. Achtet darauf, dass der Wurzelballen gut mit Erde bedeckt ist.
5. Angießen: Gießt die Pflanzen nach dem Einpflanzen gründlich an.
6. Stützen: Gebt den Pflanzen einen Pflanzstab oder ein Rankgitter, damit sie nicht umknicken, wenn sie größer werden und Früchte tragen.
Phase 3: Kreative Anbaumethoden – Mehr als nur ein Topf
Jetzt wird es richtig spannend! Wir werden verschiedene kreative Anbaumethoden ausprobieren, um das Beste aus unseren Paprikapflanzen herauszuholen.
Vertikaler Anbau mit Autoreifen
Eine super coole und recycelte Idee!
1. Reifen vorbereiten: Reinigt alte Autoreifen gründlich.
2. Stapeln: Stapelt die Reifen übereinander. Ihr könnt sie mit Schrauben oder Kabelbindern fixieren, damit sie nicht verrutschen.
3. Befüllen: Füllt die Reifen mit Erde. Mischt Kompost und eventuell etwas Kokosfaser unter, um die Drainage zu verbessern.
4. Pflanzen: Pflanzt die Paprikapflanzen in die Reifen. Achtet darauf, dass sie ausreichend Platz haben.
5. Bewässern: Gießt die Pflanzen regelmäßig.
Vertikaler Anbau mit Holzpaletten
Eine weitere platzsparende und dekorative Lösung!
1. Palette vorbereiten: Sucht euch eine stabile Holzpalette. Schleift sie ab und behandelt sie mit einer Holzschutzlasur, um sie wetterfest zu machen.
2. Taschen anbringen: Befestigt Pflanztaschen aus Stoff oder Folie an der Palette. Ihr könnt sie entweder nähen oder mit einem Tacker befestigen.
3. Befüllen: Füllt die Taschen mit Erde.
4. Pflanzen: Pflanzt die Paprikapflanzen in die Taschen.
5. Aufstellen: Stellt die Palette an einen sonnigen Standort.
6. Bewässern: Gießt die Pflanzen regelmäßig.
Anbau im Maurerkübel
Ideal für größere Paprikapflanzen und Sorten, die viel Platz brauchen.
1. Kübel vorbereiten: Wählt einen ausreichend großen Maurerkübel (mindestens 20 Liter). Bohrt Löcher in den Boden, damit das Wasser ablaufen kann.
2. Drainage: Füllt eine Schicht Kies oder Blähton auf den Boden des Kübels, um die Drainage zu verbessern.
3. Erde: Füllt den Kübel mit Erde. Mischt Kompost und eventuell etwas Perlit unter, um die Belüftung zu verbessern.
4. Pflanzen: Pflanzt die Paprikapflanze in den Kübel.
5. Stützen: Gebt der Pflanze einen Pflanzstab oder ein Rankgitter.
6. Bewässern: Gießt die Pflanze regelmäßig.
Phase 4: Pflege und Ernte – Der Lohn der Mühe
Die richtige Pflege ist entscheidend für eine reiche Ernte.
1. Bewässerung: Paprika brauchen regelmäßig Wasser, besonders während der Blütezeit und Fruchtbildung. Gießt am besten morgens, damit die Blätter abtrocknen können und Pilzkrankheiten vermieden werden.
2. Düngung: Düngt die Pflanzen regelmäßig mit einem speziellen Paprikadünger oder organischem Dünger. Achtet auf die Dosierungsanleitung.
3. Beschneiden: Entfernt regelmäßig Seitentriebe, die zwischen dem Haupttrieb und den Blättern wachsen. Das fördert die Fruchtbildung.
4. Schutz vor Schädlingen: Kontrolliert die Pflanzen regelmäßig auf Schädlinge wie Blattläuse oder Spinnmilben.

Conclusion
So, there you have it! Growing bell peppers creatively isn’t just a whimsical gardening experiment; it’s a pathway to a more abundant, flavorful, and visually appealing harvest. By embracing these DIY tricks, you’re not just planting seeds; you’re cultivating a deeper connection with your food and the natural world.
Why is this a must-try? Because it empowers you to take control of your bell pepper production, regardless of your space constraints or gardening experience. Imagine plucking vibrant, perfectly formed bell peppers from your own backyard, balcony, or even windowsill. The satisfaction is unparalleled, and the taste? Infinitely superior to anything you’ll find in a grocery store.
Beyond the sheer joy of homegrown produce, these creative growing methods offer practical benefits. Vertical gardening maximizes space, making it ideal for urban dwellers. Companion planting naturally deters pests and enhances growth, reducing the need for harmful chemicals. And upcycling containers adds a touch of personality to your garden while minimizing waste.
Ready to take your bell pepper game to the next level?
Consider these variations to personalize your approach:
* Experiment with different bell pepper varieties: From the classic green to the sweet red, yellow, orange, and even purple, each variety offers a unique flavor profile and visual appeal. Try a mix-and-match approach to create a colorful and diverse harvest.
* Explore alternative growing mediums: While soil is the traditional choice, you can also experiment with soilless mixes like coco coir or perlite. These mediums offer excellent drainage and aeration, promoting healthy root growth.
* Incorporate vertical gardening structures: Get creative with your vertical supports. Use repurposed pallets, trellises, hanging baskets, or even DIY structures made from bamboo or PVC pipes.
* Fine-tune your companion planting strategy: Research which plants thrive alongside bell peppers in your specific climate and growing conditions. Consider incorporating herbs like basil or rosemary, which repel pests and attract beneficial insects.
* Try hydroponics: For the more adventurous gardener, hydroponics offers a soilless growing method that delivers nutrients directly to the roots, resulting in faster growth and higher yields.
But the most important thing is to simply start. Don’t be afraid to experiment, make mistakes, and learn from your experiences. Gardening is a journey, not a destination, and every season brings new opportunities for growth and discovery.
We’re confident that these DIY tricks will transform your bell pepper growing experience. So, grab your seeds, gather your supplies, and get ready to embark on a rewarding gardening adventure.
And most importantly, we want to hear about your success! Share your photos, tips, and stories with us in the comments below. Let’s create a community of creative bell pepper growers and inspire others to embrace the joys of homegrown produce. Your experiences can help others discover the magic of growing bell peppers creatively.
Frequently Asked Questions (FAQ)
What are the best bell pepper varieties to grow for beginners?
For beginners, some of the easiest and most rewarding bell pepper varieties to grow include ‘California Wonder’ (a classic green bell pepper), ‘Yolo Wonder’ (another reliable green variety), and ‘Ace’ (a fast-maturing red bell pepper). These varieties are known for their disease resistance, adaptability, and consistent yields. They are also relatively forgiving, making them ideal for novice gardeners. Consider starting with these varieties to build your confidence and then branching out to more exotic or challenging types as you gain experience.
How much sunlight do bell peppers need?
Bell peppers are sun-loving plants and require at least 6-8 hours of direct sunlight per day to thrive. Insufficient sunlight can lead to stunted growth, poor fruit production, and bland-tasting peppers. When choosing a location for your bell pepper plants, select a spot that receives full sun throughout the day. If you’re growing bell peppers indoors, supplement natural sunlight with grow lights to ensure they receive adequate illumination. Rotate your plants regularly to ensure even exposure to light.
What is the best soil for growing bell peppers?
Bell peppers prefer well-draining, fertile soil with a slightly acidic to neutral pH (around 6.0 to 7.0). Amend your soil with compost or other organic matter to improve drainage, aeration, and nutrient content. Avoid heavy clay soils, which can become waterlogged and inhibit root growth. If you’re growing bell peppers in containers, use a high-quality potting mix specifically formulated for vegetables. Consider adding perlite or vermiculite to the potting mix to further improve drainage.
How often should I water my bell pepper plants?
Bell peppers need consistent moisture to produce healthy fruits. Water deeply and regularly, especially during hot, dry weather. Aim to keep the soil consistently moist but not waterlogged. Check the soil moisture level regularly by sticking your finger about an inch into the soil. If the soil feels dry to the touch, it’s time to water. Avoid overhead watering, which can promote fungal diseases. Instead, water at the base of the plant, using a soaker hose or drip irrigation system.
What are some common pests and diseases that affect bell peppers?
Bell peppers are susceptible to various pests and diseases, including aphids, whiteflies, spider mites, blossom-end rot, and fungal diseases like powdery mildew and leaf spot. Regularly inspect your plants for signs of infestation or disease. Use organic pest control methods, such as insecticidal soap or neem oil, to control pests. Prevent fungal diseases by ensuring good air circulation, avoiding overhead watering, and applying a fungicide if necessary. Blossom-end rot is caused by calcium deficiency and can be prevented by ensuring adequate calcium levels in the soil and providing consistent watering.
How do I prevent blossom-end rot in bell peppers?
Blossom-end rot, a common problem in bell peppers, is caused by a calcium deficiency in the developing fruit. This deficiency is often due to inconsistent watering, which prevents the plant from absorbing calcium properly. To prevent blossom-end rot, ensure consistent watering, especially during fruit development. Amend your soil with calcium-rich amendments like bone meal or crushed eggshells. You can also use a calcium foliar spray to provide a direct source of calcium to the plant. Avoid over-fertilizing with nitrogen, which can interfere with calcium uptake.
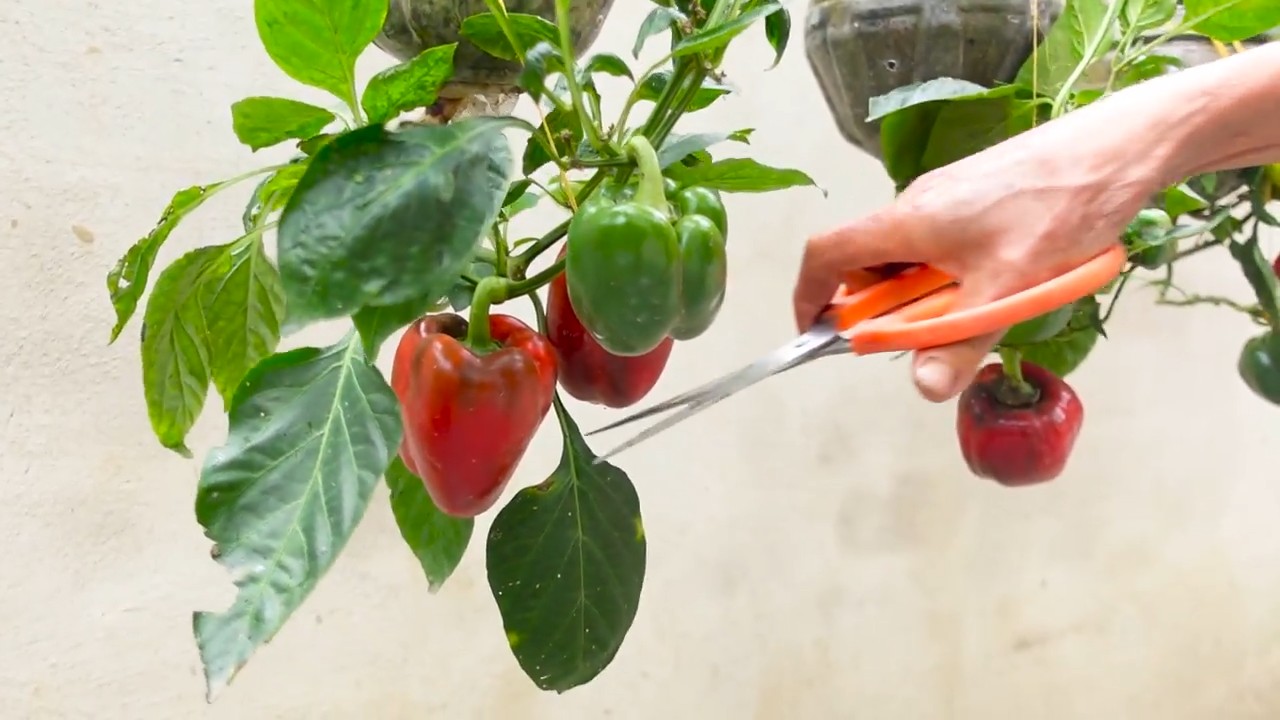
When should I harvest my bell peppers?
Bell peppers can be harvested at any stage of maturity, depending on your preference. Green bell peppers are typically harvested when they are firm, glossy, and reach their mature size. Colored bell peppers (red, yellow, orange) are harvested when they have fully ripened and developed their characteristic color. The longer you leave bell peppers on the plant, the sweeter they will become. Use pruning shears or a sharp knife to cut the peppers from the plant, leaving a short stem attached.
Can I grow bell peppers in containers?
Yes, bell peppers are well-suited for container gardening. Choose a container that is at least 12 inches in diameter and depth to provide adequate space for root growth. Use a high-quality potting mix specifically formulated for vegetables. Ensure the container has drainage holes to prevent waterlogging. Place the container in a sunny location that receives at least 6-8 hours of direct sunlight per day. Water regularly and fertilize every 2-3 weeks with a balanced fertilizer.
What are some good companion plants for bell peppers?
Companion planting can benefit bell peppers by attracting beneficial insects, repelling pests, and improving soil health. Some good companion plants for bell peppers include basil, rosemary, marigolds, carrots, onions, and garlic. Basil repels aphids and whiteflies, while rosemary deters cabbage moths and bean beetles. Marigolds attract beneficial insects like ladybugs, which prey on aphids. Carrots, onions, and garlic repel various pests and improve soil health. Avoid planting bell peppers near fennel or brassicas (cabbage, broccoli, cauliflower), as they can inhibit growth.
Leave a Comment