
Growing Cabbage at Home can feel like a daunting task, conjuring images of sprawling farms and professional gardeners. But what if I told you that cultivating your own crisp, delicious cabbage is entirely achievable, even in a small backyard or balcony garden? Forget the supermarket produce aisle – imagine the satisfaction of harvesting your own homegrown cabbage, bursting with flavor and freshness!
Cabbage, a staple in cuisines worldwide, boasts a rich history dating back thousands of years. From ancient Rome, where it was prized for its medicinal properties, to the hearty stews of Eastern Europe, cabbage has nourished generations. Its versatility and resilience have made it a beloved vegetable across cultures, and now, you can bring that tradition to your own home.
Why should you embark on this DIY adventure? Well, for starters, homegrown cabbage tastes infinitely better than store-bought varieties. Plus, you have complete control over the growing process, ensuring that your cabbage is free from harmful pesticides and chemicals. In this article, I’ll share some simple yet effective DIY tricks and hacks that will empower you to successfully growing cabbage at home, regardless of your gardening experience. Get ready to transform your green space and enjoy the rewarding experience of harvesting your own delicious cabbage!

Growing Cabbage at Home: A Beginner’s Guide
Hey there, fellow garden enthusiasts! Ever dreamt of harvesting your own crisp, delicious cabbage right from your backyard? Well, dream no more! Growing cabbage at home is surprisingly rewarding, and with a little know-how, you can enjoy fresh, homegrown cabbage in your favorite dishes. I’m here to guide you through the entire process, from seed to harvest. Let’s get started!
Choosing Your Cabbage Variety
First things first, let’s talk about cabbage varieties. There’s a whole world of cabbages out there, each with its own unique characteristics. Choosing the right one depends on your climate, growing season, and personal preferences. Here are a few popular options:
* Early Varieties: These mature quickly (around 60-70 days) and are great for shorter growing seasons. Examples include ‘Golden Acre’ and ‘Early Jersey Wakefield’.
* Mid-Season Varieties: These take a bit longer (70-90 days) but often produce larger heads. ‘Copenhagen Market’ and ‘Savoy Ace’ are good choices.
* Late Varieties: These require the longest growing season (90-120 days) and are ideal for areas with mild winters. ‘January King’ and ‘Danish Ballhead’ are popular late-season options.
* Savoy Cabbages: These have crinkled leaves and a milder flavor. ‘Savoy Ace’ is a reliable choice.
* Red Cabbages: These add a pop of color to your garden and have a slightly peppery flavor. ‘Red Acre’ is a classic red cabbage.
Consider your local climate and the length of your growing season when making your selection. Check with your local garden center for varieties that thrive in your area.
Starting Your Cabbage Seeds
You can either start your cabbage seeds indoors or sow them directly in your garden. I personally prefer starting them indoors, as it gives them a head start and protects them from pests and harsh weather.
Starting Seeds Indoors:
1. Gather Your Supplies: You’ll need seed starting trays or small pots, seed starting mix (a light, well-draining mix), cabbage seeds, a spray bottle, and a grow light (optional, but highly recommended).
2. Fill the Trays/Pots: Fill your seed starting trays or pots with the seed starting mix, leaving about half an inch of space at the top.
3. Sow the Seeds: Make a small indentation (about ¼ inch deep) in the soil and place 2-3 cabbage seeds in each indentation. Cover the seeds lightly with soil.
4. Water Gently: Use a spray bottle to gently moisten the soil. Avoid overwatering, as this can lead to damping off (a fungal disease that kills seedlings).
5. Provide Light and Warmth: Place the trays/pots in a warm location (around 65-75°F) and provide plenty of light. A grow light is ideal, but a sunny windowsill can also work. If using a windowsill, rotate the trays/pots regularly to prevent the seedlings from leaning towards the light.
6. Keep the Soil Moist: Check the soil moisture daily and water as needed to keep it consistently moist but not soggy.
7. Thin the Seedlings: Once the seedlings have developed their first true leaves (the second set of leaves), thin them to one seedling per cell or pot. Choose the strongest, healthiest-looking seedling and snip off the others at the soil line.
8. Harden Off the Seedlings: About a week before you plan to transplant the seedlings outdoors, you’ll need to “harden them off.” This process gradually acclimates the seedlings to outdoor conditions. Start by placing the trays/pots outdoors in a sheltered location for a few hours each day, gradually increasing the amount of time they spend outside. Protect them from direct sunlight and strong winds.
Direct Sowing:
If you have a long growing season, you can sow cabbage seeds directly in your garden.
1. Prepare the Soil: Choose a sunny location with well-drained soil. Amend the soil with compost or other organic matter to improve its fertility and drainage.
2. Sow the Seeds: Sow the seeds about ½ inch deep and 1-2 inches apart in rows.
3. Water Gently: Water the soil gently to keep it moist.
4. Thin the Seedlings: Once the seedlings have developed their first true leaves, thin them to the desired spacing (see below).
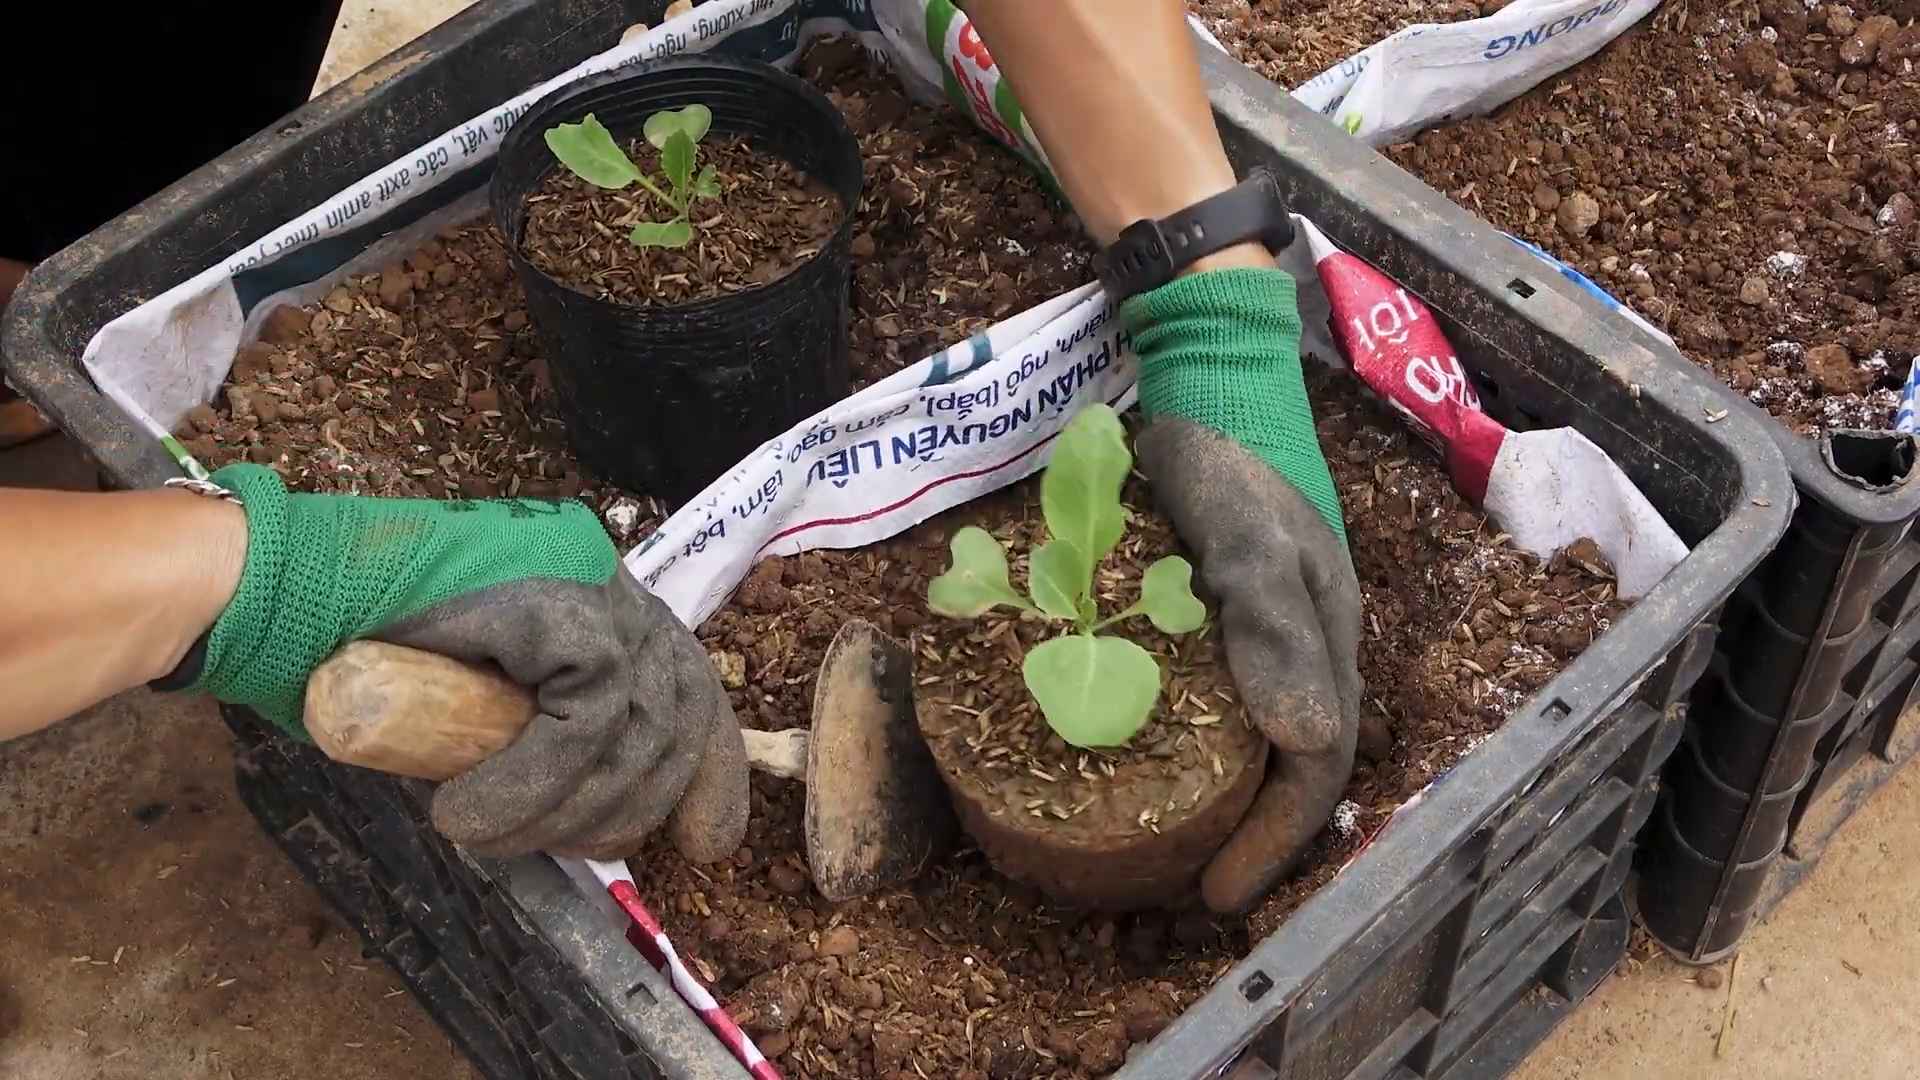
Transplanting Cabbage Seedlings
Whether you started your seeds indoors or purchased seedlings from a garden center, you’ll need to transplant them into your garden.
1. Prepare the Garden Bed: Choose a sunny location with well-drained soil. Cabbage prefers slightly acidic soil with a pH of 6.0 to 7.0. Amend the soil with compost or other organic matter to improve its fertility and drainage.
2. Space the Seedlings: Space the seedlings 12-24 inches apart, depending on the variety. Smaller varieties can be planted closer together, while larger varieties need more space. Rows should be spaced 24-36 inches apart.
3. Dig the Holes: Dig holes that are slightly larger than the root balls of the seedlings.
4. Transplant the Seedlings: Gently remove the seedlings from their trays or pots and place them in the holes. Make sure the top of the root ball is level with the soil surface.
5. Fill the Holes: Fill the holes with soil and gently firm the soil around the seedlings.
6. Water Thoroughly: Water the seedlings thoroughly after transplanting.
7. Mulch: Apply a layer of mulch around the seedlings to help retain moisture, suppress weeds, and regulate soil temperature. Straw, shredded leaves, or wood chips are good choices.
Caring for Your Cabbage Plants
Once your cabbage plants are in the ground, it’s important to provide them with proper care to ensure a healthy and bountiful harvest.
* Watering: Cabbage needs consistent moisture, especially during head formation. Water deeply and regularly, especially during dry spells. Aim for about 1-1.5 inches of water per week.
* Fertilizing: Cabbage is a heavy feeder and benefits from regular fertilization. Apply a balanced fertilizer (e.g., 10-10-10) every 2-3 weeks. You can also side-dress with compost or other organic matter.
* Weeding: Keep the garden bed free of weeds, as they can compete with the cabbage plants for nutrients and water. Hand-pull weeds regularly or use a hoe to cultivate the soil.
* Pest Control: Cabbage plants are susceptible to several pests, including cabbage worms, cabbage loopers, aphids, and flea beetles. Inspect your plants regularly for signs of pests and take action promptly.
* Cabbage Worms and Cabbage Loopers: These caterpillars can devour cabbage leaves. Hand-pick them off the plants or use Bacillus thuringiensis (Bt), a natural insecticide that is effective against caterpillars.
* Aphids: These small, sap-sucking insects can weaken cabbage plants. Spray them with a strong stream of water or use insecticidal soap.
* Flea Beetles: These tiny beetles can create small holes in cabbage leaves. Cover the plants with row covers to prevent flea beetles from reaching them.
* Disease Control: Cabbage plants can also be affected by several diseases, including black rot, clubroot, and downy mildew.
* Black Rot: This bacterial disease causes yellowing and browning of the leaves. Plant disease-resistant varieties and avoid overhead watering.
* Clubroot: This fungal disease causes swollen, distorted roots. Rotate your crops and amend the soil with lime to raise the pH.
* Downy Mildew: This fungal disease causes white or gray patches on the leaves. Improve air circulation and avoid overhead watering.
Harvesting Your Cabbage
The time it takes for cabbage to mature depends on the variety and growing conditions. Generally, you can expect to harvest your cabbage 60-120 days after planting.
1. Check for Firmness: The cabbage head should be firm and solid to the touch.
2. Cut the Head: Use a sharp knife to cut the head from the plant, leaving a few outer leaves attached.
3. Store the Cabbage: Store the cabbage in the refrigerator for up to several weeks.
Enjoy Your Homegrown Cabbage!
Congratulations! You’ve successfully grown your own cabbage at home. Now you can enjoy it in your favorite dishes, such as coleslaw, sauerkraut, stir-fries, and soups. There’s nothing quite like the taste of fresh, homegrown cabbage. Happy gardening!
Conclusion
So, there you have it! Growing cabbage at home, while it might seem daunting at first, is a surprisingly rewarding experience. It’s a journey from tiny seed to crisp, leafy head, and the satisfaction of harvesting your own fresh produce is simply unmatched. Forget those bland, store-bought cabbages that have traveled miles – imagine the vibrant flavor and satisfying crunch of a cabbage you nurtured yourself, right in your own backyard.
This isn’t just about saving a few dollars at the grocery store; it’s about connecting with your food, understanding the growing process, and enjoying the unparalleled taste of truly fresh ingredients. Plus, you have complete control over what goes into your cabbage, ensuring it’s free from harmful pesticides and chemicals.
But the real reason this DIY trick for growing cabbage at home is a must-try lies in its adaptability. You’re not limited to just one type of cabbage. Experiment with different varieties! Try growing red cabbage for a vibrant salad, Savoy cabbage for its delicate leaves, or Napa cabbage for delicious Asian-inspired dishes. Consider succession planting – staggering your planting times – to ensure a continuous harvest throughout the growing season. You can even try companion planting, placing herbs like rosemary or thyme nearby to deter pests naturally.
Don’t be afraid to get creative! Maybe you want to try growing your cabbage in raised beds for better drainage, or perhaps you’ll experiment with different soil amendments to see what yields the best results. The possibilities are endless, and the learning never stops.
We wholeheartedly encourage you to give this DIY trick a try. Start small, perhaps with just a few plants, and see how it goes. The initial investment is minimal, and the potential rewards are immense. Imagine the delicious coleslaw, sauerkraut, or stuffed cabbage rolls you can create with your homegrown harvest!
And most importantly, we want to hear about your experience! Share your successes, your challenges, and your tips with us in the comments below. What varieties did you grow? What techniques did you find most effective? What delicious recipes did you create with your homegrown cabbage? Your insights can help other aspiring gardeners embark on their own cabbage-growing adventures. Let’s build a community of cabbage enthusiasts and share the joy of growing our own food! So, grab some seeds, get your hands dirty, and discover the magic of growing cabbage at home. You won’t regret it!
Frequently Asked Questions (FAQ)
What is the best time of year to plant cabbage?
The best time to plant cabbage depends on your climate and the variety you’re growing. Generally, cabbage is a cool-season crop, meaning it thrives in temperatures between 60°F and 70°F (15°C and 21°C). For spring harvests, start seeds indoors 6-8 weeks before the last expected frost. Transplant seedlings outdoors 2-3 weeks before the last frost. For fall harvests, direct sow seeds in mid-summer or start seeds indoors and transplant them outdoors in late summer. Check your local frost dates and the specific recommendations for your chosen cabbage variety for the most accurate timing.
What kind of soil does cabbage need?
Cabbage prefers well-drained, fertile soil that is rich in organic matter. The ideal soil pH is between 6.0 and 7.0. Before planting, amend your soil with compost, well-rotted manure, or other organic materials to improve drainage, fertility, and water retention. A soil test can help you determine if your soil is lacking any essential nutrients and guide you on what amendments to add. Cabbage are heavy feeders, so ensuring the soil is nutrient-rich is crucial for healthy growth and large heads.
How much sunlight does cabbage need?
Cabbage needs at least 6 hours of direct sunlight per day to thrive. Choose a planting location that receives full sun for the majority of the day. While cabbage can tolerate some partial shade, especially in hotter climates, insufficient sunlight can result in smaller heads and slower growth. Monitor your plants throughout the day to ensure they are receiving adequate sunlight.
How often should I water cabbage?
Cabbage needs consistent moisture to grow properly. Water deeply and regularly, especially during dry periods. Aim to keep the soil consistently moist but not waterlogged. A good rule of thumb is to water when the top inch of soil feels dry to the touch. Mulching around your cabbage plants can help retain moisture in the soil and reduce the need for frequent watering. Drip irrigation or soaker hoses are excellent options for delivering water directly to the roots of your plants.
What are some common pests and diseases that affect cabbage?
Cabbage is susceptible to several pests and diseases, including cabbage worms, cabbage loopers, aphids, flea beetles, clubroot, and black rot. Regularly inspect your plants for signs of infestation or disease. Use row covers to protect young plants from pests. Handpick pests off plants whenever possible. Introduce beneficial insects, such as ladybugs and lacewings, to control aphid populations. Practice crop rotation to prevent soilborne diseases. Choose disease-resistant cabbage varieties whenever possible. If necessary, use organic pesticides or fungicides to control pests and diseases, following label instructions carefully.
How do I know when my cabbage is ready to harvest?
Cabbage is ready to harvest when the head is firm and solid to the touch. The size of the head will vary depending on the variety, but generally, a mature cabbage head will be about 6-12 inches in diameter. Check the seed packet or plant tag for the expected maturity date of your chosen variety. To harvest, use a sharp knife to cut the head from the stem, leaving a few outer leaves attached.
Can I grow cabbage in containers?
Yes, you can grow cabbage in containers, but you’ll need to choose a large container that is at least 12 inches in diameter and 12 inches deep. Use a high-quality potting mix that is well-draining and rich in organic matter. Water regularly and fertilize every 2-3 weeks with a balanced fertilizer. Container-grown cabbage may require more frequent watering and fertilization than cabbage grown in the ground.
How do I store harvested cabbage?
To store harvested cabbage, remove any loose or damaged outer leaves. Wrap the cabbage head in plastic wrap or place it in a plastic bag. Store it in the refrigerator crisper drawer for up to 2-3 weeks. Cabbage can also be shredded and frozen for later use. Blanch the shredded cabbage in boiling water for 2 minutes, then cool it in ice water before freezing.
What are some good companion plants for cabbage?
Good companion plants for cabbage include herbs like rosemary, thyme, sage, and dill, which can help deter pests. Marigolds and nasturtiums are also effective pest repellents. Other beneficial companion plants include onions, garlic, and legumes like beans and peas, which can help improve soil fertility. Avoid planting cabbage near strawberries, tomatoes, or grapes, as these plants can compete for nutrients or attract pests that also affect cabbage.
Can I grow cabbage from seed?
Yes, growing cabbage from seed is a cost-effective way to start your own plants. You can start seeds indoors 6-8 weeks before the last expected frost or direct sow seeds outdoors in mid-summer for a fall harvest. Use a seed-starting mix and keep the soil consistently moist. Once the seedlings have developed a few sets of true leaves, transplant them into larger pots or directly into the garden.

Leave a Comment