
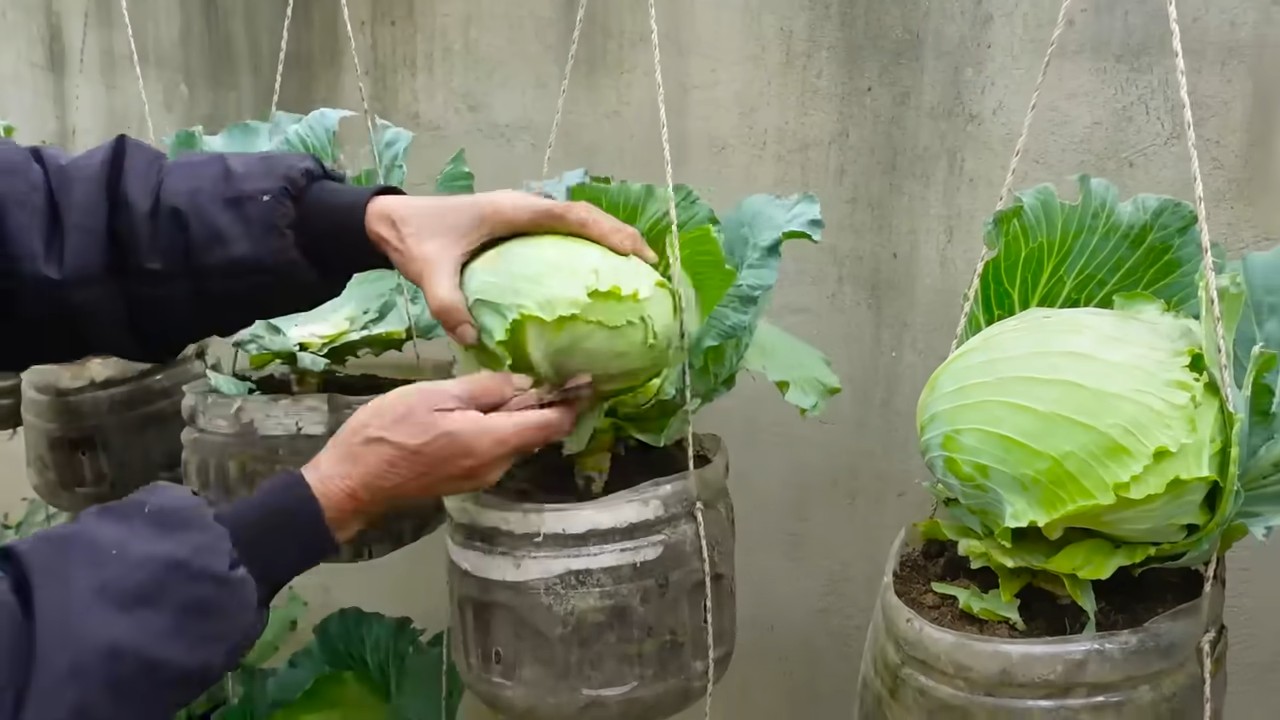
Growing Cabbage in Bottles might sound like something out of a science fiction novel, but trust me, it’s a surprisingly effective and space-saving gardening technique! Have you ever dreamed of harvesting fresh, crisp cabbage right from your balcony or even your kitchen counter? Well, this DIY project makes that dream a reality, even if you’re short on garden space.
While container gardening has been around for centuries, with evidence suggesting its use in ancient Egypt and Rome, the idea of specifically growing cabbage in bottles is a more modern adaptation, born out of necessity and ingenuity. Think about urban dwellers with limited access to traditional gardens – this method offers a fantastic way to cultivate their own food. It’s a testament to human creativity and our enduring connection to nature, regardless of our living situation.
Let’s be honest, buying fresh produce can be expensive, and sometimes the quality just isn’t there. Plus, there’s nothing quite like the satisfaction of nurturing a plant from seedling to harvest. This DIY trick not only saves you money but also gives you control over what you eat, ensuring it’s fresh, organic, and free from harmful chemicals. So, if you’re looking for a fun, eco-friendly, and rewarding gardening project, keep reading! I’m going to show you exactly how to transform ordinary plastic bottles into mini cabbage patches, bringing a touch of green and deliciousness into your life.
Kohl im Flaschengarten: Dein DIY-Guide für Mini-Kohlköpfe
Hey Gärtnerfreunde! Habt ihr Lust auf ein ungewöhnliches Gartenprojekt? Ich zeige euch heute, wie ihr Kohl in Flaschen ziehen könnt. Ja, richtig gelesen! Das ist nicht nur platzsparend, sondern auch ein echter Hingucker. Perfekt für den Balkon, die Terrasse oder sogar die Fensterbank. Lasst uns loslegen!
Was du brauchst:
* Kohlsaat: Am besten eignen sich kleinbleibende Kohlsorten wie Mini-Kopfkohl, Pak Choi oder Chinakohl.
* Plastikflaschen: 5-Liter-Wasserflaschen sind ideal, aber auch kleinere Flaschen funktionieren. Wichtig ist, dass sie sauber sind.
* Erde: Hochwertige Blumenerde oder Anzuchterde.
* Messer oder Schere: Zum Zuschneiden der Flaschen.
* Sprühflasche: Zum Befeuchten der Erde.
* Optional: Drainagematerial (Kies, Blähton)
* Optional: Pflanzschilder
Warum Kohl im Flaschengarten?
* Platzsparend: Ideal für kleine Balkone oder Terrassen.
* Dekorativ: Ein echter Hingucker!
* Kontrollierte Umgebung: Weniger Schädlinge und Krankheiten.
* Frühe Ernte: Oftmals schneller als im Freiland.
* Nachhaltig: Wiederverwendung von Plastikflaschen.
Die Vorbereitung: Die Flasche zum Beet machen
1. Flasche reinigen: Zuerst müsst ihr die Plastikflasche gründlich reinigen. Entfernt alle Etiketten und spült sie mit warmem Wasser und etwas Spülmittel aus. Achtet darauf, dass keine Spülmittelreste zurückbleiben.
2. Flasche zuschneiden: Jetzt kommt der spannende Teil! Ihr habt zwei Möglichkeiten:
* Variante 1: Schneidet die Flasche etwa 10-15 cm unterhalb des Flaschenhalses ab. So erhaltet ihr einen Topf und einen Trichter. Der Trichter kann später umgedreht in den Topf gesteckt werden, um die Erde feucht zu halten.
* Variante 2: Schneidet die Flasche horizontal in der Mitte durch. Den oberen Teil könnt ihr dann umgedreht in den unteren Teil stecken. Achtet darauf, dass der Flaschenhals nicht ganz im Wasser steht, damit die Erde nicht zu nass wird.
3. Drainage legen (optional): Wenn ihr wollt, könnt ihr eine Schicht Drainagematerial (Kies oder Blähton) auf den Boden der Flasche geben. Das verhindert Staunässe und sorgt für eine bessere Belüftung der Wurzeln. Ich mache das meistens, weil ich auf Nummer sicher gehen will.
4. Erde einfüllen: Füllt die Flasche mit Erde. Lasst oben etwa 2-3 cm Platz. Drückt die Erde leicht an.
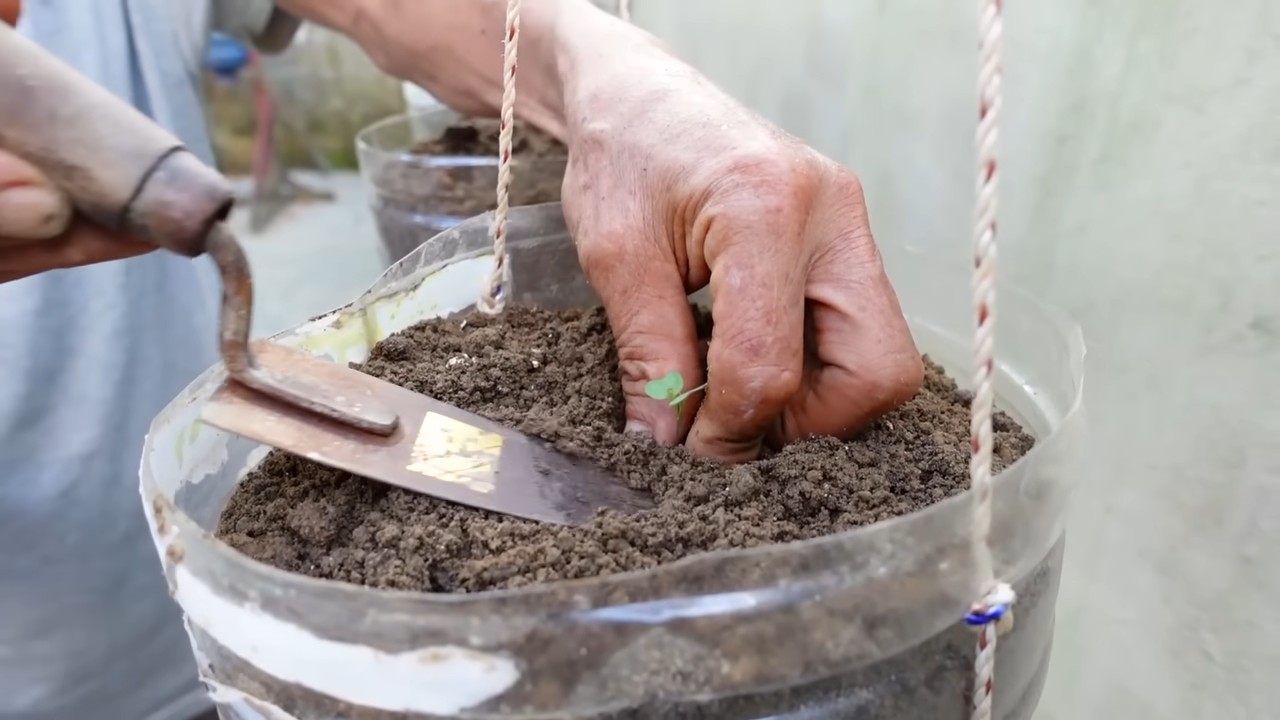
Die Aussaat: Kleine Samen, große Ernte
1. Erde befeuchten: Befeuchtet die Erde mit einer Sprühflasche. Sie sollte feucht, aber nicht nass sein.
2. Samen aussäen: Verteilt die Kohlsaat gleichmäßig auf der Erde. Achtet darauf, dass die Samen nicht zu dicht liegen. Ich säe meistens etwas mehr aus und pikiere dann die schwächeren Pflänzchen.
3. Samen bedecken: Bedeckt die Samen mit einer dünnen Schicht Erde.
4. Erde erneut befeuchten: Befeuchtet die Erde erneut mit der Sprühflasche.
5. Abdecken (optional): Um die Luftfeuchtigkeit zu erhöhen, könnt ihr die Flasche mit Frischhaltefolie oder einem Gefrierbeutel abdecken. Achtet darauf, dass ihr kleine Löcher in die Folie stecht, damit die Luft zirkulieren kann.
Die Pflege: Geduld wird belohnt
1. Standort: Stellt die Flasche an einen hellen und warmen Ort. Kohl braucht viel Licht, um gut zu wachsen. Ein Südfenster oder ein sonniger Balkon sind ideal.
2. Gießen: Gießt die Erde regelmäßig, aber nicht zu viel. Die Erde sollte immer leicht feucht sein. Vermeidet Staunässe. Ich prüfe immer mit dem Finger, ob die Erde trocken ist, bevor ich gieße.
3. Lüften: Wenn ihr die Flasche abgedeckt habt, solltet ihr sie regelmäßig lüften, um Schimmelbildung zu vermeiden.
4. Düngen (optional): Nach etwa 2-3 Wochen könnt ihr mit dem Düngen beginnen. Verwendet einen organischen Flüssigdünger und haltet euch an die Dosierungsanleitung.
5. Pikieren: Wenn die Pflänzchen groß genug sind (etwa 5-7 cm), könnt ihr sie pikieren. Das bedeutet, dass ihr die schwächeren Pflänzchen entfernt und die stärkeren in größere Töpfe oder Flaschen umpflanzt.
6. Schädlinge kontrollieren: Achtet auf Schädlinge wie Blattläuse oder Kohlweißlingsraupen. Bei Bedarf könnt ihr natürliche Schädlingsbekämpfungsmittel einsetzen. Ich verwende gerne Brennnesseljauche.
Die Ernte: Dein eigener Mini-Kohl
1. Erntezeitpunkt: Je nach Kohlsorte und Wachstumsbedingungen könnt ihr nach etwa 6-8 Wochen mit der Ernte beginnen.
2. Erntemethode: Schneidet den Kohlkopf mit einem scharfen Messer ab.
3. Genießen: Verwendet den Kohl für Salate, Suppen oder Gemüsegerichte.
Extra Tipps für den perfekten Flaschenkohl
* Sortenwahl: Wählt kleinbleibende Kohlsorten, die sich gut für den Anbau in Töpfen eignen.
* Erde: Verwendet hochwertige Blumenerde oder Anzuchterde.
* Licht: Kohl braucht viel Licht. Stellt die Flasche an einen sonnigen Ort.
* Wasser: Gießt regelmäßig, aber nicht zu viel. Vermeidet Staunässe.
* Dünger: Düngt regelmäßig mit einem organischen Flüssigdünger.
* Schädlinge: Kontrolliert regelmäßig auf Schädlinge und bekämpft sie bei Bedarf.
* Belüftung: Sorgt für eine gute Belüftung, um Schimmelbildung zu vermeiden.
* Rotation: Baut Kohl nicht jedes Jahr am selben Standort an, um Krankheiten vorzubeugen.
* Kreativität: Experimentiert mit verschiedenen Flaschengrößen und Kohlsorten.
Häufige Probleme und Lösungen
* Gelbe Blätter: Können auf Nährstoffmangel hindeuten. Düngt mit einem organischen Flüssigdünger.
* Schimmelbildung: Kann durch zu hohe Luftfeuchtigkeit entstehen. Lüftet die Flasche regelmäßig.
* Blattläuse: Können mit einem Wasserstrahl abgespült oder mit natürlichen Schädlingsbekämpfungsmitteln bekämpft werden.
* Kohlweißlingsraupen: Sammelt die Raupen ab oder verwendet ein biologisches Insektizid.
* Staunässe: Sorgt für eine gute Drainage und gießt nicht zu viel.
Fazit: Dein grüner Daumen im Flaschenformat
Kohl im Flaschengarten ist ein tolles Projekt für alle, die wenig Platz haben oder einfach mal etwas Neues ausprobieren möchten. Mit etwas Geduld und Pflege könnt ihr eure eigenen Mini-Kohlköpfe ernten und genießen. Probiert es aus und lasst mich wissen, wie es euch gefallen hat! Viel Spaß beim Gärtnern!
Conclusion
So, there you have it! Growing cabbage in bottles might sound unconventional, but it’s a surprisingly effective and rewarding method, especially if you’re short on space or battling common garden pests. This DIY trick offers a multitude of benefits, from protecting your young seedlings from slugs and snails to providing a controlled environment that promotes healthy growth. It’s a fantastic way to extend your growing season and enjoy fresh, homegrown cabbage even when the weather isn’t cooperating.
But why is this method a must-try? Firstly, it’s incredibly space-efficient. Urban gardeners and those with limited garden beds will find this technique a game-changer. You can grow a surprising amount of cabbage in a small area, utilizing vertical space and maximizing your yield. Secondly, the bottle acts as a mini-greenhouse, warming the soil and protecting the delicate seedlings from harsh weather conditions like frost, strong winds, and heavy rain. This gives your cabbage a significant head start and increases its chances of survival. Thirdly, and perhaps most importantly, the bottle provides a physical barrier against common cabbage pests like cabbage white butterflies, cabbage root flies, and those ever-pesky slugs and snails. This reduces the need for chemical pesticides and allows you to grow organic, healthy cabbage with minimal effort.
Beyond the basic method, there are several exciting variations you can explore. Consider using different types of bottles – larger water cooler bottles can accommodate larger cabbage varieties, while smaller soda bottles are perfect for starting seedlings that you’ll later transplant. You can also experiment with different soil mixes to find the perfect blend for your specific climate and cabbage variety. Adding drainage holes to the bottom of the bottles is crucial, but you can also add a layer of gravel or pebbles to further improve drainage and prevent waterlogging. For added protection against extreme heat, consider painting the bottles white or covering them with shade cloth during the hottest part of the day. You can also use this method for other brassicas like broccoli, cauliflower, and kale.
Don’t be afraid to get creative and adapt the technique to suit your own needs and preferences. The beauty of this DIY trick is its simplicity and adaptability. It’s a fun and engaging project that’s perfect for gardeners of all skill levels, from beginners to seasoned pros.
We wholeheartedly encourage you to give growing cabbage in bottles a try. It’s a simple, effective, and rewarding way to enjoy fresh, homegrown cabbage, regardless of your space constraints or gardening experience. Once you’ve tried it, we’d love to hear about your experience! Share your photos, tips, and tricks in the comments below. Let’s build a community of bottle-cabbage growers and learn from each other’s successes and challenges. Happy gardening!
Frequently Asked Questions (FAQ)
What type of cabbage is best suited for growing in bottles?
While you can technically grow any type of cabbage in bottles, smaller, more compact varieties tend to thrive best. Consider varieties like ‘Golden Acre,’ ‘Early Jersey Wakefield,’ or ‘Dwarf Blue Vates.’ These varieties don’t require as much space to mature and are less likely to become root-bound in the bottle. However, with proper care and potentially transplanting to a larger container as they grow, you can successfully grow larger varieties as well. The key is to monitor the plant’s growth and adjust the container size accordingly.
How often should I water cabbage grown in bottles?
Watering frequency depends on several factors, including the size of the bottle, the type of soil, the weather conditions, and the stage of growth of the cabbage plant. Generally, you should aim to keep the soil consistently moist but not waterlogged. Check the soil moisture level regularly by sticking your finger about an inch into the soil. If it feels dry, it’s time to water. During hot and dry weather, you may need to water daily, while during cooler or rainy periods, you may only need to water every few days. Ensure the bottle has adequate drainage to prevent root rot.
What type of soil should I use for growing cabbage in bottles?
A well-draining, nutrient-rich soil mix is essential for growing healthy cabbage in bottles. A good option is a mix of equal parts potting soil, compost, and perlite or vermiculite. The potting soil provides a good base, the compost adds essential nutrients, and the perlite or vermiculite improves drainage and aeration. You can also add a slow-release fertilizer to the soil mix to provide a steady supply of nutrients throughout the growing season. Avoid using garden soil, as it can be too heavy and compact, leading to poor drainage and root problems.
How much sunlight does cabbage grown in bottles need?
Cabbage requires at least 6 hours of direct sunlight per day to thrive. Choose a location that receives plenty of sunlight throughout the day. If you live in a particularly hot climate, you may need to provide some afternoon shade to prevent the leaves from scorching. You can also rotate the bottles regularly to ensure that all sides of the plant receive adequate sunlight. If you’re growing cabbage indoors, you’ll need to supplement with grow lights to provide sufficient light.
How do I prevent pests and diseases when growing cabbage in bottles?
Growing cabbage in bottles already offers some protection against pests, but there are still some precautions you can take. Regularly inspect your plants for signs of pests or diseases. If you spot any, take action immediately. You can use organic pest control methods like insecticidal soap or neem oil to control aphids, cabbage worms, and other common cabbage pests. To prevent fungal diseases, ensure good air circulation around the plants and avoid overwatering. You can also apply a fungicide if necessary. Regularly cleaning the bottles can also help prevent the buildup of algae and other unwanted organisms.
Can I transplant cabbage seedlings grown in bottles to the garden?
Yes, you can definitely transplant cabbage seedlings grown in bottles to the garden. This is a great way to get a head start on the growing season. When transplanting, choose a cloudy day to minimize stress on the plants. Gently remove the seedling from the bottle, being careful not to damage the roots. Dig a hole in the garden that is slightly larger than the root ball and plant the seedling at the same depth it was growing in the bottle. Water thoroughly after transplanting and provide some shade for the first few days to help the plant adjust to its new environment.
How do I fertilize cabbage grown in bottles?
Cabbage is a heavy feeder and requires regular fertilization to thrive. You can use a balanced liquid fertilizer or a slow-release granular fertilizer. Follow the instructions on the fertilizer package for application rates. Fertilize every 2-3 weeks during the growing season. You can also supplement with compost tea or other organic fertilizers. Avoid over-fertilizing, as this can lead to excessive vegetative growth and reduced head formation.
What do I do if my cabbage plant outgrows the bottle?
If your cabbage plant outgrows the bottle, you have a couple of options. You can either transplant it to a larger container or transplant it to the garden. If you choose to transplant it to a larger container, select a pot that is at least twice the size of the bottle. If you choose to transplant it to the garden, follow the same transplanting instructions as mentioned above.
How long does it take to grow cabbage in bottles?
The time it takes to grow cabbage in bottles depends on the variety of cabbage, the growing conditions, and your local climate. Generally, it takes about 60-90 days from transplanting seedlings to harvest. Some early-maturing varieties may be ready in as little as 50 days, while later-maturing varieties may take up to 120 days. Monitor your plants regularly and harvest when the heads are firm and fully formed.
Can I reuse the bottles for growing cabbage again?
Yes, you can definitely reuse the bottles for growing cabbage again. Simply clean the bottles thoroughly with soap and water to remove any dirt, debris, or algae. You can also disinfect the bottles with a diluted bleach solution to kill any remaining pathogens. Rinse the bottles thoroughly before using them again. Reusing the bottles is a great way to reduce waste and save money.
Leave a Comment