
Growing Flavorful Chili Peppers at home might seem daunting, but trust me, it’s an incredibly rewarding experience! Imagine plucking fiery, vibrant peppers straight from your garden, ready to spice up your favorite dishes. Forget bland, store-bought chilies – with a few simple tricks and a little DIY magic, you can cultivate a pepper patch bursting with flavor.
The history of chili peppers is as rich and vibrant as their colors. Originating in South America, these fiery fruits have been cultivated for thousands of years, playing a vital role in cuisines and cultures worldwide. From ancient Aztec rituals to modern-day culinary masterpieces, chili peppers have always held a special place in our hearts (and on our palates!).
Why should you embark on this DIY adventure? Well, for starters, growing flavorful chili peppers yourself allows you to control the entire process, ensuring you’re using organic methods and avoiding harmful pesticides. Plus, the taste of a homegrown chili is simply unmatched – the freshness and intensity are truly something special. In this article, I’m going to share some easy-to-follow DIY tricks and hacks that will help you cultivate a thriving chili pepper garden, even if you’re a complete beginner. Get ready to unleash your inner gardener and spice up your life!
Growing Flavorful Chili Peppers: A DIY Guide to Spicy Success
Hey fellow spice enthusiasts! Ever dreamt of harvesting a bumper crop of fiery chili peppers right from your own backyard? Well, you’ve come to the right place! I’m going to walk you through everything you need to know to grow incredibly flavorful chili peppers, from seed to salsa. Get ready to turn up the heat!
Choosing Your Chili Pepper Varieties
Before we get our hands dirty, let’s talk peppers. The world of chili peppers is vast and exciting, ranging from mild and sweet to face-meltingly hot. Here’s a quick rundown to help you choose the perfect peppers for your palate:
* Mild Peppers: If you’re just starting out or prefer a gentle kick, consider varieties like Anaheim, Poblano, or Shishito. These are great for stuffing, roasting, or adding a subtle warmth to your dishes.
* Medium-Heat Peppers: For a bit more zing, explore Jalapeños, Serrano peppers, or Cayenne peppers. These are versatile options for salsas, sauces, and adding a noticeable heat to your cooking.
* Hot Peppers: Now we’re talking! If you’re a seasoned chili head, you might want to try Habaneros, Scotch Bonnets, or even Ghost Peppers. Be warned, these pack a serious punch! Handle with care and always wear gloves when working with them.
* Super-Hot Peppers: Proceed with caution! These include Carolina Reapers, Trinidad Moruga Scorpions, and other peppers that rank incredibly high on the Scoville scale. These are best left to experienced chili growers and should be used sparingly.
Pro Tip: Consider your local climate when choosing your varieties. Some peppers thrive in warmer climates, while others are more tolerant of cooler temperatures.
Starting Your Chili Pepper Seeds Indoors
Starting your chili pepper seeds indoors is crucial, especially if you live in a region with a shorter growing season. This gives your plants a head start and ensures a bountiful harvest.
1. Gather Your Supplies: You’ll need:
* Chili pepper seeds of your chosen variety.
* Seed starting trays or small pots.
* Seed starting mix (a light, well-draining soil).
* A spray bottle filled with water.
* A heat mat (optional, but highly recommended).
* A grow light (also optional, but beneficial).
2. Sow the Seeds: Fill your seed starting trays or pots with seed starting mix. Moisten the soil with your spray bottle. Sow the seeds about ¼ inch deep, placing 2-3 seeds per cell or pot. Gently cover the seeds with soil.
3. Provide Warmth and Moisture: Place the seed starting trays on a heat mat to maintain a soil temperature of around 80-85°F (27-29°C). This will significantly improve germination rates. Cover the trays with a humidity dome or plastic wrap to retain moisture.
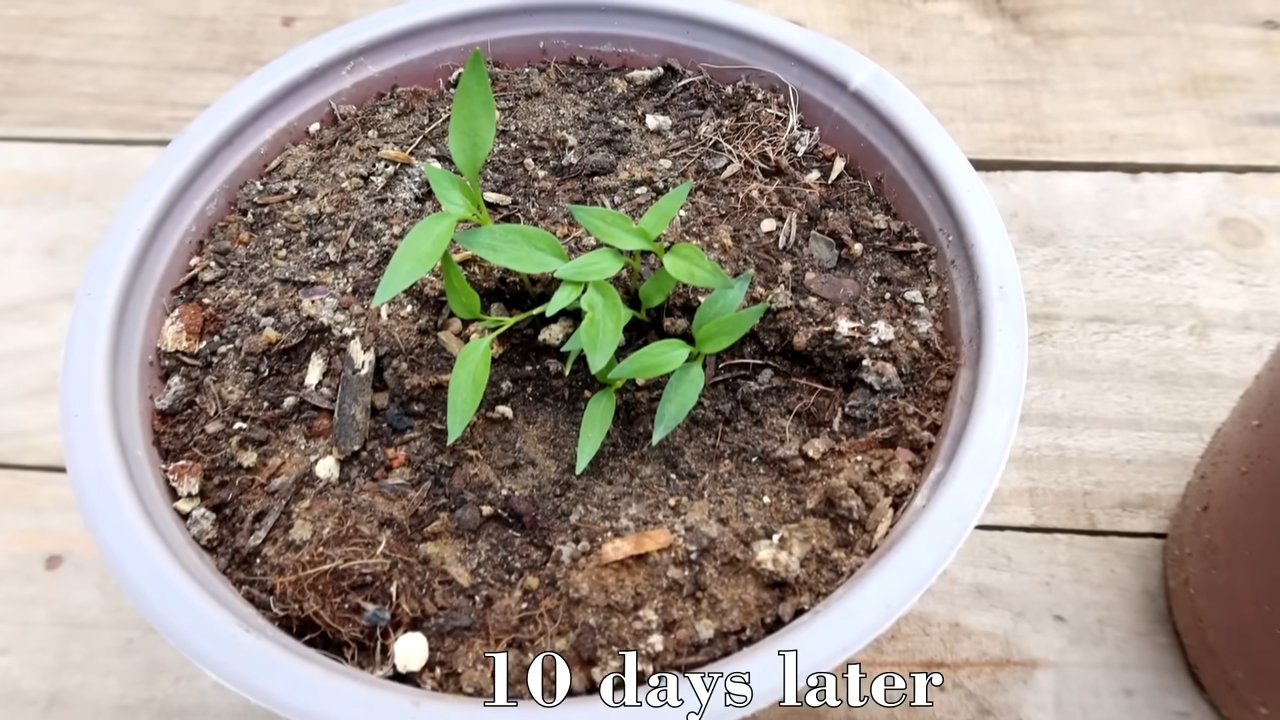
4. Monitor Germination: Keep the soil consistently moist, but not waterlogged. Check the trays daily and mist with water as needed. Germination typically takes 7-14 days, but can vary depending on the pepper variety.
5. Provide Light: Once the seedlings emerge, remove the humidity dome or plastic wrap. If you’re using a grow light, position it a few inches above the seedlings. If you’re relying on natural light, place the trays in a sunny window.
6. Thin the Seedlings: Once the seedlings have developed their first true leaves (the second set of leaves), thin them out, leaving only the strongest seedling in each cell or pot. Snip off the weaker seedlings at the soil line with scissors.
7. Harden Off the Seedlings: Before transplanting your chili pepper plants outdoors, you need to “harden them off.” This process gradually acclimates the seedlings to outdoor conditions. Start by placing the trays outdoors in a sheltered location for a few hours each day, gradually increasing the amount of time they spend outside over the course of a week or two. Protect them from strong winds and direct sunlight during this process.
Transplanting Your Chili Pepper Plants Outdoors
Once the danger of frost has passed and the soil has warmed up, it’s time to transplant your chili pepper plants outdoors.
1. Choose a Sunny Location: Chili peppers thrive in full sun, so choose a location that receives at least 6-8 hours of direct sunlight per day.
2. Prepare the Soil: Chili peppers prefer well-draining soil that is rich in organic matter. Amend the soil with compost or well-rotted manure before planting.
3. Dig the Holes: Dig holes that are slightly larger than the root balls of your chili pepper plants. Space the plants about 18-24 inches apart, depending on the variety.
4. Transplant the Plants: Gently remove the chili pepper plants from their pots or trays. Loosen the root balls slightly and place the plants in the holes. Backfill the holes with soil and gently firm the soil around the plants.
5. Water Thoroughly: Water the plants thoroughly after transplanting.
6. Mulch the Soil: Apply a layer of mulch around the plants to help retain moisture, suppress weeds, and regulate soil temperature.
Caring for Your Chili Pepper Plants
Proper care is essential for healthy chili pepper plants and a bountiful harvest.
1. Watering: Water your chili pepper plants regularly, especially during hot, dry weather. Aim to keep the soil consistently moist, but not waterlogged. Water deeply and less frequently, rather than shallowly and often.
2. Fertilizing: Chili peppers are heavy feeders and benefit from regular fertilization. Use a balanced fertilizer or a fertilizer specifically formulated for peppers and tomatoes. Follow the instructions on the fertilizer label.
3. Pruning: Pruning can help improve air circulation and encourage bushier growth. Remove any suckers (small shoots that grow from the base of the plant) and any yellowing or diseased leaves.
4. Pest and Disease Control: Keep an eye out for common chili pepper pests, such as aphids, spider mites, and whiteflies. Treat infestations promptly with insecticidal soap or neem oil. Prevent fungal diseases by providing good air circulation and avoiding overhead watering.
5. Support: As your chili pepper plants grow, they may need support to prevent them from toppling over. Use stakes or cages to support the plants, especially if you’re growing taller varieties.
Harvesting Your Chili Peppers
The moment you’ve been waiting for! Harvesting your chili peppers is the most rewarding part of the process.
1. Timing: The timing of your harvest will depend on the variety of chili pepper you’re growing and your personal preference. Some peppers are best harvested when they are still green, while others are best harvested when they have fully ripened and turned red, yellow, or orange.
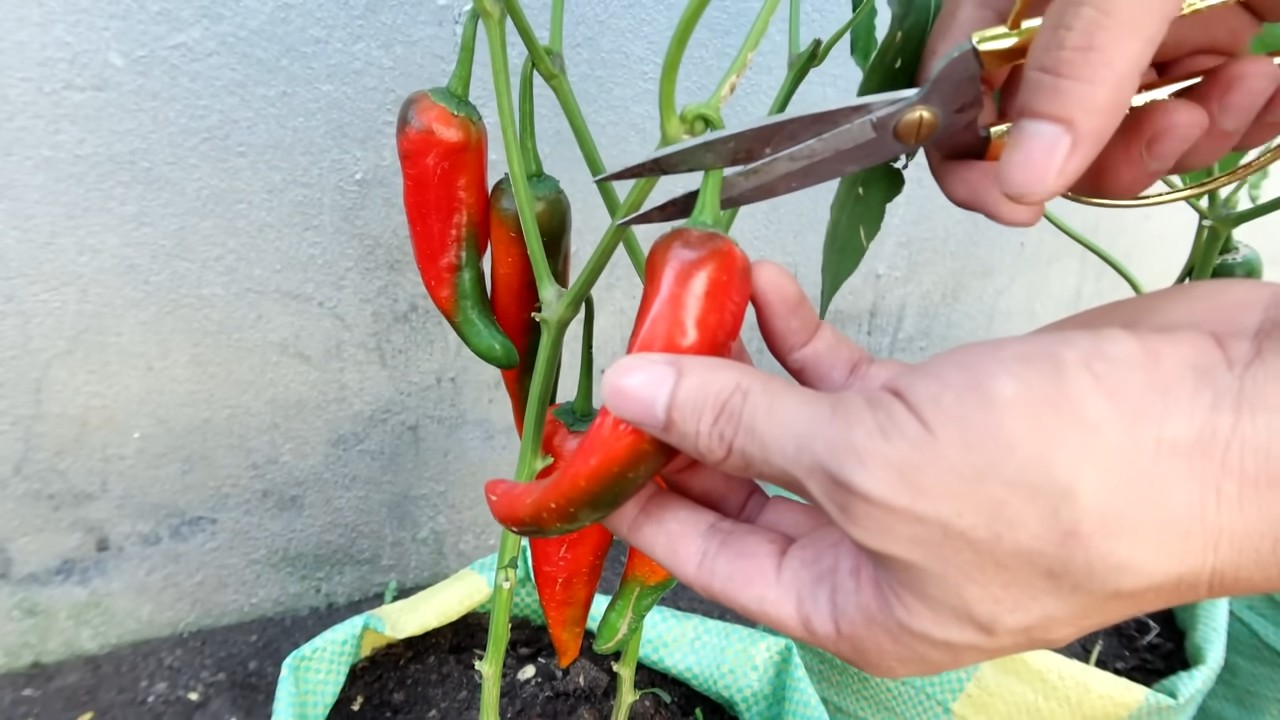
2. Harvesting Technique: Use sharp scissors or pruning shears to cut the peppers from the plant. Leave a small stem attached to the pepper.
3. Handling Hot Peppers: When harvesting hot peppers, always wear gloves to protect your skin from the capsaicin, the compound that makes peppers hot. Avoid touching your eyes or face while handling hot peppers.
4. Storage: Freshly harvested chili peppers can be stored in the refrigerator for up to a week. You can also dry, freeze, or pickle your chili peppers for longer-term storage.
Troubleshooting Common Chili Pepper Problems
Even with the best care, you may encounter some problems while growing chili peppers. Here are a few common issues and how to address them:
* Blossom End Rot: This is a condition where the bottom of the pepper develops a dark, sunken spot. It’s caused by a calcium deficiency. To prevent blossom end rot, ensure your soil is rich in calcium and water your plants consistently.
* Sunscald: This occurs when peppers are exposed to too much direct sunlight, causing them to develop white or yellow patches. Provide shade during the hottest part of the day.
* Pest Infestations: As mentioned earlier, keep an eye out for common chili pepper pests and treat infestations promptly.
* Fungal Diseases: Prevent fungal diseases by providing good air circulation and avoiding overhead watering.
Drying Chili Peppers: Preserving the Flavor
Drying chili peppers is a fantastic way to preserve their flavor and heat for long-term use. Here’s how I do it:
1. Stringing: The traditional method involves stringing the peppers together using a needle and thread. Pierce the peppers near the stem and create a long strand. Hang the strand in a well-ventilated area, away from direct sunlight.
2. Dehydrator: A food dehydrator is a quick and efficient way to dry chili peppers. Arrange the peppers in a single layer on the dehydrator trays and set the temperature to around 125-135°F (52-57°C). Dehydrate for 6-12 hours, or until the peppers
Conclusion
So, there you have it! Growing flavorful chili peppers at home isn’t just a gardening project; it’s an adventure in flavor, a journey from seed to spice rack, and a deeply satisfying way to connect with your food. We’ve explored the essential steps, from selecting the right seeds and nurturing seedlings to providing optimal growing conditions and harvesting your fiery bounty. But the real magic lies in the details – the careful attention to soil composition, the strategic use of sunlight, and the diligent protection against pests and diseases.
This isn’t just about saving money on store-bought peppers (though that’s a definite perk!). It’s about cultivating a deeper appreciation for the ingredients that enhance our meals. It’s about knowing exactly where your food comes from and having complete control over its quality. And, let’s be honest, there’s a certain thrill in impressing your friends and family with peppers you’ve grown yourself, bursting with flavor and heat.
Don’t be afraid to experiment! Try different varieties of chili peppers to discover your personal favorites. Jalapenos, habaneros, serranos, ghost peppers – the possibilities are endless. Consider growing your peppers in containers if you have limited space, or even indoors with the help of grow lights. You can also explore different methods of preserving your harvest, such as drying, pickling, or making your own hot sauce. Imagine the satisfaction of gifting homemade hot sauce made with peppers you nurtured from tiny seeds!
Remember, patience is key. Growing chili peppers takes time and effort, but the rewards are well worth it. Don’t get discouraged if you encounter challenges along the way. Every gardener faces setbacks, and each experience is an opportunity to learn and improve.
We are confident that with the knowledge and tips shared in this article, you’ll be well on your way to harvesting a bumper crop of delicious, flavorful chili peppers. So, grab your seeds, get your hands dirty, and embark on this exciting gardening adventure!
Now, we want to hear from you! Have you tried growing chili peppers at home before? What are your favorite varieties? What challenges have you faced, and how did you overcome them? Share your experiences, tips, and photos in the comments below. Let’s create a community of passionate chili pepper growers and learn from each other. Your insights could inspire and help other readers on their own gardening journeys. Let’s get those gardens growing and those taste buds tingling!
Frequently Asked Questions (FAQ)
Q: What are the easiest chili peppers to grow for beginners?
A: For beginners, jalapenos are an excellent choice. They are relatively easy to grow, produce a good yield, and have a manageable level of heat. Bell peppers, while not spicy, are also a good starting point to learn the basics of pepper cultivation. Other beginner-friendly options include Anaheim peppers and poblano peppers. These varieties are generally more forgiving of beginner mistakes and offer a satisfying harvest. Remember to choose varieties that are well-suited to your local climate.
Q: How much sunlight do chili peppers need?
A: Chili peppers thrive in full sun, requiring at least 6-8 hours of direct sunlight per day. Insufficient sunlight can lead to leggy plants, reduced flowering, and smaller, less flavorful peppers. If you’re growing peppers indoors, consider using grow lights to supplement natural sunlight. Position your plants in the sunniest spot in your garden or on your balcony. If you live in a particularly hot climate, some afternoon shade may be beneficial to prevent scorching.
Q: What kind of soil is best for growing chili peppers?
A: Chili peppers prefer well-draining, fertile soil with a slightly acidic to neutral pH (around 6.0-7.0). Amend your soil with compost or other organic matter to improve drainage and nutrient content. Avoid heavy clay soils, as they can become waterlogged and lead to root rot. You can also use a potting mix specifically formulated for vegetables if you’re growing peppers in containers. Regular soil testing can help you determine the pH and nutrient levels of your soil and make necessary adjustments.
Q: How often should I water my chili pepper plants?
A: Water your chili pepper plants deeply and regularly, especially during hot, dry weather. Allow the soil to dry out slightly between waterings to prevent overwatering and root rot. Check the soil moisture by sticking your finger about an inch into the soil. If it feels dry, it’s time to water. Avoid overhead watering, as this can promote fungal diseases. Instead, water at the base of the plant. Mulching around the base of the plant can help retain moisture and suppress weeds.
Q: How do I fertilize my chili pepper plants?
A: Chili peppers benefit from regular fertilization, especially during the flowering and fruiting stages. Use a balanced fertilizer with a higher phosphorus content to promote flower and fruit development. Avoid over-fertilizing with nitrogen, as this can lead to excessive foliage growth at the expense of fruit production. Follow the instructions on the fertilizer label carefully. You can also use organic fertilizers, such as compost tea or fish emulsion. Side-dress your plants with fertilizer every few weeks throughout the growing season.
Q: How do I protect my chili pepper plants from pests and diseases?
A: Regularly inspect your plants for signs of pests and diseases. Common pests include aphids, spider mites, and whiteflies. You can control these pests with insecticidal soap, neem oil, or by hand-picking them off the plants. Common diseases include fungal diseases like powdery mildew and blossom end rot. Prevent fungal diseases by providing good air circulation, avoiding overhead watering, and using a fungicide if necessary. Blossom end rot is caused by calcium deficiency, so ensure your soil has adequate calcium levels.
Q: When should I harvest my chili peppers?
A: The timing of harvest depends on the variety of chili pepper and your desired level of heat. Generally, chili peppers are ready to harvest when they have reached their mature color and size. You can harvest green chili peppers for a milder flavor, or wait until they turn red, yellow, or orange for a hotter flavor. Use pruning shears or scissors to cut the peppers from the plant, leaving a small stem attached. Handle the peppers carefully to avoid bruising them.
Q: Can I grow chili peppers indoors?
A: Yes, you can grow chili peppers indoors, but you’ll need to provide them with adequate light and warmth. Use grow lights to supplement natural sunlight, and ensure the plants are kept at a consistent temperature. Choose smaller varieties of chili peppers that are well-suited to container growing. Use a well-draining potting mix and fertilize regularly. Pollinate the flowers by hand using a small brush or cotton swab.
Q: How do I save seeds from my chili peppers?
A: To save seeds from your chili peppers, allow the peppers to fully ripen on the plant. Once they are ripe, cut them open and remove the seeds. Spread the seeds out on a paper towel to dry completely. Once the seeds are dry, store them in an airtight container in a cool, dark place. Label the container with the variety of chili pepper and the date of harvest. The seeds should remain viable for several years.
Q: What can I do with my harvested chili peppers?
A: The possibilities are endless! You can use your harvested chili peppers fresh in salsas, sauces, and other dishes. You can also dry them, pickle them, or make your own hot sauce. Consider freezing them for later use. Experiment with different recipes and find your favorite ways to use your homegrown chili peppers. You can even give them away as gifts to friends and family!
Leave a Comment