
Growing gourds indoors might sound like a whimsical dream, conjuring images of sprawling vines taking over your living room. But trust me, it’s more achievable (and less chaotic!) than you think. For centuries, gourds have held a special place in various cultures, from being practical tools like dippers and containers to becoming artistic canvases adorned with intricate carvings. Think of the vibrant Day of the Dead decorations in Mexico or the traditional African water vessels – gourds are more than just quirky vegetables; they’re living history!
Now, why would you want to embark on this indoor gourd-growing adventure? Well, perhaps you live in an area with a short growing season, or maybe you simply crave the satisfaction of nurturing something unique from seed to harvest, regardless of the weather outside. Growing gourds indoors allows you to control the environment, ensuring your gourds get the light, warmth, and care they need to thrive. Plus, imagine the bragging rights when you show off your homegrown, handcrafted gourd creations! This DIY guide will walk you through every step, from selecting the right variety to providing the perfect growing conditions, so you can enjoy the beauty and versatility of gourds all year round. Let’s get started!
Growing Gourds Indoors: A Comprehensive DIY Guide
Okay, so you want to grow gourds indoors? Awesome! It’s totally doable, and I’m here to walk you through the whole process. It might seem a little intimidating at first, but trust me, with a little patience and the right setup, you’ll be harvesting your own homegrown gourds in no time. Let’s get started!
What You’ll Need
Before we dive into the nitty-gritty, let’s gather our supplies. Having everything on hand will make the process much smoother. Here’s a list of what you’ll need:
* Gourd Seeds: Obviously! Choose the variety you want to grow. Smaller gourds tend to do better indoors.
* Seed Starting Trays or Small Pots: These are perfect for getting your seeds germinated.
* Seed Starting Mix: This is a light, airy soil mix specifically designed for seedlings.
* Larger Pots (5-10 gallon): Once your seedlings are big enough, they’ll need a bigger home.
* Potting Soil: A good quality potting soil is essential for healthy growth.
* Grow Lights: Gourds need a lot of light, so grow lights are a must, especially indoors. LED grow lights are energy-efficient and work great.
* Trellis or Support System: Gourds are vines, so they’ll need something to climb on.
* Watering Can or Spray Bottle: For gentle watering.
* Liquid Fertilizer: A balanced liquid fertilizer will help your gourds thrive.
* Pruning Shears: For trimming and shaping your gourd vines.
* Small Fan: To provide air circulation and prevent fungal diseases.
* Thermometer: To monitor the temperature in your growing area.
* Humidity Monitor (Optional): Gourds prefer moderate humidity.
Phase 1: Germinating Your Gourd Seeds
This is where the magic begins! Getting your seeds to sprout is the first crucial step.
1. Soak the Seeds: To help speed up germination, soak your gourd seeds in warm water for 24-48 hours. This softens the seed coat and makes it easier for the seedling to emerge. I usually put them in a small bowl on my kitchen counter.
2. Prepare Your Seed Starting Trays: Fill your seed starting trays or small pots with seed starting mix. Moisten the mix thoroughly, but don’t let it get soggy.
3. Plant the Seeds: Plant one or two seeds per cell or pot, about ½ inch deep. Gently cover the seeds with the seed starting mix.
4. Water Gently: Water the seeds gently with a spray bottle or watering can. You want to keep the soil moist but not waterlogged.
5. Provide Warmth: Gourds germinate best in warm temperatures, around 70-80°F (21-27°C). You can use a heat mat under the seed starting trays to provide consistent warmth.
6. Cover with a Humidity Dome (Optional): Covering the trays with a humidity dome or plastic wrap can help retain moisture and create a humid environment, which is ideal for germination. Just make sure to remove the cover once the seedlings emerge to prevent fungal growth.
7. Wait Patiently: Germination can take anywhere from 7-21 days, depending on the variety of gourd and the temperature. Keep the soil moist and be patient!
Phase 2: Transplanting Your Seedlings
Once your seedlings have developed a few sets of true leaves (the leaves that look like miniature versions of the adult leaves), it’s time to transplant them into larger pots.
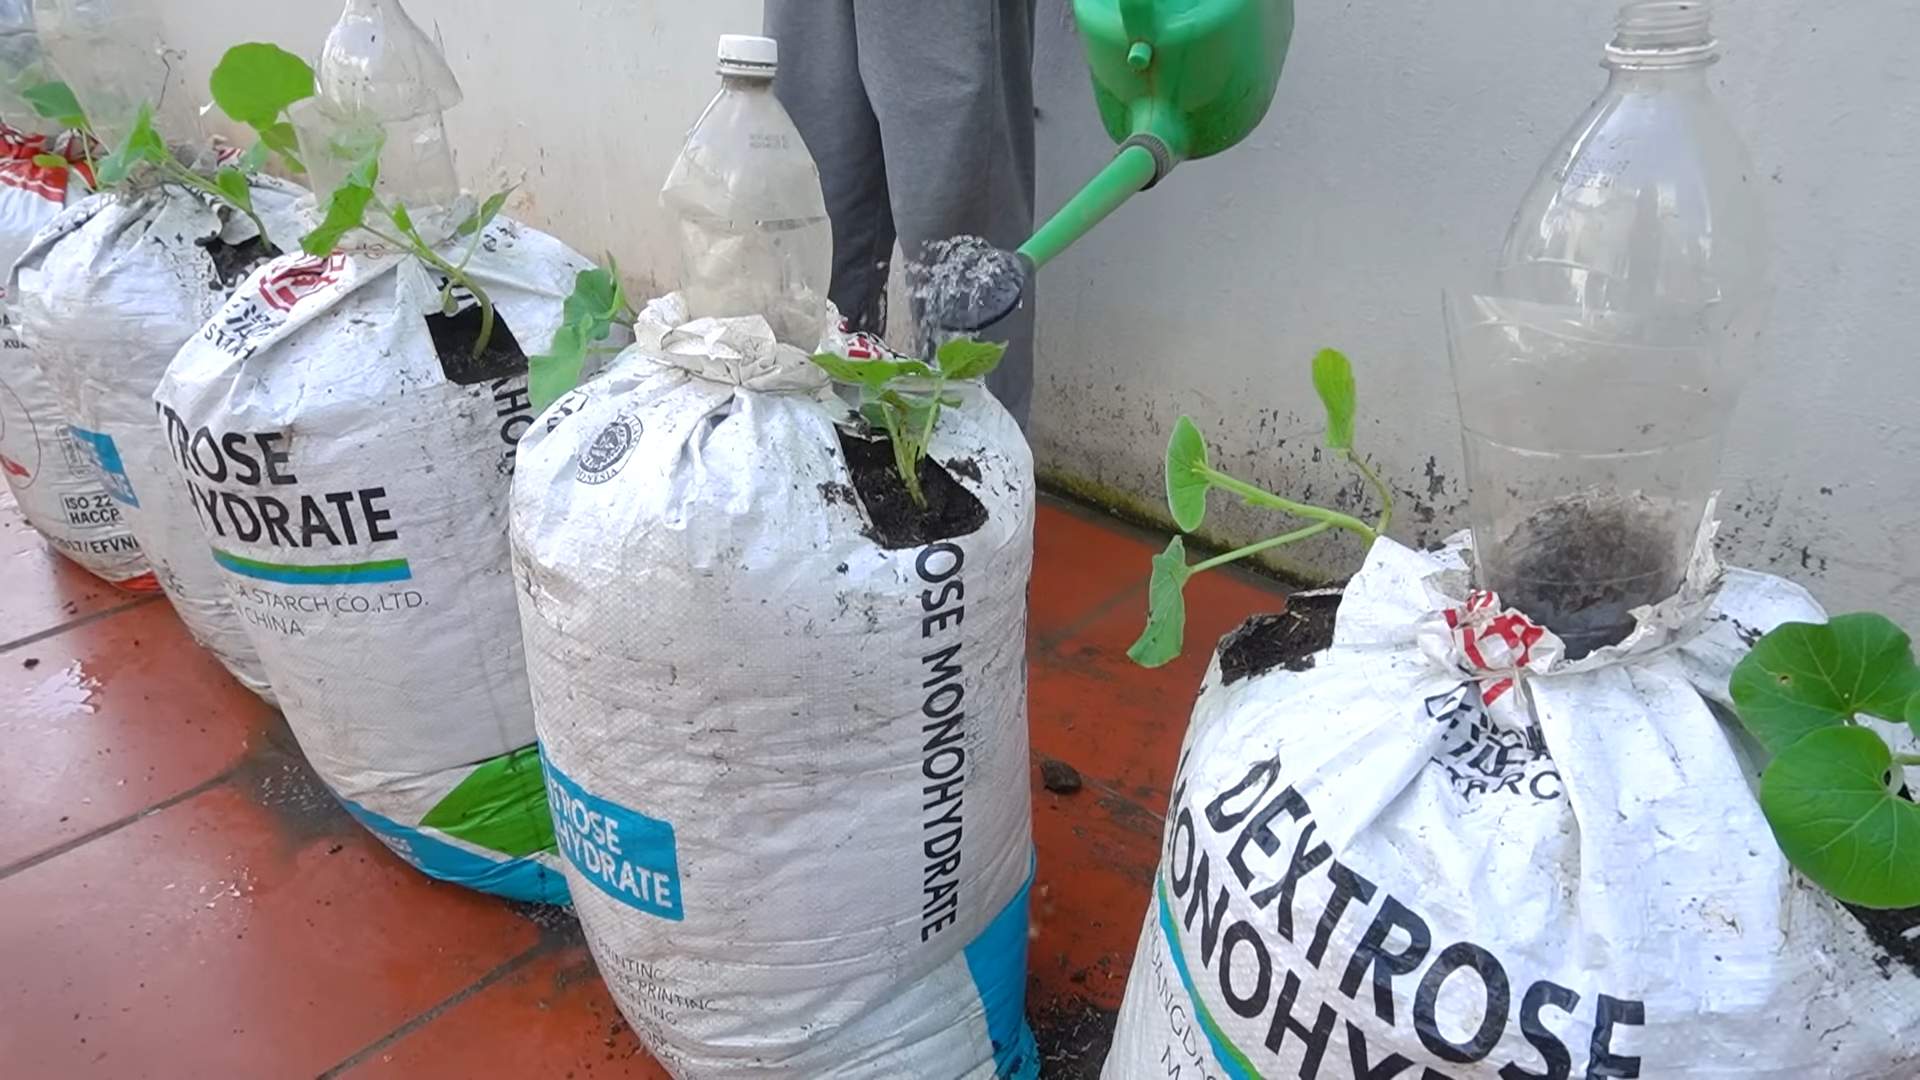
1. Prepare Your Larger Pots: Fill your 5-10 gallon pots with a good quality potting soil. Make sure the pots have drainage holes to prevent waterlogging.
2. Carefully Remove the Seedlings: Gently remove the seedlings from the seed starting trays or small pots. Be careful not to damage the roots. If the roots are tightly bound, gently loosen them before transplanting.
3. Plant the Seedlings: Dig a hole in the center of the pot that’s large enough to accommodate the root ball. Place the seedling in the hole and gently backfill with potting soil.
4. Water Thoroughly: Water the seedlings thoroughly after transplanting. This will help settle the soil and reduce transplant shock.
5. Provide Support: Install your trellis or support system in the pot. Gourds are vines and will need something to climb on. You can use a bamboo stake, a small trellis, or even a tomato cage.
Phase 3: Providing the Right Environment
Now that your gourds are in their larger pots, it’s crucial to provide them with the right environment to thrive.
1. Light: Gourds need at least 6-8 hours of direct light per day. Since you’re growing them indoors, you’ll need to supplement with grow lights. Position your grow lights about 6-12 inches above the plants. I use LED grow lights because they are energy efficient and don’t produce too much heat.
2. Temperature: Gourds prefer warm temperatures, around 70-80°F (21-27°C) during the day and slightly cooler at night. Avoid exposing your gourds to extreme temperature fluctuations.
3. Humidity: Gourds prefer moderate humidity, around 50-60%. If the air in your home is too dry, you can increase the humidity by using a humidifier or placing a tray of water near the plants.
4. Air Circulation: Good air circulation is essential to prevent fungal diseases. Use a small fan to circulate the air around your plants.
5. Watering: Water your gourds regularly, but don’t overwater. Allow the top inch of soil to dry out between waterings. When you water, water deeply, until the water drains out of the drainage holes.
6. Fertilizing: Feed your gourds with a balanced liquid fertilizer every 2-3 weeks. Follow the instructions on the fertilizer label.
Phase 4: Pruning and Training Your Gourd Vines
Gourd vines can get quite long and unruly, so it’s important to prune and train them to keep them manageable and encourage fruit production.
1. Pruning: Prune away any dead or yellowing leaves. You can also prune back the vines to encourage branching and more fruit production. I usually prune the side shoots to encourage the main vine to grow upwards.
2. Training: Train your gourd vines to climb the trellis or support system. You can use plant ties or clips to secure the vines to the support.
3. Pollination: Gourds are pollinated by insects, so if you’re growing them indoors, you’ll need to hand-pollinate the flowers. Use a small paintbrush to transfer pollen from the male flowers to the female flowers. The female flowers have a small gourd-like structure behind the flower.
Phase 5: Harvesting and Curing Your Gourds
Harvesting and curing are the final steps in the gourd-growing process.
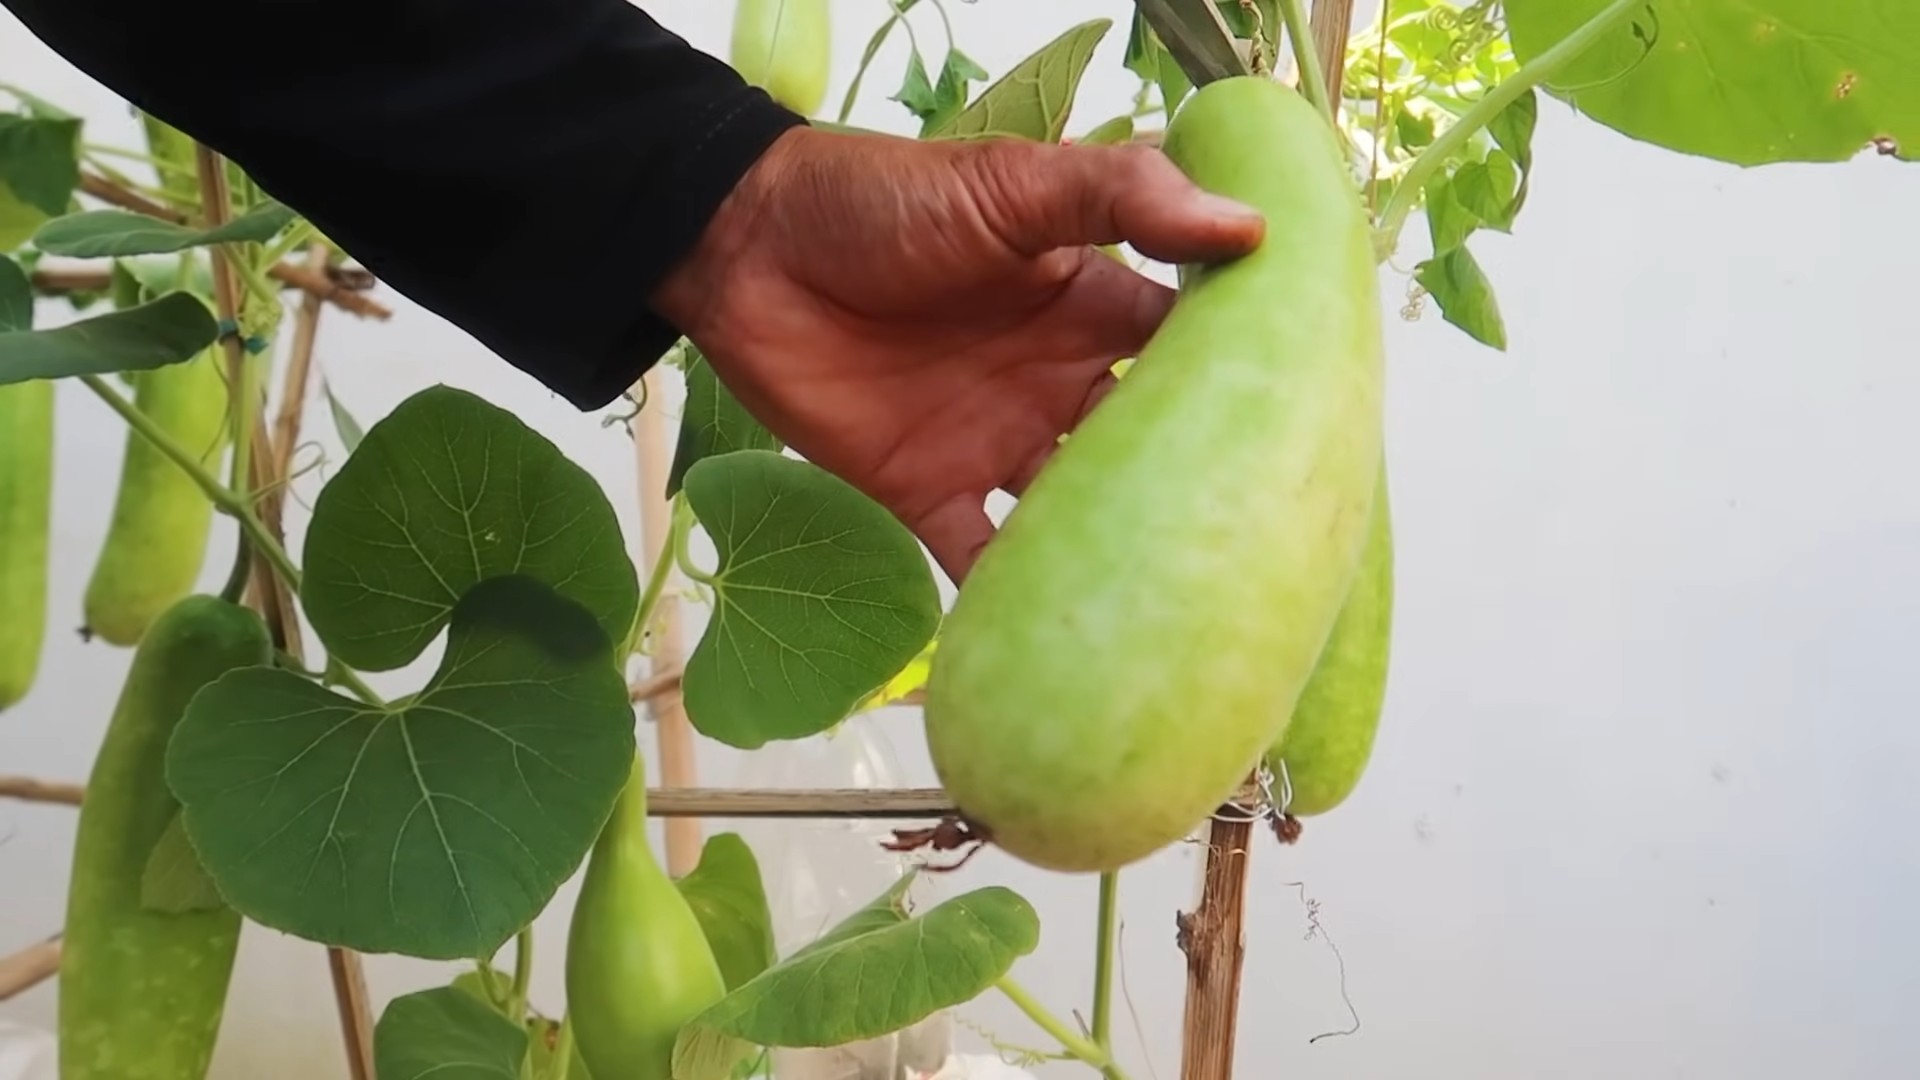
1. Harvesting: Harvest your gourds when they are mature and the stems have dried and turned brown. The skin of the gourd should be hard and resistant to scratching.
2. Curing: Curing is essential to preserve your gourds and prevent them from rotting. To cure your gourds, wash them with soapy water and dry them thoroughly. Then, place them in a well-ventilated area, away from direct sunlight. Turn the gourds regularly to ensure even drying. Curing can take several weeks or even months, depending on the size of the gourd and the humidity. You’ll know the gourds are cured when they are lightweight and the seeds rattle inside.
Troubleshooting
Even with the best care, you might encounter some problems while growing gourds indoors. Here are some common issues and how to address them:
* Powdery Mildew: This is a common fungal disease that can affect gourds. It appears as a white, powdery coating on the leaves. To prevent powdery mildew, provide good air circulation and avoid overhead watering. If you see signs of powdery mildew, treat the plants with a fungicide.
* Aphids: These small, sap-sucking insects can infest gourd plants. They can be controlled with insecticidal soap or neem oil.
* Spider Mites: These tiny pests can also infest gourd plants. They can be controlled with insecticidal soap or neem oil. Increasing humidity can also help deter spider mites.
* Lack of Pollination: If your gourds are not producing fruit, it could be due to a lack of pollination. Make sure to hand-pollinate the flowers if you’re growing them indoors.
Growing gourds indoors can be a rewarding experience. With a little patience and attention, you can enjoy your own homegrown gourds year-round. Good luck, and happy growing!
Conclusion
So, there you have it! Growing gourds indoors might seem like a whimsical endeavor, but with a little patience and the right approach, you can cultivate these fascinating fruits right in your own home. This DIY trick isn’t just about having a unique decorative item; it’s about connecting with nature, learning about plant life cycles, and experiencing the satisfaction of nurturing something from seed to harvest.
Why is this a must-try? Because it’s accessible, rewarding, and offers a creative outlet. Forget relying solely on store-bought gourds that may not perfectly match your vision. With indoor gourd growing, you have complete control over the variety, shape, and even the eventual use of your harvest. Imagine crafting personalized birdhouses, unique bowls, or stunning decorative pieces, all from gourds you nurtured yourself.
But the possibilities don’t stop there! Consider experimenting with different gourd varieties to discover your favorites. Bottle gourds, with their classic shape, are perfect for crafting. Luffa gourds offer the added bonus of natural sponges. And ornamental gourds, with their vibrant colors and quirky shapes, add a touch of whimsy to any space. You can also play around with training techniques, guiding your gourds to grow in specific shapes or patterns. Try using trellises or supports to encourage vertical growth, maximizing space and creating a visually stunning display.
Don’t be afraid to get creative with your growing setup, too. While a sunny windowsill is a great starting point, you can supplement natural light with grow lights to ensure optimal growth, especially during the shorter days of winter. Experiment with different potting mixes to find what works best for your gourds. And remember to monitor your plants regularly for pests and diseases, addressing any issues promptly to keep your gourds healthy and thriving.
We understand that growing gourds indoors can seem daunting at first, but we encourage you to take the plunge. The journey is just as rewarding as the destination. The feeling of watching your tiny seedlings sprout and develop into mature plants is truly magical. And the satisfaction of harvesting your own homegrown gourds is unparalleled.
So, grab some seeds, prepare your potting mix, and embark on your indoor gourd-growing adventure today! We’re confident that you’ll be amazed by the results. And most importantly, we want to hear about your experience! Share your photos, tips, and challenges in the comments below. Let’s create a community of indoor gourd growers and inspire others to discover the joy of this unique and rewarding DIY project. Let us know what kind of growing gourds indoors experience you have.
Frequently Asked Questions (FAQ)
What are the best gourd varieties to grow indoors?
While many gourd varieties can be grown indoors, some are better suited than others due to their size and growth habits. Smaller ornamental gourds, such as those from the Cucurbita pepo species, are generally a good choice. Bottle gourds (Lagenaria siceraria) can also be grown indoors, but they require more space and a sturdy support system. Luffa gourds (Luffa aegyptiaca) are another option, but they also need ample space and a long growing season. Consider the size of your growing area and the amount of support you can provide when selecting your gourd varieties. Researching the specific needs of each variety is crucial for success.
How much light do indoor gourds need?
Gourds require a significant amount of light to thrive, ideally 6-8 hours of direct sunlight per day. If you don’t have a south-facing window that provides sufficient sunlight, you’ll need to supplement with grow lights. Fluorescent or LED grow lights are excellent options. Position the lights close to the plants, but not so close that they burn the leaves. Adjust the height of the lights as the plants grow to ensure they receive adequate illumination. Remember that consistent light is key for healthy growth and fruit production.
What type of potting mix is best for growing gourds indoors?
A well-draining potting mix is essential for growing gourds indoors. A mix of peat moss, perlite, and vermiculite is a good starting point. You can also add compost or other organic matter to improve drainage and nutrient content. Avoid using garden soil, as it can be too heavy and may contain pests or diseases. Ensure the potting mix is slightly acidic to neutral (pH 6.0-7.0). Proper drainage is crucial to prevent root rot, a common problem with indoor plants.
How often should I water my indoor gourds?
Water your gourds regularly, keeping the soil consistently moist but not waterlogged. Check the soil moisture level daily by sticking your finger into the soil. If the top inch feels dry, it’s time to water. Water deeply, allowing the excess water to drain out of the bottom of the pot. Avoid overwatering, as this can lead to root rot. The frequency of watering will depend on factors such as the size of the pot, the type of potting mix, and the temperature and humidity of your home.
How do I pollinate my indoor gourds?
Gourds are typically pollinated by insects, but since you’re growing them indoors, you’ll need to hand-pollinate them. Gourds have separate male and female flowers. The male flowers have a long, thin stem, while the female flowers have a small, immature gourd at the base. To hand-pollinate, use a small paintbrush or cotton swab to collect pollen from the male flower and transfer it to the stigma of the female flower. It’s best to do this in the morning when the flowers are open. Repeat the process for several days to ensure successful pollination.
What are some common pests and diseases that affect indoor gourds?
Common pests that can affect indoor gourds include aphids, spider mites, and whiteflies. These pests can be controlled with insecticidal soap or neem oil. Diseases that can affect gourds include powdery mildew and root rot. Powdery mildew can be prevented by ensuring good air circulation and avoiding overhead watering. Root rot can be prevented by using a well-draining potting mix and avoiding overwatering. Regularly inspect your plants for signs of pests or diseases and take action promptly to prevent them from spreading.
How long does it take for gourds to mature indoors?
The time it takes for gourds to mature indoors depends on the variety and growing conditions. Generally, it takes 90-120 days from planting to harvest. The gourds are ready to harvest when the stems begin to dry and turn brown. The skin of the gourd should also be hard and resistant to scratching. Once harvested, gourds need to be cured in a dry, well-ventilated area for several weeks to allow the skin to harden and the flesh to dry out.
Can I save seeds from my indoor-grown gourds?
Yes, you can save seeds from your indoor-grown gourds, but it’s important to note that the seeds may not produce plants that are identical to the parent plant, especially if the gourds were cross-pollinated. To save seeds, allow the gourds to fully mature and dry on the vine. Once the gourds are dry, cut them open and remove the seeds. Clean the seeds and allow them to dry completely before storing them in an airtight container in a cool, dark place.
What can I do with my homegrown gourds?
The possibilities are endless! You can use your homegrown gourds for a variety of crafts and decorations. Bottle gourds can be used to make birdhouses, bowls, and musical instruments. Luffa gourds can be used as natural sponges. Ornamental gourds can be used to create centerpieces, wreaths, and other decorative items. Let your creativity guide you and explore the many ways you can use your homegrown gourds.
Leave a Comment