
Growing Kale for Continuous Harvest is easier than you might think, and I’m here to show you how! Forget those sad, single harvests that leave you craving more of this nutritional powerhouse. Imagine stepping into your backyard and snipping fresh, vibrant kale leaves whenever you need them – for smoothies, salads, or even a quick sauté. Sounds dreamy, right?
Kale, a leafy green with a rich history dating back to ancient Greece and Rome, has long been valued for its resilience and nutritional benefits. It was a staple food for peasants and royalty alike, and its hardiness made it a reliable crop even in challenging climates. Today, kale enjoys a resurgence in popularity, celebrated as a superfood packed with vitamins and antioxidants.
But let’s be honest, sometimes gardening can feel overwhelming. That’s where these DIY tricks come in! Many people struggle with getting a consistent yield from their kale plants, often ending up with a glut of leaves all at once, followed by a long period of waiting. This article will equip you with simple, effective techniques to ensure a continuous supply of fresh kale throughout the growing season. I’ll share my favorite tips and tricks for growing kale for continuous harvest, so you can enjoy this amazing vegetable whenever you want. Get ready to unlock the secrets to a never-ending kale bounty!
Growing Kale for Continuous Harvest: My Foolproof Guide
Hey there, fellow gardeners! I’m so excited to share my secrets to growing kale for a continuous harvest. Forget those sad, single harvests – we’re talking about a constant supply of fresh, nutritious kale right from your backyard! I’ve been doing this for years, and trust me, it’s easier than you think. Let’s dive in!
Choosing the Right Kale Variety
First things first, not all kale is created equal when it comes to continuous harvesting. Some varieties are better suited for this method than others. Here are a few of my favorites:
* Dwarf Blue Curled Vates: This is a classic for a reason. It’s compact, cold-hardy, and produces tons of curly leaves. Plus, it’s relatively quick to mature.
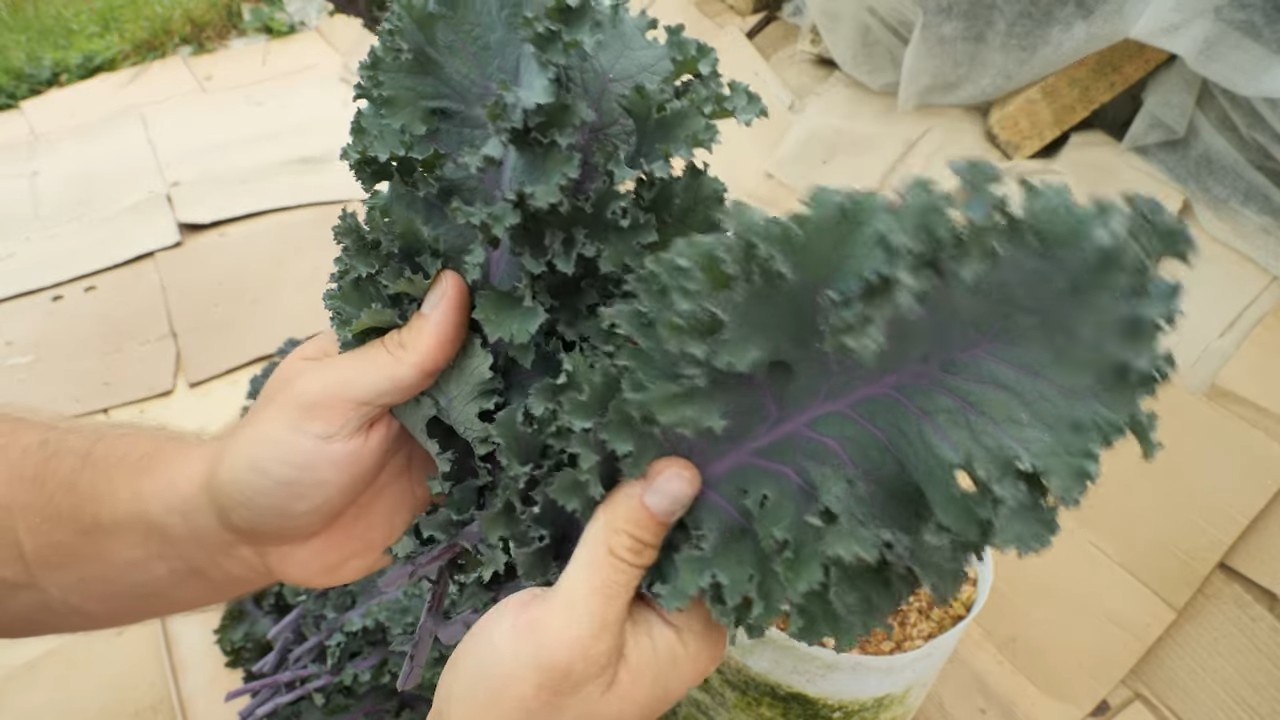
* Red Russian: I love the slightly sweeter flavor and beautiful red stems of this variety. It’s also very productive and tolerates heat well.
* Lacinato (Dinosaur) Kale: This one has a unique, almost prehistoric look with its long, bumpy leaves. It has a slightly milder flavor than curly kale and is a great option if you’re not a huge fan of the typical kale taste.
* Redbor Kale: If you want to add some color to your garden, Redbor is the way to go! Its frilly, purple leaves are stunning, and it’s just as productive as the other varieties.
Preparing Your Kale Bed
Okay, now that we’ve got our kale varieties sorted, let’s get our garden bed ready. Kale is a fairly easy-going plant, but it does appreciate a little TLC.
* Sunlight: Kale needs at least 6 hours of sunlight per day. More is even better! Choose a spot in your garden that gets plenty of sunshine.
* Soil: Kale prefers well-drained soil that’s rich in organic matter. Before planting, amend your soil with compost or well-rotted manure. This will provide your kale with the nutrients it needs to thrive.
* pH: Kale likes a soil pH between 6.0 and 7.5. You can test your soil pH with a simple soil testing kit from your local garden center. If your soil is too acidic, you can add lime to raise the pH.
* Spacing: Give your kale plants enough space to grow. I usually space them about 12-18 inches apart. This allows for good air circulation, which helps prevent diseases.
Planting Your Kale
You can start kale from seed or purchase seedlings from a nursery. I’ve done both, and honestly, I find that starting from seed is just as easy and much more cost-effective.
* Starting from Seed: Sow kale seeds indoors 6-8 weeks before the last expected frost. Plant the seeds about 1/4 inch deep in seed-starting mix. Keep the soil moist and warm. Once the seedlings have a few sets of true leaves, you can transplant them outdoors.
* Buying Seedlings: If you’re buying seedlings, choose healthy-looking plants with no signs of disease or pests. Gently remove the seedlings from their containers and plant them in your prepared garden bed.
* Planting Time: The best time to plant kale is in the spring or fall. Kale is a cool-season crop, so it thrives in cooler temperatures. In the spring, plant kale after the last frost. In the fall, plant kale about 6-8 weeks before the first expected frost.
The Continuous Harvest Method: My Secret Weapon
Alright, here’s the heart of the matter – how to harvest kale continuously! This is where the magic happens.
* Don’t Harvest the Whole Plant: This is the most important rule! Instead of cutting the entire plant down, harvest only the outer leaves. This allows the plant to continue producing new leaves from the center.
* Harvest Regularly: The more you harvest, the more the plant will produce. I usually harvest kale every week or two.
* Harvest the Older Leaves: Focus on harvesting the older, larger leaves first. These leaves are usually tougher and less flavorful than the younger leaves.
* Leave the Center Leaves: Always leave the center leaves intact. These are the leaves that will continue to grow and produce new leaves.
* Cut, Don’t Tear: Use a sharp knife or scissors to cut the leaves from the stem. Tearing the leaves can damage the plant and make it more susceptible to disease.
* Harvest from the Bottom Up: Start harvesting from the bottom of the plant and work your way up. This will help keep the plant tidy and encourage new growth.
Step-by-Step Harvesting Instructions
Let’s break down the harvesting process into easy-to-follow steps:
1. Inspect Your Plants: Take a look at your kale plants and identify the outer, older leaves that are ready to be harvested. These leaves should be at least 4-6 inches long.
2. Grab Your Tools: Grab a sharp knife or a pair of scissors. Make sure your tools are clean to prevent the spread of disease.
3. Cut the Leaves: Carefully cut the leaves from the stem, about an inch or two above the ground. Be sure to leave the center leaves intact.
4. Repeat: Repeat this process for all the plants in your kale bed.
5. Wash and Enjoy: Wash the harvested leaves thoroughly and enjoy them in your favorite kale recipes!
Caring for Your Kale Plants
To keep your kale plants producing a continuous harvest, it’s important to provide them with proper care.
* Watering: Kale needs consistent moisture, especially during hot, dry weather. Water your kale plants deeply whenever the soil feels dry to the touch.
* Fertilizing: Kale is a heavy feeder, so it needs regular fertilization. I like to use a balanced organic fertilizer every few weeks. You can also side-dress your kale plants with compost or well-rotted manure.
* Weeding: Keep your kale bed free of weeds. Weeds compete with kale for nutrients and water.
* Pest Control: Kale is susceptible to a few pests, such as aphids, cabbage worms, and flea beetles. Inspect your plants regularly for signs of pests. If you find any pests, you can control them with insecticidal soap or neem oil. I prefer organic methods whenever possible.
* Mulching: Mulch around your kale plants with straw, wood chips, or shredded leaves. Mulch helps to retain moisture, suppress weeds, and regulate soil temperature.
Troubleshooting Common Kale Problems
Even with the best care, you might encounter a few problems when growing kale. Here are some common issues and how to fix them:
* Yellowing Leaves: Yellowing leaves can be a sign of nutrient deficiency, overwatering, or underwatering. Make sure your kale plants are getting enough fertilizer and water. Check the soil drainage to make sure it’s not waterlogged.
* Holes in Leaves: Holes in leaves are usually caused by pests, such as cabbage worms or flea beetles. Inspect your plants for pests and control them with insecticidal soap or neem oil. You can also cover your kale plants with row covers to prevent pests from reaching them.
* Bolting: Bolting is when kale plants start to produce flowers and seeds. This usually happens in hot weather. Once kale bolts, the leaves become bitter and less palatable. To prevent bolting, plant kale in the spring or fall, and provide it with plenty of water and shade during hot weather.
* Root Rot: Root rot is a fungal disease that can occur in waterlogged soil. To prevent root rot, make sure your soil is well-drained. Avoid overwatering your kale plants.
Extending Your Harvest Season
Want to keep harvesting kale even longer? Here are a few tips for extending your harvest season:
* Succession Planting: Plant new kale seedlings every few weeks to ensure a continuous supply of fresh kale.
* Cold Frames: Use cold frames to protect your kale plants from frost and extend the harvest season into the winter.
* Row Covers: Cover your kale plants with row covers to protect them from frost and pests.
* Choose Cold-Hardy Varieties: Select kale varieties that are known for their cold hardiness, such as Dwarf Blue Curled Vates or Red Russian.
Enjoying Your Harvest
Now for the best part – enjoying your fresh, homegrown kale! Kale is incredibly versatile and can be used in a variety of dishes.
* Salads: Add chopped kale to your salads for a boost of nutrients. Massage the kale with olive oil and lemon juice to make it more tender.
* Smoothies: Blend kale into your smoothies for a healthy and delicious treat.
* Soups and Stews: Add chopped kale to your soups and stews for extra flavor and nutrients.
* Sautéed Kale: Sauté kale with garlic, olive oil, and a pinch of salt for a simple
Conclusion
So, there you have it! Mastering the art of growing kale for continuous harvest isn’t just about having fresh, nutritious greens at your fingertips; it’s about embracing a sustainable and rewarding gardening practice. We’ve explored the key steps, from selecting the right kale varieties to understanding the importance of proper spacing and consistent harvesting techniques. By implementing these strategies, you can transform your garden into a kale-producing powerhouse, providing you with a steady supply of this superfood throughout the growing season.
Why is this DIY trick a must-try? Because it empowers you to take control of your food source, reduce your reliance on store-bought produce, and enjoy the unparalleled flavor and freshness of homegrown kale. Imagine stepping outside your door and snipping off a handful of vibrant, crisp kale leaves for your morning smoothie, lunchtime salad, or evening stir-fry. The taste difference alone is worth the effort! Plus, knowing exactly where your food comes from and how it was grown provides peace of mind and a deeper connection to the natural world.
But the beauty of growing kale for continuous harvest lies in its adaptability. Feel free to experiment with different kale varieties to discover your personal favorites. Try planting a mix of curly kale, lacinato kale (also known as dinosaur kale), and Russian kale to add variety to your meals. Consider companion planting to deter pests and improve soil health. Marigolds, for example, are known to repel aphids, while herbs like rosemary and thyme can attract beneficial insects.
And don’t be afraid to get creative with your kale recipes! Beyond the usual salads and smoothies, kale can be incorporated into soups, stews, casseroles, and even baked into crispy kale chips. The possibilities are endless!
We strongly encourage you to give this DIY trick a try. Start small, perhaps with just a few kale plants, and gradually expand your garden as you gain experience. The rewards are well worth the effort. Not only will you enjoy a continuous supply of fresh, nutritious kale, but you’ll also experience the satisfaction of growing your own food and connecting with nature.
Most importantly, we want to hear about your experiences! Share your tips, tricks, and successes (and even your challenges!) in the comments below. Let’s build a community of kale-growing enthusiasts and learn from each other. What varieties have you found to be most productive? What harvesting techniques have worked best for you? What are your favorite kale recipes? Your insights could help other gardeners achieve their kale-growing goals. So, get out there, get your hands dirty, and start growing kale for continuous harvest today! You’ll be amazed at the abundance and flavor that this versatile green can bring to your table. Remember, consistent effort in **growing kale** will yield the best results.
Frequently Asked Questions (FAQ)
What are the best kale varieties for continuous harvesting?
Several kale varieties are well-suited for continuous harvesting. Curly kale, such as ‘Vates Blue Curled Scotch,’ is a popular choice due to its vigorous growth and abundant leaves. Lacinato kale, also known as dinosaur kale or Tuscan kale, is another excellent option, offering a slightly milder flavor and a distinctive texture. Russian kale, including ‘Red Russian’ and ‘White Russian,’ is known for its cold hardiness and tender leaves. Experimenting with different varieties will help you discover which ones thrive best in your local climate and suit your taste preferences. Consider planting a mix of varieties to extend your harvest season and add variety to your meals.
How often should I harvest kale for continuous production?
The frequency of harvesting depends on the growth rate of your kale plants and your consumption needs. As a general rule, you should harvest outer leaves every few days or once a week. Avoid taking more than one-third of the plant’s leaves at a time, as this can stress the plant and slow down its growth. Focus on harvesting the largest, most mature leaves, leaving the smaller, younger leaves to continue growing. Regular harvesting encourages the plant to produce new leaves, ensuring a continuous supply of fresh kale.
What’s the best way to harvest kale leaves?
The best way to harvest kale leaves is to use a sharp knife or scissors to cut the leaves close to the stem. Avoid tearing the leaves, as this can damage the plant and make it more susceptible to disease. When harvesting, start from the bottom of the plant and work your way up, taking only the outer leaves. Leave the central bud intact, as this is where new growth will emerge. After harvesting, wash the leaves thoroughly and store them in the refrigerator for up to a week.
How do I prevent pests and diseases from affecting my kale crop?
Preventing pests and diseases is crucial for maintaining a healthy and productive kale crop. Start by choosing disease-resistant kale varieties and planting them in well-drained soil. Practice crop rotation to prevent the buildup of soilborne pathogens. Regularly inspect your plants for signs of pests or diseases, such as aphids, cabbage worms, or fungal infections. If you spot any problems, take action immediately. Handpicking pests, using insecticidal soap, or applying organic fungicides can help control infestations and diseases. Companion planting with herbs like rosemary and thyme can also deter pests.
What kind of fertilizer should I use for kale?
Kale benefits from regular fertilization to support its rapid growth and continuous leaf production. A balanced fertilizer with equal amounts of nitrogen, phosphorus, and potassium is a good choice. You can also use organic fertilizers, such as compost, aged manure, or fish emulsion. Apply fertilizer according to the package instructions, being careful not to over-fertilize, as this can lead to excessive leaf growth and reduced flavor. Side-dressing your kale plants with fertilizer every few weeks can help maintain their vigor and productivity.
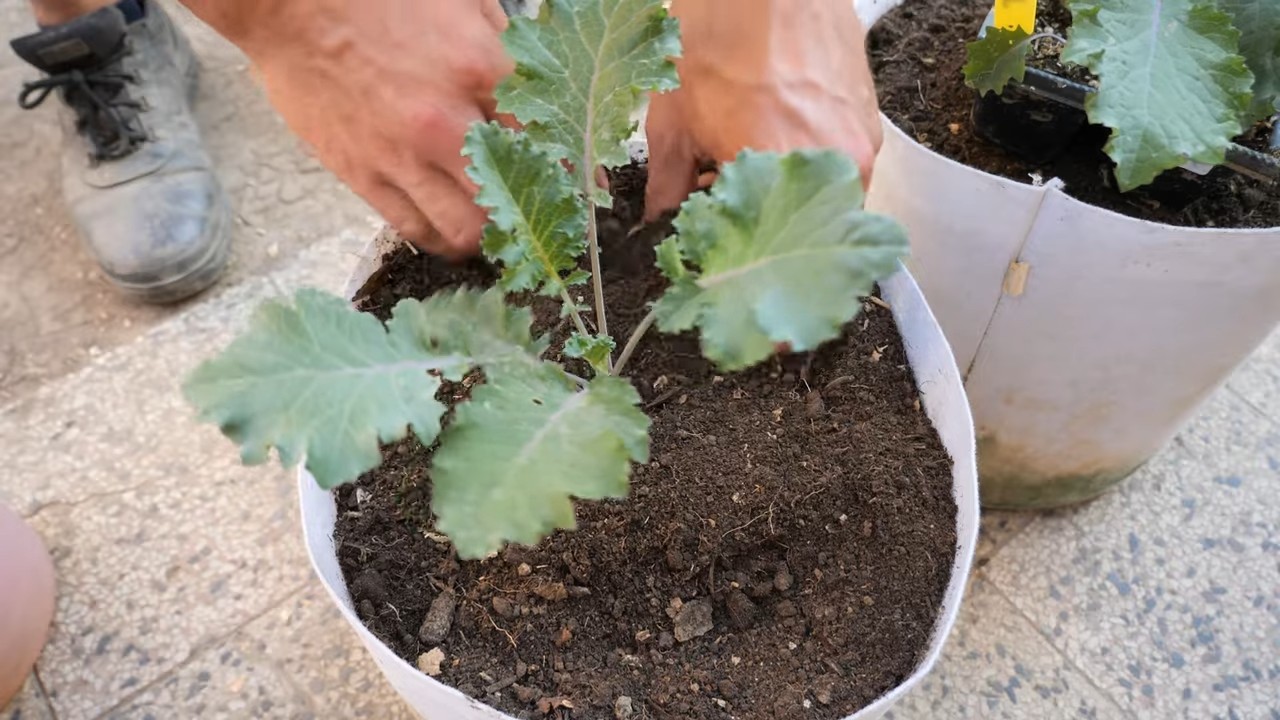
Can I grow kale in containers?
Yes, kale can be successfully grown in containers, making it a great option for gardeners with limited space. Choose a large container with good drainage holes and fill it with a high-quality potting mix. Select a compact kale variety, such as ‘Dwarf Blue Curled Vates,’ which is well-suited for container gardening. Place the container in a sunny location and water regularly, allowing the soil to dry slightly between waterings. Fertilize your container-grown kale plants every few weeks to provide them with the nutrients they need to thrive.
What do I do with kale stems?
Don’t throw away those kale stems! While they can be a bit tougher than the leaves, they are still packed with nutrients and can be used in a variety of ways. You can chop them finely and add them to soups, stews, or stir-fries. You can also blend them into smoothies or juice them. Another option is to pickle them for a tangy and flavorful snack. Before using kale stems, remove any tough outer layers and chop them into smaller pieces to make them easier to cook or eat.
How do I store harvested kale?
To store harvested kale, wash the leaves thoroughly and dry them completely. Wrap the dry leaves in a paper towel and place them in a plastic bag or container in the refrigerator. This will help keep the kale fresh and crisp for up to a week. Avoid storing kale near fruits that produce ethylene gas, such as apples and bananas, as this can cause the kale to yellow and wilt.
What if my kale leaves are bitter?
Kale can sometimes have a slightly bitter taste, especially in warmer weather. To reduce the bitterness, try massaging the leaves with olive oil and lemon juice before using them in salads. Cooking kale can also help mellow its flavor. Blanching the leaves in boiling water for a minute or two before cooking can further reduce bitterness. Choosing kale varieties that are known for their milder flavor, such as lacinato kale, can also help.
How can I extend the kale harvesting season?
To extend the kale harvesting season, consider planting kale in succession, sowing seeds every few weeks. This will ensure a continuous supply of fresh kale throughout the growing season. You can also protect your kale plants from frost by covering them with row covers or blankets. Kale is relatively cold-hardy and can often survive temperatures as low as 20°F (-7°C). In milder climates, kale can even be grown year-round.
Leave a Comment