
Growing Peanuts in Sacks: Sounds a little unconventional, right? But trust me, this DIY trick is a game-changer for peanut lovers, especially if you’re short on space or dealing with less-than-ideal soil. For centuries, peanuts have been a staple crop, not just for their delicious taste, but also for their nutritional value. Originating in South America, they’ve spread across the globe, becoming a beloved snack and ingredient in countless cuisines.
Now, you might be thinking, “Why sacks? Can’t I just plant them in the ground?” Well, you absolutely can! But growing peanuts in sacks offers several advantages. It’s perfect for urban gardeners with limited space, allowing you to enjoy fresh, homegrown peanuts even on a balcony or patio. Plus, it gives you greater control over the soil conditions, ensuring your peanuts get the nutrients they need to thrive.
I’ve found that many people struggle with growing peanuts because of poor soil drainage or pest problems. This method bypasses those common issues, making growing peanuts in sacks a simple and rewarding experience. Imagine the satisfaction of harvesting your own peanuts, roasted to perfection, knowing you grew them yourself! This article will guide you through each step, from choosing the right sack to harvesting your bounty. So, let’s get started and unlock the secrets to successful sack-grown peanuts!
Growing Peanuts in Sacks: A DIY Guide to Bountiful Harvests!
Hey there, fellow gardening enthusiasts! Ever thought about growing peanuts? It might sound a bit exotic, but trust me, it’s surprisingly easy and rewarding, especially when you grow them in sacks! This method is perfect if you have limited garden space or just want to try something a little different. I’ve been doing this for a few years now, and I’m excited to share my secrets to a successful peanut harvest with you.
Why Grow Peanuts in Sacks?
Before we dive into the nitty-gritty, let’s talk about why growing peanuts in sacks is such a great idea:
* Space-Saving: This is the biggest advantage! Sacks take up minimal space compared to traditional garden beds. Perfect for balconies, patios, or small yards.
* Easy to Move: Need to chase the sun? No problem! Sacks are easy to move around, allowing you to optimize sunlight exposure.
* Better Drainage: Sacks generally provide excellent drainage, which is crucial for peanut growth. Peanuts don’t like soggy feet!
* Weed Control: Sacks help minimize weed competition, making your life a whole lot easier.
* Fun and Educational: It’s a fantastic project for kids and adults alike. Watching the peanuts develop underground is truly fascinating!
What You’ll Need
Okay, let’s gather our supplies. Here’s what you’ll need to get started:
* Peanut Seeds (Raw, Unsalted): This is the most important ingredient! Make sure you get raw, unsalted peanuts from a reputable source. Roasted or salted peanuts won’t germinate. You can usually find these at health food stores or online.
* Large Sacks: Burlap sacks, heavy-duty plastic grow bags, or even old feed sacks will work. Aim for a size that’s at least 24 inches in diameter and 24 inches deep. The bigger, the better!
* Potting Mix: A well-draining potting mix is essential. I like to use a mix of compost, peat moss (or coco coir), and perlite. This provides the nutrients and drainage that peanuts crave.
* Water: You’ll need a reliable water source to keep your peanut plants hydrated.
* Optional:
* Fertilizer: A balanced fertilizer (like 10-10-10) can give your peanuts a boost.
* Lime: Peanuts prefer slightly acidic soil. If your soil is very acidic, adding a bit of lime can help.
* Mycorrhizae: These beneficial fungi can help your peanut plants absorb nutrients more efficiently.
Step-by-Step Instructions: Planting Your Peanuts
Alright, let’s get our hands dirty! Here’s how to plant your peanuts in sacks:
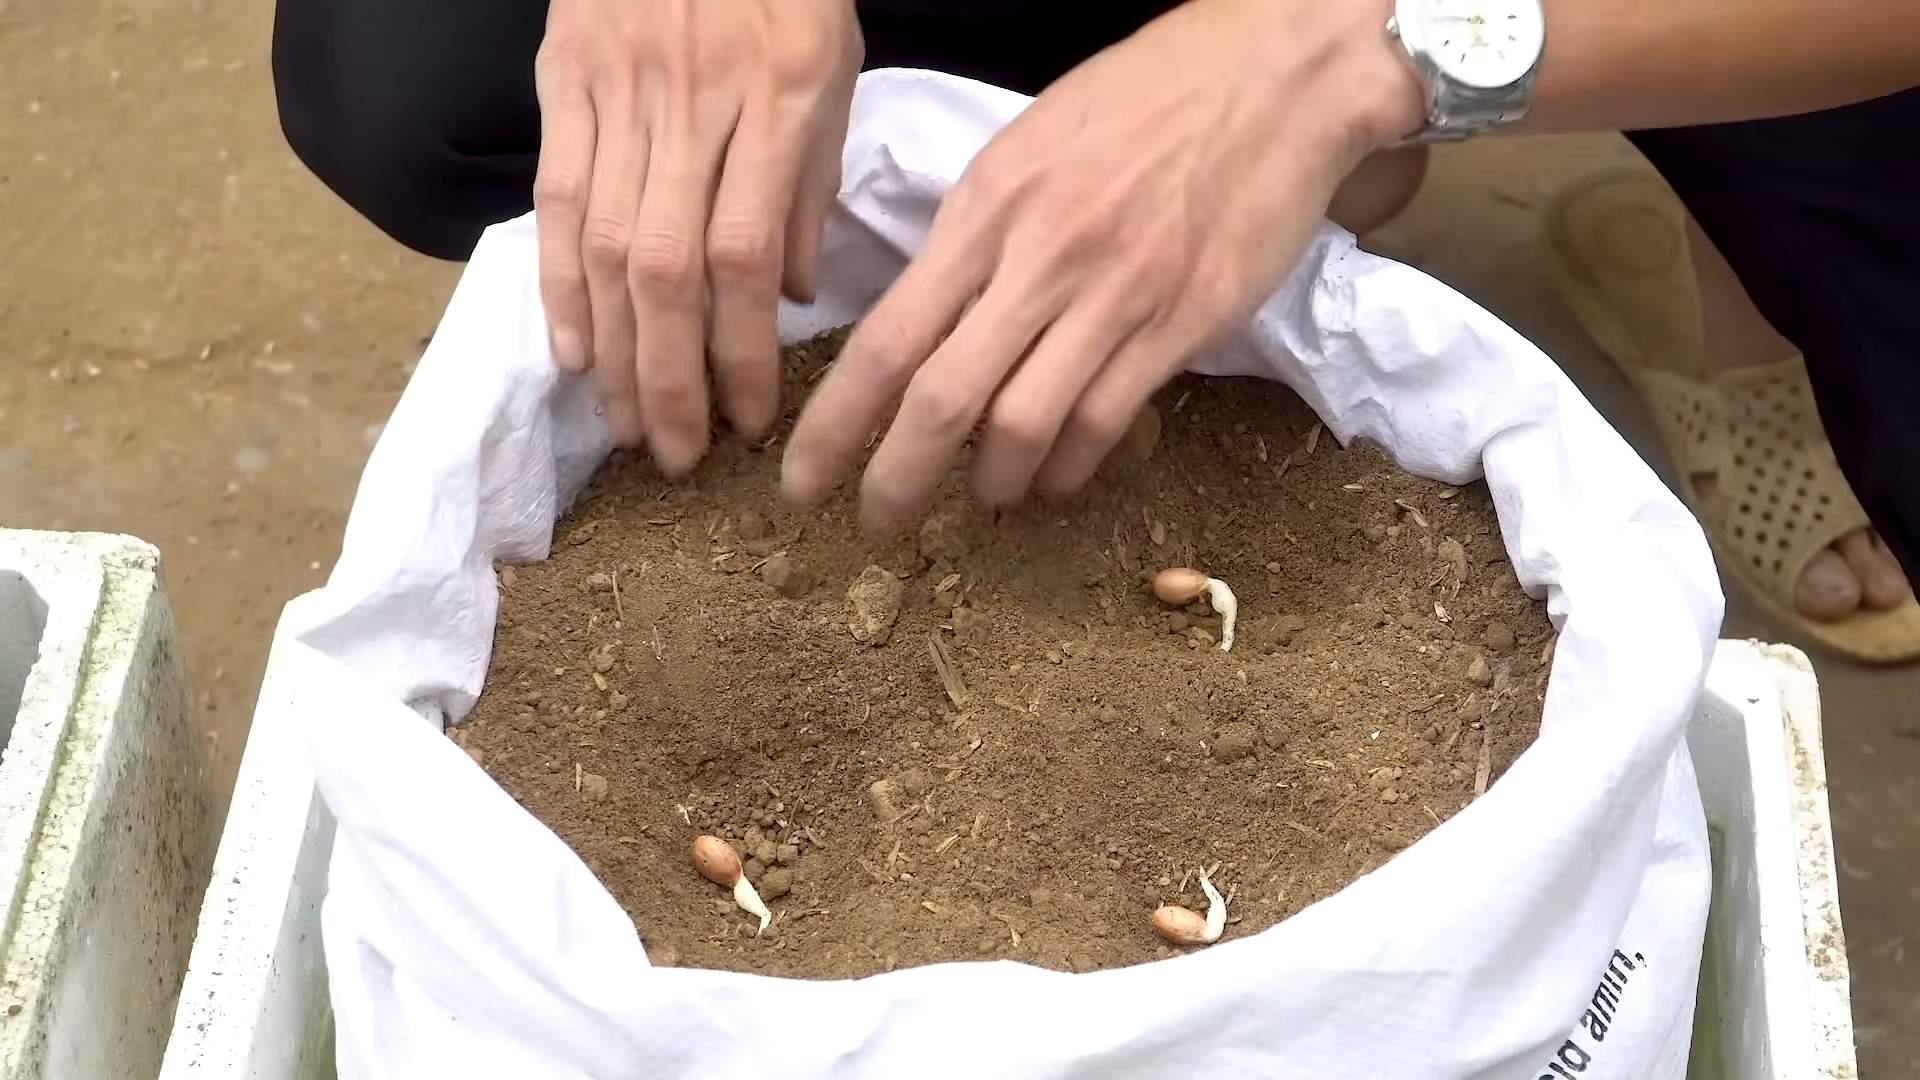
1. Soak the Peanuts: Before planting, soak your peanut seeds in water for 12-24 hours. This will help soften the shells and speed up germination. I usually put them in a bowl of water and leave them on the counter overnight.
2. Prepare the Sacks: If you’re using burlap sacks, you might want to line them with a plastic bag to prevent the soil from drying out too quickly. Just poke a few holes in the bottom of the bag for drainage. For plastic grow bags, make sure they have adequate drainage holes.
3. Fill the Sacks: Fill your sacks with the potting mix, leaving about 4-6 inches of space at the top. This will give you room to add more soil later as the plants grow.
4. Plant the Peanuts: Plant the peanut seeds about 1-2 inches deep and 6-8 inches apart. I usually plant 3-4 peanuts per sack to ensure at least one or two germinate.
5. Water Thoroughly: After planting, water the sacks thoroughly until the water drains out of the bottom. This will help settle the soil and get the peanuts off to a good start.
6. Choose a Sunny Location: Peanuts need at least 6-8 hours of sunlight per day, so choose a sunny spot for your sacks.
Caring for Your Peanut Plants
Now that your peanuts are planted, it’s time to provide them with the care they need to thrive.
1. Watering: Keep the soil consistently moist, but not soggy. Water deeply whenever the top inch of soil feels dry. During hot weather, you may need to water daily.
2. Fertilizing: About 4-6 weeks after planting, fertilize your peanut plants with a balanced fertilizer. Follow the instructions on the fertilizer package. I usually use a liquid fertilizer diluted to half strength.
3. Hilling: As your peanut plants grow, they will produce “pegs” that grow down from the plant into the soil. These pegs are what develop into peanuts. To encourage peanut production, you’ll need to “hill” the plants. This means adding more soil around the base of the plants to cover the pegs. I usually do this every few weeks as the plants grow.
4. Weed Control: Keep the sacks free of weeds. Hand-pull any weeds that pop up.
5. Pest Control: Peanuts are generally pest-resistant, but keep an eye out for aphids, spider mites, and other common garden pests. If you spot any pests, treat them with an appropriate insecticide or organic pest control method.
Harvesting Your Peanuts
The most exciting part! Here’s how to harvest your peanuts:
1. Timing: Peanuts typically take about 120-150 days to mature. You’ll know they’re ready to harvest when the leaves start to turn yellow and the plants begin to die back.
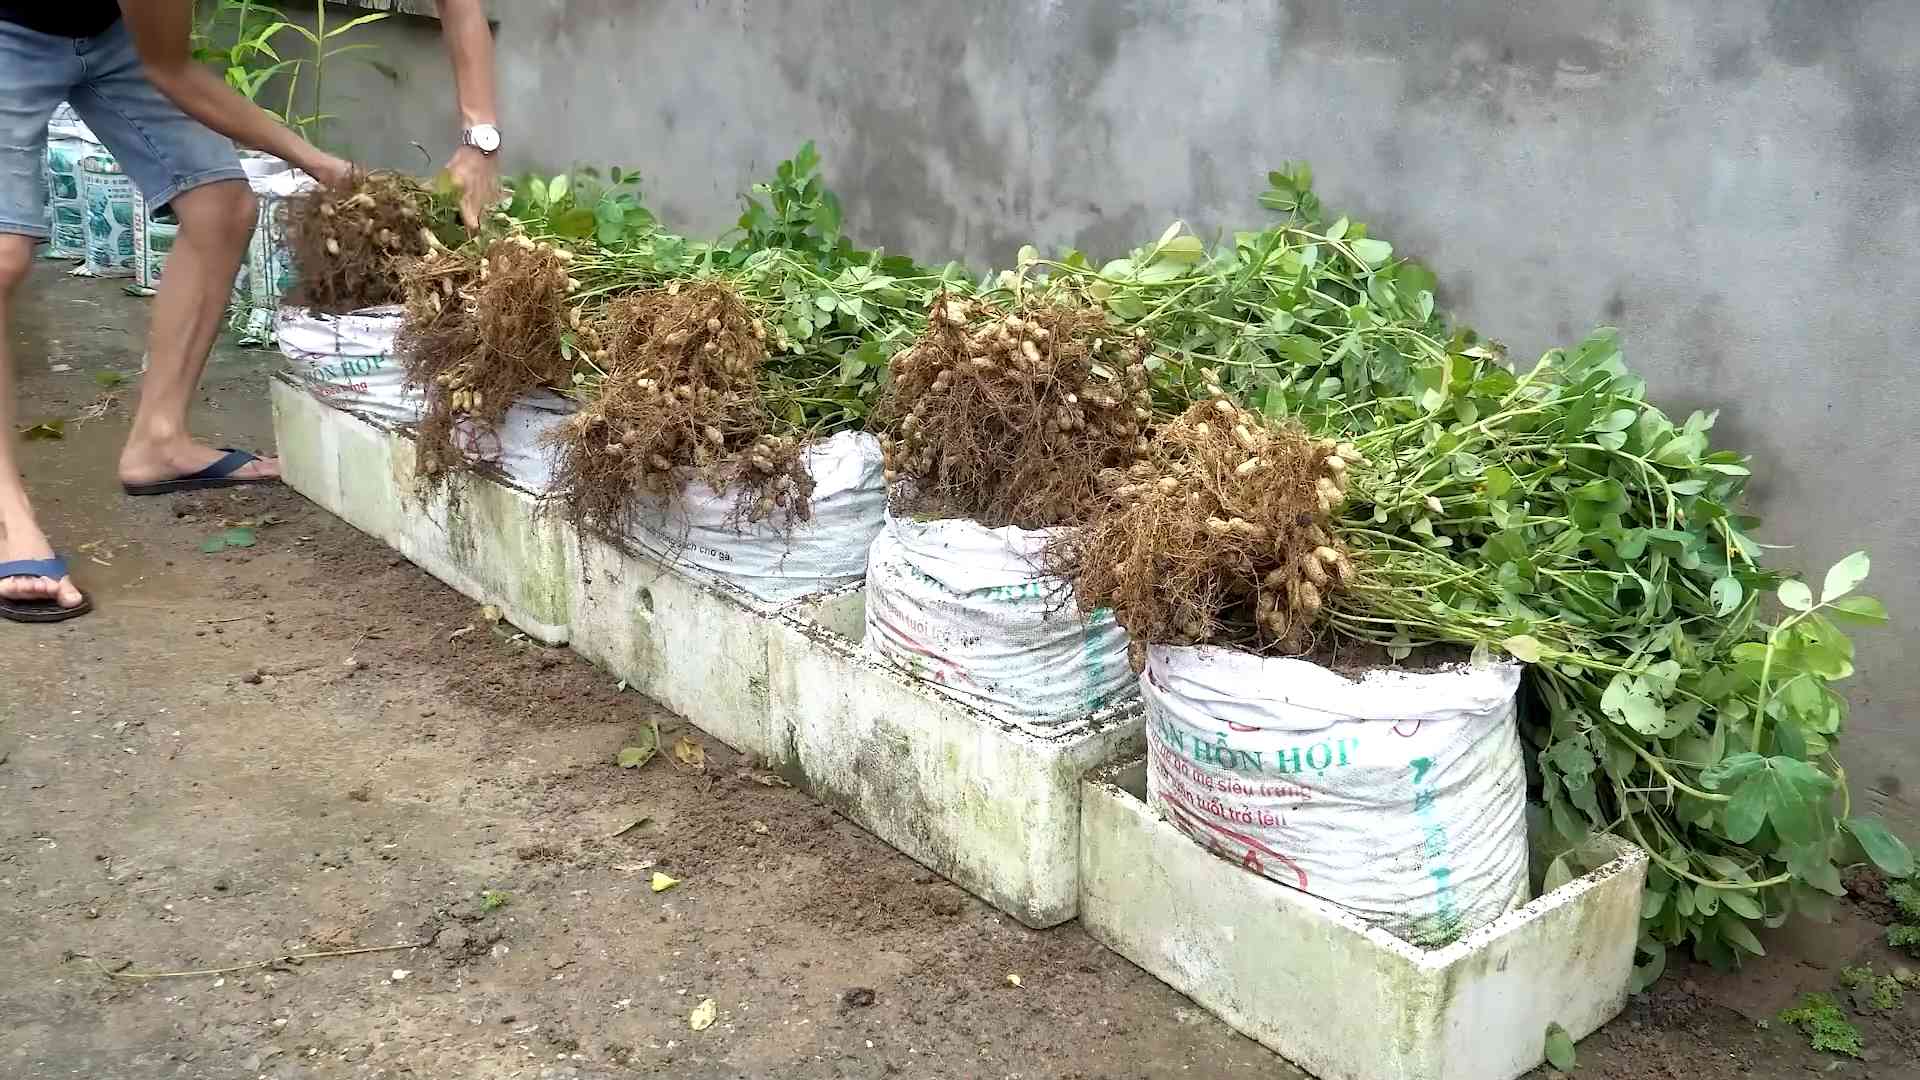
2. Digging: To harvest, simply tip the sack over and gently pull the entire plant out of the soil. Be careful not to break off any of the peanuts.
3. Cleaning: Shake off as much soil as possible from the peanuts.
4. Curing: The most important step! Cure the peanuts by hanging the entire plant upside down in a well-ventilated area for 2-4 weeks. This will allow the peanuts to dry properly and develop their flavor. I usually hang them in my garage.
5. Storage: Once the peanuts are cured, you can remove them from the plant and store them in a cool, dry place. They can be stored in their shells or shelled and stored in an airtight container.
Troubleshooting
Even with the best care, you might encounter a few challenges along the way. Here are some common problems and how to fix them:
* Poor Germination: If your peanut seeds don’t germinate, it could be due to several factors:
* Old Seeds: Make sure your seeds are fresh.
* Improper Planting Depth: Plant the seeds at the correct depth (1-2 inches).
* Cold Soil: Peanuts need warm soil to germinate. Wait until the soil temperature is consistently above 65掳F (18掳C).
* Overwatering: Soggy soil can rot the seeds.
* Yellowing Leaves: Yellowing leaves can indicate a nutrient deficiency. Try fertilizing with a balanced fertilizer.
* Lack of Peanuts: If your plants are growing well but not producing peanuts, it could be due to:
* Insufficient Sunlight: Make sure your plants are getting enough sunlight.
* Poor Soil: Peanuts need well-draining soil.
* Lack of Hilling: Make sure you’re hilling the plants regularly to encourage peanut production.
* Pests: Keep an eye out for pests and treat them promptly.
Tips for Success
Here are a few extra tips to help you grow the best peanuts possible:
* Choose the Right Variety: There are many different varieties of peanuts available. Choose one that is well-suited to your climate.
* Start Indoors: If you live in a cooler climate, you can start your peanut seeds indoors 4-6 weeks before the last frost.
* Use a Soil Thermometer: A soil thermometer can help you determine when the soil is warm enough to plant peanuts.
* Be Patient: Peanuts take a while to mature, so be patient and don’t give up!
Enjoy Your Homegrown Peanuts!
Growing peanuts in sacks is a fun and rewarding experience. With a little bit of care and attention, you can enjoy a bountiful harvest of homegrown peanuts. So, what are you waiting for? Get out there and start planting! I hope this guide helps you on your peanut-growing journey. Happy gardening!
Conclusion
So, there you have it! Growing peanuts in sacks is not just a quirky gardening experiment; it’s a genuinely rewarding and surprisingly efficient way to cultivate these delicious legumes, even if you’re short on space or dealing with less-than-ideal soil conditions. We’ve walked through the entire process, from selecting the right sack and preparing the soil mix to planting, watering, and eventually, the thrilling harvest.
Why is this DIY trick a must-try? Because it democratizes peanut cultivation! No sprawling fields are required. A sunny balcony, a patio, or even a well-lit corner of your garden can become your personal peanut patch. It’s also a fantastic educational experience, especially for children, allowing them to witness the fascinating underground development of peanuts firsthand. Plus, the taste of homegrown peanuts, freshly roasted and salted, is simply unparalleled. The flavor is richer, the texture is more satisfying, and the pride of having grown them yourself makes every bite even more enjoyable.
But the beauty of this method lies in its adaptability. Feel free to experiment with different sack sizes. Larger sacks will accommodate more plants and potentially yield a larger harvest, but remember they’ll also be heavier to move. You can also play around with the soil mix. While our recommended blend of compost, peat moss, and perlite works wonders, you could incorporate other organic materials like well-rotted manure or leaf mold to enrich the soil further.
Consider exploring different peanut varieties as well. While Virginia peanuts are a popular choice for their large size, Spanish peanuts are known for their sweeter flavor, and Valencia peanuts are prized for their multiple kernels per shell. Each variety offers a unique taste and texture profile, so don’t be afraid to branch out and discover your personal favorite.
Another exciting variation is to incorporate companion planting. Marigolds, for example, are known to deter nematodes, which can sometimes affect peanut plants. Basil is another excellent companion plant, as it repels certain pests and can even improve the flavor of the peanuts.
Don’t be intimidated by the prospect of growing your own peanuts. It’s a relatively low-maintenance project that yields a high return in terms of both enjoyment and delicious, homegrown snacks. The key is to provide your plants with plenty of sunlight, consistent moisture, and well-draining soil. And remember to be patient! Peanuts take time to mature, but the wait is well worth it.
We wholeheartedly encourage you to give this DIY peanut-growing trick a try. It’s a fun, educational, and ultimately rewarding experience that will connect you with nature and provide you with a bounty of delicious, homegrown peanuts. And most importantly, we want to hear about your experiences! Share your photos, tips, and stories with us in the comments section below. Let’s create a community of sack-grown peanut enthusiasts and learn from each other’s successes and challenges. What peanut variety did you choose? What kind of sack did you use? What challenges did you face, and how did you overcome them? Your insights could be invaluable to other aspiring peanut growers. So, get your sacks ready, grab some peanut seeds, and let’s get growing! Let’s see how many of you can achieve a bountiful harvest of delicious, homegrown peanuts using this simple and effective method. Happy gardening!
Frequently Asked Questions (FAQ)
What kind of sack is best for growing peanuts?
The ideal sack should be durable, breathable, and have good drainage. Burlap sacks are a classic choice, as they allow for excellent airflow and drainage. However, they can decompose over time, especially if exposed to moisture. Heavy-duty grow bags made from fabric are another excellent option. They are typically more durable than burlap and offer similar breathability. Avoid using plastic bags, as they can trap moisture and lead to root rot. The size of the sack will depend on how many plants you want to grow. A 10-gallon sack can typically accommodate 2-3 peanut plants.
How often should I water my peanut plants in sacks?
Watering frequency will depend on the weather conditions and the type of soil mix you’re using. Generally, you should water your peanut plants whenever the top inch of soil feels dry to the touch. During hot, dry weather, you may need to water them daily. Be careful not to overwater, as this can lead to root rot. Ensure that the sack has good drainage to prevent water from pooling at the bottom. A good way to check if your plants need water is to stick your finger into the soil about an inch deep. If it feels dry, it’s time to water.
What kind of fertilizer should I use for peanut plants in sacks?
Peanut plants are legumes, which means they can fix nitrogen from the air. Therefore, they don’t require a lot of nitrogen fertilizer. However, they do benefit from phosphorus and potassium. A fertilizer with a ratio of 5-10-10 or 6-12-12 is a good choice. Apply the fertilizer according to the package directions, typically every 4-6 weeks. You can also amend the soil with bone meal, which is a good source of phosphorus. Avoid over-fertilizing, as this can lead to excessive vegetative growth and reduced peanut production.
How much sunlight do peanut plants need?
Peanut plants need at least 6-8 hours of direct sunlight per day to thrive. Choose a location for your sacks that receives plenty of sunlight throughout the day. If you live in a particularly hot climate, you may need to provide some afternoon shade to prevent the plants from scorching. If you’re growing peanuts indoors, you’ll need to supplement with grow lights to provide adequate light.
How long does it take for peanuts to mature in sacks?
Peanuts typically take 120-150 days to mature, depending on the variety and the growing conditions. You’ll know they’re ready to harvest when the foliage starts to turn yellow and the pods feel plump and full. You can also dig up a few plants to check the maturity of the peanuts. The inside of the peanut shell should be dark and the kernels should be fully developed.
What pests and diseases affect peanut plants in sacks?
Common pests that can affect peanut plants include aphids, spider mites, and nematodes. Aphids and spider mites can be controlled with insecticidal soap or neem oil. Nematodes can be more challenging to manage, but incorporating organic matter into the soil and practicing crop rotation can help. Diseases that can affect peanut plants include leaf spot and root rot. Leaf spot can be treated with a fungicide. Root rot can be prevented by ensuring good drainage and avoiding overwatering.
Can I reuse the soil from my peanut sacks?
Yes, you can reuse the soil from your peanut sacks, but it’s important to amend it with fresh compost and other organic matter to replenish the nutrients. You should also sterilize the soil to kill any potential pests or diseases. You can sterilize the soil by baking it in the oven at 180 degrees Fahrenheit for 30 minutes or by solarizing it in a black plastic bag for several weeks.
What do I do with the peanut plants after harvesting the peanuts?
After harvesting the peanuts, you can compost the peanut plants. They are a good source of nitrogen and other nutrients. You can also use the peanut plants as mulch around other plants.
Can I grow peanuts in sacks indoors?
Yes, you can grow peanuts in sacks indoors, but you’ll need to provide them with adequate light and ventilation. Use grow lights to supplement natural sunlight and ensure that the plants receive at least 6-8 hours of light per day. You’ll also need to provide good air circulation to prevent fungal diseases.
How do I cure and store my homegrown peanuts?
After harvesting your peanuts, you’ll need to cure them to reduce the moisture content and prevent them from spoiling. Spread the peanuts out in a single layer on a screen or tray and allow them to air dry for several weeks. Once the peanuts are fully cured, you can store them in an airtight container in a cool, dry place. They can also be frozen for longer storage.

Leave a Comment