
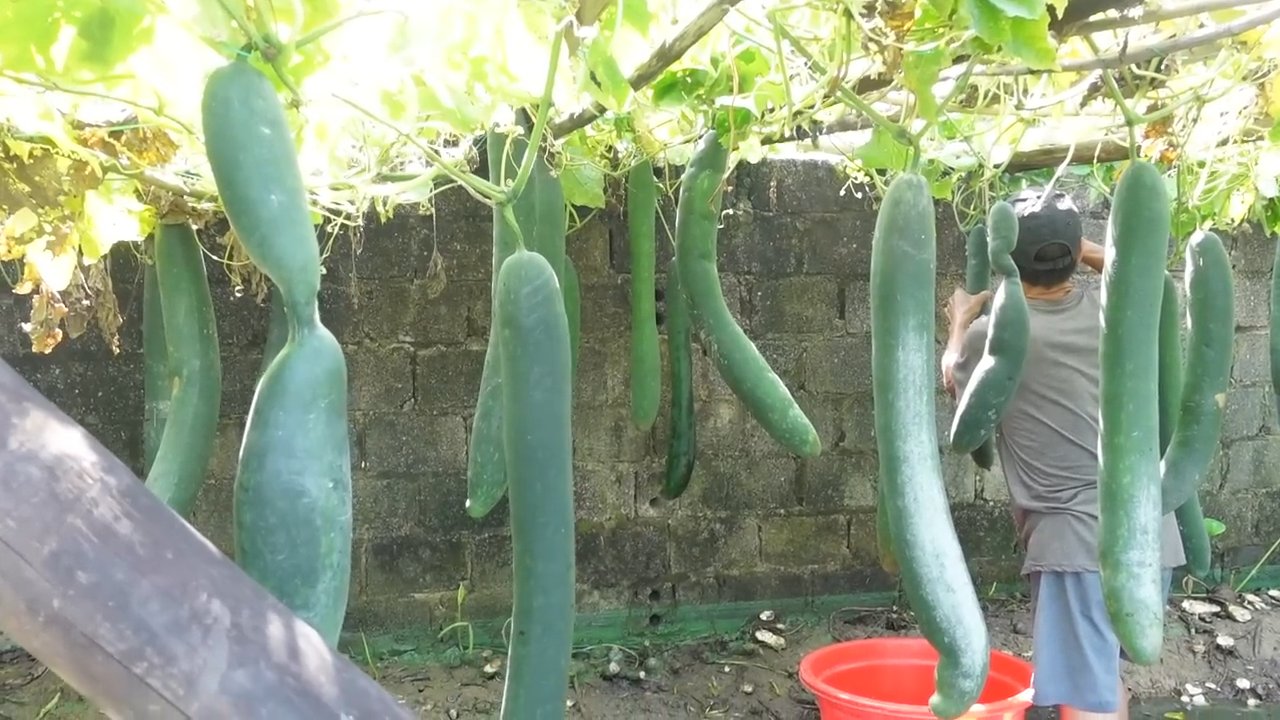
Growing long squash at home can seem like a Herculean task, right? I get it! You envision those impressive, elongated gourds gracing your garden, but the reality often falls short. Maybe you’re ending up with stubby, misshapen squash, or perhaps the vines are thriving, but the fruit just isn’t reaching its full potential. Well, fear not, fellow gardening enthusiast! This isn’t just another article; it’s your secret weapon to unlocking the secrets of cultivating truly magnificent, elongated squash.
Squash, in its many forms, has a rich history, dating back thousands of years in the Americas. Indigenous cultures revered squash not only as a vital food source but also for its medicinal properties and even its use in crafting tools and containers. Think about that connection to the earth as you embark on this journey!
But why bother with the extra effort of learning these tricks? Because growing long squash at home isn’t just about bragging rights (though, let’s be honest, that’s a fun perk!). It’s about maximizing your garden’s yield, enjoying the freshest, most flavorful produce possible, and connecting with the age-old tradition of cultivating your own food. Plus, imagine the delicious meals you can create with your bountiful harvest! I’m going to share some simple yet effective DIY tricks and hacks that will transform your squash-growing game. Get ready to impress your neighbors and enjoy a truly rewarding gardening experience!
Lange Kürbisse selbst ziehen: Ein umfassender DIY-Leitfaden
Hallo liebe Gartenfreunde! Habt ihr euch jemals gefragt, wie man diese beeindruckend langen Kürbisse züchtet, die man manchmal auf Märkten sieht? Ich habe es ausprobiert und es ist gar nicht so schwer, wie man denkt! Mit ein wenig Planung, Geduld und den richtigen Techniken könnt auch ihr eure eigenen XXL-Kürbisse ernten. In diesem Artikel zeige ich euch Schritt für Schritt, wie es geht.
Was du brauchst:
* Kürbissamen: Wählt eine Sorte, die für ihre Länge bekannt ist, z.B. “Tromboncino” (Zucchino Tromba d’Albenga), “Snake Gourd” (Schlangenkürbis) oder spezielle Langkürbis-Züchtungen.
* Anzuchttöpfe: Kleine Töpfe oder Anzuchtschalen für die Voranzucht.
* Anzuchterde: Spezielle Erde für die Anzucht von Jungpflanzen.
* Gartenerde: Hochwertige Gartenerde für das Beet oder den Kübel.
* Kompost oder organischer Dünger: Zur Verbesserung der Bodenqualität.
* Pflanzstäbe oder Rankgitter: Um den Kürbis beim Wachsen zu unterstützen.
* Gießkanne oder Gartenschlauch: Zum Bewässern der Pflanzen.
* Mulchmaterial: Stroh, Holzhackschnitzel oder Rasenschnitt, um den Boden feucht zu halten und Unkraut zu unterdrücken.
* Scharfe Schere oder Messer: Zum Beschneiden der Pflanze.
* Geduld: Lange Kürbisse brauchen Zeit zum Wachsen!
Die Vorbereitung: Der Grundstein für lange Kürbisse
Bevor wir loslegen, ist eine gute Vorbereitung das A und O. Hier sind die wichtigsten Schritte:
1. Samen auswählen: Wie bereits erwähnt, ist die Wahl der richtigen Sorte entscheidend. Informiert euch über verschiedene Langkürbis-Sorten und wählt diejenige aus, die am besten zu eurem Klima und euren Vorlieben passt. Ich persönlich habe gute Erfahrungen mit dem Tromboncino gemacht, da er nicht nur lang, sondern auch sehr schmackhaft ist.
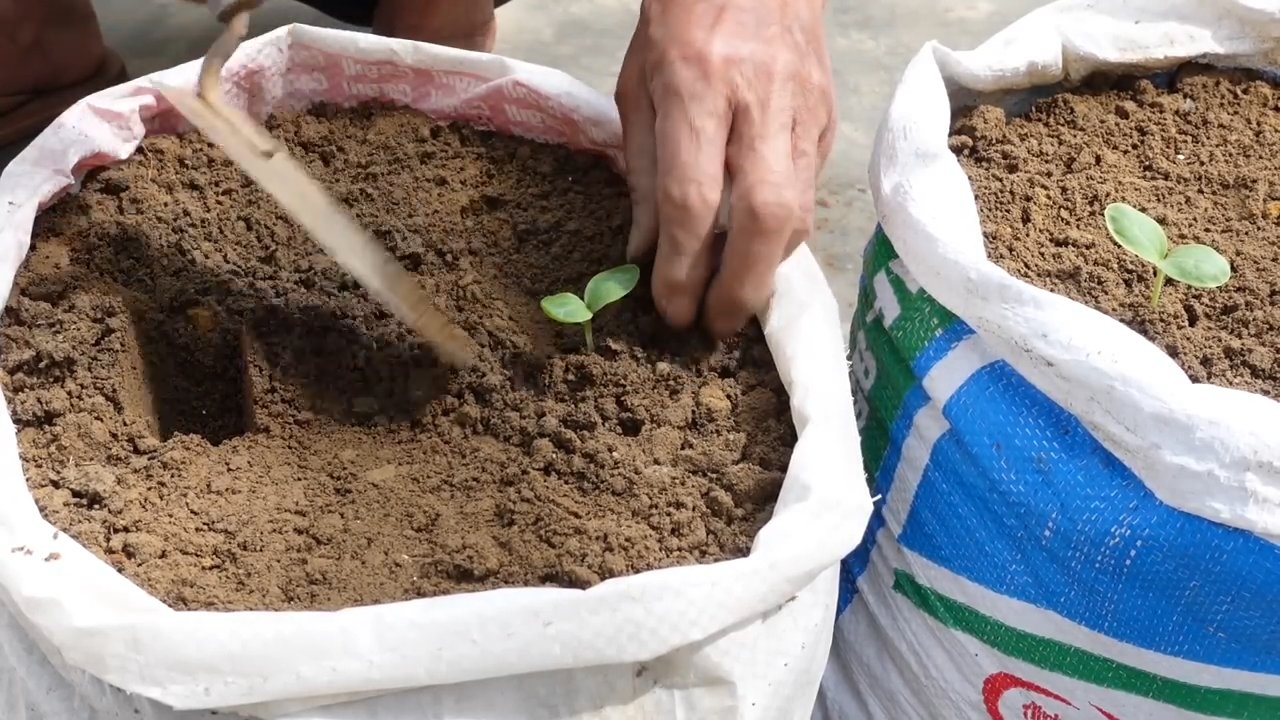
2. Anzucht vorbereiten: Füllt eure Anzuchttöpfe mit Anzuchterde. Diese ist nährstoffarm und locker, was den jungen Wurzeln hilft, sich gut zu entwickeln.
3. Aussaat: Legt in jeden Topf ein bis zwei Samen, etwa 2-3 cm tief. Bedeckt die Samen leicht mit Erde und gießt sie vorsichtig an.
4. Standort: Stellt die Anzuchttöpfe an einen warmen und hellen Ort. Eine Fensterbank oder ein Gewächshaus sind ideal. Die Keimung dauert in der Regel 7-14 Tage.
5. Pflege der Jungpflanzen: Haltet die Erde feucht, aber nicht nass. Sobald die Jungpflanzen zwei bis drei echte Blätter haben, könnt ihr sie pikieren, falls ihr mehrere Samen pro Topf gesät habt. Das bedeutet, ihr setzt die stärkste Pflanze in einen größeren Topf um.
Das Auspflanzen: Der Umzug ins Freie
Sobald die Jungpflanzen kräftig genug sind und keine Frostgefahr mehr besteht (in der Regel Mitte Mai), können sie ins Freie umziehen.
1. Standortwahl: Kürbisse sind Sonnenanbeter! Wählt einen sonnigen Standort mit mindestens 6 Stunden direkter Sonneneinstrahlung pro Tag. Der Boden sollte locker, humusreich und gut durchlässig sein.
2. Boden vorbereiten: Lockert den Boden gründlich auf und mischt reichlich Kompost oder organischen Dünger unter. Kürbisse sind Starkzehrer und benötigen viele Nährstoffe.
3. Pflanzabstand: Gebt den Pflanzen ausreichend Platz zum Wachsen. Ein Abstand von mindestens 1 Meter zwischen den Pflanzen ist empfehlenswert. Bei sehr langen Sorten kann auch mehr Platz nötig sein.
4. Auspflanzen: Grabt ein Loch, das etwas größer ist als der Wurzelballen der Jungpflanze. Setzt die Pflanze vorsichtig ein und füllt das Loch mit Erde auf. Drückt die Erde leicht an und gießt die Pflanze gründlich.
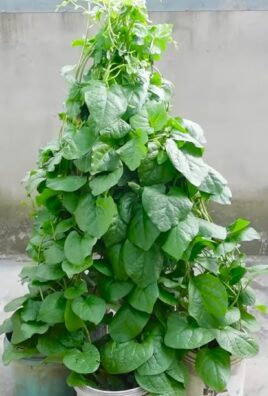
5. Rankhilfe installieren: Lange Kürbisse brauchen eine Rankhilfe, um sich daran festzuhalten und in die Höhe zu wachsen. Pflanzstäbe, Rankgitter oder sogar ein stabiles Gerüst sind geeignet. Achtet darauf, dass die Rankhilfe stabil genug ist, um das Gewicht der wachsenden Kürbisse zu tragen.
Die Pflege: Gießen, Düngen und Beschneiden
Die richtige Pflege ist entscheidend für den Erfolg. Hier sind die wichtigsten Punkte:
1. Gießen: Kürbisse haben einen hohen Wasserbedarf, besonders während der Blütezeit und Fruchtbildung. Gießt regelmäßig und gründlich, am besten am Morgen, damit die Blätter über den Tag abtrocknen können. Vermeidet Staunässe, da dies zu Wurzelfäule führen kann.
2. Düngen: Düngt die Kürbispflanzen regelmäßig mit einem organischen Dünger oder einem speziellen Kürbisdünger. Beginnt etwa zwei Wochen nach dem Auspflanzen und wiederholt die Düngung alle zwei bis drei Wochen.
3. Mulchen: Bringt eine Schicht Mulchmaterial um die Pflanzen herum auf. Dies hilft, den Boden feucht zu halten, Unkraut zu unterdrücken und die Bodentemperatur zu regulieren.
4. Beschneiden: Das Beschneiden der Kürbispflanze kann helfen, das Wachstum zu fördern und die Fruchtbildung zu verbessern. Entfernt regelmäßig Seitentriebe, die keine Blüten oder Früchte tragen. Achtet darauf, die Haupttriebe nicht zu beschneiden, da diese für das Längenwachstum verantwortlich sind.
5. Bestäubung: Kürbisse haben männliche und weibliche Blüten. Die weiblichen Blüten erkennt man an dem kleinen Fruchtansatz direkt unter der Blüte. Wenn die Bestäubung nicht von selbst erfolgt (z.B. durch Bienen), könnt ihr sie von Hand vornehmen. Nehmt dazu den Blütenstaub einer männlichen Blüte und tupft ihn auf die Narbe einer weiblichen Blüte.
Spezielle Techniken für extra lange Kürbisse
Wenn ihr wirklich lange Kürbisse züchten wollt, gibt es ein paar spezielle Techniken, die ihr anwenden könnt:
* Fruchtselektion: Lasst nur wenige Früchte pro Pflanze wachsen. Je weniger Früchte die Pflanze versorgen muss, desto mehr Energie kann sie in das Wachstum der verbleibenden Früchte stecken.
* Gewichtsentlastung: Bei sehr langen und schweren Kürbissen kann es sinnvoll sein, sie mit einem Tuch oder einer Schlinge zu stützen, um zu verhindern, dass sie abbrechen.
* Regelmäßige Kontrolle: Kontrolliert die Kürbisse regelmäßig auf Schädlinge und Krankheiten. Je früher ihr Probleme erkennt, desto besser könnt ihr sie bekämpfen.
Die Ernte: Der Lohn der Mühe
Die Erntezeit hängt von der jeweiligen Sorte ab. In der Regel sind Kürbisse erntereif, wenn die Schale hart ist und der Stiel trocken und verholzt ist. Schneidet den Kürbis vorsichtig mit einem scharfen Messer oder einer Schere ab, wobei ihr einen Teil des Stiels an der Frucht lasst.
Wichtig: Behandelt die Kürbisse vorsichtig, um Beschädigungen zu vermeiden. Beschädigte Kürbisse sind anfälliger für Fäulnis.
Lagerung: Damit die Freude lange währt
Lagert die geernteten Kürbisse an einem kühlen, trockenen und gut belüfteten Ort. Ideal ist ein Keller oder eine Speisekammer. Unter optimalen Bedingungen können sich Kürbisse mehrere Monate halten.
Ich hoffe, dieser Leitfaden hat euch geholfen und inspiriert, eure eigenen langen Kürbisse zu züchten. Es ist ein lohnendes Projekt, das viel Freude bereitet und mit einer beeindruckenden Ernte belohnt wird. Viel Erfolg und viel Spaß beim Gärtnern!
Conclusion
So, there you have it! Growing long squash at home, while it might seem daunting at first, is an incredibly rewarding experience. It’s not just about the impressive size of the final product; it’s about the satisfaction of nurturing something from seed to table, knowing exactly what went into its growth. You’re bypassing the grocery store, reducing your carbon footprint, and enjoying a fresher, more flavorful vegetable than you could likely find anywhere else.
But why is this DIY trick a must-try? Because it empowers you to take control of your food source. You’re not reliant on commercial growers or transportation networks. You’re creating a sustainable, delicious, and visually stunning addition to your garden and your plate. Imagine the conversations sparked by a long squash gracing your dinner table!
Beyond the basic techniques we’ve discussed, there’s plenty of room for experimentation. Consider different varieties of long squash. Tromboncino squash, for example, offers a unique flavor profile and a slightly curved shape. Or, try training your squash vines up a sturdy trellis to maximize space and improve air circulation, which can help prevent diseases. You could even experiment with companion planting, incorporating herbs like basil or marigolds to deter pests naturally.
Don’t be afraid to get your hands dirty and embrace the learning process. Every garden is different, and what works for one person might not work for another. The key is to observe your plants, adapt your techniques, and enjoy the journey.
We wholeheartedly encourage you to give this DIY trick a try. Start small, perhaps with just one or two plants, and see how it goes. The rewards are well worth the effort. And most importantly, we want to hear about your experiences! Share your photos, tips, and challenges in the comments below. Let’s build a community of long squash enthusiasts and learn from each other. Your insights could be invaluable to someone just starting out. So, grab your seeds, prepare your soil, and get ready to grow some seriously impressive long squash! You’ll be amazed at what you can achieve with a little patience, dedication, and the right knowledge.
Frequently Asked Questions (FAQ)
What is the best time to start growing long squash?
The ideal time to start growing long squash depends on your climate. Generally, you should start seeds indoors about 4-6 weeks before the last expected frost. If you live in a warmer climate with a longer growing season, you can direct sow the seeds into the ground after the danger of frost has passed. Check your local planting calendar for specific dates. Remember that long squash needs a long growing season, so starting early is generally better.
How much space does a long squash plant need?
Long squash plants are vigorous growers and require a significant amount of space. Each plant needs at least 6-8 feet of space in all directions. If you’re growing them in rows, space the rows about 8-10 feet apart. Consider using a trellis to train the vines vertically, which can save space and improve air circulation. However, even with a trellis, ensure the area is large enough to support the plant’s overall growth.
What kind of soil is best for growing long squash?
Long squash thrives in well-drained, fertile soil that is rich in organic matter. Before planting, amend the soil with compost, aged manure, or other organic amendments to improve its structure and nutrient content. The soil should have a slightly acidic to neutral pH, ideally between 6.0 and 7.0. A soil test can help you determine the pH and nutrient levels of your soil and make necessary adjustments.
How often should I water my long squash plants?
Long squash plants need consistent moisture, especially during hot, dry weather. Water deeply and regularly, aiming to keep the soil consistently moist but not waterlogged. Water at the base of the plants to avoid wetting the foliage, which can increase the risk of fungal diseases. Mulching around the plants can help retain moisture and suppress weeds. As a general rule, water deeply 2-3 times per week, but adjust the frequency based on weather conditions and soil moisture levels.
What are some common pests and diseases that affect long squash?
Long squash plants can be susceptible to various pests and diseases, including squash bugs, squash vine borers, aphids, powdery mildew, and squash mosaic virus. Regularly inspect your plants for signs of pests or diseases. Use organic pest control methods, such as insecticidal soap or neem oil, to control pests. Ensure good air circulation around the plants to prevent fungal diseases. Remove any infected leaves or plants promptly to prevent the spread of disease. Crop rotation can also help reduce the risk of soilborne diseases.
How do I know when my long squash is ready to harvest?
The time it takes for long squash to mature depends on the variety and growing conditions. Generally, long squash is ready to harvest when the skin is firm and the color is deep and even. The stem should be dry and hard. Use a sharp knife or pruning shears to cut the squash from the vine, leaving a few inches of stem attached. Handle the squash carefully to avoid bruising or damaging the skin.
Can I eat the seeds of long squash?
Yes, you can eat the seeds of long squash. Scoop out the seeds from the squash and rinse them thoroughly. Spread them out on a baking sheet and roast them in the oven at 300°F (150°C) for about 15-20 minutes, or until they are golden brown and crispy. Season them with salt, pepper, or other spices to taste. Roasted squash seeds make a delicious and nutritious snack.
How do I store long squash after harvesting?
Long squash can be stored for several months if properly cured and stored. To cure the squash, leave it in a warm, dry place for about 1-2 weeks. This allows the skin to harden and helps prevent rot. After curing, store the squash in a cool, dry, and well-ventilated place, such as a basement or root cellar. Avoid storing squash in a refrigerator, as this can cause it to spoil more quickly. Check the squash regularly for signs of spoilage, such as soft spots or mold.
What are some creative ways to use long squash in cooking?
Long squash is a versatile vegetable that can be used in a variety of dishes. It can be roasted, grilled, sautéed, or used in soups, stews, and casseroles. It can also be used to make squash bread, muffins, and pies. The long shape of the squash makes it ideal for slicing into long ribbons or noodles, which can be used as a low-carb alternative to pasta. Get creative and experiment with different recipes to find your favorite ways to use long squash.
Can I grow long squash in containers?
While it’s possible to grow long squash in containers, it’s not ideal due to the plant’s large size and extensive root system. If you do choose to grow long squash in containers, use a very large container (at least 20 gallons) and fill it with a high-quality potting mix. Provide the plants with plenty of sunlight, water, and fertilizer. You may also need to provide support for the vines, such as a trellis or stake. Be aware that container-grown long squash may not produce as much fruit as plants grown in the ground.
Leave a Comment