
Growing Malabar Spinach can seem intimidating, but trust me, it’s easier than you think! Have you ever dreamed of stepping into your backyard and harvesting vibrant, leafy greens for a delicious and nutritious meal? Well, with a few simple tricks and a little DIY spirit, that dream can become a reality. For centuries, Malabar Spinach, also known as Basella alba, has been a staple in Asian and African cuisines, prized for its mild flavor and impressive nutritional profile. It’s not just a tasty addition to your diet; it’s also packed with vitamins and minerals that can boost your overall health.
But why should *you* bother with growing your own Malabar Spinach? In today’s world, we’re increasingly aware of the importance of fresh, locally sourced food. Plus, let’s be honest, store-bought greens can sometimes be a bit… lackluster. Growing Malabar Spinach at home allows you to control exactly what goes into your food, ensuring it’s free from harmful pesticides and bursting with flavor. This DIY guide will provide you with all the insider tips and tricks you need to successfully cultivate this amazing plant, even if you’re a complete beginner. Get ready to transform your garden and your plate with this rewarding and easy-to-follow guide!
Growing Malabar Spinach: A Beginner’s Guide to This Climbing Green
Hey there, fellow gardening enthusiasts! Today, I’m super excited to share my experience with growing Malabar spinach ( *Basella alba* ), a fantastic and often overlooked leafy green. It’s not a true spinach, but it tastes similar and thrives in hot weather, making it perfect for those of us who struggle to keep regular spinach alive during the summer months. Plus, it’s a beautiful climbing vine, adding a touch of elegance to your garden. Let’s dive in!
What You’ll Need
Before we get started, let’s gather our supplies. Here’s what you’ll need to successfully grow Malabar spinach:
* **Malabar Spinach Seeds or Cuttings:** You can find seeds online or at some nurseries. Cuttings are another great option if you know someone who already grows it.
* **Potting Mix (if starting indoors) or Garden Soil:** A well-draining potting mix is essential for starting seeds indoors. For planting directly in the garden, amend your soil with compost.
* **Pots or Seed Trays (for starting indoors):** Choose pots that are at least 4 inches in diameter.
* **Trellis or Support Structure:** Malabar spinach is a vine, so it needs something to climb on. A trellis, fence, or even a sturdy tomato cage will work.
* **Watering Can or Hose:** Consistent watering is key, especially during hot weather.
* **Compost or Organic Fertilizer:** To give your plants a boost.
* **Gardening Gloves:** To keep your hands clean and protected.
* **Optional: Heat Mat (for faster germination):** Malabar spinach seeds can be slow to germinate, so a heat mat can help speed things up.
Starting Malabar Spinach from Seed
Malabar spinach can be a bit slow to germinate, so I usually start my seeds indoors a few weeks before the last expected frost. Here’s how I do it:
1. **Scarify the Seeds (Optional but Recommended):** Malabar spinach seeds have a hard outer shell, which can make germination difficult. To help them sprout faster, you can scarify them. This involves gently scratching or nicking the seed coat. I usually use a nail file or sandpaper to lightly scratch the surface of each seed. Be careful not to damage the inside of the seed!
2. **Soak the Seeds:** After scarifying (or even if you skip that step), soak the seeds in warm water for 12-24 hours. This helps to soften the seed coat and further encourages germination.
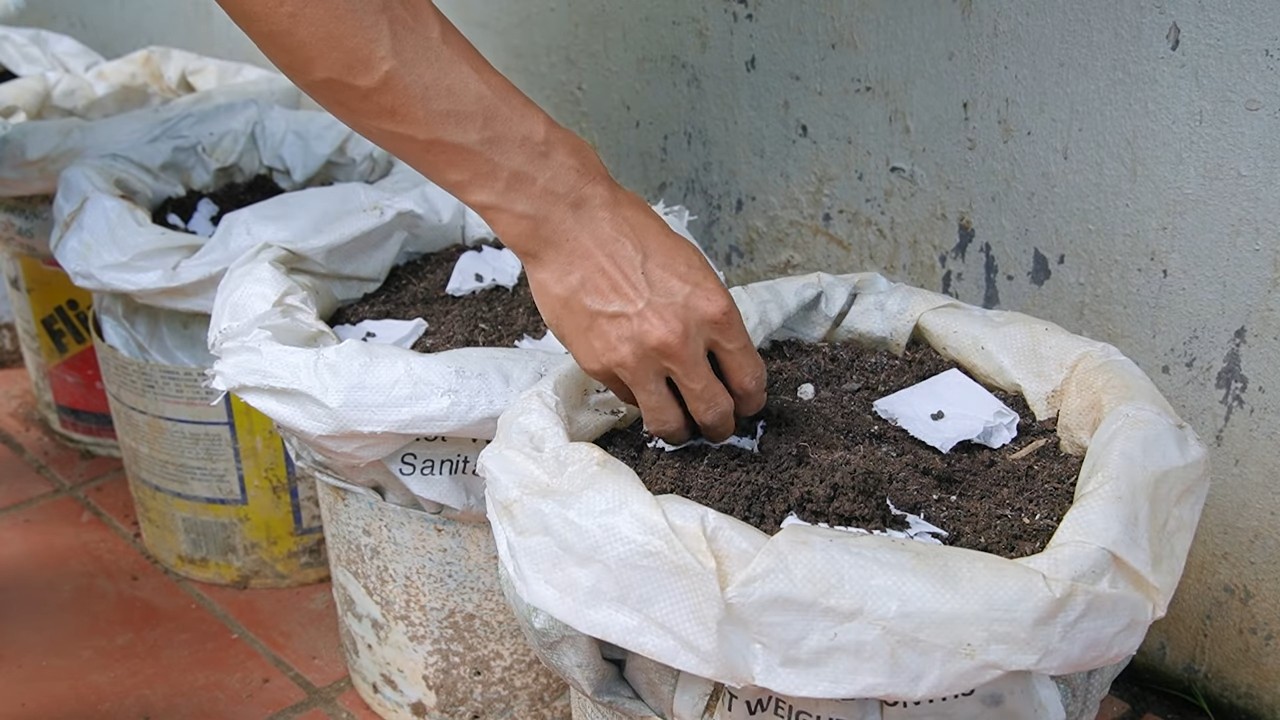
3. **Prepare Your Seed Starting Trays or Pots:** Fill your seed starting trays or pots with a well-draining potting mix. Moisten the soil thoroughly.
4. **Sow the Seeds:** Plant the seeds about ½ inch deep in the soil. I usually plant 2-3 seeds per pot or cell, just in case some don’t germinate.
5. **Provide Warmth and Moisture:** Malabar spinach seeds need warmth to germinate. If you have a heat mat, place your seed trays on it. Otherwise, find a warm spot in your house, like on top of the refrigerator. Keep the soil consistently moist, but not soggy. You can cover the trays with a plastic dome or plastic wrap to help retain moisture.
6. **Wait Patiently:** Germination can take anywhere from 1-3 weeks, so be patient! Once the seedlings emerge, remove the plastic cover and move them to a sunny location.
Starting Malabar Spinach from Cuttings
If you have access to a mature Malabar spinach plant, starting from cuttings is a quick and easy way to propagate new plants. Here’s how:
1. **Take Cuttings:** Choose healthy stems that are about 4-6 inches long. Cut them just below a node (the point where leaves grow from the stem).
2. **Remove Lower Leaves:** Remove the leaves from the bottom 2 inches of the cutting. This will prevent them from rotting when you put the cutting in water.
3. **Root the Cuttings in Water:** Place the cuttings in a glass or jar of water, making sure that the nodes are submerged. Change the water every few days to keep it fresh.
4. **Wait for Roots to Develop:** In a week or two, you should start to see roots growing from the nodes. Once the roots are about an inch long, the cuttings are ready to be planted.
Transplanting Seedlings or Cuttings
Once your seedlings have a few sets of true leaves (the leaves that look like miniature versions of the adult leaves) or your cuttings have developed roots, it’s time to transplant them into their permanent home in the garden.
1. **Choose a Sunny Location:** Malabar spinach needs at least 6 hours of sunlight per day to thrive.
2. **Prepare the Soil:** Amend your garden soil with compost or other organic matter to improve drainage and fertility. Malabar spinach prefers slightly acidic soil with a pH of 6.0 to 6.5.
3. **Dig a Hole:** Dig a hole that is slightly larger than the root ball of your seedling or cutting.
4. **Gently Remove the Seedling or Cutting:** Carefully remove the seedling or cutting from its pot or water. If the roots are tightly bound, gently loosen them with your fingers.
5. **Plant the Seedling or Cutting:** Place the seedling or cutting in the hole and backfill with soil. Gently firm the soil around the base of the plant.
6. **Water Thoroughly:** Water the newly transplanted seedling or cutting thoroughly.
7. **Provide Support:** Install a trellis, fence, or other support structure for the Malabar spinach to climb on.
Caring for Your Malabar Spinach
Once your Malabar spinach is planted, it’s relatively easy to care for. Here are a few tips:
* **Water Regularly:** Malabar spinach needs consistent moisture, especially during hot weather. Water deeply whenever the top inch of soil feels dry.
* **Fertilize Occasionally:** Feed your Malabar spinach with compost or organic fertilizer every few weeks to encourage growth.
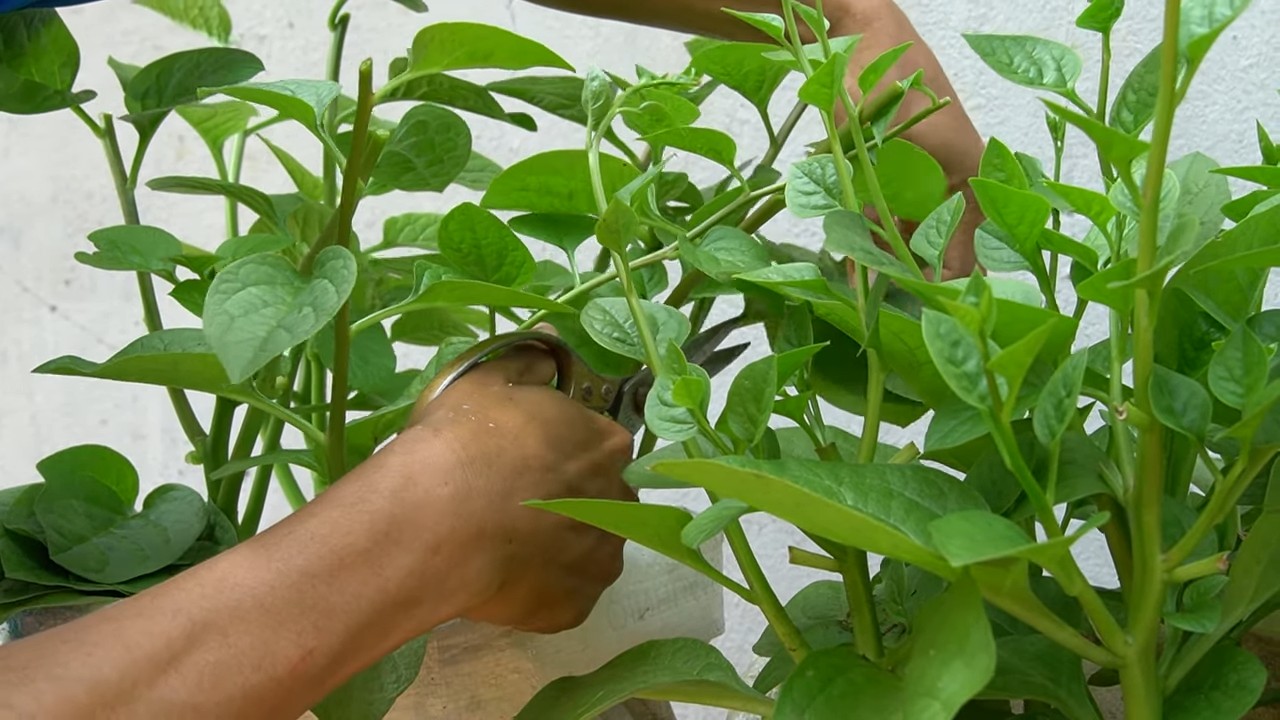
* **Pinch Back the Tips:** Pinching back the tips of the vines will encourage branching and bushier growth. This will also increase your harvest.
* **Control Pests and Diseases:** Malabar spinach is generally pest and disease resistant, but keep an eye out for aphids, spider mites, and fungal diseases. If you notice any problems, treat them promptly with organic pest control methods.
* **Provide Support:** As the vines grow, train them to climb on the trellis or support structure. You can use twine or plant clips to help them along.
Harvesting Malabar Spinach
You can start harvesting Malabar spinach leaves as soon as the plants are large enough, usually about 6-8 weeks after planting.
* **Harvest Regularly:** The more you harvest, the more the plant will produce.
* **Pick the Young Leaves:** The young leaves are the most tender and flavorful.
* **Cut the Stems:** You can also harvest the stems, which are also edible. Just cut them back to a node.
* **Wash and Store:** Wash the harvested leaves and stems thoroughly and store them in the refrigerator for up to a week.
Enjoying Your Harvest
Malabar spinach can be used in a variety of dishes, just like regular spinach. Here are a few ideas:
* **Salads:** Add the young leaves to salads for a slightly peppery flavor.
* **Soups and Stews:** Use the leaves and stems in soups and stews.
* **Stir-fries:** Stir-fry the leaves and stems with other vegetables and protein.
* **Sauteed:** Saute the leaves with garlic and olive oil.
* **Smoothies:** Add the leaves to smoothies for a nutritional boost.
Troubleshooting
Even with the best care, you might encounter a few problems while growing Malabar spinach. Here are some common issues and how to address them:
* **Slow Germination:** As mentioned earlier, Malabar spinach seeds can be slow to germinate. Make sure you scarify and soak the seeds before planting, and provide plenty of warmth.
* **Yellowing Leaves:** Yellowing leaves can be a sign of overwatering, underwatering, or nutrient deficiency. Check the soil moisture and adjust your watering schedule accordingly. Fertilize with compost or organic fertilizer to provide essential nutrients.
* **Pest Infestations:** Keep an eye out for aphids, spider mites, and other pests. Treat infestations with insecticidal soap or neem oil.
* **Fungal Diseases:** Fungal diseases can be a problem in humid conditions. Improve air circulation by spacing plants properly and avoiding overhead watering. Treat fungal diseases with a fungicide if necessary.
Why I Love Growing Malabar Spinach
I absolutely love growing Malabar spinach for several reasons:
* **Heat Tolerance:** It thrives in hot weather when regular spinach wilts.
* **Easy to Grow:** It’s relatively low-maintenance and pest-resistant.
* **Versatile:** It can be used in a variety of dishes.
* **Beautiful Vine:** It adds a touch
Conclusion
So, there you have it! Growing Malabar spinach at home is not just a fun gardening project; it’s a gateway to fresh, nutritious greens right at your fingertips. Forget those wilted, overpriced bunches at the grocery store. With a little effort and the right conditions, you can cultivate a thriving supply of this unique leafy vegetable, ready to be harvested whenever you need it.
Why is this DIY trick a must-try? Because it empowers you to control the quality and freshness of your food. You know exactly what goes into your Malabar spinach – no pesticides, no questionable handling, just pure, homegrown goodness. Plus, it’s incredibly rewarding to watch those tiny seeds sprout and transform into lush, vibrant vines. The satisfaction of harvesting your own food is unparalleled.
But the benefits don’t stop there. Growing Malabar spinach is also a sustainable choice. You’re reducing your carbon footprint by eliminating the transportation and packaging associated with store-bought produce. And you’re contributing to a healthier ecosystem by creating a haven for pollinators in your garden.
Looking for variations? Consider growing Malabar spinach in containers if you have limited space. A large pot on a sunny balcony or patio works perfectly. You can also experiment with different trellising methods. Instead of a traditional trellis, try using a fence, an arbor, or even a sturdy tomato cage. This will not only support the vines but also add visual interest to your garden.
Another exciting variation is to explore different cultivars of Malabar spinach. While the green-stemmed variety is the most common, you might be able to find red-stemmed cultivars, which offer a slightly different flavor profile and a stunning visual contrast.
Don’t be afraid to get creative with your Malabar spinach in the kitchen, too. While it’s delicious in stir-fries and soups, try adding it to salads, smoothies, or even using it as a wrap for your favorite fillings. The possibilities are endless!
We wholeheartedly encourage you to give this DIY trick a try. It’s easier than you might think, and the rewards are well worth the effort. Imagine the pride you’ll feel when you serve a dish featuring your own homegrown Malabar spinach.
And most importantly, we want to hear about your experience! Share your photos, tips, and recipes with us in the comments below. Let’s create a community of Malabar spinach enthusiasts and inspire others to embrace the joys of homegrown food. What are you waiting for? Get those seeds started and embark on your Malabar spinach growing adventure today! Let us know what you think of our **Malabar spinach** growing guide.
Frequently Asked Questions (FAQ)
What are the ideal growing conditions for Malabar spinach?
Malabar spinach thrives in warm, sunny locations with well-drained soil. It needs at least 6-8 hours of direct sunlight per day. The ideal soil pH is between 6.0 and 7.5. Consistent moisture is crucial, especially during hot weather. Mulching around the plants can help retain moisture and suppress weeds. This plant is a heat lover, so don’t rush to plant it out too early in the spring. Wait until all danger of frost has passed and the soil has warmed up.
How often should I water my Malabar spinach?
Water deeply and regularly, especially during dry spells. The soil should be consistently moist but not waterlogged. Check the soil moisture by sticking your finger about an inch deep. If it feels dry, it’s time to water. Container-grown plants may need more frequent watering than those grown in the ground. Aim for watering in the morning so the leaves have time to dry before nightfall, which can help prevent fungal diseases.
When is the best time to harvest Malabar spinach?
You can start harvesting Malabar spinach leaves as soon as the plant is established and has produced enough foliage. Typically, this is about 6-8 weeks after planting. Harvest regularly to encourage continued growth. Simply snip off the leaves and tender stems with scissors or pruning shears. Avoid removing more than one-third of the plant at a time to prevent stressing it. The younger leaves are more tender and have a milder flavor.
How do I propagate Malabar spinach?
Malabar spinach can be propagated from seeds or stem cuttings. To propagate from seeds, soak the seeds in water for 24 hours before planting to improve germination rates. Sow the seeds directly into the garden or in seed trays, about 1/2 inch deep. Keep the soil moist until the seedlings emerge. To propagate from stem cuttings, take cuttings that are about 4-6 inches long. Remove the lower leaves and place the cuttings in water or directly into moist potting mix. Roots should develop within a few weeks.
What are some common pests and diseases that affect Malabar spinach?
Malabar spinach is relatively pest-resistant, but it can be susceptible to aphids, spider mites, and snails. Inspect your plants regularly and take action if you notice any signs of infestation. Aphids can be washed off with a strong stream of water or treated with insecticidal soap. Spider mites can be controlled with neem oil. Snails can be handpicked or trapped. Fungal diseases, such as leaf spot, can occur in humid conditions. Ensure good air circulation around the plants and avoid overhead watering. If necessary, treat with a fungicide.
Can I grow Malabar spinach indoors?
While Malabar spinach prefers to grow outdoors, it can be grown indoors with sufficient light. Place the plant near a sunny window or use grow lights to provide at least 6-8 hours of light per day. Ensure good air circulation and maintain consistent moisture. You may need to provide a trellis or support for the vines to climb.
Is Malabar spinach a perennial or an annual?
Malabar spinach is a tender perennial in tropical and subtropical climates, meaning it can live for more than two years if protected from frost. However, in colder climates, it is typically grown as an annual, meaning it completes its life cycle in one growing season.
How can I store harvested Malabar spinach?
Store harvested Malabar spinach in the refrigerator in a plastic bag or container. It will keep for several days. For longer storage, you can blanch the leaves for a minute or two and then freeze them.
What are the nutritional benefits of Malabar spinach?
Malabar spinach is a nutritional powerhouse, packed with vitamins, minerals, and antioxidants. It’s a good source of vitamins A and C, iron, calcium, and fiber. It’s also low in calories and fat.
Can I eat the flowers and seeds of Malabar spinach?
The flowers of Malabar spinach are edible and can be added to salads or used as a garnish. The seeds are also edible, but they should be cooked before consumption. They can be used as a substitute for quinoa or other grains. However, some people may find the seeds to have a slightly bitter taste.


Leave a Comment