
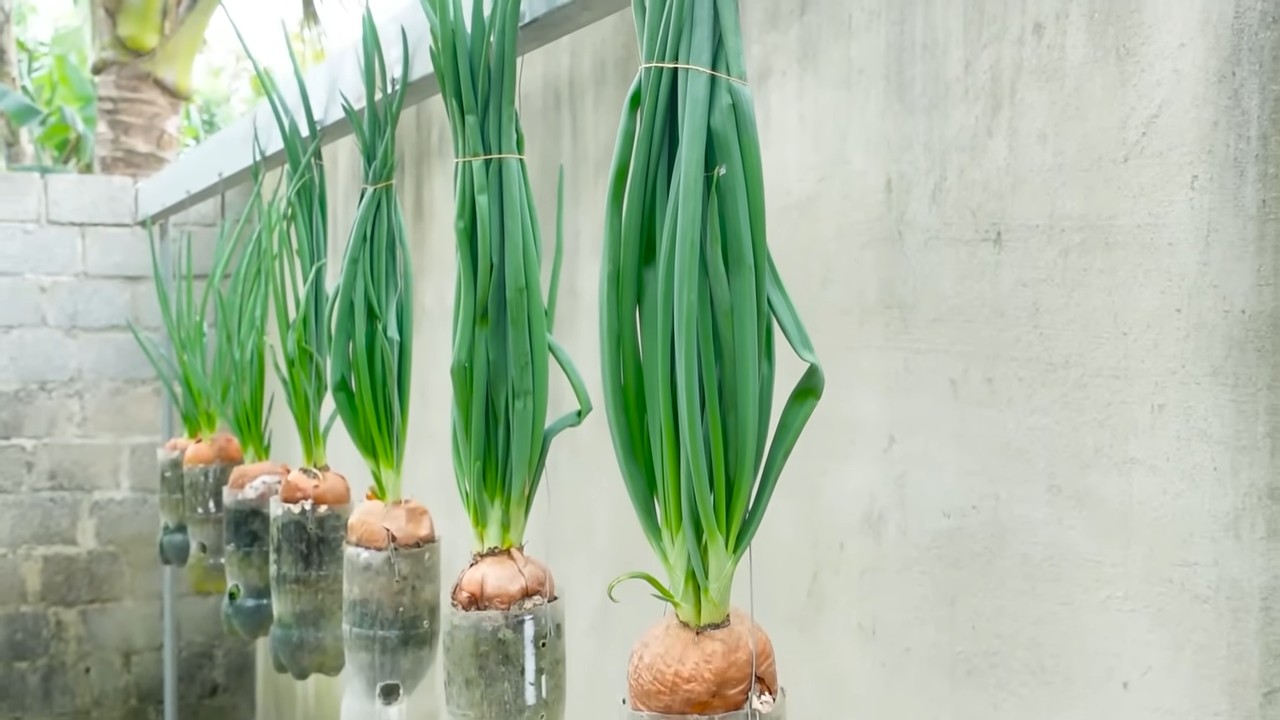
Growing onions in plastic bottles might sound a little unconventional, but trust me, it’s a game-changer for any home gardener, especially if you’re short on space or just love a good DIY project! For centuries, humans have cultivated onions, from the fertile crescent where they were first domesticated to the meticulously planned gardens of ancient Egypt, where they were even revered as symbols of eternity. Now, we’re bringing this ancient practice into the modern age with a clever twist.
Have you ever dreamed of having a constant supply of fresh onions right at your fingertips? Imagine snipping off a few green onions to add a burst of flavor to your salad or grabbing a bulb for your favorite soup, all without a trip to the grocery store. That’s the beauty of this DIY hack! Many of us struggle with limited garden space, pests, or simply the time it takes to maintain a traditional garden. Growing onions in plastic bottles offers a simple, space-saving, and surprisingly effective solution. I’m excited to share this easy-to-follow guide that will have you harvesting your own delicious onions in no time. Let’s get started!
Zwiebeln im Plastikflaschen-Garten: Eine DIY-Anleitung für den kleinen Raum
Hallo Gartenfreunde! Habt ihr auch nur einen kleinen Balkon oder gar keinen Garten, aber trotzdem Lust auf frische, selbstgezogene Zwiebeln? Dann habe ich hier genau das Richtige für euch: Zwiebeln im Plastikflaschen-Garten! Das ist nicht nur super platzsparend, sondern auch eine tolle Möglichkeit, Plastikmüll wiederzuverwerten. Ich zeige euch, wie ihr mit einfachen Mitteln und ein bisschen Geduld eure eigenen Zwiebeln anbauen könnt. Los geht’s!
Was ihr für euren Plastikflaschen-Zwiebelgarten braucht:
* Leere Plastikflaschen: Am besten eignen sich große Flaschen (1,5 oder 2 Liter). Je mehr, desto mehr Zwiebeln könnt ihr anbauen!
* Zwiebeln: Entweder bereits gekaufte Steckzwiebeln oder Zwiebeln, die bereits ausgetrieben haben. Letzteres ist eine super Möglichkeit, Küchenabfälle zu verwerten!
* Erde: Normale Blumenerde oder Gartenerde ist perfekt.
* Schere oder Messer: Zum Zuschneiden der Plastikflaschen.
* Bohrer oder Nagel: Für die Drainage-Löcher.
* Gießkanne oder Sprühflasche: Zum Bewässern.
* Optional: Kieselsteine oder Tonscherben für die Drainage.
* Optional: Etiketten und Stift, um die verschiedenen Zwiebelsorten zu kennzeichnen.
Schritt-für-Schritt-Anleitung: So baut ihr eure Zwiebeln in Plastikflaschen an
1. Flaschen vorbereiten:
* Zuerst müsst ihr die Plastikflaschen gründlich reinigen. Entfernt alle Etiketten und Rückstände.
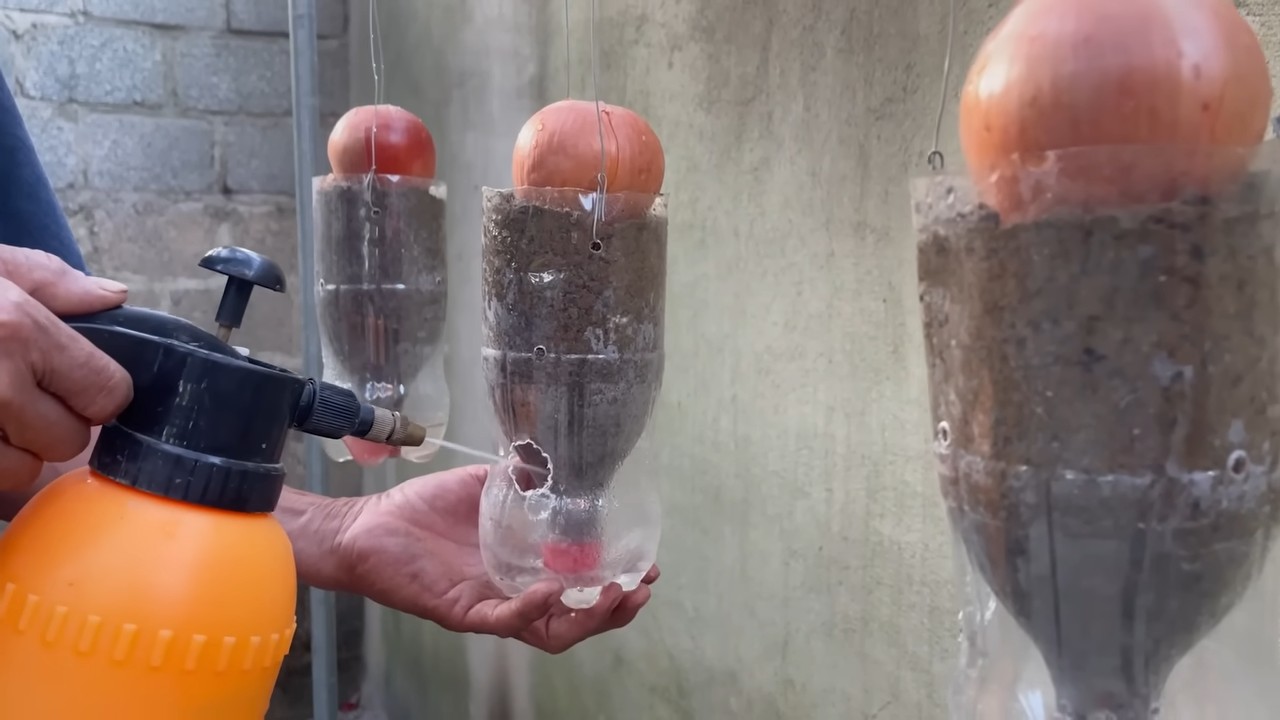
* Schneidet dann die Flaschen in der Mitte durch. Ihr könnt entweder beide Hälften verwenden oder nur die untere Hälfte. Wenn ihr beide Hälften verwendet, dreht die obere Hälfte um und steckt sie als Trichter in die untere Hälfte. Das spart Erde und sorgt für eine bessere Drainage.
* Bohrt oder stecht mit einem Nagel mehrere Löcher in den Boden der Flaschen. Diese Löcher sind wichtig für die Drainage, damit das Wasser ablaufen kann und die Zwiebeln nicht faulen.
2. Drainage schaffen (optional, aber empfohlen):
* Gebt eine Schicht Kieselsteine oder Tonscherben auf den Boden der Flaschen. Das verbessert die Drainage zusätzlich und verhindert Staunässe.
3. Erde einfüllen:
* Füllt die Flaschen mit Erde. Lasst oben etwa 2-3 cm Platz, damit das Wasser beim Gießen nicht gleich überläuft.
* Drückt die Erde leicht an.
4. Zwiebeln pflanzen:
* Macht kleine Löcher in die Erde, etwa 5-7 cm tief.
* Setzt die Zwiebeln mit der Spitze nach oben in die Löcher.
* Bedeckt die Zwiebeln mit Erde, sodass nur noch die Spitze herausschaut.
* Achtet darauf, dass die Zwiebeln genügend Abstand zueinander haben, damit sie sich gut entwickeln können. Etwa 5-7 cm Abstand sind ideal.
5. Gießen:
* Gießt die Zwiebeln vorsichtig an. Die Erde sollte feucht, aber nicht nass sein.
* Achtet darauf, dass das Wasser durch die Drainage-Löcher ablaufen kann.
6. Standort wählen:
* Stellt die Plastikflaschen an einen sonnigen Standort. Zwiebeln brauchen viel Sonne, um gut zu wachsen.
* Ein Balkon, eine Terrasse oder ein Fensterbrett sind ideal.
7. Pflege:
* Gießt die Zwiebeln regelmäßig, aber nicht zu viel. Die Erde sollte immer leicht feucht sein.
* Entfernt regelmäßig Unkraut, das in den Flaschen wächst.
* Düngt die Zwiebeln bei Bedarf mit einem organischen Dünger.
Spezialtipp: Zwiebeln aus Küchenabfällen ziehen
Anstatt Steckzwiebeln zu kaufen, könnt ihr auch Zwiebeln verwenden, die bereits in eurer Küche ausgetrieben haben. Das ist eine super Möglichkeit, Lebensmittelverschwendung zu vermeiden und gleichzeitig Geld zu sparen.
1. Zwiebel vorbereiten:
* Schneidet die Zwiebel etwa 2-3 cm über der Wurzel ab.
* Lasst die Wurzeln intakt.
2. In Wasser stellen:
* Stellt die Zwiebel in ein Glas mit Wasser, sodass die Wurzeln im Wasser sind.
* Achtet darauf, dass die Zwiebel nicht komplett im Wasser liegt, da sie sonst faulen kann.
3. Wurzeln bilden:
* Stellt das Glas an einen hellen Ort.
* Wechselt das Wasser regelmäßig, etwa alle 1-2 Tage.
* Nach einigen Tagen werden sich neue Wurzeln bilden.
4. Einpflanzen:
* Sobald die Wurzeln etwa 2-3 cm lang sind, könnt ihr die Zwiebel in die Plastikflasche einpflanzen, wie oben beschrieben.
Weitere Tipps und Tricks für euren Zwiebelgarten
* Sortenvielfalt: Probiert verschiedene Zwiebelsorten aus! Es gibt rote, gelbe und weiße Zwiebeln, die alle ihren eigenen Geschmack haben.
* Beschriftung: Beschriftet die Plastikflaschen mit den verschiedenen Zwiebelsorten, damit ihr den Überblick behaltet.
* Schädlinge: Achtet auf Schädlinge wie Blattläuse oder Zwiebelfliegen. Bei Bedarf könnt ihr natürliche Schädlingsbekämpfungsmittel verwenden.
* Ernte: Die Zwiebeln sind erntereif, wenn das Laub gelb wird und umknickt. Zieht die Zwiebeln vorsichtig aus der Erde und lasst sie einige Tage an einem trockenen Ort trocknen.
Häufige Probleme und Lösungen
* Zwiebeln faulen: Das liegt meistens an Staunässe. Achtet darauf, dass die Drainage gut funktioniert und gießt nicht zu viel.
* Zwiebeln wachsen nicht: Das kann an zu wenig Sonne oder Nährstoffen liegen. Stellt die Flaschen an einen sonnigeren Standort und düngt die Zwiebeln bei Bedarf.
* Schädlinge: Kontrolliert eure Zwiebeln regelmäßig auf Schädlinge und bekämpft sie bei Bedarf mit natürlichen Mitteln.
Zusammenfassung
Mit dieser einfachen DIY-Anleitung könnt ihr ganz einfach eure eigenen Zwiebeln in Plastikflaschen anbauen. Es ist eine tolle Möglichkeit, Platz zu sparen, Plastikmüll wiederzuverwerten und frische, selbstgezogene Zwiebeln zu genießen. Probiert es aus und lasst mich wissen, wie es euch gefällt! Viel Spaß beim Gärtnern!
Conclusion
So, there you have it! Growing onions in plastic bottles isn’t just a quirky gardening experiment; it’s a surprisingly effective and space-saving method that can bring fresh, flavorful onions right to your windowsill or balcony. We’ve explored the step-by-step process, from preparing your bottles and soil to planting and nurturing your onion sets. The benefits are undeniable: reduced garden space requirements, efficient water usage, and a fun, eco-friendly way to recycle those plastic bottles that might otherwise end up in a landfill.
But why is this DIY trick a must-try? Beyond the environmental advantages, growing onions in plastic bottles offers a level of control and accessibility that traditional gardening often lacks. You can easily monitor the soil moisture, adjust the sunlight exposure, and protect your precious onions from pests and diseases. Imagine the satisfaction of harvesting your own plump, juicy onions, knowing that you nurtured them from tiny sets to culinary perfection, all within the confines of a recycled plastic bottle.
Don’t be afraid to experiment with variations! Try using different types of onions, such as red onions, shallots, or even spring onions, to see which varieties thrive best in your bottle garden. You can also add companion plants, like basil or marigolds, to deter pests and enhance the flavor of your onions. Consider using different types of soil mixes to optimize drainage and nutrient availability. For example, adding perlite or vermiculite can improve drainage, while incorporating compost or worm castings can boost fertility.
This method is particularly beneficial for urban dwellers with limited outdoor space. A few strategically placed plastic bottle onion gardens can transform a small balcony or patio into a thriving edible landscape. It’s also a fantastic project for families, teaching children about the wonders of gardening and the importance of sustainability.
We encourage you to embrace this innovative approach to onion cultivation and experience the joy of harvesting your own homegrown produce. Remember to document your progress, take photos, and share your successes (and even your challenges!) with the gardening community. Your experiences can inspire others to adopt this eco-friendly and rewarding practice.
Ready to embark on your own plastic bottle onion-growing adventure? Gather your supplies, follow our guide, and prepare to be amazed by the results. The taste of freshly grown onions, harvested from your own recycled bottles, is an experience you won’t soon forget. So, get your hands dirty, embrace the challenge, and discover the magic of growing onions in plastic bottles! We are confident that you will find this method a rewarding and sustainable way to enjoy fresh onions.
Don’t forget to share your journey with us! We’d love to see your bottle gardens and hear about your experiences. Use the hashtag #PlasticBottleOnions on social media to connect with other gardeners and share your tips and tricks. Let’s create a community of eco-conscious gardeners who are passionate about growing their own food in sustainable ways.
Now, let’s address some of the most frequently asked questions about growing onions in plastic bottles:
Frequently Asked Questions (FAQ)
Q: What type of plastic bottles are best for growing onions?
A: Ideally, you should use sturdy, food-grade plastic bottles, such as those that previously contained water, juice, or soda. Avoid using bottles that have held harsh chemicals or cleaning products, as these may contaminate the soil and affect the onions. Clear or translucent bottles are preferable, as they allow you to monitor the soil moisture levels. Ensure the bottles are thoroughly cleaned and rinsed before use. The size of the bottle will depend on the type of onion you are growing. Larger bottles are better for bulb onions, while smaller bottles are suitable for spring onions or shallots.
Q: What kind of soil should I use for growing onions in plastic bottles?
A: A well-draining potting mix is essential for successful onion cultivation in plastic bottles. A mixture of equal parts potting soil, compost, and perlite or vermiculite is ideal. The potting soil provides a base for the onions to grow, the compost adds nutrients, and the perlite or vermiculite improves drainage and aeration. Avoid using heavy garden soil, as it can become compacted in the bottles and restrict root growth. You can also add a slow-release fertilizer to the soil mix to provide a steady supply of nutrients to the onions.
Q: How often should I water my onions grown in plastic bottles?
A: The watering frequency will depend on the climate, the type of soil, and the size of the bottle. Generally, you should water your onions when the top inch of soil feels dry to the touch. Avoid overwatering, as this can lead to root rot. Ensure that the bottles have drainage holes to allow excess water to escape. During hot and dry weather, you may need to water your onions more frequently. Check the soil moisture levels regularly and adjust your watering schedule accordingly.
Q: How much sunlight do onions need when grown in plastic bottles?
A: Onions require at least 6-8 hours of direct sunlight per day to thrive. Place your plastic bottle onion gardens in a sunny location, such as a windowsill, balcony, or patio. If you don’t have access to enough natural sunlight, you can supplement with artificial grow lights. Rotate the bottles regularly to ensure that all sides of the onions receive adequate sunlight. Insufficient sunlight can result in weak, leggy growth and reduced bulb size.
Q: How do I fertilize onions grown in plastic bottles?
A: Onions are heavy feeders and require regular fertilization to produce large, healthy bulbs. You can use a balanced liquid fertilizer, such as a 10-10-10 or 20-20-20 formula, diluted to half strength. Apply the fertilizer every 2-3 weeks during the growing season. You can also use organic fertilizers, such as compost tea or fish emulsion. Avoid over-fertilizing, as this can burn the roots and damage the onions. Monitor the growth of your onions and adjust the fertilization schedule as needed.
Q: How long does it take to grow onions in plastic bottles?
A: The time it takes to grow onions in plastic bottles will depend on the type of onion, the growing conditions, and the size of the bottle. Generally, it takes about 90-120 days to grow bulb onions from sets. Spring onions can be harvested much sooner, typically within 30-60 days. Monitor the growth of your onions and harvest them when they reach the desired size. The tops of the onions will start to turn yellow and fall over when they are ready to harvest.
Q: How do I prevent pests and diseases from affecting my onions grown in plastic bottles?
A: Growing onions in plastic bottles can help to reduce the risk of pests and diseases, as the bottles provide a physical barrier. However, it’s still important to take precautions to protect your onions. Inspect your plants regularly for signs of pests or diseases. If you notice any problems, take action immediately. You can use organic pest control methods, such as neem oil or insecticidal soap, to control pests. Ensure that the bottles have good drainage to prevent fungal diseases. Avoid overcrowding the plants, as this can create a humid environment that is conducive to disease.
Q: Can I reuse the soil from plastic bottles after harvesting the onions?
A: It’s generally not recommended to reuse the soil from plastic bottles after harvesting the onions, as it may be depleted of nutrients and contain pathogens. However, you can amend the soil with compost and other organic matter to improve its fertility and drainage. Alternatively, you can use the old soil as a base for a new potting mix. Be sure to sterilize the soil before reusing it to kill any harmful pathogens.
Q: What are some other plants I can grow in plastic bottles besides onions?
A: Plastic bottles are versatile containers that can be used to grow a wide variety of plants, including herbs, vegetables, and flowers. Some popular choices include lettuce, spinach, tomatoes, peppers, strawberries, basil, mint, and petunias. The key is to choose plants that are appropriate for the size of the bottle and the growing conditions. Be sure to provide adequate drainage and sunlight for your plants to thrive.
Q: How do I harvest onions grown in plastic bottles?
A: Harvesting onions grown in plastic bottles is similar to harvesting onions grown in the ground. Once the tops of the onions have turned yellow and fallen over, they are ready to harvest. Gently pull the onions out of the bottles, being careful not to damage the bulbs. Brush off any excess soil and allow the onions to dry in a well-ventilated area for a few days before storing them. Store the onions in a cool, dry place, such as a pantry or cellar.

Leave a Comment