
Growing peanuts in buckets might sound like a quirky experiment, but trust me, it’s a surprisingly rewarding and accessible way to enjoy fresh, homegrown peanuts, even if you don’t have a sprawling garden! Have you ever imagined harvesting your own crunchy, earthy peanuts right from your patio or balcony? It’s easier than you think, and this DIY guide will show you exactly how to do it.
Peanuts, originally cultivated in South America thousands of years ago, have become a beloved snack and staple food worldwide. From ancient Incan offerings to modern-day peanut butter sandwiches, their journey is a testament to their versatility and deliciousness. But did you know that you can skip the grocery store and cultivate this historical legume yourself, even in a limited space?
In today’s world, where access to fresh, healthy food is increasingly important, growing peanuts in buckets offers a fantastic solution for urban dwellers and anyone with limited gardening space. Plus, it’s a fun and educational project for the whole family! This DIY trick not only provides you with a sustainable source of delicious peanuts but also connects you to the natural world in a meaningful way. So, ditch the store-bought peanuts and let’s get our hands dirty! I’m excited to share my tips and tricks for a successful peanut harvest, right from the comfort of your own home.
Growing Peanuts in Buckets: A Beginner’s Guide
Hey there, fellow gardening enthusiasts! Ever thought about growing your own peanuts? It might sound a bit unusual, especially if you don’t have a sprawling farm, but trust me, it’s totally doable – and super rewarding – even in a small space like a balcony or patio. I’m going to walk you through the process of growing peanuts in buckets. It’s easier than you think, and the satisfaction of harvesting your own homegrown peanuts is just amazing!
What You’ll Need
Before we dive in, let’s gather our supplies. Here’s a list of everything you’ll need to successfully grow peanuts in buckets:
* Peanut Seeds (Raw, Unsalted, and In-Shell): This is the most important ingredient! Make sure they’re raw and unsalted, as roasted or salted peanuts won’t germinate. You can find these at most garden centers or online. I usually buy Virginia peanuts because they tend to be larger and easier to handle.
* Large Buckets (5-Gallon or Larger): The bigger, the better! Peanuts need room to spread their roots and develop those delicious nuts. 5-gallon buckets are a good starting point, but if you have the space, go for even larger ones. Make sure the buckets have drainage holes.
* Well-Draining Potting Mix: Peanuts need soil that drains well to prevent root rot. A good quality potting mix is essential. I like to use a mix specifically formulated for vegetables.
* Optional: Compost or Aged Manure: Adding compost or aged manure to your potting mix will give your peanuts an extra boost of nutrients.
* Watering Can or Hose: You’ll need a way to water your peanuts regularly.
* Optional: Peanut Inoculant: This contains beneficial bacteria that help peanuts fix nitrogen from the air, promoting healthy growth. It’s not essential, but it can definitely help.
* Optional: Garden Gloves: To keep your hands clean and protected.
* Optional: Trowel or Small Shovel: For planting the peanut seeds.
Preparing Your Buckets
This is a crucial step to ensure your peanuts have a happy home.
* Drill Drainage Holes: If your buckets don’t already have them, drill several drainage holes in the bottom. This is super important to prevent waterlogging, which can kill your peanut plants. I usually drill about 4-5 holes, each about half an inch in diameter.
* Add a Layer of Gravel (Optional): Some people like to add a layer of gravel or small stones to the bottom of the bucket to further improve drainage. This is optional, but it can’t hurt.
* Fill with Potting Mix: Fill the buckets with your well-draining potting mix, leaving a few inches of space at the top. If you’re using compost or aged manure, mix it in with the potting mix before filling the buckets. I usually aim for a ratio of about 1 part compost to 3 parts potting mix.
Planting Your Peanut Seeds
Now for the fun part – planting those peanut seeds!
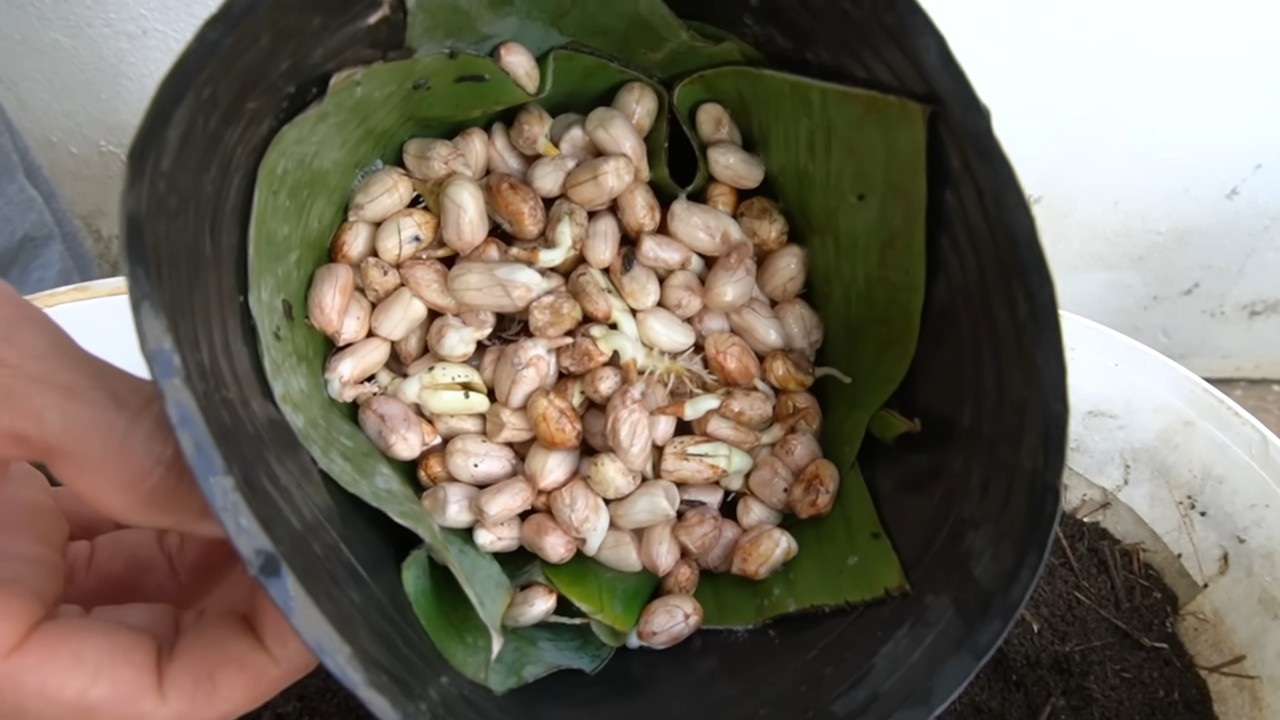
1. Crack the Shells (Gently!): Carefully crack open the peanut shells and remove the peanuts inside. Be gentle, as you don’t want to damage the peanuts themselves. I usually crack them open over a bowl to catch any stray pieces of shell.
2. Soak the Peanuts (Optional): Soaking the peanuts in water for a few hours before planting can help speed up germination. I usually soak them for about 4-6 hours.
3. Plant the Peanuts: Make a small hole in the potting mix, about 1-2 inches deep. Place one or two peanuts in each hole and cover them with soil. I usually plant two peanuts per hole just in case one doesn’t germinate.
4. Space the Plantings: If you’re planting multiple peanuts in the same bucket, space them out evenly. I usually aim for about 4-6 inches between each peanut.
5. Water Thoroughly: After planting, water the soil thoroughly until it’s evenly moist. Be careful not to overwater, as this can cause the peanuts to rot.
Caring for Your Peanut Plants
This is where the patience comes in. But trust me, it’s worth it!
1. Sunlight: Peanuts need plenty of sunlight to thrive. Aim for at least 6-8 hours of direct sunlight per day. If you’re growing your peanuts indoors, you may need to supplement with grow lights.
2. Watering: Water your peanut plants regularly, especially during hot, dry weather. The soil should be consistently moist, but not waterlogged. I usually water them every 2-3 days, depending on the weather.
3. Fertilizing: Peanuts are heavy feeders, so they’ll benefit from regular fertilization. Use a balanced fertilizer, such as a 10-10-10, every few weeks. Follow the instructions on the fertilizer package. I like to use a liquid fertilizer diluted in water for easy application.
4. Hilling: As your peanut plants grow, you’ll need to “hill” them. This means mounding soil around the base of the plants. This helps to support the plants and encourages the development of more peanuts. I usually hill my peanut plants every few weeks, starting when they’re about 6 inches tall.
5. Weeding: Keep your peanut buckets free of weeds. Weeds can compete with your peanut plants for nutrients and water. I usually hand-pull any weeds that pop up.
6. Pest Control: Peanuts are generally pest-resistant, but they can be susceptible to certain pests, such as aphids and spider mites. If you notice any pests on your plants, you can treat them with an insecticidal soap or neem oil. I prefer to use organic pest control methods whenever possible.
Harvesting Your Peanuts
This is the moment you’ve been waiting for!
1. Timing: Peanuts typically take about 120-150 days to mature. You’ll know they’re ready to harvest when the leaves start to turn yellow and the plants begin to die back. I usually start checking for peanuts around the 4-month mark.
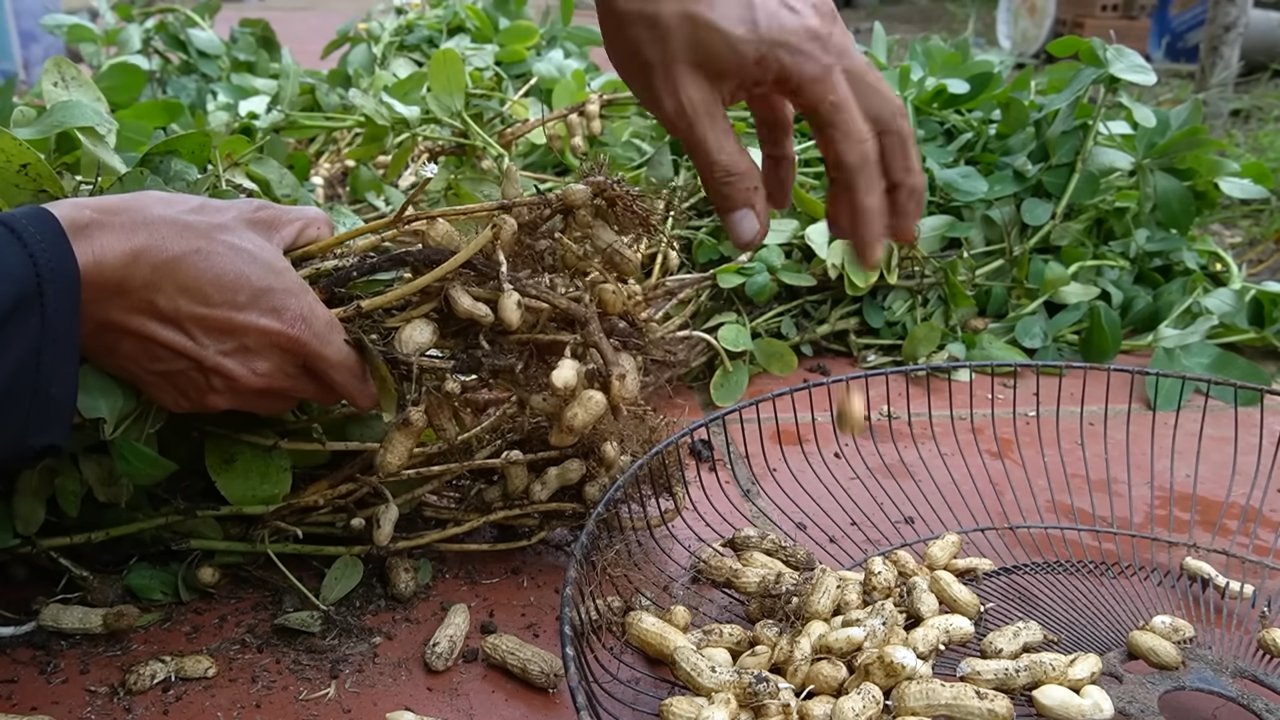
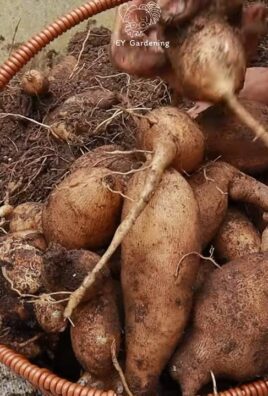
2. Digging: To harvest your peanuts, carefully dig up the entire plant. Use a trowel or small shovel to loosen the soil around the plant, then gently pull it out of the bucket.
3. Cleaning: Shake off any excess soil from the peanuts. You can also rinse them with water to remove any remaining dirt.
4. Curing: Curing is an important step in preserving your peanuts. To cure them, spread them out in a single layer on a screen or tray and let them dry in a well-ventilated area for several weeks. I usually cure my peanuts in my garage.
5. Storing: Once your peanuts are cured, you can store them in a cool, dry place. They’ll keep for several months. I usually store mine in airtight containers in my pantry.
Troubleshooting
Even with the best care, you might encounter some challenges. Here are a few common problems and how to address them:
* Poor Germination: If your peanut seeds aren’t germinating, make sure they’re raw and unsalted. Also, ensure the soil is warm enough and consistently moist. Sometimes, the seeds are just old or damaged. Try planting a few extra seeds to increase your chances of success.
* Yellowing Leaves: Yellowing leaves can indicate a nutrient deficiency. Try fertilizing your plants with a balanced fertilizer. It could also be a sign of overwatering or poor drainage. Make sure your buckets have adequate drainage holes and that you’re not watering too frequently.
* Lack of Peanuts: If your plants are growing well but not producing peanuts, it could be due to a lack of sunlight or pollination. Make sure your plants are getting at least 6-8 hours of direct sunlight per day. Peanuts are self-pollinating, but sometimes they need a little help. You can try gently shaking the plants to help distribute the pollen.
* Pests: Keep an eye out for pests like aphids and spider mites. Treat them with insecticidal soap or neem oil as needed.
Extra Tips for Peanut-Growing Success
* Choose the Right Variety: Different peanut varieties have different growing requirements. Research which varieties are best suited for your climate and growing conditions.
* Start Indoors: If you live in a colder climate, you can start your peanut seeds indoors a few weeks before the last frost. This will give them a head start on the growing season.
* Rotate Your Crops: Don’t plant peanuts in the same spot year after year. Rotating your crops can help prevent soilborne diseases and pests.
* Have Fun! Growing peanuts is a rewarding experience. Don’t be afraid to experiment and try new things.
Growing peanuts in buckets is a fun and rewarding project
Conclusion
So, there you have it! Growing peanuts in buckets is not just a quirky gardening experiment; it’s a genuinely rewarding and surprisingly accessible way to enjoy fresh, homegrown peanuts, even if you’re short on space or live in an apartment. We’ve walked you through the entire process, from selecting the right variety and preparing your buckets to nurturing your plants and harvesting your bounty.
Why is this DIY trick a must-try? Because it democratizes peanut cultivation! Forget needing acres of farmland; with a few buckets, some quality soil, and a sunny spot, you can experience the unique satisfaction of growing your own food. Plus, the process is incredibly engaging, offering a fascinating glimpse into the life cycle of these fascinating legumes. It’s a fantastic project for families, a great way to teach children about where their food comes from, and a fulfilling hobby for anyone who enjoys getting their hands dirty.
But the benefits don’t stop there. Homegrown peanuts often taste significantly better than store-bought varieties. They’re fresher, more flavorful, and you have complete control over the growing process, ensuring they’re free from unwanted chemicals or additives. Imagine the taste of freshly roasted peanuts, still warm from the oven, knowing you nurtured them from seed to snack. That’s an experience you simply can’t replicate with commercially grown peanuts.
Looking for variations? Absolutely! Consider experimenting with different peanut varieties to discover your favorite flavor profile. Virginia peanuts are known for their large size and excellent roasting qualities, while Spanish peanuts offer a sweeter, nuttier taste. You can also try adding companion plants to your buckets, such as marigolds to deter pests or basil to improve the overall health of your peanut plants. Another fun variation is to create a tiered peanut garden by stacking multiple buckets, creating a visually appealing and space-saving display.
Don’t be afraid to get creative with your bucket setup. While we recommend using buckets with drainage holes, you can also repurpose other containers, such as large plastic tubs or even old tires, as long as they provide adequate drainage and space for the peanut plants to grow. Just remember to clean and sanitize any repurposed containers before using them to prevent the spread of diseases.
And finally, consider the roasting process. While oven roasting is a classic method, you can also experiment with other techniques, such as air frying or pan roasting, to achieve different textures and flavors. For a savory twist, try adding spices like chili powder, garlic powder, or smoked paprika to your peanuts before roasting. Or, for a sweet treat, toss them with cinnamon and sugar.
We wholeheartedly encourage you to give this DIY trick a try. Growing peanuts in buckets is a rewarding and enjoyable experience that will connect you with nature and provide you with a delicious and healthy snack. We are confident that you will find the process to be both educational and fulfilling.
But don’t just take our word for it! We want to hear about your experiences. Share your photos, tips, and tricks on social media using the hashtag #BucketPeanuts. Let’s create a community of bucket peanut growers and inspire others to try this amazing DIY project. We can’t wait to see what you grow! Happy peanut growing!
Frequently Asked Questions (FAQ)
What kind of soil is best for growing peanuts in buckets?
Peanuts thrive in well-draining, sandy loam soil. Avoid heavy clay soils, as they can become waterlogged and hinder the development of peanut pods. A good mix would be equal parts potting soil, sand, and compost. The compost provides essential nutrients, while the sand ensures proper drainage. You can also purchase a pre-mixed soil specifically formulated for vegetables, which often contains the ideal balance of nutrients and drainage properties. Ensure the soil is loose and airy to allow the peanut pegs (the stems that develop into peanut pods) to easily penetrate the soil.
How often should I water my peanut plants in buckets?
Watering frequency depends on the weather and the drainage of your buckets. Generally, water deeply when the top inch of soil feels dry to the touch. Avoid overwatering, as this can lead to root rot and other fungal diseases. During hot, dry periods, you may need to water daily, while during cooler, wetter periods, you may only need to water every few days. Check the soil moisture regularly and adjust your watering schedule accordingly. Remember that peanuts need consistent moisture, especially during flowering and pod development.
How much sunlight do peanut plants need?
Peanut plants require at least 6-8 hours of direct sunlight per day to thrive. Choose a location for your buckets that receives ample sunlight throughout the day. If you live in a particularly hot climate, you may need to provide some afternoon shade to prevent the plants from scorching. Insufficient sunlight can lead to stunted growth and reduced peanut production.
When is the best time to plant peanuts in buckets?
The best time to plant peanuts is after the last frost, when the soil has warmed up to at least 65°F (18°C). Peanuts are warm-season crops and will not germinate or grow well in cold soil. In most regions, this is typically in late spring or early summer. You can start peanut seeds indoors a few weeks before the last frost to get a head start, but be sure to harden them off gradually before transplanting them into your buckets.
How do I know when my peanuts are ready to harvest?
Determining the right time to harvest peanuts is crucial for optimal flavor and yield. The best indicator is the maturity of the peanut pods. Around 120-150 days after planting, start checking the pods. Dig up a test plant and examine the pods. The inside of the shells should be dark brown or reddish-brown, and the kernels should be plump and well-formed. If the shells are still white or pale, the peanuts are not yet mature. Another sign is yellowing and browning of the foliage.
What are some common pests and diseases that affect peanut plants, and how can I prevent them?
Common pests that affect peanut plants include aphids, spider mites, and leafhoppers. These pests can be controlled with insecticidal soap or neem oil. Diseases that can affect peanut plants include leaf spot and root rot. To prevent these diseases, ensure good air circulation around the plants, avoid overwatering, and use disease-resistant peanut varieties. Crop rotation can also help prevent soilborne diseases. Regularly inspect your plants for signs of pests or diseases and take action promptly to prevent them from spreading.
Can I grow peanuts in containers indoors?
While it’s possible to grow peanuts indoors, it’s more challenging than growing them outdoors. Peanut plants require a lot of sunlight, so you’ll need to provide supplemental lighting, such as grow lights, to ensure they receive enough light. You’ll also need to ensure proper ventilation and humidity levels. Indoor peanut plants may not produce as many peanuts as outdoor plants, but it can still be a fun and rewarding experiment.
How do I cure and store my harvested peanuts?
After harvesting, cure your peanuts by drying them in a well-ventilated area for several weeks. Spread the peanuts out in a single layer on a screen or rack and allow them to air dry until the shells are brittle and the kernels are loose inside. Once the peanuts are cured, you can store them in an airtight container in a cool, dry place. Properly cured and stored peanuts can last for several months. You can also freeze peanuts for longer storage.
What are some creative ways to use my homegrown peanuts?
The possibilities are endless! Of course, you can roast them and enjoy them as a snack. But you can also use them to make homemade peanut butter, add them to salads or stir-fries, or use them in baking. Consider making peanut brittle, peanut cookies, or peanut sauce. You can even use the peanut shells as mulch in your garden. Get creative and experiment with different recipes to discover your favorite ways to enjoy your homegrown peanuts.
Is growing peanuts in buckets a good way to teach kids about gardening and where food comes from?
Absolutely! Growing peanuts in buckets is a fantastic educational activity for children. It’s a hands-on way for them to learn about plant life cycles, the importance of sunlight and water, and the process of growing their own food. It can also teach them about responsibility and patience, as they need to care for the plants and wait for them to mature. Plus, the excitement of harvesting their own peanuts is a rewarding experience that will foster a lifelong appreciation for gardening and healthy eating.
Leave a Comment