
Growing peanuts in foam box might sound like a quirky experiment, but trust me, it’s a surprisingly rewarding and space-saving way to enjoy fresh, homegrown peanuts! For centuries, peanuts have been a staple food in many cultures, from South America where they originated, to Asia and Africa, providing essential nutrients and a delicious nutty flavor. But who knew you could cultivate these underground treasures right on your balcony or patio?
Let’s be honest, the idea of digging up a whole garden bed just for peanuts can be daunting. That’s where this DIY trick comes in! I’m going to show you how to bypass the traditional garden setup and create a mini peanut farm in a simple foam box. This method is perfect for apartment dwellers, those with limited garden space, or anyone who wants a fun and educational gardening project.
Why do you need this DIY hack? Because growing peanuts in foam box is not only incredibly convenient, but it also allows for better control over soil conditions, drainage, and even pest management. Plus, imagine the satisfaction of harvesting your own peanuts, knowing exactly where they came from and how they were grown. Get ready to unleash your inner gardener and embark on this exciting peanut-growing adventure!
Erdnüsse im Styroporbehälter anbauen: Eine Schritt-für-Schritt-Anleitung
Hallo liebe Gartenfreunde! Habt ihr schon mal darüber nachgedacht, Erdnüsse selbst anzubauen? Es ist einfacher als man denkt, und mit einem Styroporbehälter könnt ihr sogar auf dem Balkon oder der Terrasse eine kleine Erdnussplantage starten. Ich zeige euch, wie es geht!
Was ihr braucht:
* Einen Styroporbehälter (ca. 40x60x30 cm oder größer, je nachdem wie viele Pflanzen ihr wollt)
* Erde (am besten eine Mischung aus Gartenerde, Kompost und Sand)
* Erdnüsse (roh, ungesalzen und ungeröstet – am besten aus dem Bioladen oder Gartencenter)
* Einen Bohrer oder Schraubenzieher
* Wasser
* Optional: Dünger (organisch oder mineralisch)
* Optional: Mulch (Stroh, Heu oder Holzhackschnitzel)
Warum ein Styroporbehälter?
Styroporbehälter haben einige Vorteile für den Erdnussanbau:
* Isolierung: Sie schützen die Wurzeln vor extremen Temperaturen, sowohl Hitze als auch Kälte.
* Leichtgewicht: Sie sind leicht zu transportieren, auch wenn sie mit Erde gefüllt sind.
* Drainage: Sie lassen sich leicht mit Löchern versehen, um Staunässe zu vermeiden.
* Wiederverwendbar: Sie sind robust und können mehrere Saisons verwendet werden.
Vorbereitung des Styroporbehälters
Bevor wir mit dem Pflanzen beginnen, müssen wir den Behälter vorbereiten.
1. Drainagelöcher bohren: Nehmt euren Bohrer oder Schraubenzieher und bohrt mehrere Löcher in den Boden des Behälters. Ich empfehle mindestens 6-8 Löcher, um sicherzustellen, dass das Wasser gut ablaufen kann. Staunässe ist der Feind der Erdnüsse!
2. Behälter reinigen: Falls der Behälter gebraucht ist, reinigt ihn gründlich mit Wasser und eventuell etwas Spülmittel. Achtet darauf, alle Rückstände zu entfernen.
3. Standort wählen: Sucht einen sonnigen Standort für euren Behälter. Erdnüsse lieben die Sonne und brauchen mindestens 6-8 Stunden direktes Sonnenlicht pro Tag.
Die Erdnüsse vorbereiten
Jetzt kümmern wir uns um die Erdnüsse.
1. Erdnüsse auswählen: Wählt gesunde, pralle Erdnüsse aus. Vermeidet Erdnüsse, die beschädigt oder geschrumpft sind.
2. Einweichen (optional): Ihr könnt die Erdnüsse vor dem Pflanzen für 24 Stunden in lauwarmes Wasser legen. Das beschleunigt die Keimung. Ich mache das meistens, aber es geht auch ohne.
3. Schälen (optional): Manche Leute schälen die Erdnüsse vor dem Pflanzen, um die Keimung zu beschleunigen. Ich persönlich lasse sie lieber in der Schale, da sie so besser vor Schädlingen geschützt sind. Aber probiert es ruhig aus, wenn ihr neugierig seid!
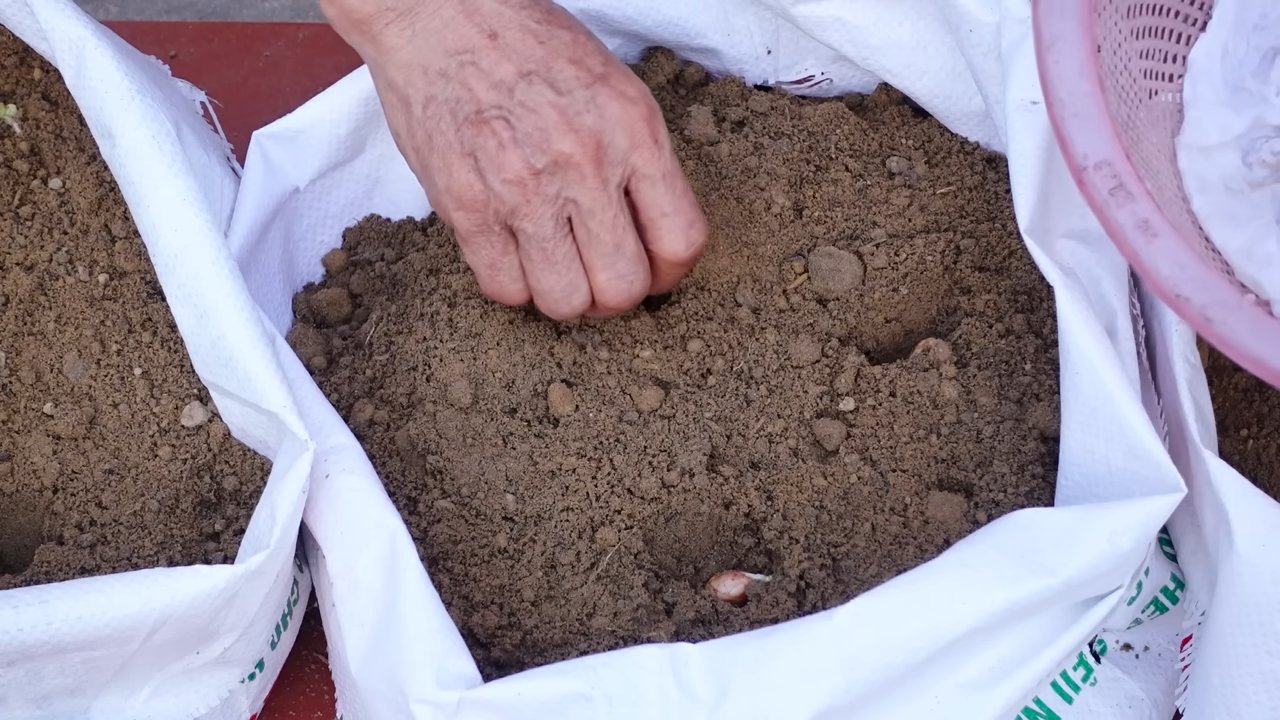
Das Pflanzen der Erdnüsse
Jetzt kommt der spannende Teil: das Pflanzen!
1. Behälter befüllen: Füllt den Behälter mit eurer Erdmischung. Lasst etwa 5-10 cm Platz bis zum Rand.
2. Pflanzlöcher machen: Macht mit dem Finger oder einem kleinen Löffel kleine Löcher in die Erde. Die Löcher sollten etwa 2-3 cm tief sein.
3. Erdnüsse einsetzen: Legt in jedes Loch eine Erdnuss. Achtet darauf, dass die Erdnüsse nicht zu eng beieinander liegen. Ich empfehle einen Abstand von etwa 15-20 cm zwischen den Pflanzen.
4. Löcher schließen: Bedeckt die Erdnüsse mit Erde und drückt die Erde leicht an.
5. Gießen: Gießt die Erde vorsichtig an, bis sie gut durchfeuchtet ist. Achtet darauf, dass ihr nicht zu viel gießt, damit keine Staunässe entsteht.
Pflege der Erdnusspflanzen
Die Pflege der Erdnusspflanzen ist relativ einfach, aber es gibt ein paar Dinge, auf die ihr achten solltet.
1. Gießen: Gießt die Pflanzen regelmäßig, besonders während trockener Perioden. Die Erde sollte immer leicht feucht sein, aber nicht nass.
2. Düngen: Düngt die Pflanzen alle paar Wochen mit einem organischen oder mineralischen Dünger. Ich verwende gerne Komposttee oder einen Flüssigdünger für Gemüse.
3. Unkraut jäten: Entfernt regelmäßig Unkraut, das im Behälter wächst. Unkraut kann den Erdnusspflanzen Nährstoffe und Licht wegnehmen.
4. Mulchen (optional): Mulcht die Erde um die Pflanzen herum mit Stroh, Heu oder Holzhackschnitzeln. Das hilft, die Feuchtigkeit im Boden zu halten und Unkraut zu unterdrücken.
5. Blüten beobachten: Erdnusspflanzen bilden gelbe Blüten. Nach der Befruchtung biegen sich die Blütenstiele nach unten und bohren sich in die Erde. Dort entwickeln sich dann die Erdnüsse.
6. “Häufeln”: Wenn die Blütenstiele sich in die Erde bohren, könnt ihr die Erde um die Pflanzen herum etwas anhäufeln. Das fördert die Entwicklung der Erdnüsse.
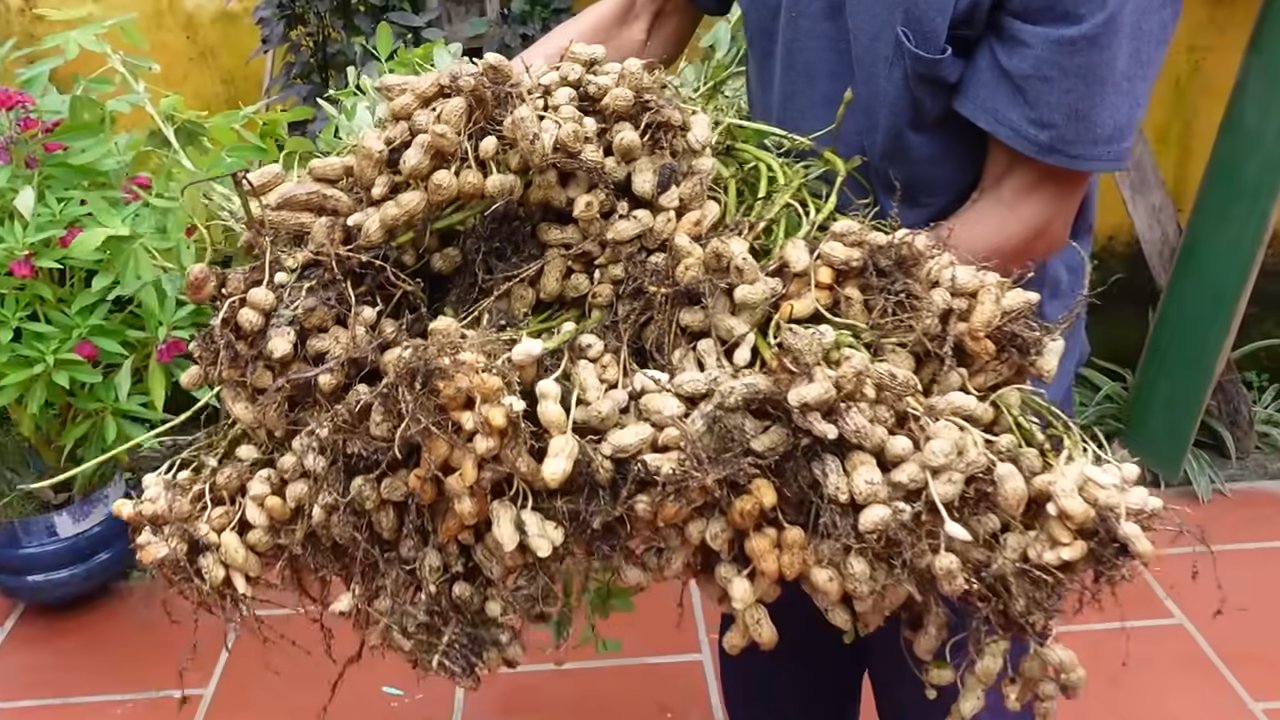
Die Ernte
Die Erntezeit ist gekommen, wenn die Blätter der Erdnusspflanzen gelb werden und absterben. Das ist normalerweise etwa 4-5 Monate nach dem Pflanzen der Fall.
1. Pflanzen ausgraben: Grabt die Pflanzen vorsichtig aus dem Behälter. Achtet darauf, die Erdnüsse nicht zu beschädigen.
2. Erdnüsse ernten: Schüttelt die Erde von den Erdnüssen ab und trennt sie von den Pflanzen.
3. Erdnüsse waschen: Wascht die Erdnüsse gründlich mit Wasser, um alle Erdreste zu entfernen.
4. Erdnüsse trocknen: Legt die Erdnüsse zum Trocknen an einen warmen, trockenen und gut belüfteten Ort. Das kann im Freien in der Sonne sein oder in einem Trockenraum. Die Erdnüsse sollten etwa 1-2 Wochen trocknen.
5. Erdnüsse lagern: Lagert die getrockneten Erdnüsse an einem kühlen, trockenen und dunklen Ort. Sie halten sich so mehrere Monate.
Häufige Probleme und Lösungen
* Schädlinge: Erdnusspflanzen können von Blattläusen, Spinnmilben oder Schnecken befallen werden. Bekämpft die Schädlinge mit natürlichen Mitteln wie Neemöl oder Schmierseifenlösung.
* Krankheiten: Erdnusspflanzen können von Pilzkrankheiten wie Mehltau oder Rost befallen werden. Sorgt für eine gute Belüftung und vermeidet Staunässe.
* Keine Erdnüsse: Wenn eure Pflanzen blühen, aber keine Erdnüsse bilden, kann das an mangelnder Bestäubung liegen. Ihr könnt die Blüten vorsichtig mit einem Pinsel bestäuben, um die Befruchtung zu fördern.
Zusätzliche Tipps
* Sortenwahl: Es gibt verschiedene Erdnusssorten. Informiert euch, welche Sorte für eure Region am besten geeignet ist.
* Fruchtfolge: Baut Erdnüsse nicht jedes Jahr am selben Standort an. Wechselt die Pflanzen, um Krankheiten und Schädlingen vorzubeugen.
* Experimentieren: Probiert verschiedene Anbaumethoden aus und findet heraus, was für euch am besten funktioniert.
Ich hoffe, diese Anleitung hilft euch dabei, eure eigenen Erdnüsse im Styroporbehälter anzubauen. Es ist ein tolles Gefühl, die eigenen Erdnüsse zu ernten und zu genießen! Viel Spaß beim Gärtnern!
Conclusion
So, there you have it! Growing peanuts in a foam box is not just a quirky gardening experiment; it’s a surprisingly effective and rewarding way to cultivate your own delicious, homegrown peanuts, even if you’re short on space or live in an area with less-than-ideal soil conditions. We’ve walked you through the entire process, from selecting the right peanuts and preparing your foam box to nurturing your plants and harvesting your bounty.
Why is this DIY trick a must-try? Because it democratizes peanut cultivation! It removes the barriers of needing a large garden plot or perfectly sandy soil. The foam box acts as a self-contained ecosystem, allowing you to control the growing environment and optimize conditions for peanut production. Plus, there’s a unique satisfaction in watching those little peanut plants thrive and eventually yield a harvest of fresh, flavorful peanuts that you grew yourself. It’s a fantastic project for families, a fun way to introduce children to gardening, and a conversation starter for any green thumb.
But the fun doesn’t stop there! Feel free to experiment with different peanut varieties. Try growing Virginia peanuts for their large size and satisfying crunch, or go for Spanish peanuts for their sweeter flavor and smaller kernels. You can also explore companion planting. Marigolds can help deter nematodes, while basil can repel other pests. Consider adding a layer of mulch to help retain moisture and suppress weeds.
And if you’re feeling adventurous, why not try adding some organic fertilizer to boost your peanut production? A balanced fertilizer with a slightly higher phosphorus content can encourage strong root development and abundant pod formation. Just be sure to follow the instructions on the fertilizer packaging carefully to avoid over-fertilizing.
The key to success with this method is consistent care and attention. Regularly check the moisture levels of the soil, provide adequate sunlight, and be vigilant for any signs of pests or diseases. With a little bit of effort, you’ll be rewarded with a bountiful harvest of homegrown peanuts that are far superior in taste and quality to anything you can buy in the store.
We wholeheartedly encourage you to give this DIY peanut-growing trick a try. It’s an affordable, accessible, and incredibly rewarding way to enjoy the fruits (or rather, the nuts!) of your labor. Don’t be afraid to get your hands dirty and experiment. Every growing season is a learning opportunity, and you’ll undoubtedly discover new tips and tricks along the way.
Once you’ve harvested your peanuts, we’d love to hear about your experience! Share your photos, stories, and any helpful tips you’ve learned in the comments section below. Let’s create a community of foam box peanut growers and inspire others to embark on this exciting gardening adventure. Happy growing! Remember, mastering the art of growing peanuts in a foam box is easier than you think, and the rewards are well worth the effort.
Frequently Asked Questions (FAQ)
What kind of foam box should I use?
Ideally, you want a foam box that is at least 12 inches deep and has drainage holes. The size of the box will depend on how many peanut plants you want to grow. A good starting point is a box that is approximately 2 feet long, 1 foot wide, and 1 foot deep. Make sure the foam is food-grade and hasn’t been used to store any harmful chemicals. You can often find suitable foam boxes at grocery stores or fish markets. If you’re concerned about the foam degrading over time, you can line the inside of the box with a heavy-duty plastic liner.
What type of soil is best for growing peanuts in a foam box?
Peanuts thrive in well-draining, sandy loam soil. Avoid heavy clay soils, as they can become waterlogged and inhibit peanut development. You can create your own potting mix by combining equal parts of garden soil, sand, and compost. Alternatively, you can purchase a pre-made potting mix specifically formulated for vegetables. Ensure the soil is loose and airy to allow for proper root growth and peg penetration.
How often should I water my peanut plants in a foam box?
Water your peanut plants regularly, especially during hot and dry weather. The soil should be consistently moist but not waterlogged. Check the moisture level of the soil by sticking your finger about an inch deep. If the soil feels dry, it’s time to water. Avoid overhead watering, as this can increase the risk of fungal diseases. Instead, water at the base of the plants. During the flowering and pegging stages, ensure the plants receive adequate moisture to support pod development.
How much sunlight do peanut plants need?
Peanut plants need at least 6-8 hours of direct sunlight per day to thrive. Choose a location for your foam box that receives plenty of sunlight throughout the day. If you live in an area with limited sunlight, you may need to supplement with artificial lighting. Grow lights can provide the necessary light intensity for healthy peanut growth.
When should I harvest my peanuts?
Peanuts are typically ready to harvest about 120-150 days after planting. The leaves will start to turn yellow and the plants will begin to wilt. To check if the peanuts are ready, dig up a few plants and examine the pods. The pods should be plump and the kernels should be fully developed and have a reddish-brown skin. If the kernels are still white or pale, they need more time to mature.
How do I cure my peanuts after harvesting?
After harvesting, gently shake off any excess soil from the peanut plants. Hang the plants upside down in a well-ventilated area for about 2-3 weeks to allow the peanuts to cure. Curing helps to reduce the moisture content of the peanuts and improves their flavor and shelf life. Once the peanuts are cured, you can remove them from the plants and store them in a cool, dry place.
Can I grow peanuts in a foam box indoors?
While it’s possible to grow peanuts in a foam box indoors, it can be challenging to provide the necessary sunlight and ventilation. You’ll need to use strong grow lights and ensure good air circulation to prevent fungal diseases. Indoor peanut plants may also require more frequent watering and fertilization. If you’re determined to grow peanuts indoors, choose a sunny location near a window and supplement with artificial lighting.
What are some common pests and diseases that affect peanut plants?
Common pests that can affect peanut plants include aphids, spider mites, and nematodes. Diseases include leaf spot, rust, and white mold. Regularly inspect your plants for any signs of pests or diseases. You can use organic pest control methods, such as insecticidal soap or neem oil, to control pests. To prevent diseases, ensure good air circulation and avoid overwatering.
Can I reuse the soil from my foam box for future peanut crops?
It’s generally not recommended to reuse the soil from your foam box for future peanut crops, as it may contain disease pathogens or pests. However, if you’re determined to reuse the soil, you can sterilize it by baking it in the oven at 180 degrees Fahrenheit for 30 minutes. Alternatively, you can solarize the soil by covering it with clear plastic for several weeks during the hottest part of the summer. After sterilizing the soil, amend it with fresh compost and fertilizer before planting your next crop.
How do I know if my peanuts are safe to eat?
Always inspect your peanuts for any signs of mold or spoilage before eating them. Discard any peanuts that are discolored, have a musty odor, or show signs of mold growth. Properly cured and stored peanuts should be safe to eat for several months. If you’re unsure about the safety of your peanuts, it’s best to err on the side of caution and discard them.
Leave a Comment