
Growing peppermint indoors can transform your home into a fragrant oasis, and I’m so excited to share some simple DIY tricks that will have you harvesting fresh mint in no time! Forget those wilting supermarket herbs – imagine stepping into your kitchen and snipping off vibrant, aromatic peppermint leaves for your tea, cocktails, or even a refreshing summer salad.
Peppermint has a rich history, dating back to ancient Egypt where it was valued for its medicinal properties. The Romans and Greeks also used it extensively, believing in its digestive benefits and invigorating scent. Today, its popularity continues, and what better way to enjoy this versatile herb than by growing it yourself, right in your own home?
Let’s face it, not everyone has a sprawling garden. But that shouldn’t stop you from enjoying fresh herbs! Growing peppermint indoors is a fantastic solution for apartment dwellers, city residents, or anyone who simply wants to have a readily available supply of this amazing herb. Plus, it’s incredibly rewarding to nurture a plant from a tiny seedling to a thriving, fragrant bush. This DIY guide will walk you through everything you need to know, from choosing the right container to providing the perfect light and water. Get ready to unleash your inner gardener and enjoy the delightful benefits of homegrown peppermint!
Pfefferminze im Haus anbauen: Ein DIY-Leitfaden für frischen Duft und Geschmack
Hallo liebe Pflanzenfreunde! Habt ihr euch jemals gewünscht, immer frische Pfefferminze griffbereit zu haben, egal ob für Tee, Cocktails oder zum Kochen? Dann seid ihr hier genau richtig! Ich zeige euch, wie ihr ganz einfach Pfefferminze im Haus anbauen könnt. Es ist einfacher als ihr denkt und bringt einen Hauch von Frische in euer Zuhause.
Was ihr braucht: Die Zutaten für euren Minzgarten
Bevor wir loslegen, hier eine Liste der Dinge, die ihr benötigt:
* Pfefferminzpflanze oder Stecklinge: Ihr könnt entweder eine bereits gewachsene Pflanze im Gartencenter kaufen oder Stecklinge von einer Freundin oder einem Freund bekommen.
* Geeigneter Topf: Wählt einen Topf mit einem Durchmesser von mindestens 15 cm und guter Drainage. Pfefferminze mag es nicht, in stehendem Wasser zu stehen.
* Hochwertige Blumenerde: Eine gute Blumenerde ist wichtig für das Wachstum eurer Pfefferminze. Achtet darauf, dass sie locker und nährstoffreich ist.
* Wasser: Klares, sauberes Wasser zum Gießen.
* Sonniger Standort: Pfefferminze braucht viel Licht, also wählt einen sonnigen Platz am Fenster.
* Optional: Flüssigdünger für Kräuter, um das Wachstum zu fördern.
Pfefferminze anbauen: Schritt-für-Schritt-Anleitung
Jetzt geht’s ans Eingemachte! Hier ist eine detaillierte Anleitung, wie ihr eure Pfefferminze erfolgreich im Haus anbauen könnt:
1. Die Vorbereitung: Der richtige Topf und die Erde
1. Wählt den richtigen Topf: Wie bereits erwähnt, ist ein Topf mit guter Drainage entscheidend. Ich empfehle einen Terrakotta-Topf, da dieser atmungsaktiv ist und überschüssige Feuchtigkeit ableitet. Achtet darauf, dass der Topf Löcher im Boden hat.
2. Bereitet die Erde vor: Füllt den Topf mit hochwertiger Blumenerde. Ich mische gerne etwas Kompost unter die Erde, um sie noch nährstoffreicher zu machen. Lasst oben etwa 2-3 cm Platz.
3. Befeuchtet die Erde: Gießt die Erde leicht an, bevor ihr die Pfefferminze einpflanzt. Sie sollte feucht, aber nicht nass sein.
2. Das Einpflanzen: Pfefferminze in ihr neues Zuhause bringen
1. Pflanze vorbereiten (bei gekaufter Pflanze): Wenn ihr eine gekaufte Pfefferminzpflanze habt, lockert vorsichtig die Wurzeln auf, bevor ihr sie in den Topf pflanzt. Das hilft der Pflanze, sich besser zu etablieren.
2. Stecklinge vorbereiten (bei Stecklingen): Wenn ihr Stecklinge verwendet, entfernt die unteren Blätter, so dass etwa 2-3 cm des Stiels frei sind. Stellt die Stecklinge in ein Glas Wasser und wartet, bis sich Wurzeln bilden (das dauert in der Regel 1-2 Wochen). Wechselt das Wasser regelmäßig.
3. Pflanze einsetzen: Macht ein kleines Loch in die Erde und setzt die Pfefferminze (oder den bewurzelten Steckling) vorsichtig hinein. Achtet darauf, dass die Wurzeln gut bedeckt sind.
4. Erde andrücken: Drückt die Erde leicht um die Pflanze herum an, um sie zu stabilisieren.
5. Angießen: Gießt die Pflanze erneut, bis die Erde gut durchfeuchtet ist.
3. Die Pflege: Damit eure Pfefferminze prächtig gedeiht
1. Der richtige Standort: Pfefferminze liebt Licht! Stellt den Topf an einen sonnigen Platz am Fenster, idealerweise ein Südfenster. Wenn eure Pfefferminze nicht genug Licht bekommt, werden die Blätter blass und die Pflanze wächst spärlich.
2. Richtig gießen: Gießt eure Pfefferminze regelmäßig, aber vermeidet Staunässe. Die Erde sollte immer leicht feucht sein. Überprüft die Feuchtigkeit der Erde, indem ihr euren Finger etwa 2 cm tief in die Erde steckt. Wenn sie sich trocken anfühlt, ist es Zeit zum Gießen.
3. Düngen: Während der Wachstumsperiode (Frühling und Sommer) könnt ihr eure Pfefferminze alle 2-4 Wochen mit einem Flüssigdünger für Kräuter düngen. Befolgt dabei die Anweisungen auf der Verpackung.
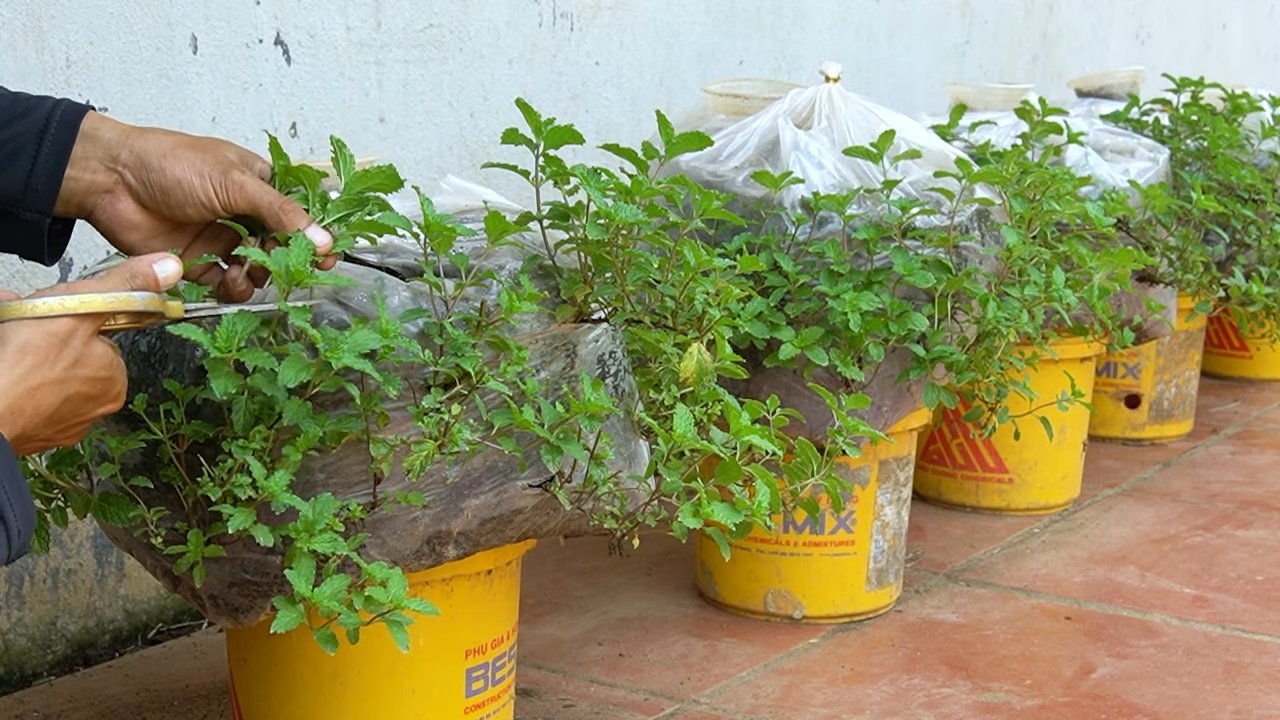
4. Schneiden: Regelmäßiges Schneiden fördert das Wachstum und verhindert, dass die Pfefferminze zu lang und spärlich wird. Schneidet die Spitzen der Triebe ab, um die Verzweigung anzuregen. Ihr könnt die abgeschnittenen Blätter natürlich sofort verwenden!
5. Umpflanzen: Pfefferminze wächst schnell und kann den Topf schnell ausfüllen. Wenn ihr feststellt, dass die Wurzeln aus den Drainagelöchern wachsen oder die Pflanze nicht mehr so gut wächst, ist es Zeit, sie in einen größeren Topf umzupflanzen.
Häufige Probleme und Lösungen: Was tun, wenn etwas schief geht?
Auch bei der Pfeffminzpflege können Probleme auftreten. Hier sind einige häufige Probleme und wie ihr sie lösen könnt:
* Gelbe Blätter: Gelbe Blätter können ein Zeichen für Überwässerung, Unterwässerung oder Nährstoffmangel sein. Überprüft die Feuchtigkeit der Erde und passt eure Gießgewohnheiten entsprechend an. Düngt die Pflanze gegebenenfalls.
* Blasse Blätter: Blasse Blätter deuten oft auf Lichtmangel hin. Stellt die Pflanze an einen sonnigeren Standort.
* Schädlinge: Pfefferminze kann von Blattläusen oder Spinnmilben befallen werden. Sprüht die Pflanze mit einer Lösung aus Wasser und etwas Spülmittel ab oder verwendet ein spezielles Insektizid für Kräuter.
* Pilzkrankheiten: Bei zu hoher Luftfeuchtigkeit können Pilzkrankheiten auftreten. Sorgt für eine gute Belüftung und vermeidet es, die Blätter beim Gießen zu benetzen.
Pfefferminze ernten und verwenden: Frische für eure Sinne
Ihr könnt eure Pfefferminze jederzeit ernten, sobald die Pflanze ausreichend gewachsen ist. Schneidet einfach die Blätter oder Triebe ab, die ihr benötigt. Am besten erntet ihr am Morgen, wenn die ätherischen Öle am konzentriertesten sind.
Hier sind einige Ideen, wie ihr eure frische Pfefferminze verwenden könnt:
* Tee: Übergießt frische Pfefferminzblätter mit heißem Wasser und lasst den Tee einige Minuten ziehen.
* Cocktails: Pfefferminze ist eine tolle Zutat für Cocktails wie Mojitos oder Minz-Juleps.
* Kochen: Verwendet Pfefferminze zum Würzen von Salaten, Saucen oder Desserts.
* Dekoration: Pfefferminze ist eine hübsche Dekoration für Speisen und Getränke.
* Ätherisches Öl: Ihr könnt aus eurer Pfefferminze auch ätherisches Öl herstellen (das ist allerdings etwas aufwendiger).
Zusätzliche Tipps und Tricks: Für noch mehr Erfolg mit eurer Pfefferminze
* Pfefferminze vermehren: Ihr könnt eure Pfefferminze ganz einfach durch Stecklinge vermehren. Schneidet einfach einen Trieb ab, entfernt die unteren Blätter und stellt den Steckling in ein Glas Wasser, bis sich Wurzeln bilden.
* Pfefferminze überwintern: Pfefferminze ist winterhart, aber im Topf kann sie etwas frostempfindlicher sein. Stellt den Topf im Winter an einen kühlen, hellen Ort und gießt weniger.
* Verschiedene Sorten: Es gibt viele verschiedene Pfefferminzsorten, wie Schokoladenminze, Orangenminze oder Zitronenminze. Probiert verschiedene Sorten aus, um eure Lieblingssorte zu finden!
Ich hoffe, dieser Leitfaden hat euch geholfen, eure eigene Pfefferminze im Haus anzubauen. Es ist ein tolles Gefühl, immer frische Kräuter griffbereit zu haben. Viel Spaß beim Gärtnern!
Conclusion
So, there you have it! Growing peppermint indoors isn’t just a whimsical idea for plant lovers; it’s a practical, aromatic, and incredibly rewarding endeavor. From the invigorating scent that fills your home to the readily available fresh leaves for teas, cocktails, and culinary creations, the benefits are truly abundant. We’ve walked you through the simple steps, debunked common myths, and armed you with the knowledge to cultivate your own thriving indoor peppermint patch.
But why is this DIY trick a must-try? Beyond the obvious convenience of having fresh peppermint at your fingertips, consider the environmental impact. Reducing your reliance on commercially grown and transported herbs contributes to a smaller carbon footprint. Plus, you have complete control over the growing process, ensuring your peppermint is free from harmful pesticides and chemicals. It’s a sustainable, healthy, and cost-effective alternative to buying pre-packaged herbs.
Furthermore, the act of nurturing a plant is inherently therapeutic. The simple act of watering, pruning, and observing your peppermint grow can be incredibly calming and grounding, offering a welcome respite from the stresses of daily life. It’s a small but significant way to connect with nature, even within the confines of your home.
Don’t be afraid to experiment with variations! Try different containers – terracotta pots, repurposed jars, or even hanging baskets can all work beautifully. Explore different soil mixes to find what your peppermint responds to best. And consider companion planting – basil, rosemary, and thyme are all excellent companions for peppermint, creating a fragrant and productive indoor herb garden. You can even try different varieties of peppermint, such as chocolate peppermint or lemon peppermint, for a unique twist on the classic flavor.
We wholeheartedly encourage you to give this DIY trick a try. It’s easier than you might think, and the rewards are well worth the effort. Imagine sipping a refreshing peppermint tea made with leaves you grew yourself, or adding a sprig of fresh peppermint to your favorite cocktail for an extra burst of flavor. The possibilities are endless!
Once you’ve embarked on your indoor peppermint growing journey, we’d love to hear about your experience. Share your tips, tricks, and triumphs in the comments below. Let’s create a community of indoor peppermint enthusiasts and learn from each other’s successes (and even the occasional setbacks!). Your insights could inspire others to take the plunge and discover the joy of growing their own fresh herbs. So, grab a pot, some soil, and a peppermint plant, and get ready to transform your home into a fragrant oasis. Happy growing!
Frequently Asked Questions (FAQ)
1. What kind of container is best for growing peppermint indoors?
The best container for growing peppermint indoors is one that provides adequate drainage and is large enough to accommodate the plant’s spreading roots. A pot that is at least 6 inches in diameter and 6 inches deep is a good starting point. Terracotta pots are a popular choice because they allow for good air circulation and help prevent overwatering. However, plastic pots are also suitable and can be more lightweight. Ensure that the container has drainage holes to prevent water from accumulating at the bottom, which can lead to root rot. You can also use repurposed containers like jars or tin cans, but make sure to drill drainage holes in the bottom.
2. What type of soil should I use for growing peppermint indoors?
Peppermint thrives in well-draining, nutrient-rich soil. A good potting mix for indoor peppermint should consist of a combination of peat moss, perlite, and vermiculite. This mixture provides good drainage, aeration, and moisture retention. You can also add compost or other organic matter to enrich the soil and provide essential nutrients. Avoid using garden soil, as it can be too heavy and may contain pests or diseases. A slightly acidic to neutral pH (around 6.0 to 7.0) is ideal for peppermint growth.
3. How much sunlight does indoor peppermint need?
Peppermint needs at least 4-6 hours of direct sunlight per day to thrive. Place your peppermint plant near a sunny window, preferably one that faces south or west. If you don’t have access to a sunny window, you can supplement with artificial light. A fluorescent grow light or LED grow light can provide the necessary light for healthy growth. Position the light a few inches above the plant and keep it on for 12-14 hours per day. Rotate the plant regularly to ensure that all sides receive adequate light.
4. How often should I water my indoor peppermint plant?
Water your indoor peppermint plant when the top inch of soil feels dry to the touch. Water thoroughly until excess water drains out of the drainage holes. Avoid overwatering, as this can lead to root rot. During the growing season (spring and summer), you may need to water more frequently than during the dormant season (fall and winter). Check the soil moisture regularly and adjust your watering schedule accordingly.
5. How do I fertilize my indoor peppermint plant?
Peppermint benefits from regular fertilization, especially during the growing season. Use a balanced liquid fertilizer diluted to half strength every 2-4 weeks. Look for a fertilizer with an N-P-K ratio of around 10-10-10 or 20-20-20. Avoid over-fertilizing, as this can burn the roots. You can also add compost or other organic matter to the soil to provide slow-release nutrients.
6. How do I harvest peppermint leaves from my indoor plant?
You can start harvesting peppermint leaves once the plant is established and has several sets of leaves. Simply pinch or cut off the leaves as needed. Regular harvesting encourages the plant to produce more leaves. For a larger harvest, you can cut back the entire plant by about one-third. This will promote bushier growth and a more abundant harvest.
7. How do I propagate peppermint from cuttings?
Peppermint is easy to propagate from cuttings. Simply take a 4-6 inch cutting from a healthy stem, removing the lower leaves. Place the cutting in a glass of water, making sure that the lower nodes are submerged. Roots should start to develop within a week or two. Once the roots are about an inch long, you can transplant the cutting into a pot filled with well-draining potting mix.
8. What are some common pests and diseases that affect indoor peppermint?
Common pests that can affect indoor peppermint include aphids, spider mites, and whiteflies. These pests can be controlled with insecticidal soap or neem oil. Root rot is a common disease that can affect peppermint if the soil is too wet. To prevent root rot, ensure that the soil is well-draining and avoid overwatering.
9. Can I grow peppermint indoors year-round?
Yes, you can grow peppermint indoors year-round with proper care. Provide adequate light, water, and fertilizer, and protect the plant from extreme temperatures. During the winter months, you may need to reduce watering and fertilization, as the plant’s growth will slow down.
10. Is peppermint safe for pets?
While peppermint is generally considered safe for humans, it can be toxic to pets if ingested in large quantities. The essential oils in peppermint can cause gastrointestinal upset in dogs and cats. If you have pets, keep your peppermint plant out of their reach.
Leave a Comment