
Growing Pineapples at Home might seem like an exotic dream reserved for tropical climates, but I’m here to tell you it’s absolutely achievable, even if you’re miles away from a sandy beach! Imagine the look on your friends’ faces when you casually mention you harvested a pineapple from your own backyard. Forget store-bought – we’re talking about fresh, juicy, homegrown goodness!
The pineapple, a symbol of hospitality and luxury, has a fascinating history. Originating in South America, it was a prized possession, often displayed as a status symbol in Europe during the 17th and 18th centuries. Now, you can bring a piece of that history and tropical flair to your own home.
Why should you embark on this DIY adventure? Well, for starters, store-bought pineapples can be expensive and sometimes lack that intense, sweet flavor. Plus, growing pineapples at home is incredibly rewarding and surprisingly easy with the right know-how. This article will provide you with simple, step-by-step instructions and insider tips to successfully cultivate your own pineapple plant, regardless of your gardening experience. Get ready to impress yourself and everyone around you with your newfound green thumb!
Growing Pineapples at Home: A Tropical Treat You Can Cultivate!
Okay, let’s be honest, who doesn’t love a juicy, sweet pineapple? And the thought of growing your own? Sounds like a dream, right? Well, it’s totally achievable, even if you don’t live in a tropical paradise! I’m going to walk you through exactly how to grow pineapples at home, whether you have a sprawling garden or just a sunny windowsill. Get ready to impress your friends (and yourself!) with your newfound pineapple-growing prowess.
Choosing Your Pineapple and Preparing the Crown
The first step is arguably the most fun: eating a pineapple! But seriously, the pineapple you choose is crucial for success.
* Selecting the Right Pineapple: Look for a pineapple that’s ripe, but not *too* ripe. You want one with healthy-looking, green leaves. Avoid pineapples with brown, wilted, or damaged leaves. The fruit itself should be golden-yellow and fragrant.
* Why the Crown Matters: The crown is the leafy top of the pineapple, and this is what we’ll be using to grow our new plant. It needs to be healthy and free from disease.
Step-by-Step Instructions:
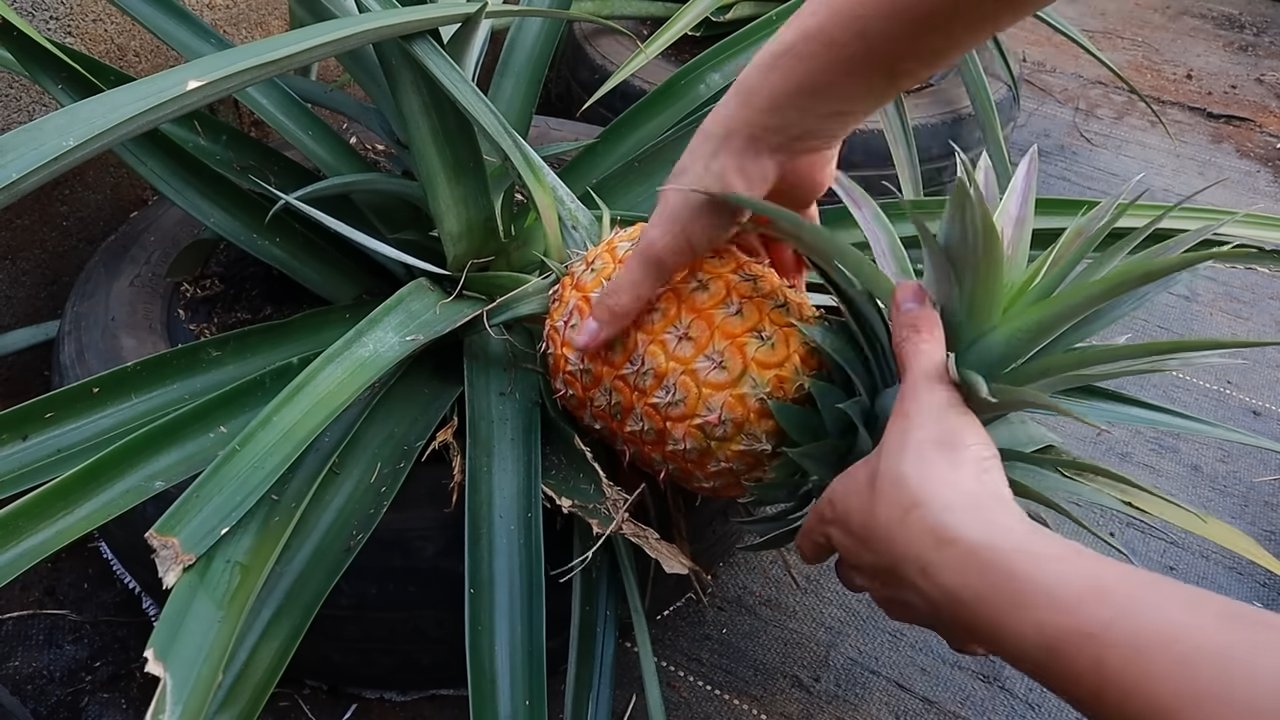
1. Twist and Shout (or Cut): There are two main ways to remove the crown. The first is to firmly grasp the leaves near the base and twist the crown off the fruit. This works best when the pineapple is perfectly ripe. If twisting doesn’t work, use a sharp knife to cut the crown off, leaving about an inch of fruit attached.
2. Remove the Excess Fruit: This is important! The remaining fruit will rot and can cause your crown to fail. Carefully peel off or cut away all the fruit from the base of the crown. You want to expose the little nubs or root primordia that are waiting to sprout.
3. Peel Back the Lower Leaves: Gently peel back the bottom few layers of leaves from the base of the crown. This will expose more of the stem and encourage root growth. Don’t be afraid to peel back a good inch or two of leaves.
4. Let it Dry (Important!): This is a crucial step to prevent rot. Place the crown in a cool, dry place for about a week. This allows the cut end to callous over, which will protect it from fungal infections. I usually just leave mine on a paper towel on the kitchen counter.
Rooting Your Pineapple Crown
Now that your crown is prepped, it’s time to get those roots growing! There are two main methods for rooting: water rooting and direct planting. I’ve had success with both, but I personally prefer water rooting because you can actually *see* the roots developing.
* Water Rooting: This method involves suspending the base of the crown in water until roots appear.
* Direct Planting: This method involves planting the crown directly into soil.
Step-by-Step Instructions (Water Rooting):
1. Choose Your Container: Select a clear glass or jar that’s wide enough to support the crown and deep enough to hold a few inches of water.
2. Fill with Water: Fill the container with fresh, clean water. I prefer using filtered water, but tap water that’s been left out overnight to dechlorinate works fine too.
3. Suspend the Crown: You want the base of the crown (where you peeled back the leaves) to be submerged in the water, but the leaves should be above the water line. You can use toothpicks inserted around the base of the crown to suspend it on the rim of the glass. Just be careful not to damage the stem.
4. Find a Sunny Spot: Place the container in a warm, sunny location. A windowsill is perfect.
5. Change the Water Regularly: Change the water every few days to prevent algae growth and keep it fresh.
6. Be Patient: Rooting can take several weeks, so don’t get discouraged if you don’t see roots right away. Just keep the water fresh and the crown in a sunny spot. You should start to see small roots emerging from the base of the crown in about 2-3 weeks.
Step-by-Step Instructions (Direct Planting):
1. Prepare Your Pot: Choose a pot that’s at least 6 inches in diameter. Make sure it has drainage holes!
2. Use Well-Draining Soil: Pineapples don’t like soggy soil. Use a well-draining potting mix, such as a cactus or succulent mix, or amend regular potting mix with perlite or sand.
3. Plant the Crown: Plant the crown in the pot, burying the base (where you peeled back the leaves) in the soil.
4. Water Lightly: Water the soil lightly, just enough to moisten it. Don’t overwater!
5. Find a Sunny Spot: Place the pot in a warm, sunny location.
6. Keep the Soil Moist (But Not Soggy): Water the soil when the top inch feels dry to the touch.
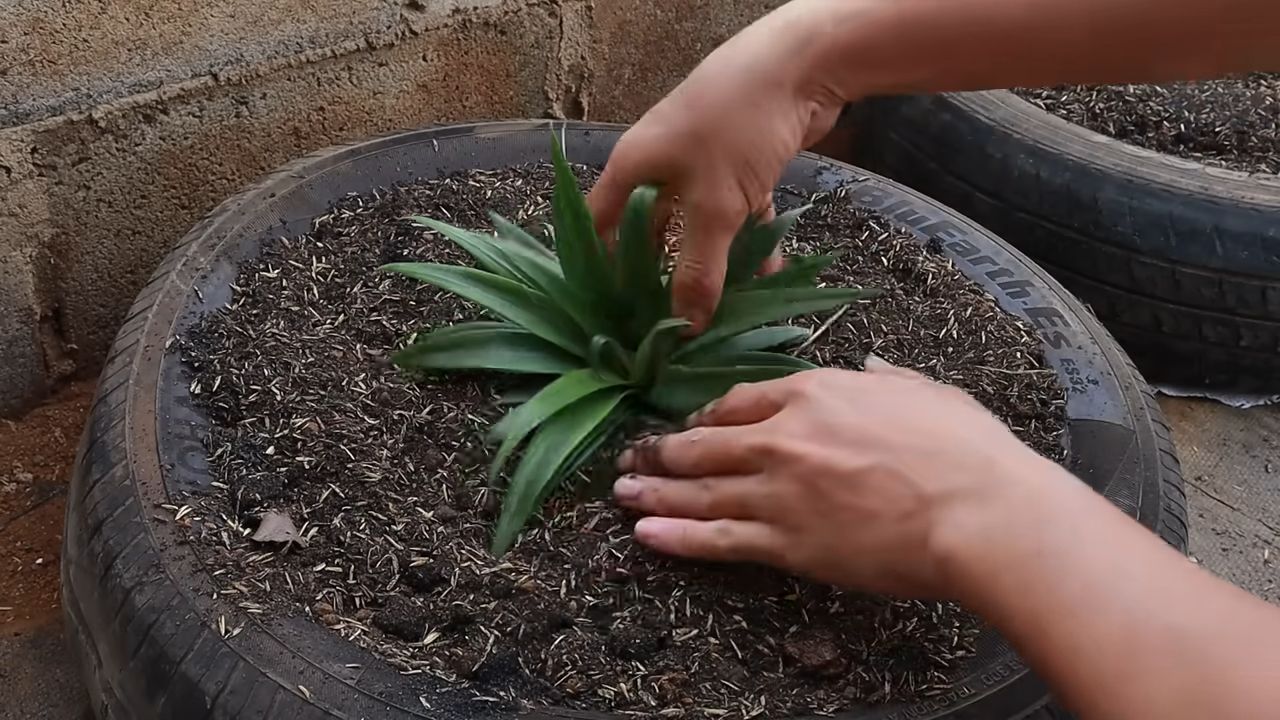
Planting Your Rooted Pineapple Crown
Once your pineapple crown has developed a good root system (about 2-3 inches long if you’re water rooting), it’s time to plant it in a pot. Even if you chose direct planting, you may need to repot into a larger container as it grows.
* Choosing the Right Pot: Pineapples need room to grow, so choose a pot that’s at least 10-12 inches in diameter. A larger pot is always better than a smaller one.
* Soil is Key: Again, well-draining soil is essential.
Step-by-Step Instructions:
1. Prepare Your Pot: Fill the pot with well-draining potting mix, leaving a few inches of space at the top.
2. Carefully Remove the Crown: If you water rooted, gently remove the crown from the water. If you direct planted, you may not need to do anything.
3. Plant the Crown: Dig a hole in the center of the pot and carefully place the crown in the hole. Make sure the roots are spread out and not crammed together.
4. Backfill with Soil: Fill the hole with soil, gently packing it around the crown.
5. Water Thoroughly: Water the soil thoroughly until water drains out of the drainage holes.
6. Find a Sunny Spot: Place the pot in a warm, sunny location. Pineapples need at least 6 hours of sunlight per day.
7. Fertilize Regularly: Pineapples are heavy feeders, so fertilize them regularly with a balanced fertilizer. Follow the instructions on the fertilizer label. I like to use a liquid fertilizer diluted to half strength every few weeks during the growing season (spring and summer).
Caring for Your Pineapple Plant
Now that your pineapple plant is planted, it’s time to provide it with the care it needs to thrive.
* Sunlight: As mentioned before, pineapples need plenty of sunlight.
* Watering: Water your pineapple plant when the top inch of soil feels dry to the touch. Avoid overwatering, as this can lead to root rot.
* Temperature: Pineapples are tropical plants and prefer warm temperatures. They can tolerate temperatures as low as 60°F (15°C), but they thrive in temperatures between 70°F (21°C) and 85°F (29°C).
* Humidity: Pineapples also prefer high humidity. If you live in a dry climate, you can increase the humidity around your plant by misting it regularly or placing it on a tray filled with pebbles and water.
* Fertilizing: Continue to fertilize your pineapple plant regularly during the growing season.
* Pest Control: Keep an eye out for pests, such as mealybugs and scale. If you find any pests, treat them with an appropriate insecticide. I prefer using neem oil, as it’s a natural and effective option.
Encouraging Fruiting
This is the part everyone’s waiting for! Getting your pineapple plant to actually produce a pineapple can take some time and patience. It can take anywhere from 1 to 3 years for a pineapple plant to mature and produce fruit.
* Maturity: The plant needs to be mature enough to fruit.
* Ethylene Gas: Pineapples are stimulated to fruit by ethylene gas.
Step-by-Step Instructions (Ethylene Gas Trick):
1. Wait for Maturity: Make sure your pineapple plant is at least 2-3 years old and has a healthy rosette of leaves.
2. Find an Apple: Grab a ripe apple. Apples naturally produce ethylene gas as they ripen.
3. Cover the Plant: Place a large plastic bag over the entire pineapple plant, including the pot.
4. Add the Apple: Place the apple inside the
Conclusion
So, there you have it! Growing pineapples at home, while it might seem like an exotic endeavor reserved for tropical climates, is surprisingly achievable with a little patience and the right approach. This DIY trick isn’t just about saving money on store-bought fruit; it’s about experiencing the unique satisfaction of nurturing a plant from its humble beginnings to a delicious, homegrown pineapple. Think about it: you’ll be able to impress your friends and family with your green thumb, and you’ll have a conversation starter that’s far more interesting than your average houseplant.
But beyond the bragging rights, growing your own pineapple offers a level of control over the growing process that you simply can’t get with store-bought fruit. You can choose organic fertilizers, avoid harmful pesticides, and ensure that your pineapple is grown in the most sustainable way possible. This is especially important if you’re concerned about the environmental impact of your food choices.
And don’t think you’re limited to just one type of pineapple! Experiment with different varieties to discover your favorite flavor profile. ‘Smooth Cayenne’ is a classic choice, known for its sweet and tangy taste, but you could also try ‘MD-2’, which is sweeter and less acidic. For a smaller, ornamental pineapple, consider ‘Red Spanish’. The possibilities are endless!
Consider these variations to tailor the process to your specific needs and preferences:
* Hydroponic Pineapple Growing: For those with limited space or a penchant for modern gardening techniques, growing pineapples hydroponically can be a fascinating and efficient alternative.
* Container Gardening with a Twist: Instead of a standard pot, try using a repurposed container like a large bucket or even a half-barrel. This adds a rustic charm to your garden and provides ample space for the pineapple to thrive.
* Pineapple Guilding: Plant herbs like basil or rosemary around the base of your pineapple plant. These companion plants can help deter pests and improve the overall health of your pineapple.
Ultimately, the best way to learn is by doing. Don’t be afraid to experiment, make mistakes, and learn from them. Growing pineapples at home is a journey, not a destination. Embrace the process, enjoy the challenges, and savor the sweet reward of your homegrown fruit.
We wholeheartedly encourage you to give this DIY trick a try. It’s a rewarding experience that connects you with nature and provides you with a delicious, healthy treat. And once you’ve harvested your first pineapple, be sure to share your experience with us! We’d love to hear your tips, tricks, and triumphs. Post photos of your pineapple plants on social media using #HomegrownPineapple and tag us so we can celebrate your success. Let’s create a community of pineapple enthusiasts and inspire others to embark on this exciting gardening adventure!
Frequently Asked Questions (FAQ)
How long does it take to grow a pineapple from a top?
The most common question, and understandably so! Growing pineapples from the top of a store-bought fruit is a patience game. Generally, it takes anywhere from 2 to 3 years for a pineapple plant to mature and produce fruit. The exact timeframe depends on several factors, including the variety of pineapple, the climate, the amount of sunlight it receives, and the overall care it gets. Don’t get discouraged if it takes longer than expected; the reward of a homegrown pineapple is well worth the wait!
What kind of soil is best for growing pineapples?
Pineapples thrive in well-draining, slightly acidic soil. A mixture of equal parts potting soil, sand, and peat moss is a good starting point. The sand helps with drainage, while the peat moss provides acidity. You can also add some perlite to further improve drainage. Avoid heavy clay soils, as they can retain too much water and lead to root rot. A soil pH between 5.5 and 6.5 is ideal. You can test your soil pH with a simple soil testing kit available at most garden centers.
How much sunlight do pineapples need?
Pineapples are sun-loving plants and need at least 6 hours of direct sunlight per day. If you’re growing your pineapple indoors, place it near a sunny window, preferably one that faces south or west. You may also need to supplement with artificial light, especially during the winter months. A grow light can provide the necessary light intensity to keep your pineapple plant healthy and productive.
How often should I water my pineapple plant?
Water your pineapple plant thoroughly when the top inch of soil feels dry to the touch. Avoid overwatering, as this can lead to root rot. Pineapples are relatively drought-tolerant, so it’s better to err on the side of underwatering than overwatering. During the growing season (spring and summer), you may need to water more frequently than during the dormant season (fall and winter). Also, remember to water the central cup of the plant, as this is where the pineapple absorbs water and nutrients.
What kind of fertilizer should I use for my pineapple plant?
Pineapples are heavy feeders and benefit from regular fertilization. Use a balanced fertilizer with a ratio of 10-10-10 or 15-15-15. Apply the fertilizer every 2-3 months during the growing season. You can also use a liquid fertilizer diluted to half strength and apply it more frequently. Avoid fertilizing during the dormant season. Organic options include compost tea or fish emulsion.
How do I know when my pineapple is ripe?
Determining when a pineapple is ripe can be tricky, but there are a few telltale signs. The pineapple should have a vibrant color, ranging from green to golden yellow, depending on the variety. The fruit should also have a sweet, fragrant aroma. Gently tug on one of the leaves near the top of the pineapple; if it comes off easily, the pineapple is likely ripe. You can also tap on the pineapple; a ripe pineapple will have a dull, thudding sound.
My pineapple plant is not fruiting. What can I do?
There are several reasons why your pineapple plant might not be fruiting. First, make sure it’s getting enough sunlight and fertilizer. Second, ensure that it’s not being overwatered or underwatered. Third, consider using ethylene gas to induce flowering. You can do this by placing a ripe apple near the pineapple plant and covering it with a plastic bag for a few days. The apple will release ethylene gas, which can stimulate flowering.
Can I grow pineapples in cold climates?
While pineapples are tropical plants, they can be grown in colder climates with proper care. The key is to grow them in containers so you can bring them indoors during the winter months. Make sure to provide them with plenty of sunlight and warmth. You may also need to use a grow light to supplement the natural light. With a little extra effort, you can enjoy homegrown pineapples even in colder climates.
What are some common pests and diseases that affect pineapple plants?
Pineapples can be susceptible to a few pests and diseases, including mealybugs, scale, and root rot. Mealybugs and scale are small, sap-sucking insects that can weaken the plant. They can be controlled with insecticidal soap or neem oil. Root rot is a fungal disease that can occur in overly wet soil. To prevent root rot, make sure your pineapple plant is planted in well-draining soil and avoid overwatering.
Is it really possible to grow a pineapple from a store-bought pineapple top?
Absolutely! While it requires patience and the right conditions, growing a pineapple from a store-bought top is a rewarding and achievable project. It’s a fantastic way to recycle, learn about plant propagation, and ultimately enjoy the delicious fruit of your labor. Don’t be discouraged by the time it takes; the journey is just as enjoyable as the destination.

Leave a Comment