
Growing Potatoes in Containers: Imagine harvesting a bounty of fresh, homegrown potatoes right from your patio or balcony! No sprawling garden needed. Sounds too good to be true? It’s not! For centuries, potatoes have been a staple food source, dating back to the Inca civilization in South America. They were domesticated thousands of years ago and have since spread across the globe, becoming a cornerstone of countless cuisines. But what if you lack the space for a traditional potato patch?
That’s where the magic of container gardening comes in. I’m here to tell you that growing potatoes in containers is not only possible, but it’s also surprisingly easy and rewarding. In today’s fast-paced world, many of us are craving a connection to nature and a way to produce our own food, even in limited spaces. This DIY guide will equip you with all the knowledge and simple tricks you need to successfully grow your own delicious potatoes, regardless of whether you have a sprawling backyard or just a sunny balcony. Get ready to dig in (pun intended!) and discover the joy of harvesting your very own spuds!
Growing Potatoes in Containers: A Bumper Crop on Your Patio!
Hey there, fellow gardening enthusiasts! I’m so excited to share my tried-and-true method for growing potatoes in containers. Forget vast fields; you can enjoy a fantastic potato harvest right on your balcony, patio, or even a sunny windowsill! This method is perfect for small spaces and makes harvesting a breeze. Let’s get digging (pun intended!) into how to grow your own spuds in containers.
Choosing the Right Container and Seed Potatoes
Before we get our hands dirty, let’s talk about the essentials: the container and the seed potatoes. These are crucial for a successful potato-growing adventure.
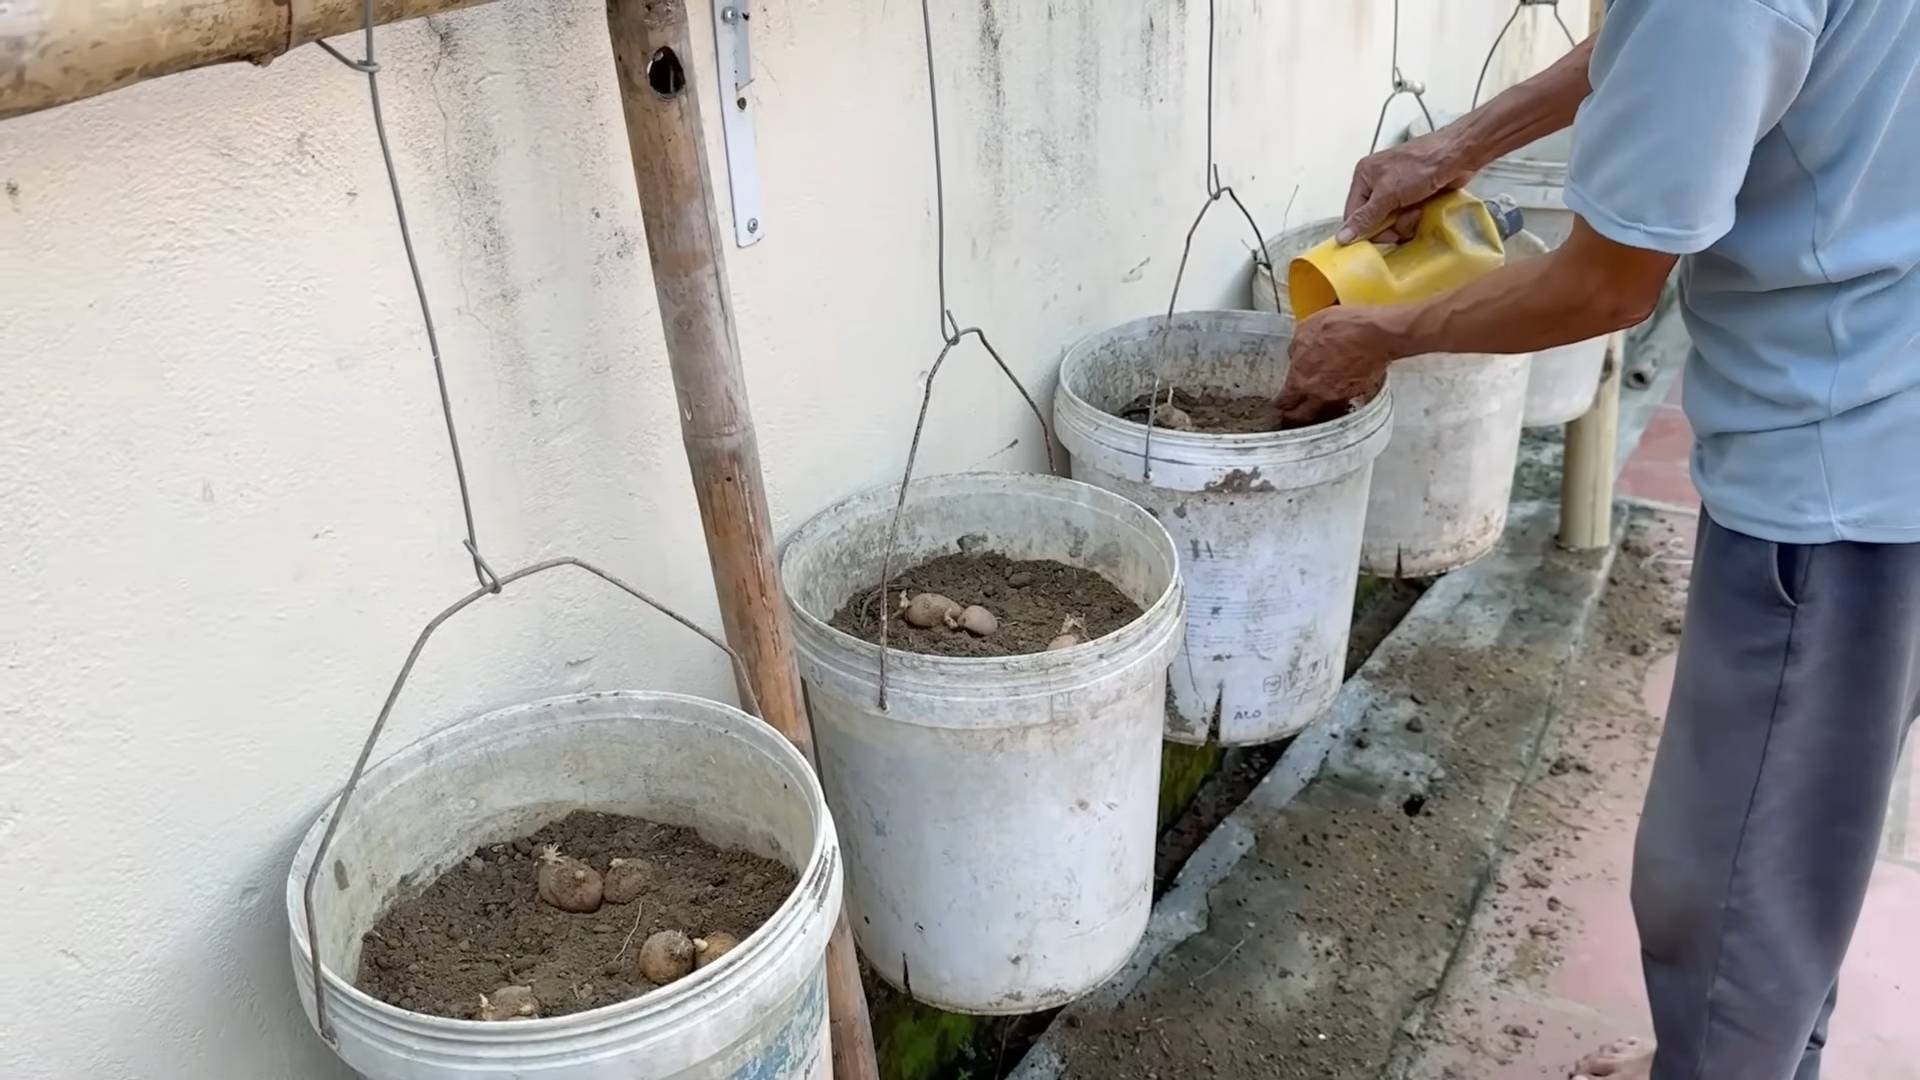
* **Container Size:** Bigger is better! I recommend a container that’s at least 15 gallons in size. A half-barrel planter, a large trash can (with drainage holes, of course!), or even a sturdy grow bag will work wonders. The depth is key – aim for at least 18 inches deep to allow those potatoes plenty of room to develop.
* **Drainage:** This is non-negotiable. Potatoes hate sitting in soggy soil. Make sure your container has ample drainage holes. If you’re using a trash can or something similar, drill several holes in the bottom.
* **Seed Potatoes:** These aren’t seeds in the traditional sense; they’re actually small potatoes or pieces of potatoes with “eyes” (those little buds that sprout). You can buy certified seed potatoes from a garden center or online. Avoid using potatoes from the grocery store, as they may be treated to prevent sprouting.
* **Variety Selection:** Choose a variety that suits your taste and growing conditions. Early-season varieties mature faster, while late-season varieties offer a larger harvest. Some popular choices include Yukon Gold, Red Pontiac, and Russet Burbank. I personally love Yukon Gold for its creamy texture and versatility.
* **Chitting (Optional but Recommended):** Chitting is the process of encouraging your seed potatoes to sprout before planting. This gives them a head start and can result in an earlier and larger harvest. To chit your potatoes, place them in a cool, bright location (but not direct sunlight) for a few weeks. You’ll see small, green sprouts emerging from the eyes.
Preparing Your Seed Potatoes and Planting
Now that we’ve got our container and seed potatoes sorted, let’s get ready to plant!
1. **Cut Large Seed Potatoes (If Necessary):** If your seed potatoes are larger than a golf ball, you can cut them into smaller pieces. Make sure each piece has at least 2-3 “eyes.” Let the cut pieces dry for a day or two to allow the cut surfaces to callous over. This helps prevent rot. I usually cut mine a day before planting.
2. **Prepare Your Soil Mix:** Potatoes thrive in well-draining, slightly acidic soil. I like to use a mix of equal parts compost, potting soil, and perlite or vermiculite. The compost provides nutrients, the potting soil provides structure, and the perlite/vermiculite improves drainage.
3. **Initial Planting:** Fill the bottom of your container with about 4-6 inches of your soil mix.
4. **Place the Seed Potatoes:** Place the seed potato pieces (or whole small seed potatoes) on top of the soil, with the “eyes” facing upwards. Space them about 8-10 inches apart if you’re planting multiple pieces in the same container.
5. **Cover with Soil:** Cover the seed potatoes with another 4-6 inches of soil mix.
6. **Water Thoroughly:** Water the container thoroughly until water drains out of the bottom. This helps settle the soil and encourages root growth.
The “Hilling” Process: Key to a Bountiful Harvest
This is where the magic happens! “Hilling” is the process of adding more soil to the container as the potato plants grow. This encourages the plants to produce more potatoes along the stems.
1. **Wait for Sprouts:** Be patient! It may take a week or two for the potato plants to emerge from the soil.
2. **First Hilling:** Once the plants are about 6-8 inches tall, add more soil mix to the container, burying the stems up to the bottom set of leaves. Leave the top few leaves exposed.
3. **Repeat Hilling:** Continue hilling every 2-3 weeks as the plants grow, always burying the stems up to the bottom set of leaves. This encourages the plants to produce more potatoes along the buried stems. I usually do this until the container is almost full.
4. **Water Regularly:** Keep the soil consistently moist, but not waterlogged. Water deeply whenever the top inch of soil feels dry.
5. **Fertilize (Optional):** While not essential, fertilizing can boost your potato yield. Use a balanced fertilizer (e.g., 10-10-10) according to the package directions. I prefer using organic fertilizers like compost tea or fish emulsion.
Caring for Your Potato Plants
Beyond hilling and watering, here are a few more tips to keep your potato plants happy and healthy:
* **Sunlight:** Potatoes need at least 6-8 hours of sunlight per day. Place your container in a sunny location.
* **Pest Control:** Keep an eye out for pests like aphids, potato beetles, and flea beetles. Hand-picking them off the plants is often effective. You can also use organic pest control methods like insecticidal soap or neem oil.
* **Disease Prevention:** Potatoes can be susceptible to diseases like blight. Ensure good air circulation around the plants and avoid overhead watering. If you notice any signs of disease, remove the affected leaves immediately.
* **Support (Optional):** As the plants grow taller, they may need some support. You can use stakes or a tomato cage to keep them upright.
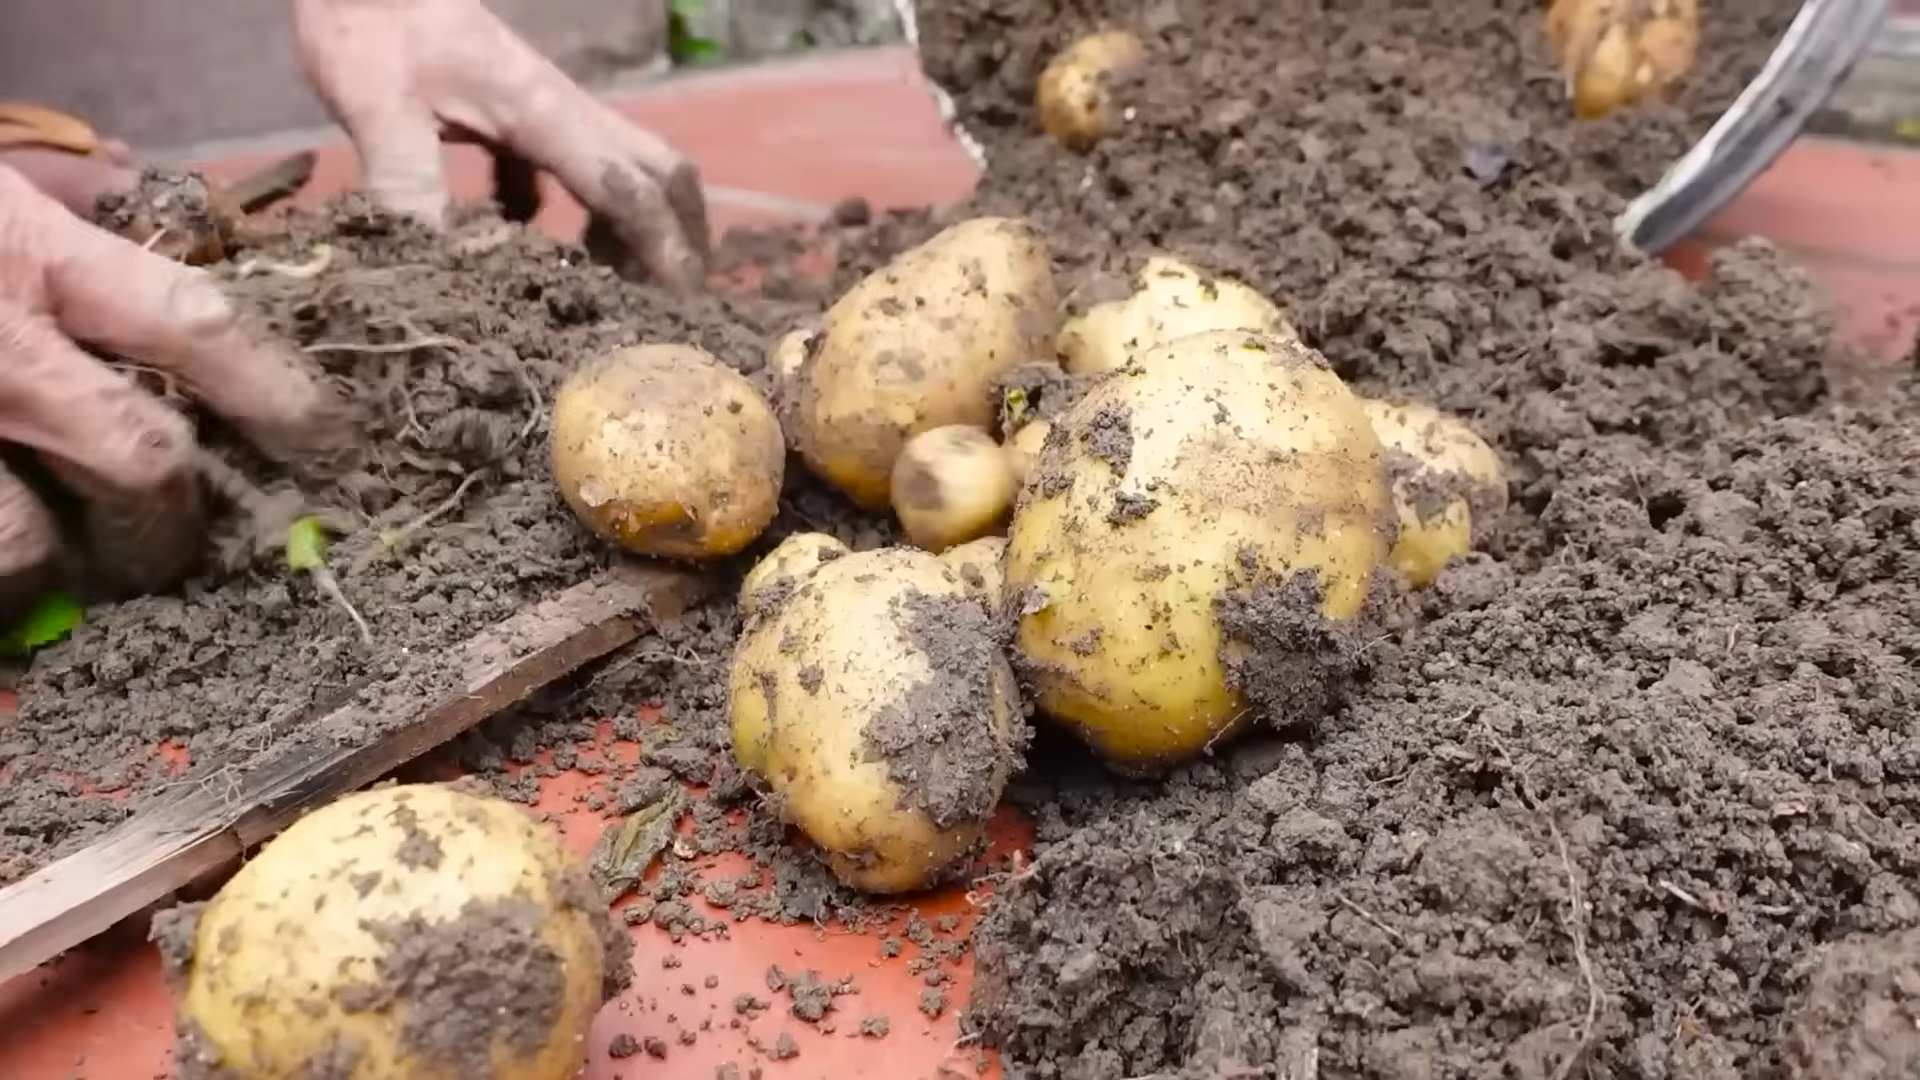
Harvesting Your Homegrown Potatoes
The moment we’ve all been waiting for! Harvesting your own potatoes is incredibly rewarding.
1. **Timing:** Early-season varieties are typically ready to harvest about 70-80 days after planting, while late-season varieties take longer (90-120 days). A good indicator is when the foliage starts to turn yellow and die back.
2. **Gentle Digging:** Stop watering a week or two before harvest to allow the potatoes to cure slightly. Then, carefully tip the container onto its side and gently dig through the soil to uncover your potatoes. You can also reach down into the container and feel around for the potatoes.
3. **Harvesting “New” Potatoes:** If you want to harvest “new” potatoes (small, tender potatoes), you can start harvesting them a few weeks after the plants flower. Just reach into the container and gently pull out a few potatoes, leaving the rest to continue growing.
4. **Curing (Optional):** If you plan to store your potatoes for a longer period, you can cure them for a week or two. Place them in a cool, dark, and well-ventilated place to allow the skins to harden.
5. **Storage:** Store your cured potatoes in a cool, dark, and dry place. Avoid storing them near apples or onions, as these can cause them to sprout prematurely.
Troubleshooting Common Potato-Growing Problems
Even with the best care, you might encounter a few challenges along the way. Here are some common problems and how to address them:
* **Green Potatoes:** Potatoes that are exposed to sunlight will turn green and produce a toxin called solanine. These potatoes are not safe to eat. Make sure to keep your potatoes covered with soil or mulch to prevent them from turning green.
* **Small Potatoes:** If your potatoes are small, it could be due to a number of factors, including insufficient sunlight, poor soil, or overcrowding. Make sure your plants are getting enough sunlight, use a good quality soil mix, and space your seed potatoes properly.
* **Potato Scab:** This is a common disease that causes rough, scabby patches on the potato skins. It’s usually not a serious problem, but it can affect the appearance of the potatoes. To prevent potato scab, avoid overwatering and maintain a slightly acidic soil pH.
* **Pests:** As mentioned earlier, pests can be a problem. Regularly inspect your plants for pests and take action promptly.
Enjoy Your Homegrown Harvest!
Growing potatoes in containers is a fun and rewarding experience. With a little bit of care and attention, you can enjoy a delicious harvest of homegrown potatoes right from your own backyard (or balcony!). I hope this guide has been helpful. Happy gardening!
Conclusion
So, there you have it! Growing potatoes in containers is not just a gardening trend; it’s a game-changer for anyone with limited space, a desire for fresh, homegrown produce, or simply a love for a rewarding DIY project. Forget the sprawling garden plots and back-breaking digging. With this container gardening method, you can cultivate a bountiful harvest of delicious potatoes right on your balcony, patio, or even a sunny windowsill.
Why is this a must-try? Because it puts you in complete control. You dictate the soil quality, the watering schedule, and the overall environment, leading to healthier plants and a more predictable yield. Plus, the sheer joy of harvesting your own potatoes, pulling them fresh from the soil you nurtured, is an experience that store-bought spuds simply can’t replicate. Imagine the satisfaction of serving a meal featuring potatoes you grew yourself – a true farm-to-table experience, no farm required!
But the beauty of container gardening lies in its adaptability. Feel free to experiment with different potato varieties. Russets, Yukon Golds, red potatoes – each offers a unique flavor and texture profile. Try mixing different types in the same container (though be mindful of spacing) for a diverse harvest. You can also add companion plants like marigolds or basil to your potato containers to deter pests and attract beneficial insects. Consider using organic fertilizers and pest control methods to keep your potatoes as natural and healthy as possible.
Don’t be afraid to get creative with your containers, either. While traditional pots work perfectly well, you can also repurpose old buckets, trash cans (with drainage holes, of course!), or even grow bags. The key is to ensure adequate drainage and enough space for the potatoes to develop.
And speaking of development, remember the importance of “hilling” your potatoes. As the potato plants grow, continue to add more soil to the container, burying the stems and encouraging the formation of more potatoes along the buried portion. This is crucial for maximizing your yield.
Ultimately, growing potatoes in containers is an accessible and rewarding way to connect with nature, enjoy fresh, homegrown food, and flex your green thumb. It’s a project that’s suitable for beginners and experienced gardeners alike.
We wholeheartedly encourage you to give this DIY trick a try. Start small, experiment with different techniques, and most importantly, have fun! And once you’ve harvested your first batch of homegrown potatoes, we’d love to hear about your experience. Share your photos, tips, and stories in the comments below. Let’s build a community of container potato growers and inspire others to discover the joys of homegrown goodness. Happy gardening!
Frequently Asked Questions (FAQs)
What is the best type of container to use for growing potatoes?
The ideal container for growing potatoes should be large enough to accommodate the growing root system and allow for hilling. A container that is at least 15-20 gallons in size is recommended. The container should also have drainage holes to prevent waterlogging, which can lead to root rot. You can use plastic pots, grow bags, or even repurposed containers like old buckets or trash cans (with drainage holes added). Grow bags are particularly popular because they allow for good airflow and drainage, and they are lightweight and easy to move. The material of the container isn’t as important as the size and drainage capabilities.
What type of soil is best for growing potatoes in containers?
Potatoes need well-draining, nutrient-rich soil. A good potting mix specifically designed for vegetables is ideal. Avoid using garden soil, as it can be too heavy and compact, hindering drainage and root development. You can also create your own potting mix by combining equal parts of compost, peat moss (or coconut coir), and perlite or vermiculite. Compost provides essential nutrients, peat moss or coconut coir helps retain moisture, and perlite or vermiculite improves drainage and aeration. The pH of the soil should be slightly acidic, around 6.0 to 6.5.
How often should I water my potato plants in containers?
Watering frequency depends on several factors, including the weather, the size of the container, and the type of soil. Generally, you should water your potato plants when the top inch of soil feels dry to the touch. Water deeply, ensuring that the water drains out of the drainage holes. Avoid overwatering, as this can lead to root rot. During hot, dry weather, you may need to water your plants daily. In cooler, wetter weather, you may only need to water them every few days. A good rule of thumb is to check the soil moisture regularly and adjust your watering schedule accordingly.
How much sunlight do potato plants need?
Potato plants need at least 6-8 hours of direct sunlight per day to thrive. Choose a location for your containers that receives plenty of sunlight. If you live in a particularly hot climate, you may need to provide some afternoon shade to prevent the plants from overheating. If you don’t have a sunny location, you can supplement with grow lights.
How do I “hill” my potato plants?
Hilling is a crucial step in growing potatoes in containers. As the potato plants grow, new potatoes will form along the buried portion of the stem. To encourage this, gradually add more soil to the container as the plants grow taller. When the plants are about 6-8 inches tall, add a few inches of soil, burying the lower portion of the stem. Repeat this process every few weeks until the container is almost full. This will encourage the plants to produce more potatoes.
When and how do I harvest my potatoes?
The time it takes for potatoes to mature depends on the variety. Generally, you can start harvesting “new potatoes” (small, immature potatoes) about 7-8 weeks after planting. To harvest new potatoes, carefully dig around the edges of the container and remove a few potatoes, leaving the rest of the plant to continue growing. For mature potatoes, wait until the foliage starts to turn yellow and die back, usually around 12-15 weeks after planting. At this point, stop watering the plants and let the soil dry out slightly. Then, carefully tip the container over and harvest all the potatoes.
What are some common pests and diseases that affect potato plants, and how can I prevent them?
Common pests that affect potato plants include aphids, potato beetles, and flea beetles. You can prevent these pests by using organic pest control methods, such as introducing beneficial insects (like ladybugs), spraying with insecticidal soap, or using row covers to protect the plants. Common diseases include early blight, late blight, and potato scab. To prevent these diseases, choose disease-resistant potato varieties, ensure good air circulation around the plants, avoid overwatering, and practice crop rotation.
Can I grow potatoes in containers indoors?
Yes, you can grow potatoes in containers indoors, but you will need to provide them with adequate light. A sunny windowsill that receives at least 6-8 hours of direct sunlight per day is ideal. If you don’t have a sunny windowsill, you can use grow lights. You will also need to ensure that the plants have good air circulation and are watered properly.
Can I reuse the soil from my potato containers?
It is generally not recommended to reuse the soil from your potato containers for growing potatoes again. Potatoes can deplete the soil of nutrients, and the soil may also harbor pests or diseases. However, you can reuse the soil for other plants that are not susceptible to the same pests or diseases. Before reusing the soil, amend it with compost and other organic matter to replenish the nutrients.
What are some good companion plants for potatoes in containers?
Companion planting can help deter pests, attract beneficial insects, and improve the overall health of your potato plants. Some good companion plants for potatoes include marigolds, basil, thyme, and nasturtiums. Marigolds deter nematodes and other soil pests. Basil repels aphids and other insects. Thyme attracts beneficial insects. Nasturtiums attract aphids away from the potato plants.

Leave a Comment