
Growing Water Spinach Easily at home can feel like unlocking a secret superpower! Imagine fresh, vibrant greens, bursting with flavor, just steps from your kitchen. Forget those wilted, overpriced bunches at the grocery store. This isn’t just about saving money; it’s about connecting with nature and enjoying the unparalleled taste of homegrown goodness.
Water spinach, also known as Ong Choy or Kangkong, has a rich history, deeply rooted in Southeast Asian cuisine. For centuries, it’s been a staple, celebrated for its nutritional value and versatility. From stir-fries to soups, this leafy green adds a delightful crunch and earthy flavor to countless dishes. I remember my grandmother always having a patch of it thriving in her backyard – a testament to its resilience and ease of cultivation.
But why should *you* learn this DIY trick? Well, let’s face it, we’re all looking for ways to eat healthier, save money, and reduce our environmental impact. Growing Water Spinach Easily ticks all those boxes! Plus, it’s incredibly rewarding to nurture a plant from seed to table. This guide will provide you with simple, step-by-step instructions, even if you’re a complete beginner. So, grab your gardening gloves, and let’s get started on your water spinach adventure!
Wasserspinat einfach selbst anbauen: Mein DIY-Guide für den Garten oder Balkon
Hallo liebe Gartenfreunde! Ich liebe Wasserspinat (auch bekannt als Ong Choy oder Morning Glory) – er ist knackig, lecker und super vielseitig in der Küche. Und das Beste: Er ist wirklich einfach selbst anzubauen, egal ob du einen Garten oder nur einen kleinen Balkon hast. In diesem Artikel zeige ich dir Schritt für Schritt, wie du deinen eigenen Wasserspinat erfolgreich anbaust. Los geht’s!
Was du für den Anbau von Wasserspinat brauchst
Bevor wir loslegen, hier eine Liste mit allem, was du benötigst:
* Wasserspinat-Samen: Diese bekommst du in gut sortierten Gartencentern oder online. Achte darauf, frische Samen zu kaufen, da die Keimfähigkeit mit der Zeit abnimmt.
* Behälter: Du kannst Töpfe, Kübel, Eimer oder sogar eine alte Badewanne verwenden. Wichtig ist, dass der Behälter groß genug ist (mindestens 30 cm tief und breit) und Abzugslöcher hat.
* Erde: Eine gute, nährstoffreiche Blumenerde ist ideal. Du kannst auch Kompost untermischen, um die Erde noch weiter aufzuwerten.
* Wasser: Wasserspinat liebt Wasser, also sorge für eine zuverlässige Wasserquelle.
* Dünger: Ein organischer Flüssigdünger ist perfekt, um das Wachstum zu fördern.
* Optional: Eine Anzuchtschale oder kleine Töpfe für die Voranzucht.
Die Vorbereitung: Samen einweichen und vorziehen (optional)
Ich persönlich ziehe meine Wasserspinat-Samen gerne vor, da ich so die Keimung besser kontrollieren kann. Aber keine Sorge, es geht auch ohne!
1. Samen einweichen: Lege die Samen für 12-24 Stunden in lauwarmes Wasser. Das hilft, die harte Samenschale aufzuweichen und die Keimung zu beschleunigen.
2. Voranzucht (optional): Fülle eine Anzuchtschale oder kleine Töpfe mit Anzuchterde. Drücke die Erde leicht an und säe die Samen etwa 1 cm tief.
3. Feucht halten: Besprühe die Erde mit Wasser, sodass sie feucht, aber nicht nass ist.
4. Warm stellen: Stelle die Anzuchtschale an einen warmen, hellen Ort. Eine Temperatur von 20-25°C ist ideal.
5. Geduld haben: Nach etwa 5-10 Tagen sollten die ersten Keimlinge zu sehen sein.
Der Hauptakt: Wasserspinat einpflanzen
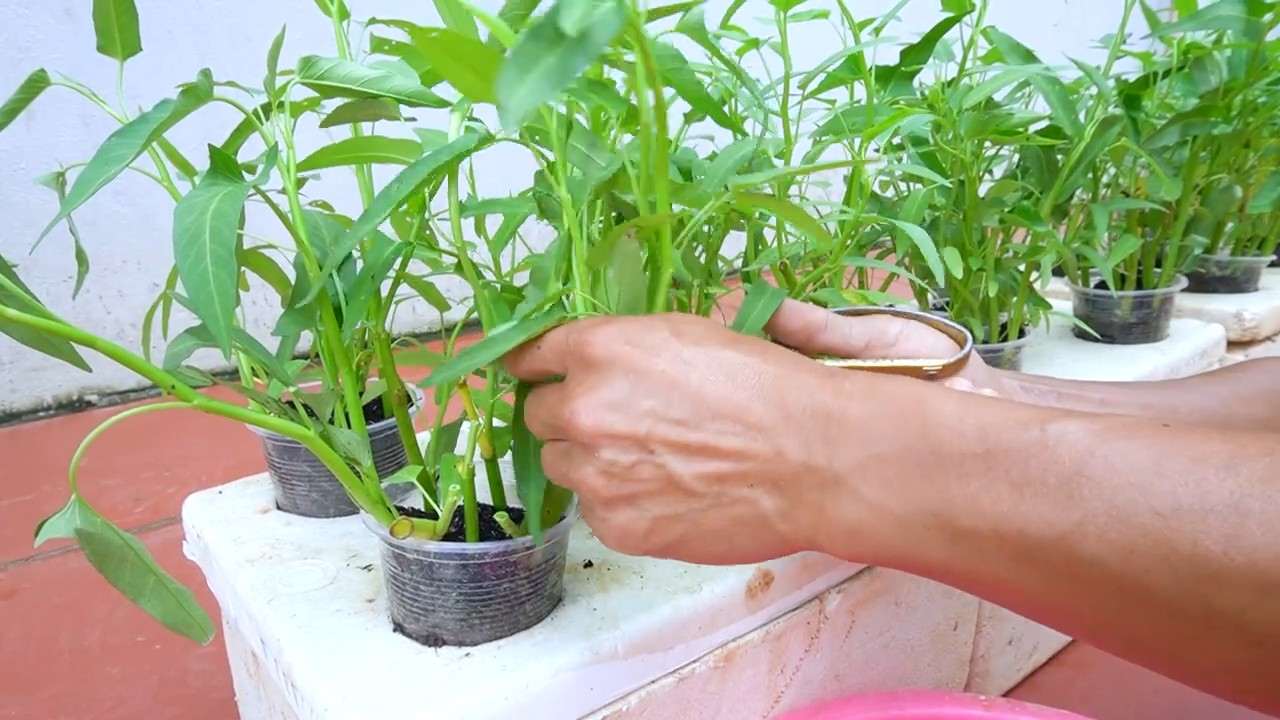
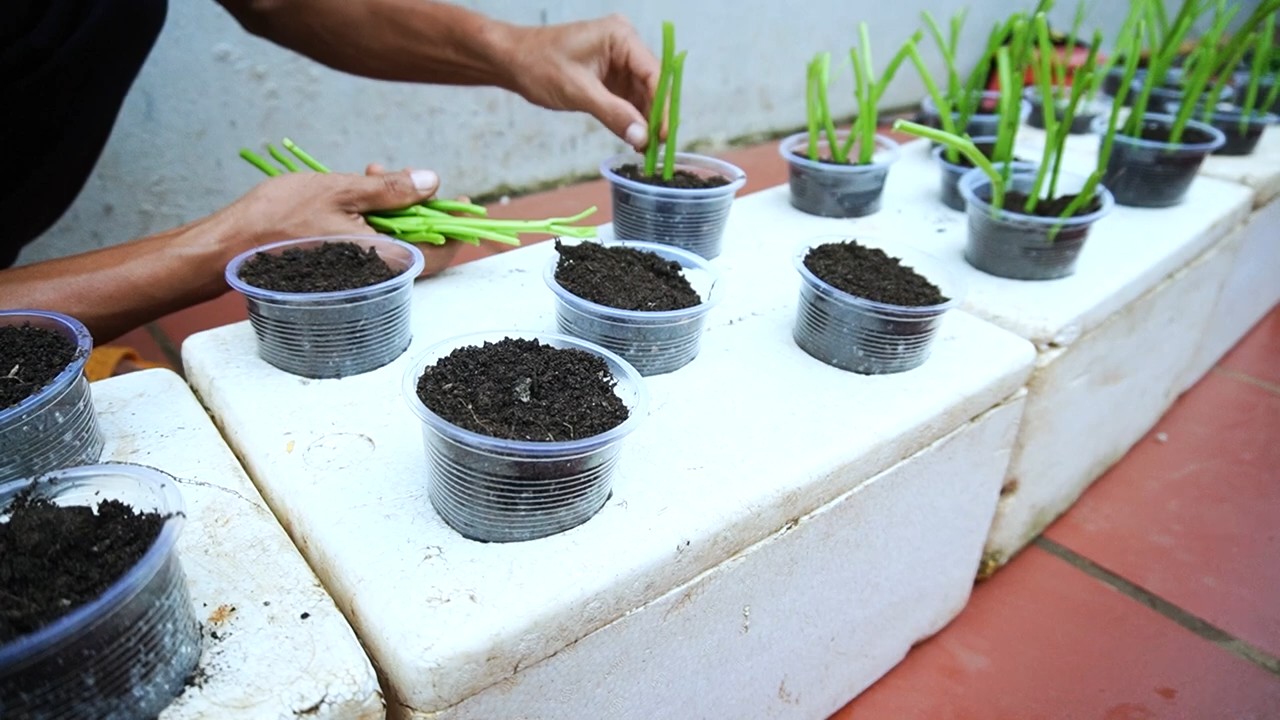
Sobald die Keimlinge ein paar Zentimeter groß sind (oder wenn du die Samen direkt gesät hast und sie gekeimt sind), ist es Zeit, sie in den endgültigen Behälter umzupflanzen.
1. Behälter vorbereiten: Fülle deinen Behälter mit Blumenerde. Lasse etwa 5 cm Platz bis zum Rand.
2. Pflanzen umsetzen: Wenn du die Samen vorgezogen hast, hebe die kleinen Pflänzchen vorsichtig aus der Anzuchtschale und setze sie in den Behälter. Achte darauf, die Wurzeln nicht zu beschädigen. Wenn du die Samen direkt gesät hast, dünne die Pflänzchen aus, sodass sie etwa 10-15 cm Abstand zueinander haben.
3. Angießen: Gieße die Pflanzen gründlich an.
4. Standort wählen: Wasserspinat liebt die Sonne! Stelle den Behälter an einen sonnigen Standort, an dem er mindestens 6 Stunden Sonne pro Tag bekommt.
Die Pflege: Gießen, düngen und ernten
Die Pflege von Wasserspinat ist wirklich unkompliziert. Hier sind die wichtigsten Punkte:
1. Gießen: Wasserspinat braucht viel Wasser! Die Erde sollte immer feucht sein, aber nicht nass. An heißen Tagen musst du möglicherweise mehrmals täglich gießen. Ich überprüfe die Erde immer mit dem Finger – wenn sie sich trocken anfühlt, ist es Zeit zum Gießen.
2. Düngen: Dünge den Wasserspinat alle 2-3 Wochen mit einem organischen Flüssigdünger. Das sorgt für ein kräftiges Wachstum und eine reiche Ernte.
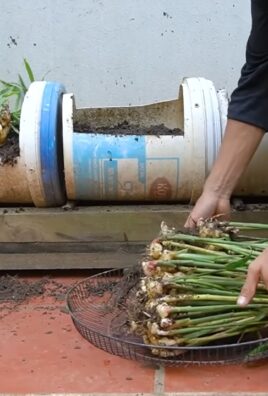
3. Ernten: Du kannst den Wasserspinat ernten, sobald die Stängel etwa 20-30 cm lang sind. Schneide die Stängel einfach mit einer Schere ab. Keine Sorge, der Wasserspinat wächst schnell nach! Du kannst ihn mehrmals ernten.
4. Regelmäßiges Ernten fördert das Wachstum: Je öfter du erntest, desto mehr neue Triebe bildet die Pflanze. Das ist wie beim Haareschneiden – es macht sie stärker!
5. Achte auf Schädlinge: Wasserspinat ist relativ resistent gegen Schädlinge, aber gelegentlich können Blattläuse auftreten. Wenn du welche entdeckst, kannst du sie einfach mit einem Wasserstrahl abspritzen oder ein biologisches Schädlingsbekämpfungsmittel verwenden.
Noch ein paar Tipps und Tricks
* Wasserspinat im Wasser anbauen: Wasserspinat kann auch hydroponisch, also im Wasser, angebaut werden. Dazu benötigst du einen Behälter mit Wasser und eine Nährlösung. Die Wurzeln der Pflanze hängen dann im Wasser.
* Wasserspinat überwintern: In kälteren Regionen ist Wasserspinat nicht winterhart. Du kannst ihn aber versuchen, im Haus zu überwintern. Stelle ihn dazu an einen hellen, kühlen Ort und gieße ihn sparsam.
* Wasserspinat als Bodendecker: Im Garten kann Wasserspinat auch als Bodendecker verwendet werden. Er breitet sich schnell aus und unterdrückt Unkraut.
* Die Blüte: Wasserspinat kann auch blühen, aber die Blüten sind eher unscheinbar. Wenn du die Blüten entfernst, förderst du das Wachstum der Blätter.
* Verschiedene Sorten: Es gibt verschiedene Sorten von Wasserspinat. Einige haben dickere Stängel, andere sind zarter. Probiere einfach verschiedene Sorten aus, um deinen Favoriten zu finden.
Häufige Probleme und Lösungen
* Gelbe Blätter: Gelbe Blätter können ein Zeichen für Nährstoffmangel oder zu wenig Wasser sein. Dünge den Wasserspinat und gieße ihn regelmäßig.
* Schleimige Stängel: Schleimige Stängel können ein Zeichen für eine Pilzerkrankung sein. Sorge für eine gute Belüftung und entferne befallene Stängel.
* Langsames Wachstum: Langsames Wachstum kann an zu wenig Sonne oder Nährstoffen liegen. Stelle den Wasserspinat an einen sonnigeren Standort und dünge ihn.
Wasserspinat in der Küche: Meine Lieblingsrezepte
Wasserspinat ist super vielseitig in der Küche. Du kannst ihn roh in Salaten verwenden, dünsten, braten oder in Suppen und Currys geben. Hier sind ein paar meiner Lieblingsrezepte:
* Gebratener Wasserspinat mit Knoblauch: Ein Klassiker! Einfach Wasserspinat mit Knoblauch und etwas Öl in der Pfanne anbraten. Mit Sojasauce und Sesamöl abschmecken.
* Wasserspinat-Suppe: Wasserspinat in einer Gemüsebrühe kochen und mit Ingwer und Chili würzen.
* Wasserspinat-Curry: Wasserspinat in einem Curry mit Kokosmilch, Currypaste und Gemüse kochen.
* Wasserspinat-Salat: Rohen Wasserspinat mit Tomaten, Gurken und einem leckeren Dressing mischen.
Warum du Wasserspinat selbst anbauen solltest
Es gibt viele gute Gründe, Wasserspinat selbst anzubauen:
* Frische: Selbst angebauter Wasserspinat ist viel frischer und aromatischer als gekaufter.
* Nachhaltigkeit: Du sparst Transportwege und Verpackungsmüll.
* Kontrolle: Du weißt genau, was in deinem Wasserspinat steckt.
* Spaß: Es macht einfach Spaß, sein eigenes Gemüse anzubauen!
Ich hoffe, dieser Guide hat dir geholfen und dich inspiriert, deinen eigenen Wasserspinat anzubauen. Es ist wirklich einfacher als du denkst! Viel Spaß beim Gärtnern und guten Appetit!
Conclusion
So, there you have it! Growing water spinach easily at home is not only achievable, but it’s also incredibly rewarding. Forget those expensive trips to the Asian market or the disappointment of finding wilted, subpar bunches. With a little effort and this simple DIY trick, you can have a constant supply of fresh, crisp, and delicious water spinach right at your fingertips.
This method is a game-changer for anyone who loves this versatile vegetable. Imagine stir-fries bursting with vibrant green leaves, soups enriched with its delicate flavor, or salads elevated by its unique texture. The possibilities are endless! And the best part? You control the growing environment, ensuring your water spinach is free from harmful pesticides and chemicals.
But the benefits extend beyond just taste and convenience. Growing your own food, even something as simple as water spinach, connects you to the natural world in a profound way. It’s a therapeutic activity that can reduce stress, boost your mood, and give you a sense of accomplishment. Plus, it’s a fantastic way to teach children about where their food comes from and the importance of sustainable living.
Don’t be afraid to experiment with variations! Try different containers, from repurposed plastic tubs to decorative ceramic pots. Adjust the nutrient solution to see what works best for your specific climate and water quality. You can even try growing different varieties of water spinach, each with its own unique flavor and texture profile. Some varieties are more heat-tolerant, while others are better suited for cooler climates. Researching and experimenting will only enhance your growing experience and help you discover your perfect water spinach cultivation method.
We’ve shown you how to grow water spinach easily, but the real magic happens when you put these tips into practice. So, grab some seeds or cuttings, gather your supplies, and get ready to embark on your own water spinach growing adventure. We are confident that you’ll be amazed at how easy and rewarding it is.
We encourage you to share your experiences with us! Post photos of your thriving water spinach plants on social media using #HomegrownWaterSpinach and tag us. Tell us about your successes, your challenges, and any tips you’ve discovered along the way. Let’s build a community of water spinach enthusiasts and inspire others to embrace the joys of homegrown goodness.
Don’t delay! Start growing your own water spinach today and experience the satisfaction of harvesting fresh, delicious, and healthy greens right from your own home. You won’t regret it!
Frequently Asked Questions (FAQ)
What exactly is water spinach, and what does it taste like?
Water spinach, also known as Ong Choy or Kang Kong, is a semi-aquatic leafy green vegetable popular in Asian cuisine. It has long, hollow stems and arrow-shaped leaves. The taste is mild and slightly sweet, with a subtle earthy undertone. The texture is crisp and slightly crunchy when cooked properly. It’s often compared to spinach but has a more delicate flavor and a more satisfying crunch.
How long does it take to grow water spinach from seed?
Generally, water spinach seeds germinate within 5-10 days. You can expect to harvest your first crop about 4-6 weeks after germination. The exact timeframe will depend on factors like temperature, sunlight, and nutrient availability. Providing optimal conditions will encourage faster growth.
Can I grow water spinach indoors?
Yes, you can absolutely grow water spinach indoors, especially if you live in a climate with cold winters. You’ll need to provide adequate light, either through a sunny window or with grow lights. Ensure good air circulation to prevent fungal diseases. Indoor growing can extend your harvest season and allow you to enjoy fresh water spinach year-round.
What kind of container should I use for growing water spinach?
Almost any container that can hold water will work for growing water spinach. Plastic tubs, buckets, large pots, or even repurposed containers like old storage bins are all suitable options. The container should be at least 6-8 inches deep to provide enough room for the roots to grow. Make sure the container is clean and free of any harmful chemicals.
What kind of water is best for growing water spinach?
Tap water is generally fine for growing water spinach, but it’s best to let it sit for 24 hours to allow chlorine to evaporate. Rainwater is an excellent option, as it’s naturally soft and free of chemicals. Avoid using water that is heavily chlorinated or contains high levels of minerals, as this can inhibit growth.
How often should I change the water in my water spinach container?
It’s recommended to change the water in your water spinach container every 1-2 weeks, or more frequently if the water becomes cloudy or stagnant. This helps to prevent the buildup of algae and bacteria, which can harm the plants. When changing the water, be careful not to disturb the roots too much.
What kind of fertilizer should I use for water spinach?
Water spinach is a heavy feeder, so it benefits from regular fertilization. A balanced liquid fertilizer, such as a 20-20-20 or a fish emulsion, is a good option. Follow the instructions on the fertilizer package for dilution rates. You can also use compost tea or other organic fertilizers. Avoid over-fertilizing, as this can lead to nutrient burn.
How much sunlight does water spinach need?
Water spinach thrives in full sun, meaning at least 6-8 hours of direct sunlight per day. If you’re growing it indoors, supplement with grow lights if necessary. Insufficient sunlight can result in leggy growth and reduced yields.
How do I harvest water spinach?
You can harvest water spinach by cutting the stems about 4-6 inches above the water line. This will encourage new growth and allow you to harvest multiple times from the same plant. Harvest in the morning for the best flavor and texture.
Are there any pests or diseases that affect water spinach?
Water spinach is generally resistant to pests and diseases, but it can be susceptible to aphids, spider mites, and fungal diseases like powdery mildew. Inspect your plants regularly for signs of infestation or disease. Treat any problems promptly with organic pest control methods or fungicides. Good air circulation and proper watering practices can help to prevent many common problems.
Can I eat the stems of water spinach?
Yes, the stems of water spinach are perfectly edible and are often used in stir-fries and other dishes. They have a slightly crunchy texture and a mild flavor. Be sure to wash the stems thoroughly before cooking.
Is water spinach safe to eat?
Water spinach is generally safe to eat, but it’s important to source it from a reputable grower or grow it yourself to ensure it’s free from contaminants. Avoid eating water spinach that has been grown in polluted water, as it can accumulate heavy metals and other toxins.
Can I grow water spinach in a hydroponic system?
Yes, water spinach is well-suited for hydroponic growing. Hydroponics allows you to control the nutrient solution and growing environment, resulting in faster growth and higher yields. There are many different hydroponic systems that can be used for growing water spinach, such as deep water culture, nutrient film technique, and ebb and flow systems.
How can I store water spinach after harvesting?
Store freshly harvested water spinach in the refrigerator in a plastic bag or container. It will stay fresh for several days. You can also blanch and freeze water spinach for longer-term storage.
What are some popular ways to cook water spinach?
Water spinach is a versatile vegetable that can be used in a variety of dishes. Some popular ways to cook it include stir-frying with garlic and chili, adding it to soups and stews, and using it in salads. It’s also delicious steamed or blanched.


Leave a Comment