
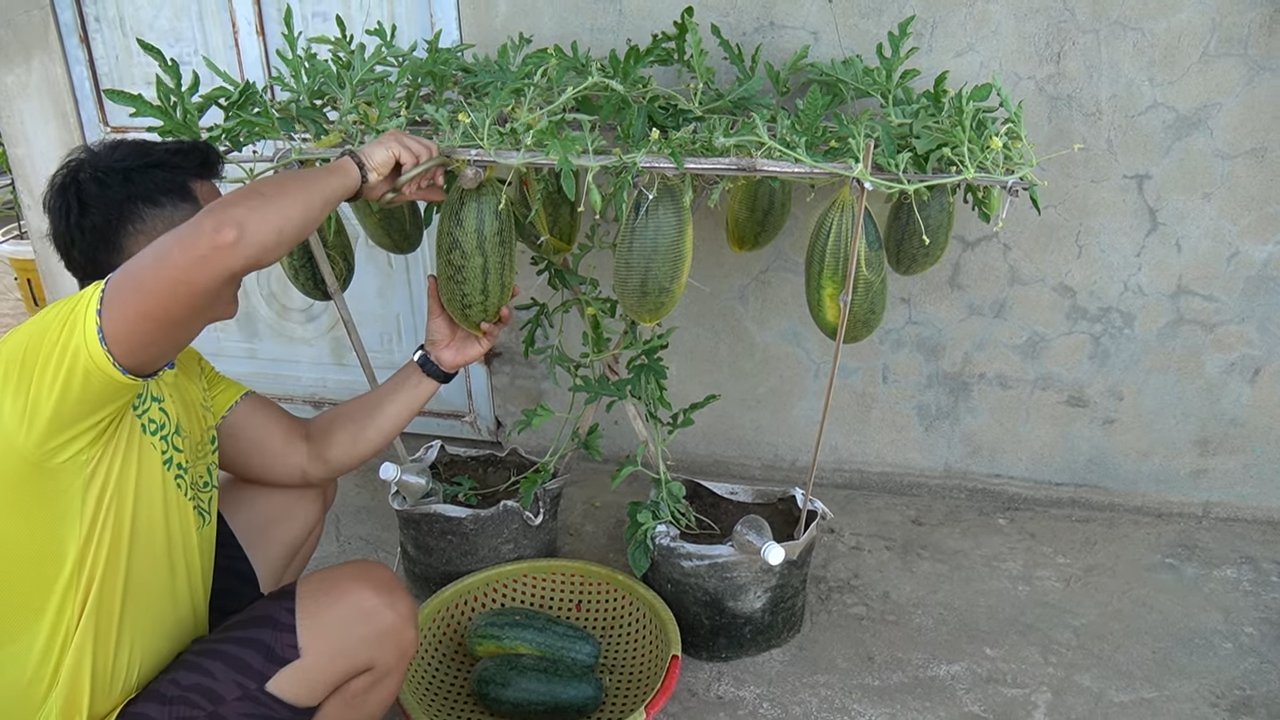
Growing Watermelons in Pots might sound like a summer dream reserved for sprawling farms, but guess what? I’m here to tell you that juicy, homegrown watermelon is totally achievable, even if you’re rocking a balcony, patio, or just a small backyard! Forget those hefty grocery store prices and bland, mass-produced melons. Imagine sinking your teeth into a sweet, sun-ripened watermelon that you nurtured from a tiny seed, all within the cozy confines of a pot.
Watermelons have a rich history, dating back thousands of years to Africa, where they were prized for their hydrating properties in arid climates. Over time, different varieties were cultivated and spread across the globe, becoming a symbol of summer refreshment and community gatherings. But traditionally, growing watermelons required a lot of space, making it seem inaccessible to many.
That’s where this DIY guide comes in! In today’s world, space is a premium, and many of us are looking for ways to connect with nature and enjoy fresh produce without needing acres of land. Growing Watermelons in Pots is the perfect solution. I’ll walk you through every step, from choosing the right variety and pot size to providing the perfect sunlight and nutrients. Get ready to impress your friends and family with your green thumb and enjoy the sweet taste of success – one delicious, homegrown watermelon at a time!
Growing Watermelons in Pots: A Sweet Summer Project!
Hey there, fellow gardening enthusiasts! Ever dreamed of biting into a juicy, homegrown watermelon but thought you didn’t have the space? Well, I’m here to tell you that you absolutely can grow watermelons, even in pots! It’s a rewarding experience, and trust me, that first bite of your own watermelon is pure bliss. Let’s dive into how to make this happen.
Choosing the Right Watermelon Variety
Not all watermelons are created equal, especially when it comes to container gardening. We need to think small(er). Here’s what I look for:
* Bush or Dwarf Varieties: These are specifically bred to be compact and manageable in pots. Look for names like ‘Bush Sugar Baby,’ ‘Sugar Baby,’ ‘Golden Midget,’ or ‘Tiger Baby.’ They produce smaller fruits and have shorter vines.
* Consider Fruit Size: Even with bush varieties, some produce larger fruits than others. Check the seed packet or plant description for the expected fruit weight. Aim for varieties that produce watermelons under 10 pounds.
* Days to Maturity: This is crucial! Choose varieties with a shorter growing season, ideally under 80 days. This gives you a better chance of harvesting before the weather turns cold.
Gathering Your Supplies
Before we get our hands dirty, let’s make sure we have everything we need. This is my go-to list:
* Large Container: This is non-negotiable. Watermelons need space for their roots to spread. I recommend a pot that’s at least 24 inches in diameter and 18 inches deep. The bigger, the better, really! A half wine barrel works great.
* High-Quality Potting Mix: Don’t skimp on this! Use a well-draining potting mix specifically formulated for containers. Avoid garden soil, as it can compact and hinder drainage. I like a mix that includes peat moss, perlite, and vermiculite.
* Water-Soluble Fertilizer: A balanced fertilizer (like 10-10-10) is a good starting point. You’ll also want a fertilizer higher in phosphorus (the middle number) to encourage flowering and fruit production.
* Watering Can or Hose: Consistent watering is key.
* Trowel or Small Shovel: For planting and transplanting.
* Seeds or Seedlings: Choose your desired watermelon variety.
* Trellis or Support (Optional): While bush varieties are more compact, they can still benefit from some support, especially as the fruits grow larger. A small trellis or tomato cage can help.
* Mulch (Optional): Mulch helps retain moisture and suppress weeds. Straw or wood chips work well.
Planting Your Watermelon Seeds or Seedlings
Okay, let’s get planting! This is where the magic begins.
1. Prepare the Container: Fill your large container with the high-quality potting mix, leaving a few inches of space at the top.
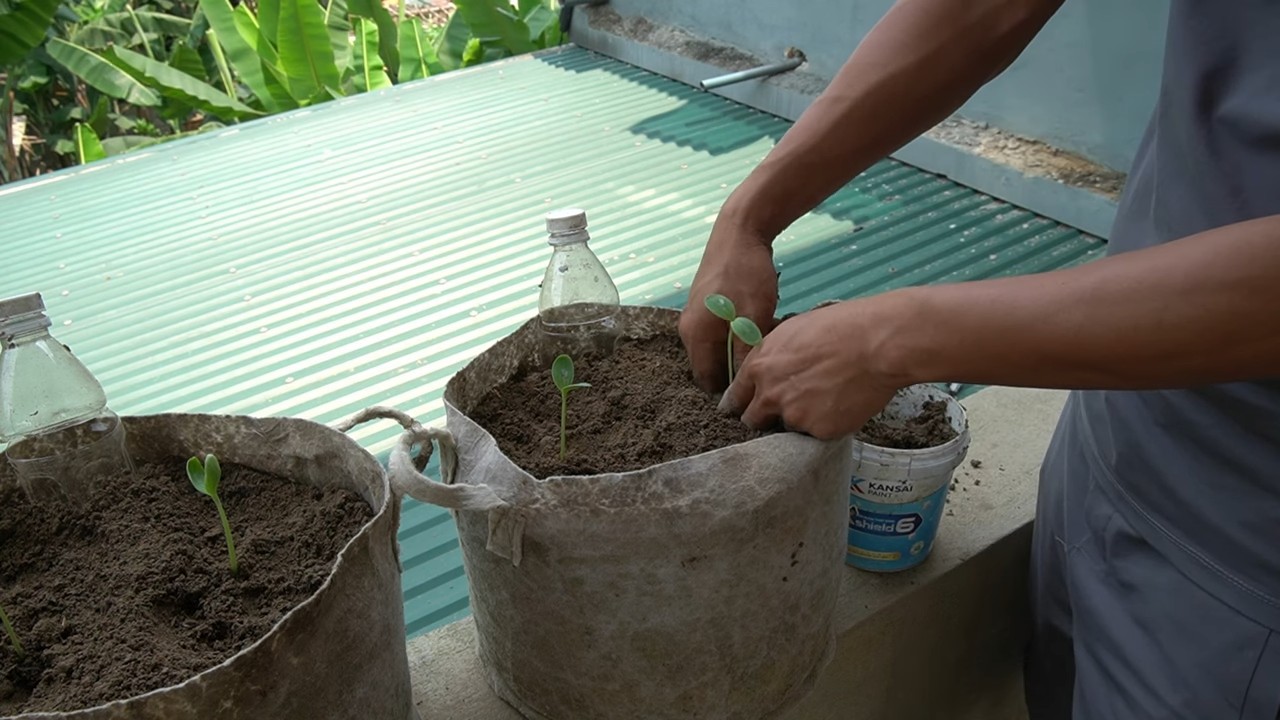
2. Sowing Seeds (Direct Sowing): If you’re starting from seeds, sow them directly into the pot. Plant 2-3 seeds per pot, about 1 inch deep. Water gently but thoroughly.
3. Starting Seeds Indoors (Transplanting): If you prefer to start seeds indoors (which I often do to get a head start), sow them in small pots or seed trays about 4-6 weeks before the last expected frost. Keep the soil moist and warm. Once the seedlings have a few true leaves, you can transplant them into the large container.
4. Transplanting Seedlings: Gently remove the seedlings from their starter pots, being careful not to damage the roots. Dig a small hole in the potting mix in the large container and place the seedling in the hole. Backfill with potting mix and gently pat down the soil.
5. Water Thoroughly: After planting, water the seedlings or seeds thoroughly. Make sure the water drains freely from the bottom of the pot.
6. Mulch (Optional): Add a layer of mulch around the base of the plant to help retain moisture and suppress weeds.
Caring for Your Watermelon Plants
Now comes the ongoing care. Watermelons are thirsty and hungry plants, so pay attention to their needs.
1. Watering: Watermelons need consistent moisture, especially during flowering and fruit development. Water deeply whenever the top inch of soil feels dry to the touch. Avoid overhead watering, as this can lead to fungal diseases. Aim to water at the base of the plant.
2. Fertilizing: Feed your watermelon plants regularly with a water-soluble fertilizer. Start with a balanced fertilizer (10-10-10) and then switch to a fertilizer higher in phosphorus (the middle number) once the plants start to flower. Follow the instructions on the fertilizer package. I usually fertilize every 2-3 weeks.
3. Sunlight: Watermelons need at least 6-8 hours of direct sunlight per day. Place your container in the sunniest spot you can find.
4. Pruning (Optional): While not essential, pruning can help improve air circulation and encourage fruit production. Remove any suckers (small shoots that grow from the base of the plant) and any yellowing or diseased leaves.
5. Pollination: Watermelons need to be pollinated to produce fruit. If you’re growing your watermelons outdoors, bees and other pollinators will usually take care of this. However, if you’re growing them indoors or in a greenhouse, you may need to hand-pollinate the flowers. To hand-pollinate, use a small paintbrush to transfer pollen from the male flowers (which have a long, thin stem) to the female flowers (which have a small, immature watermelon at the base).
6. Support (Optional): As the watermelons grow larger, they may need some support to prevent the vines from breaking. You can use a small trellis or tomato cage to support the vines. You can also place the watermelons on a piece of wood or cardboard to keep them off the soil.
Dealing with Pests and Diseases
Even in containers, watermelons can be susceptible to pests and diseases. Here’s what to watch out for:
* Aphids: These tiny insects suck the sap from plants. You can control them with insecticidal soap or by spraying them off with a strong stream of water.
* Squash Bugs: These pests can damage leaves and stems. Handpick them off the plants or use insecticidal soap.
* Powdery Mildew: This fungal disease causes a white, powdery coating on the leaves. Improve air circulation and use a fungicide if necessary.
* Fusarium Wilt: This soilborne disease can cause the plants to wilt and die. Use disease-resistant varieties and avoid overwatering.
Harvesting Your Watermelons
The moment we’ve all been waiting for! Knowing when to harvest a watermelon can be tricky, but here are a few indicators:
1. Days to Maturity: Check the seed packet for the expected days to maturity. This is a good starting point.
2. The Tendril Test: The tendril closest to the watermelon should be brown and dry.
3. The Ground Spot: The spot where the watermelon rests on the ground (or your support) should be yellow or cream-colored.
4. The Thump Test: Give the watermelon a gentle thump. A ripe watermelon will sound hollow.
5. The Look: The watermelon skin should be dull, not shiny.
Once you’re confident that your watermelon is ripe, use a sharp knife to cut it from the vine, leaving a few inches of stem attached.
Enjoying Your Homegrown Watermelon
Congratulations! You’ve successfully grown a watermelon in a pot! Now it’s time to enjoy the fruits (literally!) of your labor. Slice it up, share it with friends and family, and savor the sweet, refreshing taste of summer.
Tips for Success:
* Rotate Your Crops: If you grow watermelons in the same pot year after year, the soil can become depleted of nutrients. Rotate your crops by growing different plants in the pot each year.
* Amend the Soil: Before planting watermelons, amend the soil with compost or other organic matter to improve drainage and fertility.
* Monitor Your Plants Regularly: Check your plants regularly for signs of pests, diseases, or nutrient deficiencies. The sooner you catch a problem, the easier it will be to fix.
* Don’t Be Afraid to Experiment: Gardening is all about experimentation. Try different varieties of watermelons, different fertilizers, and different growing techniques to see what works best for you.
Growing watermelons in pots is a fun and rewarding experience. With a little bit of planning and care, you can enjoy delicious, homegrown watermelons all summer long. Happy gardening!
Conclusion
So, there you have it! Growing watermelons in pots might seem like a daunting task, reserved for sprawling gardens and seasoned green thumbs. But as we’ve explored, with a little planning, the right techniques, and a whole lot of sunshine, you can absolutely cultivate these juicy delights on your patio, balcony, or even indoors with supplemental lighting. This DIY trick isn’t just about saving space; it’s about empowering you to enjoy fresh, homegrown watermelons regardless of your living situation. Imagine the satisfaction of slicing into a watermelon you nurtured from seed to fruit, knowing exactly what went into its growth – no mystery chemicals or long-distance transportation involved.
This method offers several compelling advantages. Firstly, it provides greater control over the growing environment. You can easily move your potted watermelon to chase the sun, protect it from unexpected frosts, or shield it from excessive rain. Secondly, it allows for better soil management. You can create the perfect soil mix tailored to watermelons’ specific needs, ensuring optimal drainage and nutrient availability. Finally, it’s a fantastic way to introduce children to the wonders of gardening and the satisfaction of growing their own food.
Don’t be afraid to experiment with different watermelon varieties. While smaller, bush-type watermelons like ‘Sugar Baby’ are ideal for pots, you can also try training larger varieties like ‘Crimson Sweet’ with sturdy trellises to support their weight. Consider adding companion plants like marigolds or basil to your pots to deter pests and attract pollinators. You can also adjust the fertilizer schedule based on your watermelon’s growth and the specific nutrient needs of your chosen variety. For example, if you notice yellowing leaves, it might indicate a nitrogen deficiency, requiring a boost of nitrogen-rich fertilizer.
We understand that embarking on a new gardening adventure can be intimidating. You might encounter challenges along the way, such as pest infestations, blossom end rot, or uneven fruit development. But don’t let these setbacks discourage you. Remember that gardening is a learning process, and every mistake is an opportunity to improve your skills. Research common watermelon problems and learn how to address them effectively. Join online gardening communities or consult with local experts for advice and support.
The key to successful container watermelon growing lies in consistent care and attention. Regularly check the soil moisture, fertilize as needed, and prune any excessive vines to encourage fruit production. Be patient and observant, and you’ll be rewarded with a bountiful harvest of delicious, homegrown watermelons.
So, what are you waiting for? Grab a pot, some seeds, and get ready to embark on this exciting gardening journey. We’re confident that you’ll be amazed by the results. And most importantly, we want to hear about your experience! Share your photos, tips, and challenges with us in the comments below. Let’s create a community of container watermelon growers and inspire others to try this rewarding DIY trick. Let us know what variety you chose, what challenges you faced, and what tips you discovered along the way. Your insights could be invaluable to other aspiring watermelon gardeners. Happy growing!
Frequently Asked Questions (FAQ)
Q: What size pot is best for growing watermelons?
A: The size of the pot is crucial for successful watermelon cultivation. As a general rule, you’ll need a pot that is at least 20 gallons in size, but larger is always better. A 25-30 gallon pot will provide ample space for the roots to develop and support the growth of a healthy watermelon plant. The pot should also be sturdy and well-draining to prevent waterlogging. Consider using a fabric pot, as these allow for better aeration and drainage, promoting healthier root growth. Remember, the larger the pot, the more room the roots have to grow, and the bigger your watermelon is likely to be.
Q: What type of soil should I use for growing watermelons in pots?
A: Watermelons thrive in well-draining, nutrient-rich soil. A good potting mix for watermelons should consist of equal parts of the following: compost, peat moss (or coconut coir as a sustainable alternative), and perlite or vermiculite. Compost provides essential nutrients, peat moss (or coconut coir) helps retain moisture, and perlite or vermiculite improves drainage and aeration. You can also add a slow-release fertilizer to the soil mix to provide a steady supply of nutrients throughout the growing season. Avoid using garden soil, as it can be too heavy and compact, hindering root growth.
Q: How often should I water my potted watermelon plant?
A: Watermelons are thirsty plants, especially when grown in pots. During the peak growing season, you may need to water your watermelon plant daily, or even twice a day in hot, dry weather. The key is to keep the soil consistently moist but not waterlogged. Check the soil moisture by sticking your finger about an inch into the soil. If it feels dry, it’s time to water. When watering, water deeply, ensuring that the entire root ball is thoroughly saturated. Avoid overhead watering, as this can promote fungal diseases. Instead, water at the base of the plant.
Q: How much sunlight do watermelons need?
A: Watermelons are sun-loving plants and require at least 6-8 hours of direct sunlight per day to thrive. Choose a location for your potted watermelon that receives plenty of sunlight throughout the day. If you live in a particularly hot climate, you may need to provide some afternoon shade to prevent the plant from overheating. If you’re growing watermelons indoors, you’ll need to supplement with grow lights to provide adequate light.
Q: How do I pollinate my watermelon flowers?
A: Watermelons have separate male and female flowers. The female flowers have a small, immature watermelon at the base, while the male flowers do not. Pollination is essential for fruit development. If you’re growing watermelons outdoors, bees and other pollinators will usually take care of pollination. However, if you’re growing watermelons indoors or if you notice a lack of pollinators, you may need to hand-pollinate the flowers. To hand-pollinate, use a small paintbrush to collect pollen from the male flowers and transfer it to the female flowers. Do this in the morning, when the flowers are open.
Q: How do I know when my watermelon is ripe?
A: Determining when a watermelon is ripe can be tricky, but there are a few telltale signs to look for. First, check the tendril closest to the fruit. When this tendril turns brown and dries out, it’s a good indication that the watermelon is ripe. Second, check the underside of the watermelon where it rests on the ground (the “ground spot”). When this spot turns from white to a creamy yellow, the watermelon is likely ripe. Finally, give the watermelon a gentle thump. A ripe watermelon will sound hollow and deep.
Q: What are some common problems when growing watermelons in pots and how do I fix them?
A: Several common problems can arise when growing watermelons in pots. Blossom end rot, characterized by a dark, sunken spot on the bottom of the fruit, is often caused by calcium deficiency or inconsistent watering. To prevent blossom end rot, ensure that your soil is rich in calcium and water your plants consistently. Pest infestations, such as aphids or squash bugs, can also be a problem. Inspect your plants regularly and treat any infestations with insecticidal soap or neem oil. Fungal diseases, such as powdery mildew, can also affect watermelons. To prevent fungal diseases, provide good air circulation and avoid overhead watering.
Q: Can I grow watermelon from seed or should I buy seedlings?
A: You can grow watermelons from either seed or seedlings. Starting from seed allows you to choose from a wider variety of watermelon types and can be more cost-effective. However, it requires more time and effort, as you’ll need to start the seeds indoors several weeks before the last frost. Buying seedlings is a quicker and easier option, but you’ll have fewer choices in terms of variety. If you’re a beginner gardener, starting with seedlings might be a good option.
Q: How do I support the weight of the watermelon as it grows?
A: As your watermelon grows, it can become quite heavy, potentially causing the vine to break. To support the weight of the watermelon, you can use a sling made from netting, fabric, or even an old t-shirt. Tie the sling to a sturdy trellis or support structure, ensuring that it provides adequate support for the watermelon. You can also place the watermelon on a bed of straw or mulch to prevent it from touching the ground and rotting.

Leave a Comment