
Hanging sweet potato garden: Imagine a cascade of lush green vines, dotted with vibrant purple flowers, all spilling from a repurposed container right outside your kitchen window. Sounds dreamy, right? Well, it doesn’t have to be just a dream! This DIY guide will show you how to create your very own hanging sweet potato garden, a unique and space-saving way to grow these delicious and nutritious root vegetables.
Sweet potatoes have a rich history, dating back thousands of years in South America. They were a staple food for many ancient civilizations and have since spread across the globe, becoming a beloved ingredient in countless cuisines. Beyond their culinary appeal, sweet potatoes are packed with vitamins and antioxidants, making them a healthy addition to any diet.
But why a hanging garden, you ask? Well, not everyone has the luxury of a sprawling backyard. Apartment dwellers, balcony gardeners, and anyone with limited space can benefit from this vertical gardening technique. Plus, a hanging sweet potato garden adds a touch of whimsy and beauty to any outdoor space. I’m excited to share this simple yet effective DIY project that will not only provide you with fresh produce but also enhance the aesthetic appeal of your home. Let’s get started!

DIY Hängender Süßkartoffelgarten: Eine Schritt-für-Schritt-Anleitung
Hallo liebe Gartenfreunde! Habt ihr Lust auf etwas Ungewöhnliches und Platzsparendes? Dann lasst uns gemeinsam einen hängenden Süßkartoffelgarten bauen! Das ist nicht nur ein echter Hingucker, sondern auch eine tolle Möglichkeit, frische Süßkartoffeln zu ernten, selbst wenn ihr nur wenig Platz habt. Ich zeige euch, wie es geht!
Was ihr für euren hängenden Süßkartoffelgarten braucht:
Hier ist eine Liste der Materialien und Werkzeuge, die ihr benötigt. Keine Sorge, das meiste davon habt ihr wahrscheinlich schon zu Hause!
* Ein großer, stabiler Sack: Am besten eignet sich ein Jutesack, ein Kartoffelsack oder ein robuster Pflanzsack. Er sollte mindestens 60 cm hoch sein.
* Süßkartoffel-Setzlinge (Slips): Diese könnt ihr entweder online bestellen, im Gartencenter kaufen oder selbst ziehen (dazu später mehr!).
* Hochwertige Blumenerde: Achtet darauf, dass die Erde gut durchlässig ist und ausreichend Nährstoffe enthält.
* Kompost: Kompost ist Gold wert für eure Süßkartoffeln! Er liefert wichtige Nährstoffe und verbessert die Bodenstruktur.
* Perlit oder Vermiculit: Diese Materialien verbessern die Drainage und Belüftung der Erde.
* Gartenschere oder Messer: Zum Schneiden der Setzlinge und des Sacks.
* Gießkanne oder Schlauch: Zum Bewässern eurer Pflanzen.
* Stabile Aufhängung: Eine Kette, ein starkes Seil oder ein Haken, um den Sack aufzuhängen.
* Optional: Mulch (z.B. Stroh oder Holzhackschnitzel) zur Feuchtigkeitsspeicherung und Unkrautbekämpfung.
* Optional: Langzeitdünger für Gemüse.
Süßkartoffel-Setzlinge selbst ziehen (optional):
Wenn ihr eure Setzlinge selbst ziehen möchtet, braucht ihr etwas Vorlaufzeit. Aber es ist wirklich einfach und macht Spaß!
1. Süßkartoffel vorbereiten: Nehmt eine gesunde Süßkartoffel und halbiert sie.
2. In Wasser stellen: Steckt Zahnstocher in die Seiten der halbierten Süßkartoffel, sodass sie im Wasserglas oder -gefäß gehalten wird. Die untere Hälfte sollte im Wasser sein.
3. Warten und beobachten: Stellt das Glas an einen warmen, hellen Ort. Nach einigen Wochen werden sich Wurzeln und Triebe (Slips) bilden.
4. Slips abtrennen: Sobald die Triebe etwa 15-20 cm lang sind, könnt ihr sie vorsichtig abdrehen oder abschneiden.
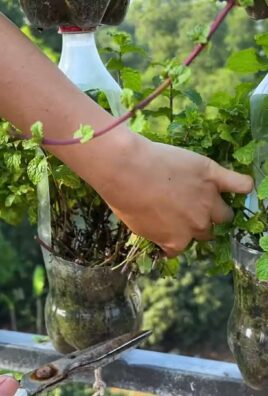
5. Bewurzeln lassen: Stellt die Slips in ein Glas Wasser, bis sie eigene Wurzeln bilden. Das dauert in der Regel ein paar Tage.
Schritt-für-Schritt-Anleitung: Euren hängenden Süßkartoffelgarten anlegen
Jetzt geht es ans Eingemachte! Folgt diesen Schritten, um euren eigenen hängenden Süßkartoffelgarten zu gestalten:
1. Den Sack vorbereiten:
* Zuerst müsst ihr den Sack vorbereiten. Wenn ihr einen Jutesack verwendet, könnt ihr ihn so lassen, wie er ist. Bei einem Kartoffelsack oder Pflanzsack solltet ihr am unteren Ende einige kleine Löcher schneiden, damit das Wasser gut ablaufen kann. Das verhindert Staunässe, die Süßkartoffeln gar nicht mögen.
* Wichtig: Die Löcher sollten nicht zu groß sein, damit keine Erde herausfällt.
2. Die erste Erdschicht einfüllen:
* Füllt den Sack mit einer etwa 20 cm dicken Schicht Blumenerde. Mischt die Erde am besten mit etwas Kompost und Perlit oder Vermiculit, um die Drainage zu verbessern.
* Tipp: Drückt die Erde leicht an, damit sie sich setzt.
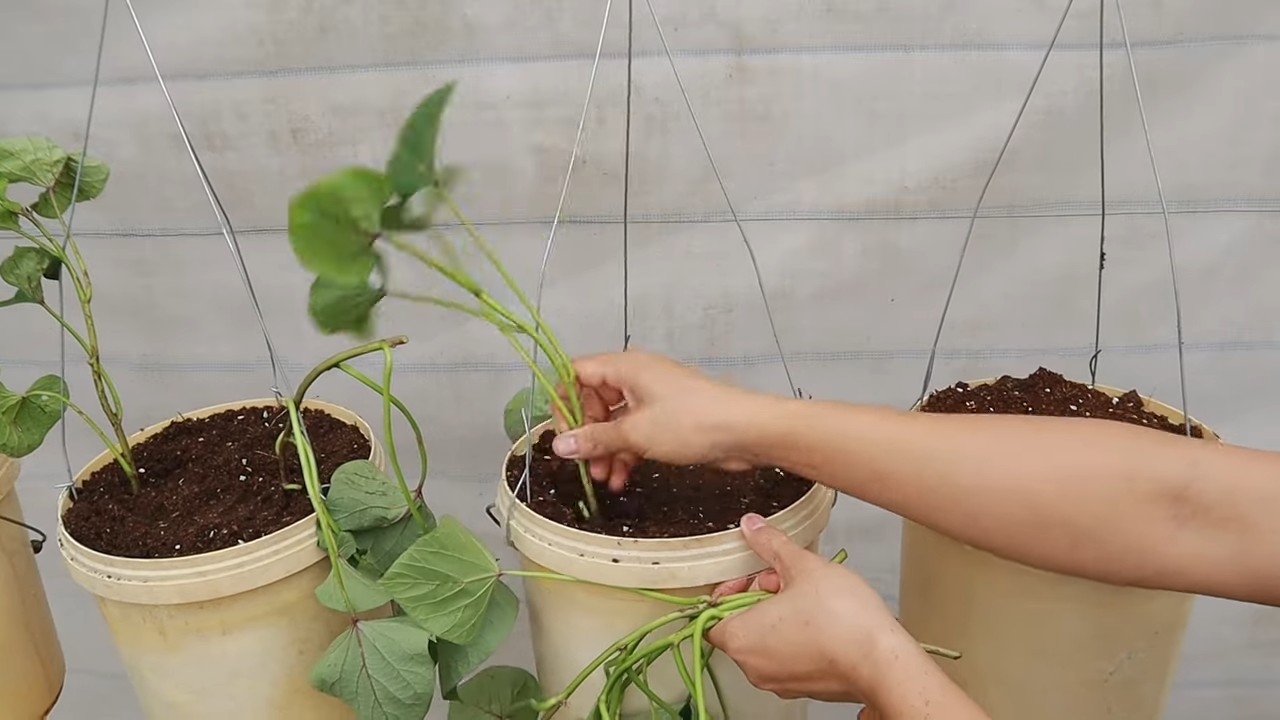
3. Die ersten Setzlinge pflanzen:
* Nehmt eure Süßkartoffel-Setzlinge und pflanzt sie in die Erde. Achtet darauf, dass die Wurzeln gut bedeckt sind und die Blätter frei liegen.
* Abstand: Pflanzt die Setzlinge in einem Abstand von etwa 15-20 cm zueinander.
* Anzahl: Je nach Größe des Sacks könnt ihr 3-5 Setzlinge in die erste Schicht pflanzen.
4. Weitere Erdschichten einfüllen und Setzlinge pflanzen:
* Füllt nun eine weitere Schicht Erde ein, etwa 15 cm dick.
* Schneidet mit einem Messer oder einer Gartenschere kleine Schlitze in den Sack, etwa 10-15 cm über der ersten Erdschicht.
* Pflanzt durch diese Schlitze weitere Setzlinge. Achtet darauf, dass die Wurzeln gut in der Erde liegen.
* Wiederholt diesen Vorgang, bis der Sack fast voll ist. Lasst oben etwa 10 cm Platz, damit ihr beim Gießen nicht alles überschwemmt.
5. Den Sack aufhängen:
* Sucht euch einen sonnigen Platz für euren hängenden Garten. Süßkartoffeln lieben die Sonne!
* Befestigt die Aufhängung (Kette, Seil oder Haken) am Sack. Achtet darauf, dass die Aufhängung stabil genug ist, um das Gewicht des Sacks zu tragen.
* Hängt den Sack auf.
6. Gießen und pflegen:
* Gießt eure Süßkartoffeln regelmäßig, besonders in den ersten Wochen nach dem Pflanzen. Die Erde sollte immer leicht feucht sein, aber nicht nass.
* Tipp: Fühlt mit dem Finger, ob die Erde trocken ist.
* Düngt eure Pflanzen regelmäßig mit einem Langzeitdünger für Gemüse.
* Entfernt regelmäßig Unkraut und abgestorbene Blätter.
* Mulchen: Eine Mulchschicht aus Stroh oder Holzhackschnitzeln hilft, die Feuchtigkeit im Boden zu halten und Unkraut zu unterdrücken.
Pflege eures hängenden Süßkartoffelgartens
Euer hängender Süßkartoffelgarten braucht natürlich etwas Pflege, damit er prächtig gedeiht. Hier sind ein paar Tipps:
* Gießen: Süßkartoffeln brauchen regelmäßig Wasser, besonders während der heißen Sommermonate. Achtet darauf, dass die Erde immer leicht feucht ist. Vermeidet aber Staunässe, da dies zu Wurzelfäule führen kann.
* Düngen: Süßkartoffeln sind Starkzehrer und benötigen ausreichend Nährstoffe. Düngt eure Pflanzen regelmäßig mit einem Langzeitdünger für Gemüse oder mit organischem Dünger wie Kompost oder Hornspäne.
* Sonnenlicht: Süßkartoffeln lieben die Sonne! Stellt euren hängenden Garten an einen sonnigen Platz, wo die Pflanzen mindestens 6 Stunden Sonne pro Tag bekommen.
* Schädlinge und Krankheiten: Achtet auf Schädlinge wie Blattläuse oder Kartoffelkäfer. Bei Bedarf könnt ihr biologische Schädlingsbekämpfungsmittel einsetzen. Süßkartoffeln sind relativ resistent gegen Krankheiten, aber achtet trotzdem auf Anzeichen von Pilzbefall oder Wurzelfäule.
* Ranken schneiden: Süßkartoffeln bilden lange Ranken, die ihr bei Bedarf kürzen könnt. Das fördert die Bildung von Knollen.
Erntezeit!
Nach etwa 3-4 Monaten könnt ihr eure eigenen Süßkartoffeln ernten! Die Blätter werden gelb und die Knollen sind reif.
* Erntezeitpunkt: Die Erntezeit ist gekommen, wenn die Blätter der Süßkartoffeln gelb werden und absterben.
* Ernten: Um die Süßkartoffeln zu ernten, kippt ihr den Sack vorsichtig aus und sammelt die Knollen ein.
* Lagerung: Lagert die Süßkartoffeln an einem kühlen, trockenen und dunklen Ort. So halten sie sich mehrere Monate.
Ich hoffe, diese Anleitung hat euch gefallen und inspiriert, euren eigenen hängenden Süßkartoffelgarten anzulegen. Es ist wirklich ein tolles Projekt, das nicht nur Spaß macht, sondern euch auch mit leckeren, selbst angebauten Süßkartoffeln belohnt. Viel
Conclusion
So, there you have it! Creating your own hanging sweet potato garden is not just a fun project; it’s a rewarding experience that brings the beauty of nature right to your doorstep, balcony, or patio. We’ve walked you through the simple steps, highlighting the benefits of this unique gardening method. From space-saving efficiency to the sheer visual appeal of cascading vines and the promise of a homegrown harvest, this DIY project offers a multitude of advantages.
Why is this a must-try? Because it empowers you to cultivate your own food, even in limited spaces. It’s an opportunity to connect with nature, learn about plant growth, and enjoy the satisfaction of nurturing something from start to finish. Plus, let’s be honest, a hanging sweet potato garden is a conversation starter! It’s a unique and eye-catching addition to any home.
But the beauty of this project lies in its adaptability. Feel free to experiment with different container sizes and materials. Upcycle old buckets, repurpose sturdy fabric bags, or even create a tiered system for a more dramatic display. Consider adding companion plants like marigolds or basil to deter pests and enhance the overall health of your sweet potato vines. You can also adjust the soil mix to suit your specific climate and growing conditions. For those in cooler climates, starting your sweet potato slips indoors before transplanting them into the hanging containers can give them a head start.
Don’t be afraid to get creative with the placement of your hanging garden. A sunny balcony railing, a sheltered patio corner, or even a sturdy tree branch can all serve as ideal locations. Just remember to ensure adequate sunlight and easy access for watering.
We believe that everyone, regardless of their gardening experience, can successfully create a thriving hanging sweet potato garden. It’s a project that’s both accessible and deeply satisfying. The vibrant green foliage, the delicate purple flowers, and the anticipation of harvesting your own sweet potatoes – it’s an experience that engages all the senses.
Now, it’s your turn! Gather your supplies, follow our simple instructions, and embark on this exciting gardening adventure. We’re confident that you’ll be amazed by the results. And most importantly, we want to hear about your experience! Share your photos, tips, and stories with us in the comments section below. Let’s create a community of hanging sweet potato gardeners, sharing our knowledge and inspiring others to embrace this unique and rewarding DIY project. Let us know what varieties you tried, what challenges you faced, and what successes you celebrated. Your feedback is invaluable and will help us refine and improve our guide for future gardeners. So, go ahead, get your hands dirty, and discover the joy of growing your own sweet potatoes in a hanging garden! This is a fantastic way to enjoy fresh produce and enhance your living space.
Frequently Asked Questions (FAQ)
What kind of sweet potato should I use?
The best sweet potato varieties for hanging gardens are those with shorter vines and a bushier growth habit. Beauregard, Georgia Jet, and Centennial are all excellent choices. These varieties tend to produce well in containers and won’t overwhelm the space with excessive vine growth. However, feel free to experiment with other varieties as well! Just be prepared to prune the vines if they become too long. Consider the climate you live in when selecting your sweet potato variety. Some varieties are better suited to warmer climates, while others are more tolerant of cooler temperatures. Local nurseries can provide valuable advice on which varieties thrive in your specific region.
How often should I water my hanging sweet potato garden?
Watering frequency depends on several factors, including the size of your container, the type of soil you’re using, the climate, and the amount of sunlight your plants receive. As a general rule, check the soil moisture daily. If the top inch of soil feels dry to the touch, it’s time to water. Water thoroughly until excess water drains out of the bottom of the container. Avoid overwatering, as this can lead to root rot. During hot, dry weather, you may need to water your plants more frequently, possibly even twice a day. Conversely, during cooler, wetter periods, you may only need to water every few days. Monitor your plants closely and adjust your watering schedule accordingly.
What kind of soil should I use?
A well-draining potting mix is essential for growing healthy sweet potatoes in hanging containers. Avoid using garden soil, as it tends to be too heavy and compact, which can hinder root growth and drainage. A good potting mix should contain a blend of peat moss, perlite, and vermiculite. You can also add compost to the mix to provide additional nutrients. Consider adding a slow-release fertilizer to the potting mix at planting time to provide a steady supply of nutrients throughout the growing season.
How much sunlight do sweet potatoes need?
Sweet potatoes thrive in full sun, which means they need at least 6-8 hours of direct sunlight per day. Choose a location for your hanging garden that receives plenty of sunlight. If you live in a particularly hot climate, you may need to provide some afternoon shade to prevent the plants from scorching. Insufficient sunlight can lead to leggy growth, reduced yields, and overall poor plant health.
How do I harvest my sweet potatoes?
Sweet potatoes are typically ready to harvest about 90-120 days after planting. The leaves will start to turn yellow and the vines will begin to die back when the potatoes are mature. To harvest, gently tip the container over and carefully remove the potatoes from the soil. Be careful not to damage the potatoes during harvesting. Cure the sweet potatoes by placing them in a warm, humid place for about a week. This will help to heal any cuts or bruises and improve their flavor and storage life.
Can I grow sweet potatoes from store-bought sweet potatoes?
Yes, you can grow sweet potato slips from store-bought sweet potatoes. Choose organic sweet potatoes, as non-organic ones may have been treated with chemicals to prevent sprouting. Suspend the sweet potato in a jar of water, with the bottom half submerged. Place the jar in a warm, sunny location. Within a few weeks, sprouts will begin to emerge from the sweet potato. Once the sprouts are about 6-8 inches long, carefully twist them off and place them in a glass of water to root. Once the roots are about an inch long, they are ready to be planted in your hanging containers.
How do I prevent pests and diseases?
Regularly inspect your plants for signs of pests or diseases. Common pests that affect sweet potatoes include aphids, spider mites, and sweet potato weevils. You can control these pests with insecticidal soap or neem oil. Diseases that can affect sweet potatoes include fungal diseases like leaf spot and root rot. To prevent these diseases, ensure good air circulation around your plants and avoid overwatering. If you notice any signs of disease, remove the affected leaves or plants immediately. Consider using companion planting to deter pests. Marigolds, for example, are known to repel many common garden pests.
Can I grow sweet potatoes indoors?
While it’s possible to grow sweet potatoes indoors, it can be challenging to provide them with the amount of sunlight they need. If you want to try growing them indoors, choose a location that receives plenty of sunlight, such as a south-facing window. You may also need to supplement with artificial grow lights. Be sure to provide adequate ventilation and monitor the soil moisture carefully.
What are some other variations I can try?
Consider adding a trellis to your hanging container to provide support for the vines. This can create a more visually appealing display and help to keep the vines off the ground. You can also experiment with different types of containers, such as hanging baskets, fabric bags, or even repurposed plastic bottles. Get creative and have fun with it! Another variation is to grow ornamental sweet potato vines in your hanging containers. These vines come in a variety of colors and textures and can add a beautiful touch to your garden. They don’t produce edible sweet potatoes, but they are still a great addition to any hanging garden.
Leave a Comment