
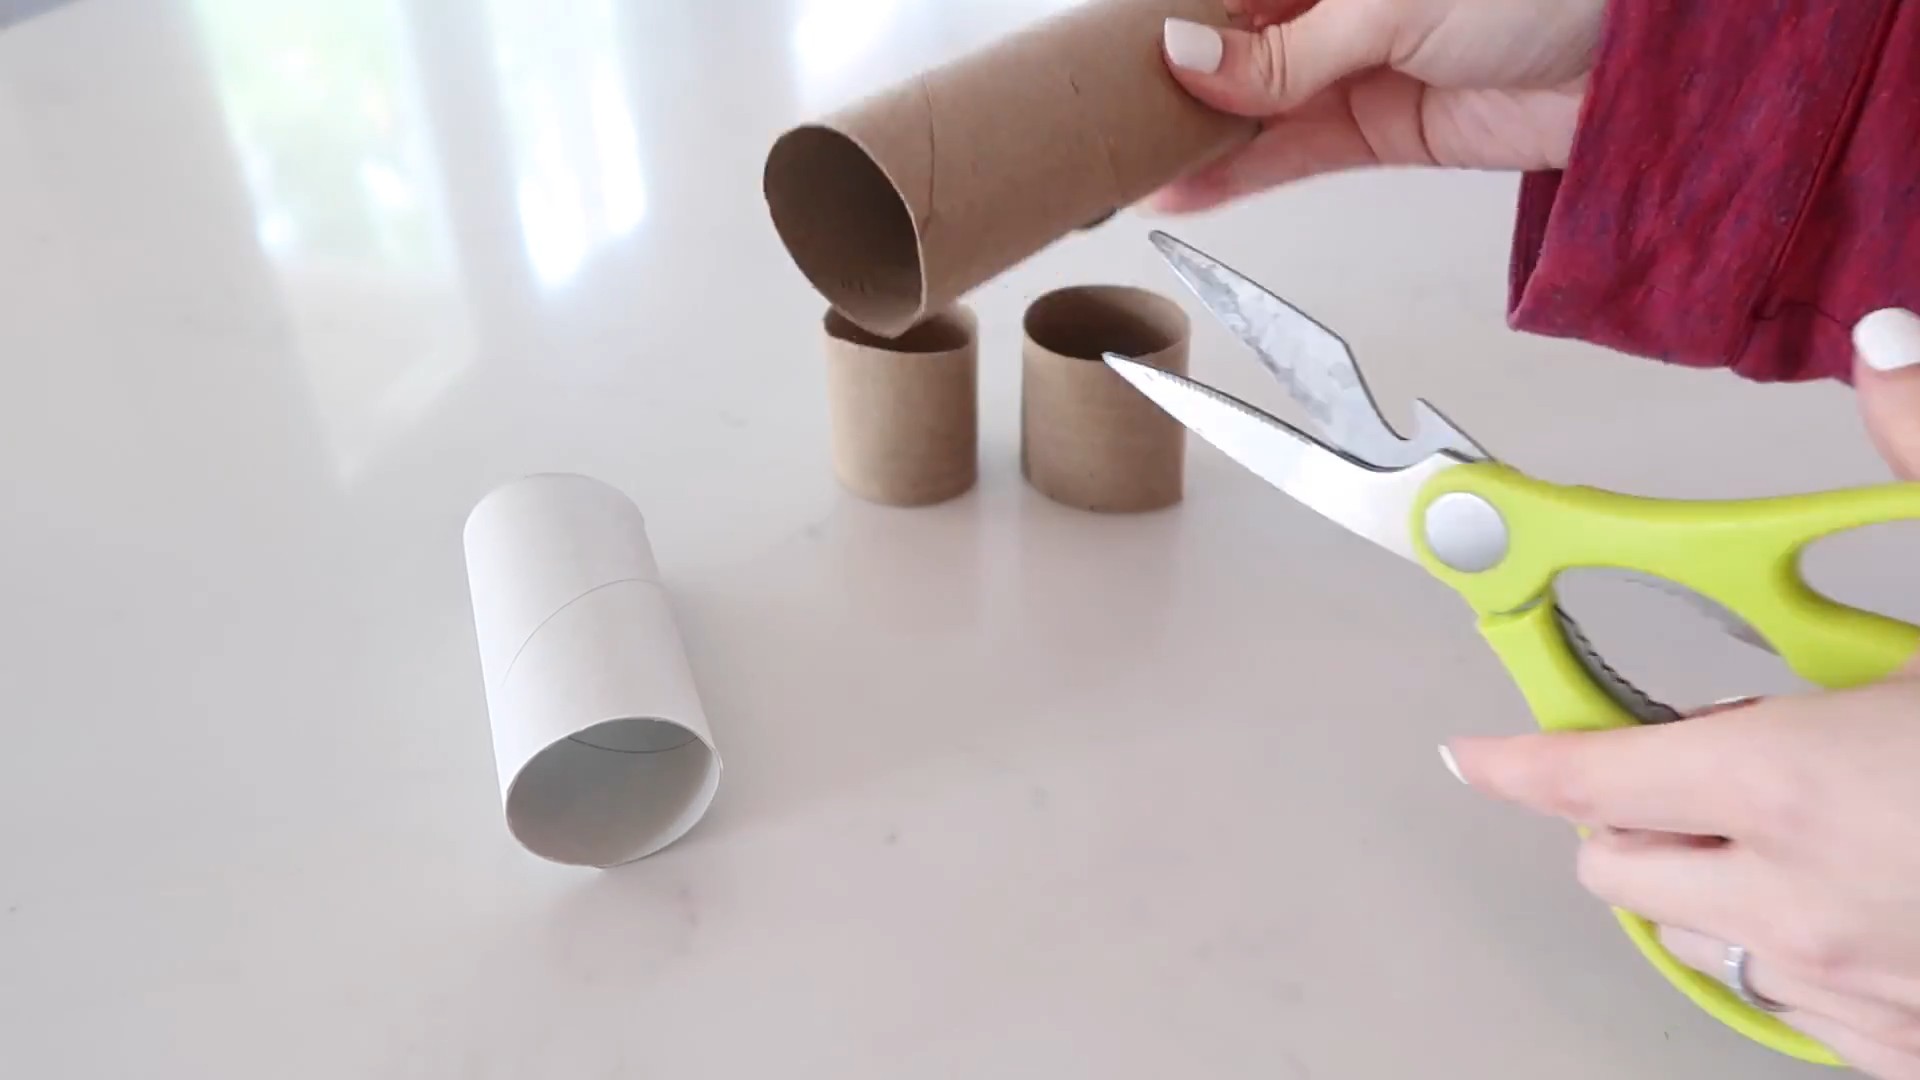
Home Hacks and Gadgets – ever feel like your house is a never-ending project? I know I do! From that leaky faucet to the eternally cluttered closet, there’s always something vying for our attention (and our wallets!). But what if I told you that you could tackle many of these home improvement hurdles with a little ingenuity and some clever DIY solutions?
For centuries, people have been finding creative ways to make their homes more comfortable and efficient. Think about it – our ancestors didn’t have access to the endless stream of gadgets and gizmos we do today. They relied on resourcefulness and a “make-do-and-mend” attitude. This spirit of innovation is still alive and well, and it’s the driving force behind the amazing world of home hacks and gadgets.
In today’s fast-paced world, time is precious, and money even more so. That’s why I’m so excited to share some of my favorite DIY tricks and hacks that will save you both! Whether you’re looking to organize your space, repair a common household problem, or simply add a touch of personality to your décor, these ideas are designed to be easy, affordable, and, most importantly, effective. Get ready to transform your house into a haven with these simple yet brilliant solutions!
Year-Round Zucchini Harvest: A DIY Guide to Extended Growing
Okay, zucchini lovers, let’s face it: zucchini season is amazing, but it’s fleeting. We’re talking about mountains of zucchini one minute and then…nothing. But what if I told you that you could enjoy fresh zucchini practically year-round? Sounds too good to be true, right? Well, it’s not! With a little planning and some DIY ingenuity, you can extend your zucchini harvest far beyond the typical summer months. I’m going to walk you through everything you need to know to make it happen.
Choosing the Right Zucchini Varieties
First things first, not all zucchini are created equal when it comes to extended growing. Some varieties are more cold-hardy or faster to mature than others. Here are a few of my favorites for year-round production:
* Black Beauty: A classic for a reason! It’s reliable, productive, and relatively quick to mature.
* Early Crookneck: As the name suggests, this one is early! Great for getting a jump start on the season.
* Costata Romanesco: This Italian heirloom has a nutty flavor and is known for its disease resistance.
* Golden Zucchini: Adds a pop of color to your garden and is generally a good producer.
Understanding the Growing Seasons
To achieve a year-round harvest, you need to understand your local climate and growing seasons. This means knowing your average first and last frost dates. You can usually find this information online by searching for “[your location] average frost dates.”
Once you know your frost dates, you can plan your planting schedule. The key is to stagger your plantings so that you always have zucchini plants in different stages of development.
Extending the Season: Cold Frames and Greenhouses
The biggest challenge to year-round zucchini growing is, of course, the cold. To overcome this, we’ll need to create a protected environment for our plants. Here are a couple of options:
* Cold Frames: These are simple, unheated structures that provide a few degrees of protection from frost. They’re great for extending the season by a few weeks in the spring and fall.
* Greenhouses: A greenhouse offers the best protection from the cold and allows you to grow zucchini even in the dead of winter.
DIY Cold Frame Construction
Building a cold frame is a relatively easy and inexpensive DIY project. Here’s how I built mine:
1. Gather Your Materials: You’ll need some lumber (I used reclaimed wood), clear plastic sheeting or old windows, hinges, screws, and a saw.
2. Cut the Lumber: Cut the lumber to create a rectangular frame. The size of your frame will depend on how many plants you want to protect. I made mine about 4 feet wide and 6 feet long. The back of the frame should be taller than the front to create a sloped roof.
3. Assemble the Frame: Screw the lumber together to create the frame. Make sure the corners are square.
4. Attach the Plastic Sheeting or Windows: Attach the plastic sheeting or windows to the top of the frame using screws or staples. If you’re using windows, you’ll need to attach hinges to one side so you can open and close the cold frame.
5. Position the Cold Frame: Place the cold frame in a sunny location that is sheltered from the wind.
6. Add Your Plants: Plant your zucchini seedlings inside the cold frame.
DIY Mini Greenhouse Construction
If you want to grow zucchini through the winter, a greenhouse is the way to go. You don’t need a huge, expensive greenhouse to get started. A small, DIY greenhouse can be just as effective.
1. Choose Your Location: Select a sunny spot in your yard that gets at least 6 hours of direct sunlight per day.
2. Build the Frame: You can build the frame out of wood, PVC pipe, or metal. I used PVC pipe because it’s lightweight, inexpensive, and easy to work with.
* PVC Frame Instructions:
a. Measure and cut the PVC pipe to the desired dimensions of your greenhouse. I made mine about 6 feet wide, 8 feet long, and 6 feet tall.
b. Use PVC connectors to assemble the frame. You’ll need corner connectors, T-connectors, and straight connectors.
c. Secure the connectors to the pipe with PVC cement.
3. Cover the Frame: Cover the frame with clear plastic sheeting. You can use greenhouse plastic, polyethylene film, or even heavy-duty painter’s plastic.
* Attaching the Plastic:
a. Cut the plastic sheeting to size, leaving a few extra inches on each side.
b. Attach the plastic to the frame using clamps, duct tape, or staples. Make sure the plastic is taut and wrinkle-free.
4. Add a Door: You’ll need a way to get into the greenhouse to water and tend to your plants. You can create a simple door by cutting a section of the plastic sheeting and attaching it to the frame with hinges.
5. Ventilation: Ventilation is crucial to prevent overheating and humidity buildup inside the greenhouse. You can add vents by cutting small holes in the plastic sheeting or by installing a small fan.
6. Heating (Optional): If you live in a very cold climate, you may need to add a heater to your greenhouse. A small electric space heater or a propane heater can be used to keep the temperature above freezing.
Step-by-Step Planting and Growing Guide
Now that you have your cold frame or greenhouse set up, it’s time to start planting! Here’s a step-by-step guide to growing zucchini year-round:
1. Start Seeds Indoors: Start your zucchini seeds indoors about 4-6 weeks before your last frost date. Use seed-starting trays or small pots filled with seed-starting mix.
2. Transplant Seedlings: Once the seedlings have developed a few true leaves, transplant them into larger pots.
3. Harden Off Seedlings: Before transplanting the seedlings into the cold frame or greenhouse, you’ll need to harden them off. This means gradually exposing them to outdoor conditions over a period of a week or two.
4. Prepare the Soil: Zucchini plants need well-drained soil that is rich in organic matter. Amend the soil with compost or aged manure before planting.
5. Planting in the Cold Frame or Greenhouse: Plant the zucchini seedlings in the cold frame or greenhouse, spacing them about 2-3 feet apart.
6. Watering: Water the plants regularly, especially during hot, dry weather. Avoid getting the leaves wet, as this can lead to fungal diseases.
7. Fertilizing: Fertilize the plants every 2-3 weeks with a balanced fertilizer.
8. Pollination: Zucchini plants need to be pollinated in order to produce fruit. If you’re growing zucchini in a greenhouse, you may need to hand-pollinate the flowers.
* Hand-Pollination Instructions:
a. Identify the male and female flowers. Male flowers have a long, thin stem, while female flowers have a small zucchini fruit at the base.
b. Use a small paintbrush to collect pollen from the male flower.
c. Transfer the pollen to the female flower.
9. Pest and Disease Control: Keep an eye out for pests and diseases, such as squash bugs, squash vine borers, and powdery mildew. Take action to control these problems as soon as they appear.
10. Harvesting: Harvest the zucchini when they are young and tender, about 6-8 inches long. Regular harvesting will encourage the plants to produce more fruit.
Staggered Planting Schedule
To ensure a continuous harvest, you’ll need to stagger your plantings. Here’s a sample planting schedule:
* Late Winter/Early Spring: Start seeds indoors for your first crop. Transplant them into the cold frame or greenhouse in early spring.
* Late Spring: Direct sow seeds outdoors for your second crop.
* Mid-Summer: Start seeds indoors for your third crop. Transplant them into the cold frame or greenhouse in late summer/early fall.
* Late Fall: Start seeds indoors for your fourth crop. Transplant them into the greenhouse in late fall/early winter.
Troubleshooting Tips
Even with the best planning, you may encounter some challenges along the way. Here are a few troubleshooting tips:
* Poor Pollination: If your zucchini plants are producing flowers but no fruit, it could be due to poor pollination. Try hand-pollinating the flowers or attracting pollinators to your garden.
* Powdery Mildew: This fungal disease can be a problem, especially in humid conditions. Improve air circulation around the plants and treat with a fungicide if necessary.
* Squash Bugs and Squash Vine Borers: These pests can wreak
Conclusion
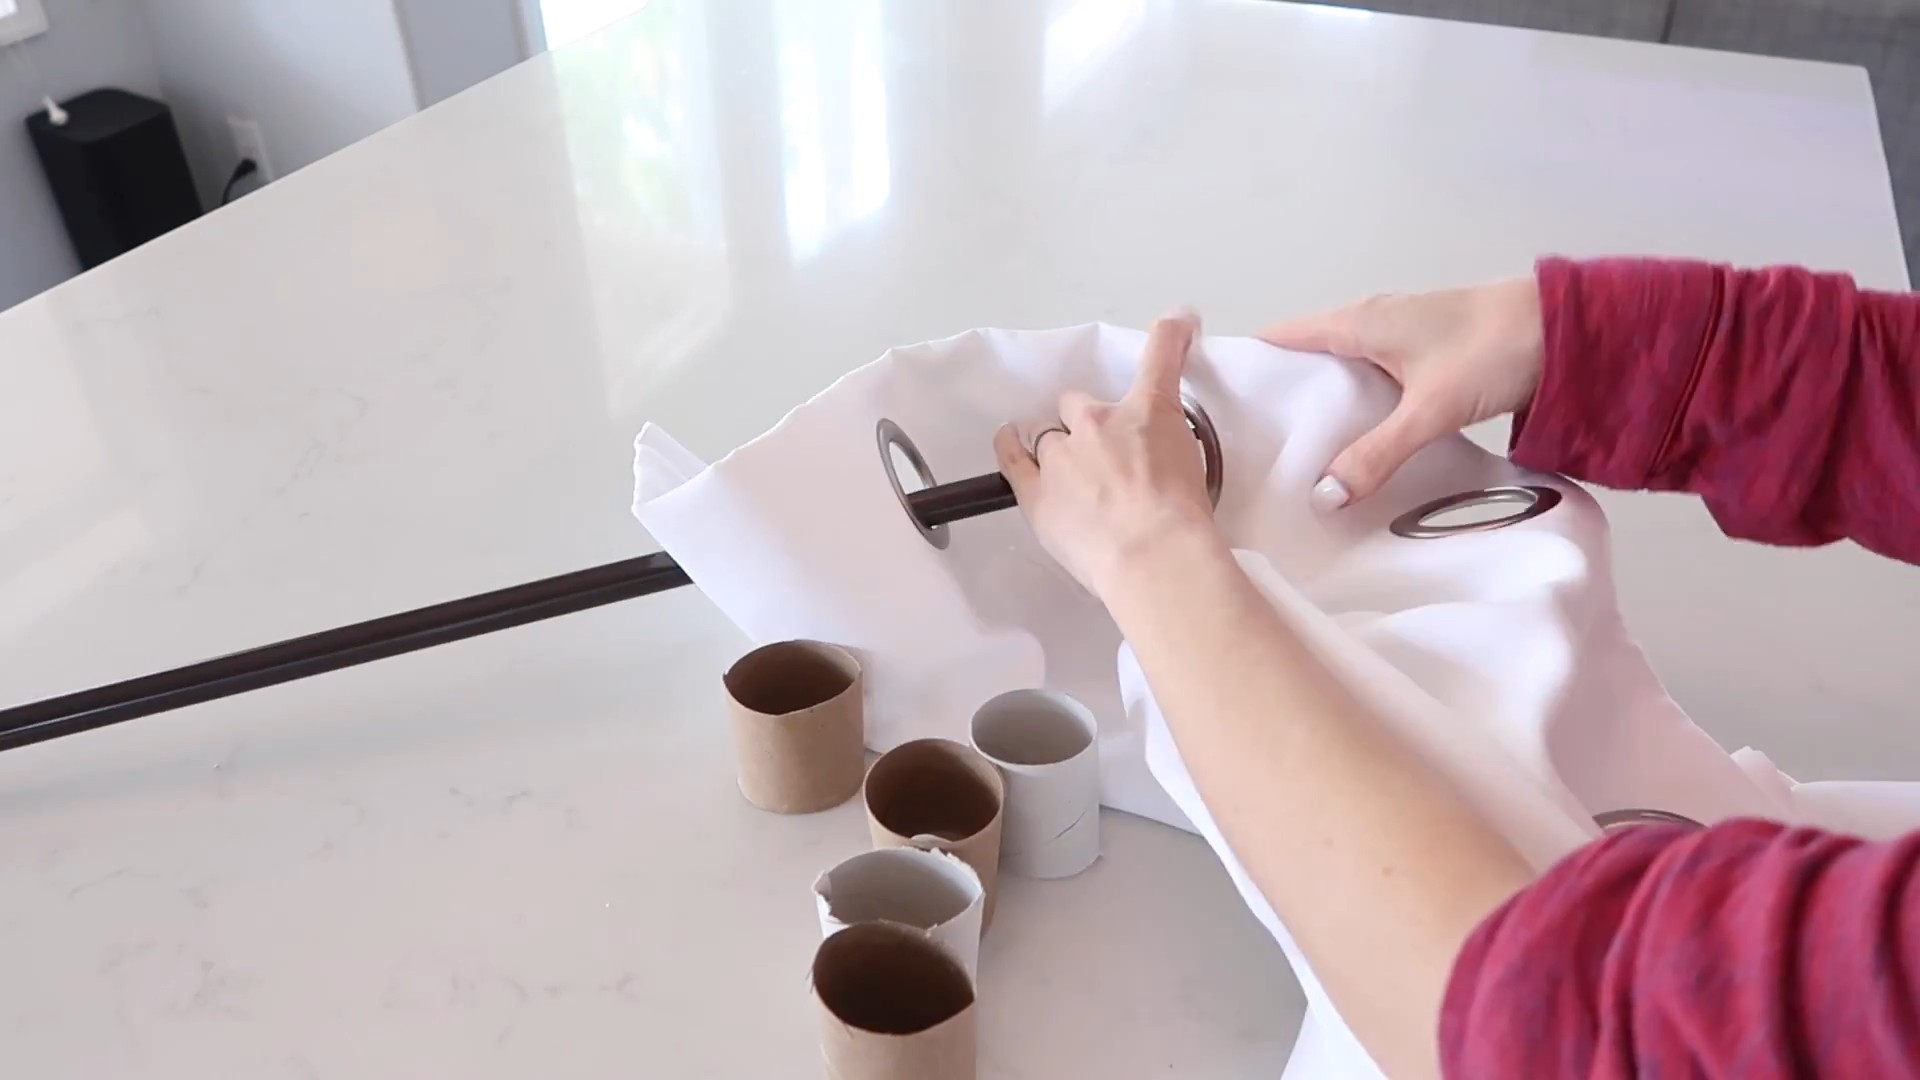
So, there you have it! This simple yet incredibly effective DIY trick is more than just a clever hack; it’s a game-changer for anyone looking to streamline their life and save money. We’ve shown you how to create a practical solution using readily available materials, transforming everyday items into something truly useful. The beauty of this DIY approach lies in its adaptability. It’s not a rigid formula but a flexible framework that you can tailor to your specific needs and preferences.
Why is this a must-try? Because it empowers you to take control, reduce waste, and create personalized solutions that perfectly fit your lifestyle. In a world of mass-produced goods, this DIY trick offers a refreshing alternative – a chance to express your creativity and resourcefulness. It’s about more than just saving a few dollars; it’s about fostering a mindset of innovation and self-sufficiency.
Consider these variations to further personalize your experience. If you’re feeling adventurous, experiment with different materials to achieve unique aesthetics or enhanced functionality. Perhaps you could incorporate recycled elements for an eco-friendly twist, or add decorative touches to match your home décor. The possibilities are truly endless! Think about adding essential oils for a pleasant scent, or using different fabrics for a unique texture. The key is to let your imagination guide you and create something that reflects your personal style.
Beyond the immediate benefits, this DIY project encourages a deeper appreciation for the things we use every day. It prompts us to think critically about consumption and to explore alternative solutions that are both practical and sustainable. By embracing DIY, we not only save money but also reduce our environmental impact and foster a sense of accomplishment.
We are confident that once you try this DIY trick, you’ll wonder how you ever lived without it. It’s a simple, effective, and rewarding way to enhance your daily life. So, gather your materials, unleash your creativity, and get ready to experience the satisfaction of creating something truly useful with your own two hands.
Don’t just take our word for it – try it yourself! We are incredibly eager to hear about your experiences. Share your creations, modifications, and success stories in the comments section below. Let us know what worked for you, what challenges you encountered, and any tips you have for fellow DIY enthusiasts. Your feedback is invaluable and will help us continue to refine and improve this guide. Together, we can build a community of resourceful individuals who are passionate about creating innovative solutions for everyday challenges. This is a fantastic example of a great home hack that you can use to improve your life.
Frequently Asked Questions (FAQ)
What if I don’t have all the exact materials listed? Can I substitute them?
Absolutely! One of the best things about DIY projects is their flexibility. Don’t feel limited by the specific materials mentioned. Get creative and think about what you already have on hand that could serve a similar purpose. For example, if you don’t have the exact type of adhesive recommended, consider using a strong glue or even double-sided tape as an alternative. If you can’t find the specified fabric, any durable material will work. The key is to assess the function of each material and find a suitable substitute that meets those requirements. Remember to prioritize safety and durability when making substitutions.
How long will this DIY trick last?
The lifespan of your creation will depend on the quality of the materials you use and how frequently you use it. Using higher-quality materials will naturally result in a more durable and long-lasting product. Regular maintenance, such as cleaning and occasional repairs, can also significantly extend its lifespan. If you notice any signs of wear and tear, address them promptly to prevent further damage. With proper care, your DIY creation should provide you with years of reliable service.
Is this DIY trick suitable for beginners?
Yes! This DIY trick is designed to be accessible to individuals of all skill levels, including beginners. The instructions are clear, concise, and easy to follow. The materials required are readily available and inexpensive. Even if you have no prior experience with DIY projects, you should be able to complete this project successfully with a little patience and attention to detail. Don’t be afraid to make mistakes – they are a natural part of the learning process.
Can I customize this DIY trick to better suit my needs?
Absolutely! Customization is highly encouraged. This DIY trick is intended to be a starting point, a foundation upon which you can build your own unique creation. Feel free to experiment with different materials, colors, sizes, and features to tailor it to your specific needs and preferences. Consider adding personal touches that reflect your individual style and personality. The possibilities are limited only by your imagination.
What safety precautions should I take when attempting this DIY trick?
Safety should always be your top priority when undertaking any DIY project. Before you begin, carefully review the instructions and identify any potential hazards. Wear appropriate safety gear, such as gloves and eye protection, to protect yourself from injury. Work in a well-ventilated area to avoid inhaling harmful fumes. Use sharp tools with caution and always cut away from your body. If you are unsure about any aspect of the project, seek guidance from a more experienced DIYer or consult online resources.
What if I encounter problems or difficulties while attempting this DIY trick?
Don’t panic! Problems and difficulties are a normal part of the DIY process. If you encounter a snag, take a deep breath and try to troubleshoot the issue. Re-read the instructions carefully and make sure you haven’t missed any steps. Consult online resources, such as videos and forums, for additional guidance. If you’re still stuck, don’t hesitate to ask for help from a friend or family member who has experience with DIY projects. Remember, persistence is key.
How can I share my DIY creation with others?
We would love to see your creations! Share photos and videos of your finished project on social media using relevant hashtags. You can also post your creations in online forums and communities dedicated to DIY projects. Consider writing a blog post or creating a video tutorial to share your experience and inspire others. Your creativity and resourcefulness can make a positive impact on the DIY community.
What are some other similar home hacks and gadgets that I can try?
There are countless DIY home hacks and gadgets that you can explore. Consider searching online for tutorials and inspiration. Look for projects that align with your interests and skill level. Some popular DIY projects include creating your own cleaning solutions, repurposing old furniture, and building custom storage solutions. The possibilities are endless! Remember to start with simple projects and gradually work your way up to more complex ones.
Is this DIY trick environmentally friendly?
This DIY trick can be environmentally friendly, depending on the materials you choose to use. Opting for recycled, repurposed, or sustainable materials can significantly reduce your environmental impact. Consider using eco-friendly adhesives and finishes. By making conscious choices about the materials you use, you can create a DIY project that is both practical and environmentally responsible.
Where can I find more inspiration for DIY projects?
The internet is a treasure trove of DIY inspiration. Websites like Pinterest, YouTube, and Instructables are excellent resources for finding tutorials, ideas, and tips. You can also find inspiration in magazines, books, and local craft stores. Don’t be afraid to experiment and try new things. The more you explore, the more creative and resourceful you will become.
Leave a Comment