
Terrace Asparagus Growing DIY: Ever dream of snipping fresh, vibrant asparagus spears right from your own terrace garden? I know I have! There’s something incredibly satisfying about growing your own food, especially when it’s a gourmet treat like asparagus. Forget those pricey supermarket bundles – with a little know-how, you can cultivate your own thriving asparagus patch, even in a limited space.
Asparagus has a rich history, enjoyed since ancient times by the Romans and Greeks, who valued it for both its culinary and medicinal properties. Today, this delicious vegetable is still highly prized, but often seen as a challenge to grow at home. That’s where this DIY guide comes in! Many people shy away from growing asparagus, thinking it requires acres of land. But I’m here to tell you that’s simply not true. With the right techniques, terrace asparagus growing DIY is totally achievable, even if you only have a small balcony or patio.
This article will provide you with all the essential tips and tricks to successfully grow asparagus on your terrace. From choosing the right container and soil to understanding the plant’s unique needs, I’ll walk you through every step of the process. Imagine the joy of harvesting your own tender asparagus spears, knowing you nurtured them from tiny crowns to culinary perfection. So, let’s get started and transform your terrace into an asparagus haven!
Growing Asparagus on Your Terrace: A DIY Guide
Asparagus! That delicious, spring-time treat that can be surprisingly expensive at the grocery store. But guess what? You don’t have to rely on the store. You can grow your own, even if you only have a terrace or balcony. It takes a little patience, as asparagus needs a few years to mature, but trust me, the fresh, homegrown flavor is worth the wait. I’m going to walk you through everything you need to know to successfully grow asparagus in containers on your terrace.
Choosing the Right Container and Location
Before we even think about planting, let’s get the basics sorted. Asparagus needs space, so selecting the right container and location is crucial.
* Container Size: This is non-negotiable. You need a large container. I’m talking at least 24 inches in diameter and 24 inches deep. Asparagus roots grow deep and wide, and a smaller container will stunt their growth. Think big! A half-barrel planter or a large, sturdy plastic container works great.
* Drainage: Excellent drainage is essential. Asparagus hates soggy roots. Make sure your container has plenty of drainage holes. If not, drill some!
* Material: The material of the container isn’t as critical as size and drainage. Plastic, wood, or terracotta all work. Just keep in mind that terracotta dries out faster, so you’ll need to water more frequently.
* Sunlight: Asparagus loves sunshine! Aim for at least 6-8 hours of direct sunlight per day. A south-facing terrace is ideal, but a west-facing one can also work. Observe your terrace throughout the day to see where the sun hits the most.
* Protection: Consider the wind. Asparagus ferns can get quite tall and are susceptible to wind damage. If your terrace is particularly windy, try to position your container in a more sheltered spot, perhaps near a wall or railing.
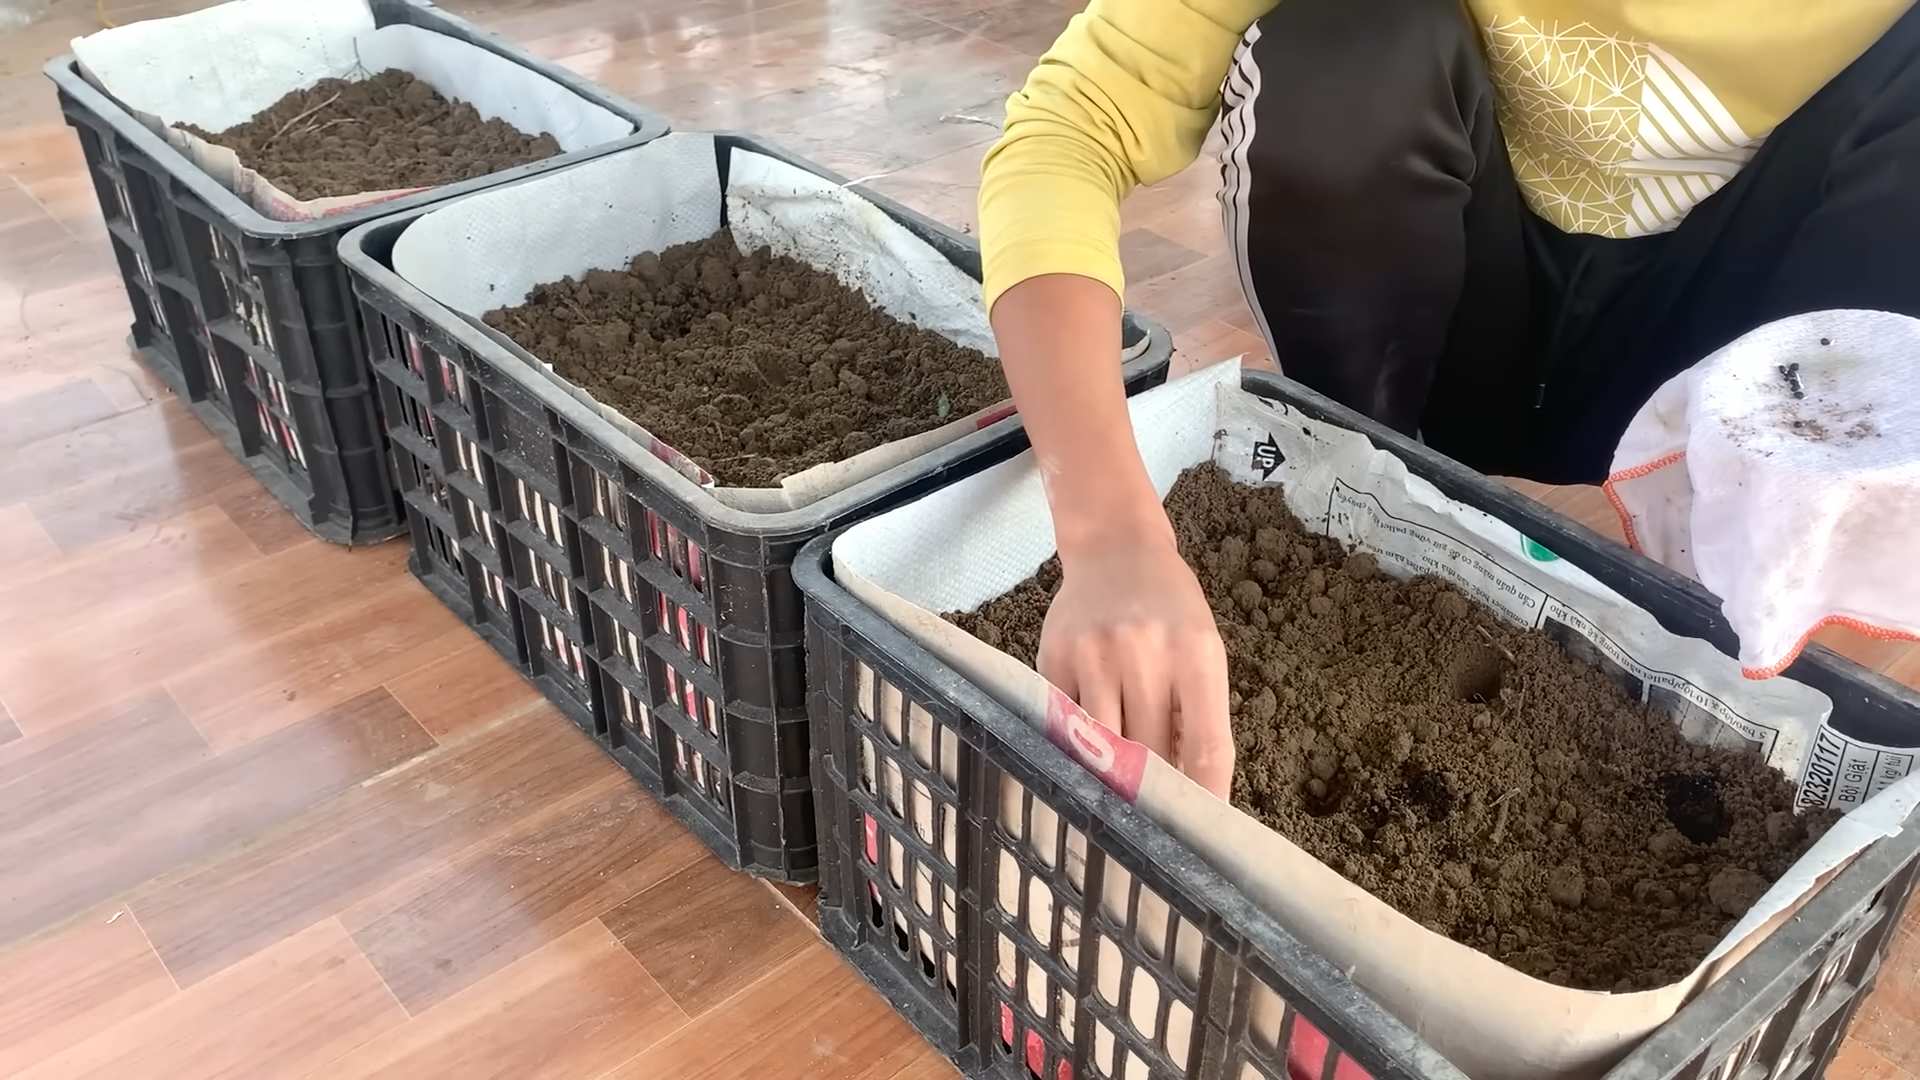
Preparing the Soil
Asparagus needs well-draining, nutrient-rich soil. Don’t even think about using garden soil straight from the ground – it’s usually too heavy and compact.
* The Perfect Mix: I recommend a mix of equal parts:
* High-quality potting mix: This provides a good base for drainage and aeration.
* Compost: This adds essential nutrients and improves soil structure.
* Sand or perlite: This further enhances drainage.
* pH Level: Asparagus prefers a slightly acidic to neutral soil pH (around 6.5-7.0). You can test your soil pH with a simple soil testing kit, available at most garden centers. If your soil is too acidic, you can amend it with lime.
* Filling the Container: Don’t fill the container completely to the top. Leave a few inches of space to make watering easier and prevent soil from spilling over.
Planting Asparagus Crowns
Now for the fun part – planting! You’ll be planting asparagus crowns, which are basically one-year-old asparagus plants.
* Choosing Crowns: Purchase your crowns from a reputable nursery. Look for healthy crowns that are plump and firm, with no signs of mold or rot. Avoid crowns that look dried out or shriveled. Jersey Knight and Mary Washington are popular varieties known for their good yields.
* Timing: The best time to plant asparagus crowns is in early spring, as soon as the soil is workable.
* Spacing: In a large container, you can plant multiple crowns. Space them about 12 inches apart.
* Planting Depth: This is important! Dig a trench in the soil about 6 inches deep and 12 inches wide. Create a small mound in the center of the trench. Place the asparagus crown on top of the mound, spreading the roots out around it. Cover the crown with about 2 inches of soil.
* Watering: Water thoroughly after planting.
Caring for Your Asparagus
Asparagus needs consistent care, especially in the first few years.
* Watering: Water regularly, especially during dry periods. The soil should be consistently moist, but not waterlogged. Check the soil moisture by sticking your finger into the soil. If the top inch feels dry, it’s time to water.
* Fertilizing: Asparagus is a heavy feeder. Fertilize every spring with a balanced fertilizer (e.g., 10-10-10). You can also side-dress with compost throughout the growing season.
* Weeding: Keep the container free of weeds. Weeds compete with asparagus for nutrients and water.
* Mulching: Apply a layer of mulch around the asparagus plants. Mulch helps to retain moisture, suppress weeds, and regulate soil temperature. Straw, wood chips, or shredded leaves are all good options.
* Fern Care: As the asparagus grows, it will produce tall, feathery ferns. These ferns are essential for the plant’s health, as they photosynthesize and store energy for future growth. Don’t cut them back until they turn brown and die back in the fall or winter.
* Pest and Disease Control: Asparagus is relatively pest-resistant, but keep an eye out for asparagus beetles. These beetles can damage the ferns. Hand-picking them off the plants is usually sufficient. If you have a severe infestation, you can use an insecticidal soap. Rust is a fungal disease that can affect asparagus. Ensure good air circulation and avoid overhead watering to prevent rust. If you see signs of rust, remove the affected ferns.
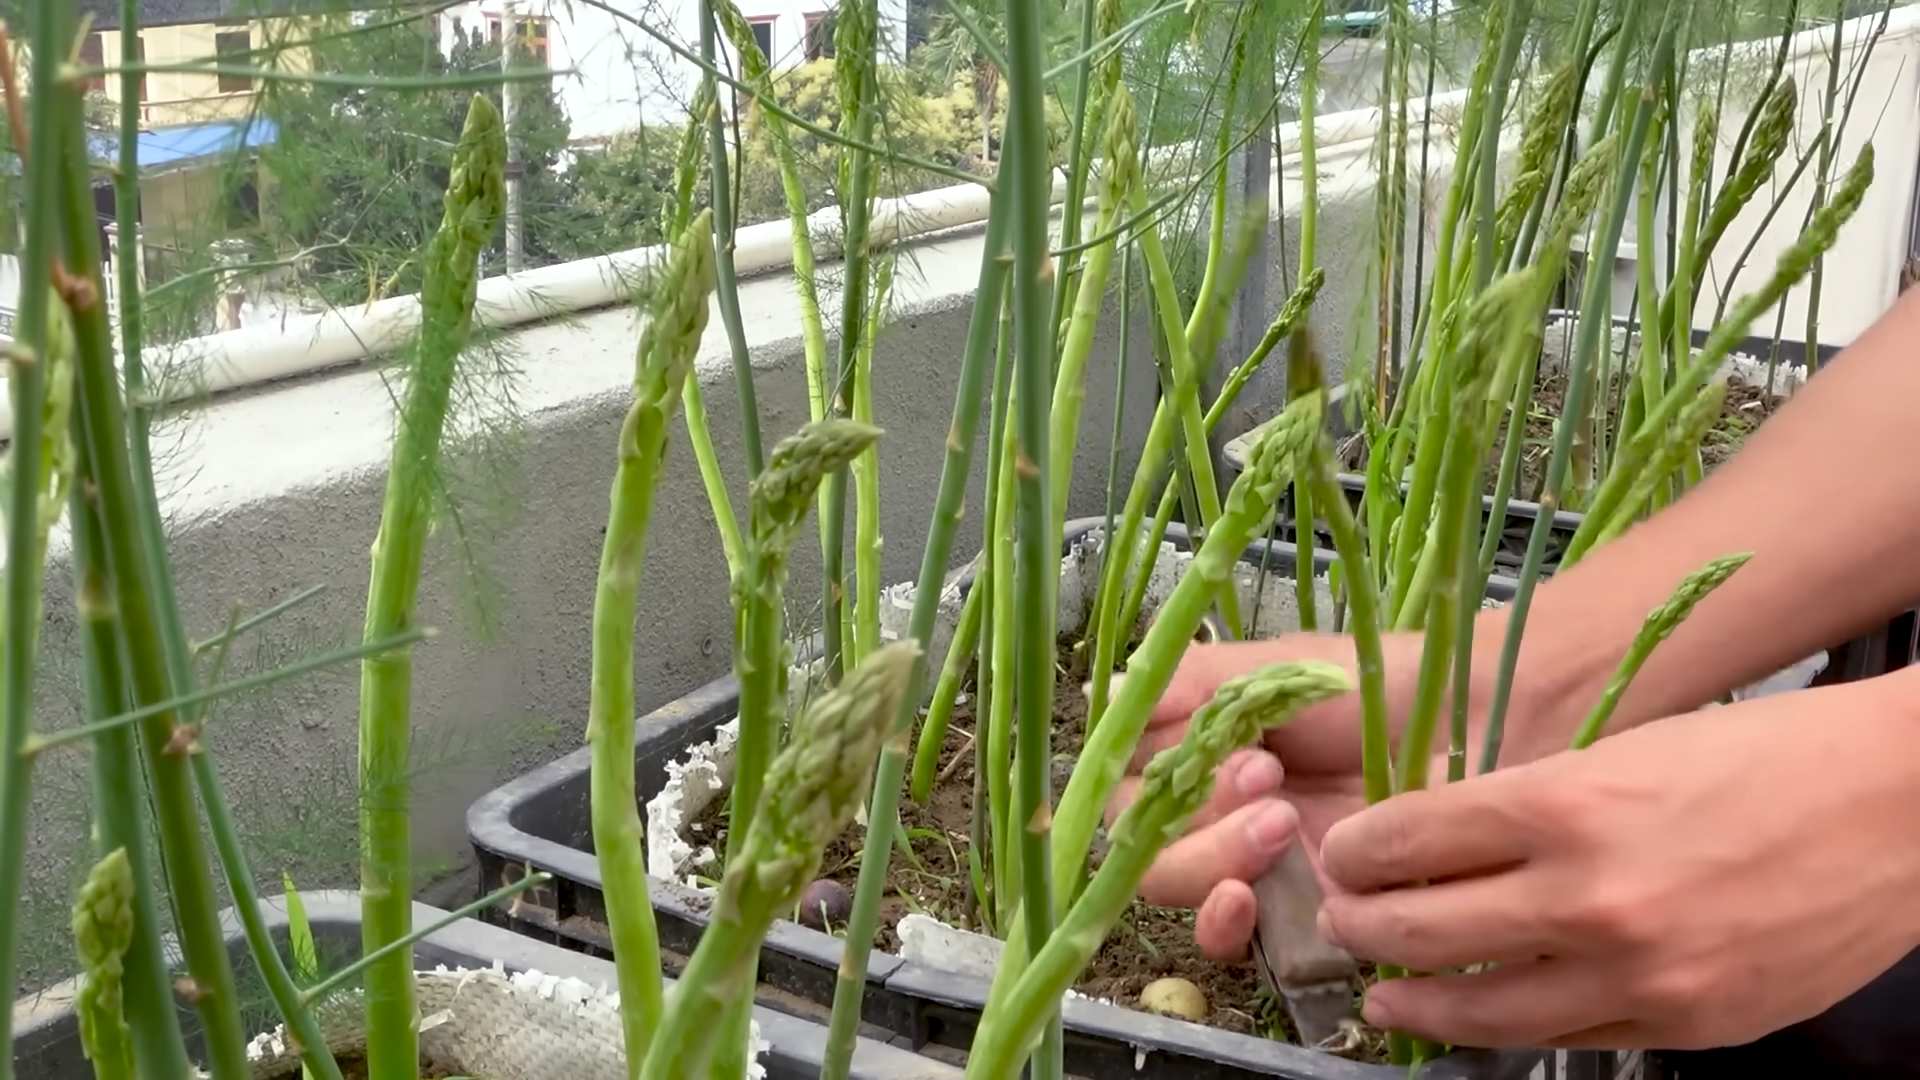
Harvesting Your Asparagus
Patience is key! Don’t harvest any asparagus spears in the first year. This allows the plants to establish a strong root system. In the second year, you can harvest a few spears, but only for a short period (about 2 weeks). In the third year and beyond, you can harvest more heavily, for a period of 6-8 weeks.
* Harvesting Technique: Harvest spears when they are about 6-8 inches tall and about as thick as your finger. Snap the spears off at ground level.
* Harvesting Period: Stop harvesting when the spears become thin and spindly. This indicates that the plant is starting to put its energy into fern growth.
* Post-Harvest Care: After harvesting, continue to water and fertilize your asparagus plants to encourage healthy fern growth.
Overwintering Asparagus
Asparagus is a perennial plant, meaning it will come back year after year. In colder climates, you’ll need to take some steps to protect your asparagus plants over the winter.
* Cutting Back Ferns: Once the ferns have turned brown and died back in the fall or winter, cut them back to ground level.
* Mulching: Apply a thick layer of mulch around the base of the plants. This will help to insulate the roots and protect them from freezing temperatures.
* Container Protection: If you live in a very cold climate, you may want to wrap the container with burlap or bubble wrap to provide extra insulation. You can also move the container to a more sheltered location, such as a garage or shed.
* Watering: Water sparingly during the winter, only when the soil is very dry.
Step-by-Step Instructions: From Crown to Table
Let’s break down the whole process into easy-to-follow steps:
1. Gather Your Supplies: You’ll need:
* A large container (at least 24 inches in diameter and 24 inches deep)
* High-quality potting mix
* Compost
* Sand or perlite
* Asparagus crowns
* A trowel
* Watering can
* Mulch
* Fertilizer (balanced, e.g., 10-10-10)
2. Prepare the Container:
* Ensure the container has adequate drainage holes.
* Mix the potting mix, compost, and sand or perlite in equal parts.
* Fill the container with the soil mixture, leaving a few inches of space at the top.
3. Plant the Crowns:
* Dig a trench in the soil about 6 inches deep and 12 inches wide.
* Create a small mound in the center of the trench.
* Place the asparagus crown on top of the mound, spreading the roots out around it.
* Cover the crown with about 2 inches of soil.
* Space multiple crowns about 12 inches apart.
4. Water Thoroughly: Water the newly planted crowns thoroughly.
5. Mulch: Apply a layer of mulch around the asparagus plants.
6. Water Regularly: Water regularly, especially during dry periods.
7. Fertilize: Fertilize every spring with a balanced fertilizer.
8. Weed
Conclusion
So, there you have it! Transforming your terrace into a thriving asparagus patch is not only achievable but also incredibly rewarding. This DIY terrace asparagus growing method offers a unique opportunity to enjoy the freshest, most flavorful asparagus imaginable, right outside your door. Forget those limp, store-bought spears that have traveled miles – imagine the vibrant green stalks, bursting with earthy sweetness, gracing your dinner table, harvested just moments before.
This isn’t just about convenience; it’s about connecting with your food, understanding its growth cycle, and experiencing the satisfaction of nurturing something from the earth. Plus, growing your own asparagus is significantly more sustainable than relying on commercially grown produce, reducing your carbon footprint and supporting a more eco-conscious lifestyle.
But the benefits don’t stop there. Asparagus, as you know, is a nutritional powerhouse, packed with vitamins, minerals, and antioxidants. By growing your own, you ensure that you’re getting the maximum nutritional value, as the spears are consumed at their peak freshness.
Why is this DIY trick a must-try? Because it empowers you to cultivate a perennial vegetable garden in a limited space, providing years of delicious harvests with minimal effort once established. It’s a project that combines gardening, sustainability, and healthy eating into one fulfilling experience.
Ready to take your terrace asparagus growing to the next level? Consider these variations:
* Companion Planting: Enhance your asparagus patch by planting companion herbs like basil, parsley, or tomatoes. These plants can deter pests and improve the overall health of your asparagus.
* Vertical Growing: If space is truly limited, explore vertical growing options. You can train your asparagus ferns to climb a trellis or support structure, maximizing your yield in a small area.
* Different Varieties: Experiment with different asparagus varieties to discover your favorite flavor profiles. ‘Jersey Knight’ is a popular choice for its high yield and disease resistance, while ‘Purple Passion’ offers a unique color and slightly sweeter taste.
* Succession Planting: Stagger your planting times to extend your harvest season. Plant some crowns in early spring and others a few weeks later to ensure a continuous supply of fresh asparagus.
We’re confident that this DIY guide will equip you with the knowledge and confidence to embark on your own terrace asparagus growing adventure. Don’t be intimidated by the initial setup; the long-term rewards are well worth the effort.
So, grab your gardening gloves, gather your supplies, and get ready to transform your terrace into an asparagus oasis. We can’t wait to hear about your experiences! Share your photos, tips, and challenges in the comments below. Let’s build a community of terrace asparagus growers and inspire others to embrace the joy of homegrown goodness. Happy gardening!
FAQ
What kind of container is best for growing asparagus on a terrace?
The ideal container for terrace asparagus growing should be large and deep. Asparagus roots need plenty of room to spread and establish themselves. A container that is at least 24 inches deep and 24 inches wide is recommended for each crown. Consider using a large planter box, a half-barrel, or even a raised bed on your terrace. Ensure the container has adequate drainage holes to prevent waterlogging, which can be detrimental to asparagus growth. The material of the container is less critical, but avoid dark-colored containers in hot climates, as they can overheat the soil.
How often should I water my terrace asparagus?
Watering frequency depends on the climate, the type of container, and the soil composition. Generally, asparagus needs consistent moisture, especially during the growing season (spring and summer). Water deeply whenever the top inch of soil feels dry to the touch. Avoid overwatering, as this can lead to root rot. During the dormant season (fall and winter), reduce watering frequency but ensure the soil doesn’t completely dry out. A good rule of thumb is to check the soil moisture every few days and water accordingly. Using a moisture meter can be helpful in determining the soil’s moisture level.
What kind of soil is best for terrace asparagus?
Asparagus thrives in well-draining, fertile soil with a slightly acidic to neutral pH (6.0 to 7.0). A mixture of garden soil, compost, and perlite or vermiculite is ideal. The compost provides essential nutrients, while the perlite or vermiculite improves drainage and aeration. Avoid heavy clay soils, as they can become waterlogged and hinder root growth. Before planting, amend the soil with plenty of organic matter to improve its structure and fertility. You can also add a slow-release fertilizer to provide a steady supply of nutrients to your asparagus plants.
How long does it take to harvest asparagus after planting?
Patience is key when growing asparagus. It typically takes two to three years after planting crowns to begin harvesting spears. In the first year, allow the plants to establish themselves and develop a strong root system. In the second year, you can harvest a few spears, but limit the harvest to a week or two. In the third year and beyond, you can enjoy a more substantial harvest, typically lasting for six to eight weeks in the spring. Avoid harvesting spears that are thinner than a pencil, as these are needed for the plant to continue growing.
How do I fertilize my terrace asparagus?
Asparagus is a heavy feeder and benefits from regular fertilization. In the spring, after the harvest season, apply a balanced fertilizer (e.g., 10-10-10) to replenish the nutrients used during spear production. You can also side-dress with compost or well-rotted manure. In the fall, apply a fertilizer high in phosphorus and potassium to promote root growth and prepare the plants for winter dormancy. Avoid over-fertilizing, as this can lead to excessive fern growth at the expense of spear production. Follow the fertilizer manufacturer’s instructions carefully.
How do I protect my terrace asparagus from pests and diseases?
While asparagus is relatively pest-resistant, it can be susceptible to certain pests and diseases. Common pests include asparagus beetles and aphids. Handpicking beetles or using insecticidal soap can control these pests. Diseases such as rust and crown rot can also affect asparagus. Ensure good air circulation around the plants to prevent fungal diseases. Avoid overwatering and provide well-draining soil to prevent crown rot. If you notice any signs of disease, remove affected foliage promptly. Consider using organic fungicides if necessary.
What do I do with the asparagus ferns after the harvest season?
After the harvest season, allow the asparagus ferns to grow and mature. These ferns are essential for photosynthesis and help the plant store energy for the following year’s spear production. In the fall, after the ferns have turned yellow or brown, cut them back to a few inches above the soil level. This helps to remove any potential overwintering pests or diseases. You can also mulch the area with compost or straw to protect the roots from cold temperatures.
Can I grow asparagus in pots indoors?
While it’s possible to start asparagus seeds indoors, growing them to maturity in pots indoors is challenging. Asparagus needs a period of dormancy and a large root system, which is difficult to replicate indoors. If you want to try growing asparagus indoors, choose a very large pot (at least 24 inches in diameter) and provide plenty of sunlight or grow lights. However, be aware that the yield will likely be much lower than growing asparagus outdoors. It’s generally best to grow asparagus outdoors on a terrace or in a garden.


Leave a Comment