
Home Mushroom Growing: Your Guide to a Fun and Flavorful Harvest
Home mushroom growing is more accessible than you might think! Forget expensive grocery store prices and unpredictable availability – I’m going to show you how to cultivate your own delicious mushrooms right in your kitchen or backyard. This isn’t just about saving money; it’s about connecting with nature in a surprisingly rewarding way. Growing your own mushrooms is a deeply satisfying experience, offering a unique blend of science and nature that’s both educational and delicious.
The practice of cultivating mushrooms boasts a rich history, dating back centuries. From ancient civilizations utilizing mushrooms for medicinal purposes to modern-day enthusiasts embracing them as a culinary delight, home mushroom growing has always held a special place in human culture. But for many, the idea of growing your own mushrooms seems daunting. That’s where this guide comes in!
Why Grow Your Own Mushrooms?
There are countless reasons to embark on this fascinating journey. Imagine the pride of harvesting your own fresh, organic mushrooms, knowing exactly where they came from and how they were grown. Beyond the satisfaction, you’ll be enjoying superior flavor and texture compared to store-bought varieties. Plus, you’ll be reducing your environmental impact by minimizing transportation and packaging waste. This DIY approach to home mushroom growing empowers you to take control of your food source and experience the magic of nature firsthand.
So, whether you’re a seasoned gardener or a complete beginner, get ready to discover the simple yet rewarding world of home mushroom cultivation. Let’s get started!
Growing Your Own Gourmet Mushrooms at Home: A Step-by-Step Guide
I’ve always been fascinated by mushrooms, their unique shapes, and incredible culinary versatility. So, naturally, I decided to take on the challenge of growing my own! It’s surprisingly easier than you might think. This guide will walk you through the process, from preparing your substrate to harvesting your delicious bounty. Let’s get started!
Phase 1: Preparing Your Substrate
The substrate is the growing medium for your mushrooms. Different mushrooms require different substrates, but for this guide, we’ll focus on a common and readily available option: straw. You can also use coffee grounds, but straw is generally easier to work with for beginners.
- Gather your materials: You’ll need straw (wheat or rye straw works best), a large pot or container for pasteurization, a thermometer, and a clean workspace.
- Prepare the straw: Break down the straw into smaller pieces, about 2-3 inches long. This will help ensure even hydration and colonization.
- Pasteurize the straw: This crucial step kills off any unwanted bacteria or mold that could compete with your mushroom spawn. Fill your pot with the straw, adding enough water to completely submerge it. Bring the water to a boil, then reduce heat and simmer for at least 1 hour, maintaining a temperature of around 160-180°F (71-82°C). Use your thermometer to monitor the temperature carefully. This is vital for success!
- Drain and cool: Once pasteurized, carefully drain the straw and allow it to cool completely. You want it to be at room temperature before proceeding.
- Squeeze out excess water: After cooling, gently squeeze out as much excess water as possible. The straw should be damp but not soggy. Too much water can lead to anaerobic conditions, hindering mushroom growth.
Phase 2: Inoculating the Substrate with Mushroom Spawn
Mushroom spawn is essentially mushroom mycelium (the vegetative part of the fungus) grown on a grain substrate like rye or wheat berries. You can purchase spawn online or from specialty stores. Choose a variety that’s suitable for beginners, such as oyster mushrooms or shiitake mushrooms.
- Prepare your workspace: Clean your workspace thoroughly with a disinfectant solution to minimize the risk of contamination. I like to use a 10% bleach solution, but make sure to rinse everything thoroughly afterwards.
- Open the spawn: Carefully open your spawn bag or container in a clean environment. Avoid touching the spawn directly with your bare hands.
- Incorporate the spawn: Gently mix the spawn into the prepared straw. Aim for a ratio of approximately 1:10 spawn to straw. Thoroughly mix the spawn throughout the straw to ensure even colonization.
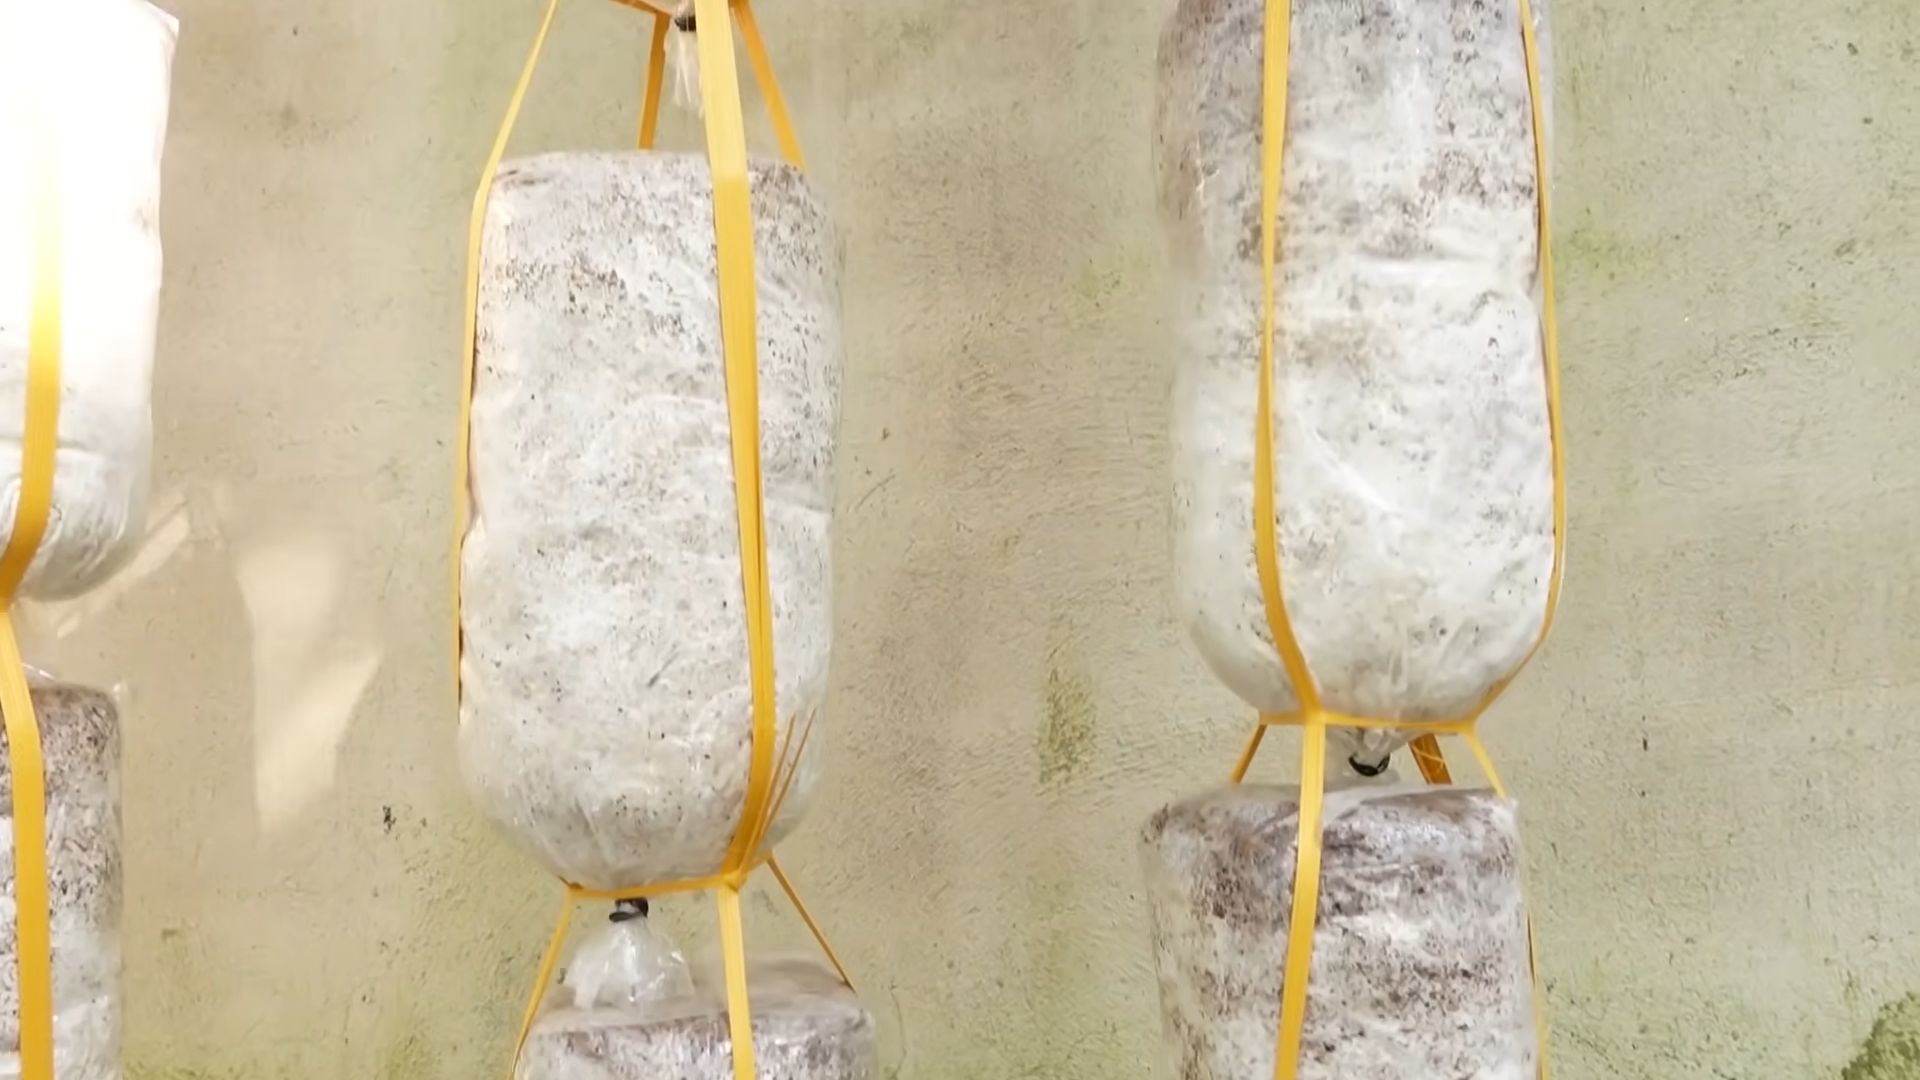
- Transfer to a growing container: Transfer the inoculated substrate into a clean, breathable container. A plastic tub with holes drilled in the lid works well. Don’t pack the substrate too tightly; leave some air space.
Phase 3: Incubation and Colonization
This is the waiting period. The mycelium will now colonize the substrate, spreading throughout and preparing for fruiting.
- Maintain optimal conditions: Keep the container in a dark, humid environment with a temperature between 65-75°F (18-24°C). A closet or basement often works well. Consistent temperature and humidity are key.
- Monitor for colonization: Check on your substrate regularly. You should start to see white mycelium spreading through the straw within a few weeks. This indicates successful colonization.
- Patience is key: Colonization can take several weeks, even months depending on the mushroom species and environmental conditions. Don’t get discouraged if you don’t see immediate results.
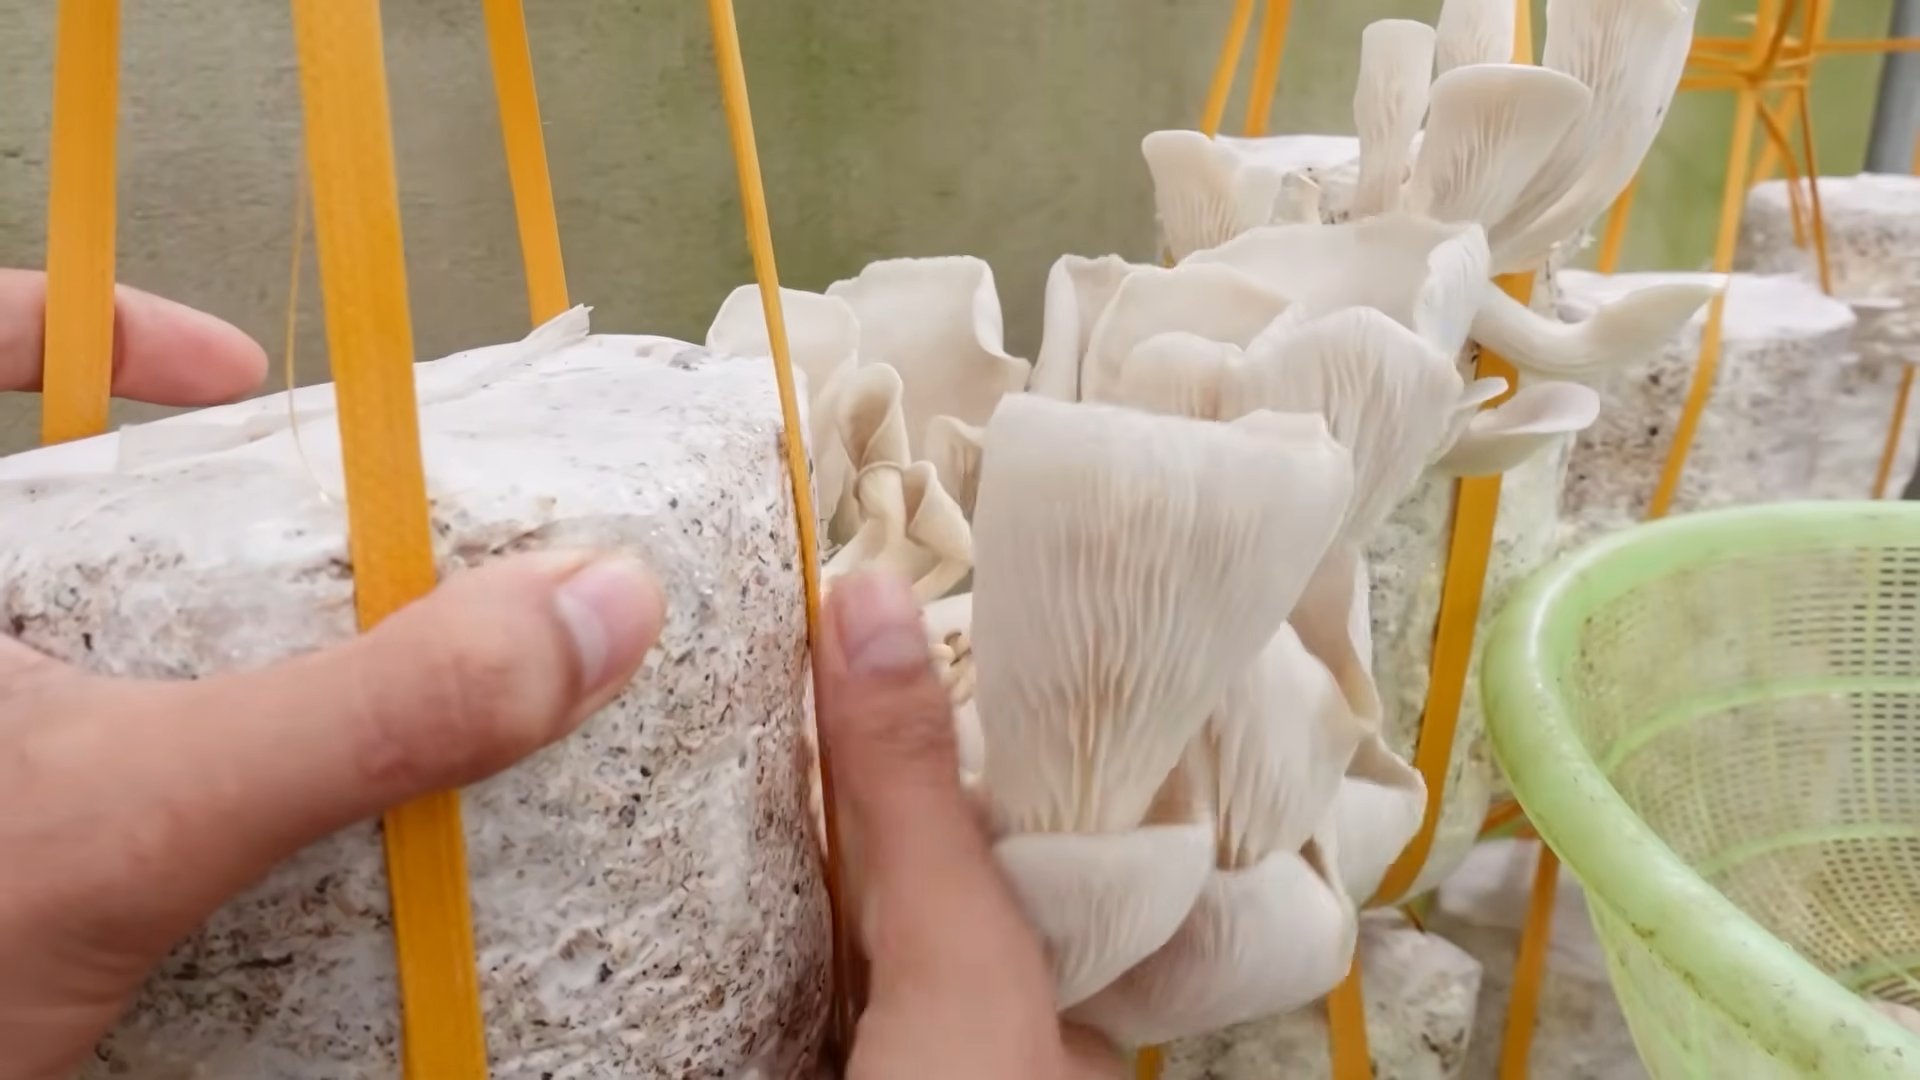
Phase 4: Fruiting and Harvesting
Once the substrate is fully colonized, it’s time to induce fruiting. This involves changing the environmental conditions to stimulate mushroom growth.
- Increase airflow: Increase airflow around the container by opening the lid slightly or creating more ventilation holes. This helps to introduce fresh air and reduce humidity.
- Introduce light: Move the container to a location with indirect light. Mushrooms need light to initiate fruiting, but direct sunlight can be harmful.
- Maintain humidity: While you’re increasing airflow, it’s important to maintain a relatively high humidity level. You can achieve this by misting the substrate with water regularly or placing the container in a humidity-controlled environment.
- Harvesting: Once the mushrooms reach maturity (size and appearance vary depending on the species), gently twist or cut them at the base. Avoid pulling them out, as this can damage the mycelium and reduce future yields.
- Multiple flushes: You’ll likely get multiple flushes (harvest cycles) from a single substrate. After each harvest, allow the substrate to rest for a few days before misting and repeating the fruiting process. You might need to add a little water to the substrate between flushes.
Troubleshooting
- Contamination: If you see any unusual colors (green, black, etc.) or strange smells, it’s likely contamination. Unfortunately, contaminated substrates usually need to be discarded to prevent the spread of unwanted organisms.
- Slow colonization: If colonization is slow, check the temperature and humidity levels. Ensure the substrate is properly hydrated but not waterlogged. Poor quality spawn can also contribute to slow growth.
- No fruiting: If the mycelium has fully colonized but no mushrooms are appearing, try adjusting the airflow, light, and humidity levels. Sometimes a slight change in conditions is all that’s needed to trigger fruiting.
Remember, growing mushrooms is a learning process. Don’t be afraid to experiment and adjust your techniques based on your observations. With patience and attention to detail, you’ll soon be enjoying the fruits (or rather, fungi!) of your labor.
Conclusion
So there you have it – your comprehensive guide to home mushroom growing! This isn’t just another hobby; it’s a rewarding journey that connects you directly with nature’s bounty. From the initial inoculation to the satisfying harvest, the entire process is deeply fulfilling. The ability to cultivate your own gourmet mushrooms at home is incredibly empowering, offering unparalleled freshness and flavor that simply can’t be matched by store-bought varieties. You’ll save money, reduce your environmental impact, and impress your friends and family with your culinary prowess. This DIY trick isn’t just about growing mushrooms; it’s about nurturing life, understanding natural processes, and enjoying the fruits (or rather, fungi!) of your labor.
Beyond the basic techniques outlined, the possibilities for experimentation are endless. Consider trying different mushroom species – oyster mushrooms are known for their ease of cultivation, while shiitake mushrooms offer a rich, umami flavor. Experiment with different substrates; coffee grounds, straw, and sawdust all provide suitable growing mediums. You can even explore different growing methods, such as using a modified plastic bag or a more elaborate mushroom grow kit. The key is to find a method that suits your space, skill level, and desired mushroom variety. Don’t be afraid to get creative and adapt the techniques to your specific circumstances. The beauty of home mushroom growing lies in its adaptability and the endless opportunities for learning and discovery.
We strongly encourage you to embark on this exciting adventure. The initial investment is minimal, and the rewards are immeasurable. Imagine the satisfaction of slicing into a plump, juicy mushroom you’ve grown yourself, knowing the journey from spore to plate. It’s a truly unique experience that connects you to the natural world in a profound way. Share your home mushroom growing journey with us! Post pictures of your thriving mycelium, your bountiful harvests, and your delicious mushroom creations on social media using #HomeMushroomGrowing. We’d love to see your progress and celebrate your successes. Let’s build a community of home mushroom growers, sharing tips, tricks, and inspiring each other to cultivate our own fungal feasts.
Remember, patience and observation are key to successful home mushroom growing. Don’t get discouraged if your first attempt isn’t perfect. Learn from your experiences, adjust your techniques, and keep experimenting. The more you learn, the better you’ll become at cultivating these fascinating fungi. So, what are you waiting for? Start your home mushroom growing journey today and experience the magic of cultivating your own delicious, nutritious mushrooms!
Frequently Asked Questions
What type of mushrooms are easiest to grow at home?
Oyster mushrooms are generally considered the easiest mushrooms for beginners to grow at home. They are relatively fast-growing, adaptable to various substrates, and require less stringent environmental controls compared to other species.
What equipment do I need to start home mushroom growing?
The necessary equipment depends on the chosen method, but generally includes a sterilized substrate (such as straw or coffee grounds), mushroom spawn (containing the mushroom’s mycelium), a container for growing (a plastic bag, a grow kit, or a more elaborate setup), and a spray bottle for maintaining humidity. You may also need a thermometer and hygrometer to monitor temperature and humidity levels.
How long does it take to grow mushrooms at home?
The time it takes to harvest mushrooms varies depending on the species and growing conditions. Oyster mushrooms, for example, can be ready for harvest in as little as 4-6 weeks, while other varieties may take longer. Careful monitoring of temperature and humidity is crucial for optimal growth.
What are the best substrates for home mushroom growing?
Many substrates can be used, including straw, coffee grounds, sawdust, and wood chips. The choice depends on the mushroom species and your preferences. It’s crucial to sterilize the substrate before inoculation to prevent contamination.
Can I grow mushrooms indoors?
Yes, many mushroom species can be successfully grown indoors. You’ll need to provide a suitable environment with appropriate temperature, humidity, and light levels. A cool, dark, and humid space is ideal for many mushroom varieties.
What if my mushrooms are not growing?
Several factors can affect mushroom growth, including improper sterilization of the substrate, incorrect temperature and humidity levels, insufficient light, or contamination. Review your growing techniques, ensure proper environmental conditions, and check for signs of contamination. If problems persist, consult online resources or experienced mushroom growers for assistance.
How do I store harvested mushrooms?
Freshly harvested mushrooms should be stored in a refrigerator in a paper bag or container to prevent moisture buildup. They are best consumed within a few days for optimal flavor and texture.
Is home mushroom growing expensive?
The initial investment for home mushroom growing is relatively low. The cost depends on the chosen method and the scale of your operation. You can start with a small-scale project using readily available materials, making it an affordable and rewarding hobby.
Are home-grown mushrooms safe to eat?
As long as you follow proper hygiene practices and use clean, sterilized materials, home-grown mushrooms are generally safe to eat. However, it’s crucial to accurately identify the mushroom species you are growing to ensure it is edible. If you are unsure about the edibility of a mushroom, do not consume it.
Where can I find mushroom spawn?
Mushroom spawn can be purchased online from various suppliers specializing in mushroom cultivation supplies. Many online retailers offer a wide selection of mushroom species and spawn types.
Leave a Comment