
Home Mushroom Growing: Unlock the secrets to cultivating your own delicious and nutritious fungi right in the comfort of your home! Have you ever dreamt of harvesting fresh, gourmet mushrooms just steps from your kitchen? This isn’t some far-fetched fantasy; it’s an achievable reality with the right knowledge and a little DIY spirit. For centuries, mushroom cultivation has been revered in various cultures, from ancient Chinese medicinal practices to European culinary traditions. Imagine the satisfaction of nurturing these fascinating organisms from spore to table, knowing exactly where your food comes from and avoiding those hefty grocery store prices.
In today’s world, where sustainability and self-sufficiency are becoming increasingly important, home mushroom growing offers a fantastic way to connect with nature and reduce your environmental footprint. Plus, it’s a rewarding hobby that can provide you with a continuous supply of fresh, flavorful ingredients for your favorite dishes. This article will guide you through simple, yet effective DIY tricks and hacks to successfully grow mushrooms at home, regardless of your experience level. Get ready to embark on a fascinating journey into the world of mycology and discover the joy of harvesting your own homegrown mushrooms!
Pilzzucht zu Hause: Dein umfassender DIY-Leitfaden
Hallo Pilzfreunde! Habt ihr euch jemals gefragt, wie es wäre, eure eigenen köstlichen Pilze zu Hause zu züchten? Es ist einfacher als ihr denkt und unglaublich befriedigend. In diesem Artikel zeige ich euch, wie ihr mit einfachen Mitteln und etwas Geduld eure eigene kleine Pilzfarm aufbauen könnt. Lasst uns loslegen!
Was du für den Start brauchst
Bevor wir in die Details gehen, hier eine Liste der Dinge, die ihr für eure Pilzzucht benötigt:
* Pilzbrut: Das ist das “Saatgut” für eure Pilze. Ihr könnt sie online oder in spezialisierten Gartencentern kaufen. Achtet darauf, die richtige Sorte für eure Bedingungen auszuwählen. Austernpilze (Pleurotus ostreatus) sind ein guter Anfang, da sie relativ einfach zu züchten sind.
* Substrat: Das ist das Material, auf dem eure Pilze wachsen werden. Beliebte Optionen sind Stroh, Kaffeesatz, Holzspäne oder Sägemehl. Die Wahl des Substrats hängt von der Pilzart ab.
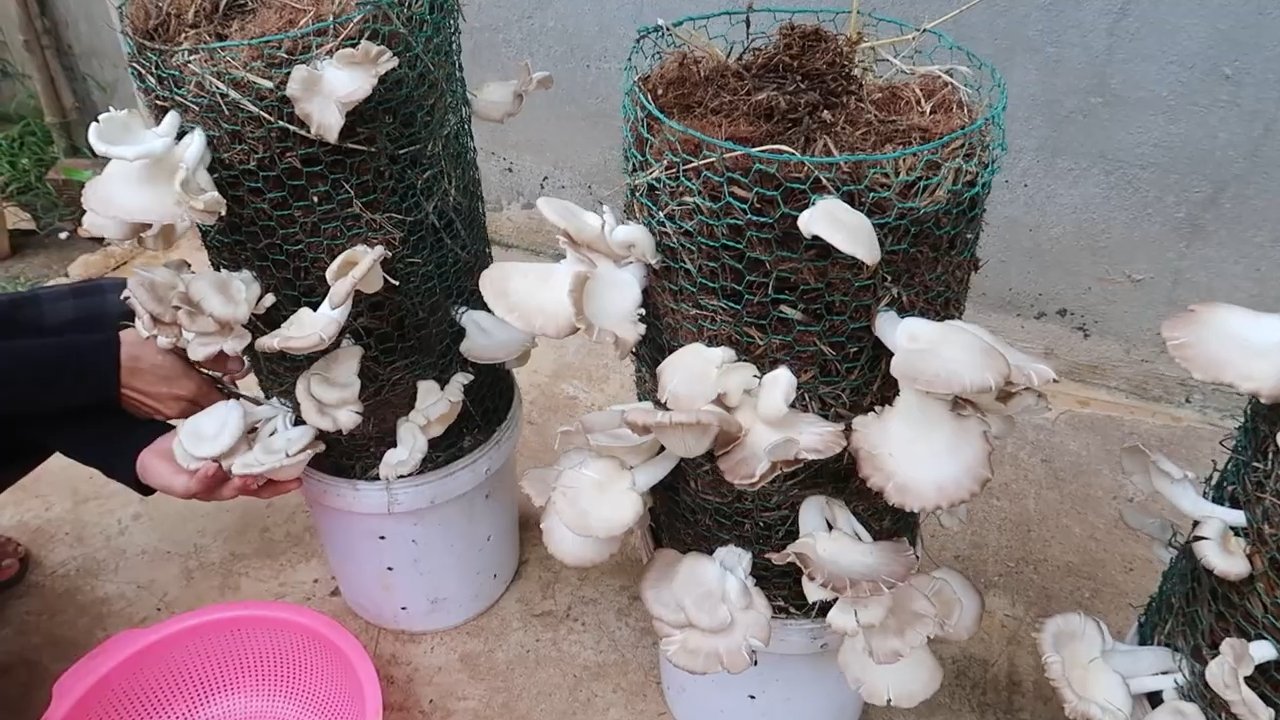
* Behälter: Ihr benötigt einen Behälter, um das Substrat und die Brut zu beherbergen. Das kann ein Eimer, eine Plastiktüte, ein Glas oder sogar ein spezieller Pilzzuchtbeutel sein.
* Sprühflasche: Um die Feuchtigkeit aufrechtzuerhalten.
* Desinfektionsmittel: Um Kontaminationen zu vermeiden. Isopropylalkohol ist eine gute Wahl.
* Handschuhe: Um eure Hände sauber zu halten und Kontaminationen zu minimieren.
* Optional: Ein Thermometer und ein Hygrometer, um Temperatur und Luftfeuchtigkeit zu überwachen.
Die richtige Pilzart wählen
Die Wahl der richtigen Pilzart ist entscheidend für den Erfolg eurer Pilzzucht. Hier sind einige beliebte Optionen und ihre Anforderungen:
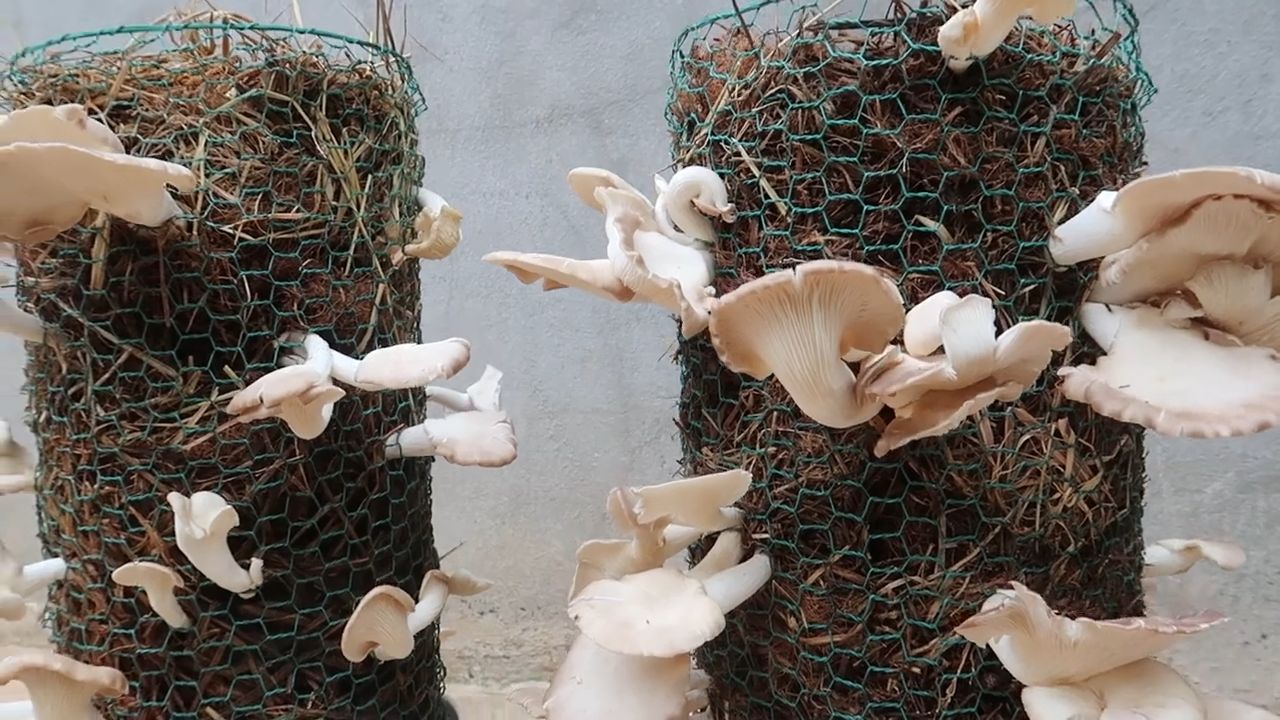
* Austerpilze (Pleurotus ostreatus): Sehr anfängerfreundlich, wachsen schnell und sind tolerant gegenüber verschiedenen Substraten. Sie bevorzugen Stroh, Kaffeesatz oder Holzspäne.
* Shiitake (Lentinula edodes): Benötigen Hartholzspäne oder -stämme. Die Zucht ist etwas anspruchsvoller, aber die Mühe lohnt sich.
* Champignons (Agaricus bisporus): Die Zucht von Champignons ist etwas komplizierter und erfordert spezielle Kompostierungstechniken. Sie sind nicht die beste Wahl für Anfänger.
* Reishi (Ganoderma lucidum): Benötigen Hartholzstämme und eine lange Wachstumsperiode. Sie sind bekannt für ihre medizinischen Eigenschaften.
Für diesen Leitfaden konzentrieren wir uns auf die Zucht von Austernpilzen, da sie am einfachsten zu handhaben sind.
Schritt-für-Schritt-Anleitung zur Austernpilzzucht
Hier ist eine detaillierte Anleitung, wie ihr Austernpilze zu Hause züchten könnt:
1. Substrat vorbereiten
Das Substrat ist die Grundlage für eure Pilzzucht. Es muss sterilisiert werden, um unerwünschte Mikroorganismen abzutöten, die mit den Pilzen konkurrieren könnten.
1. Stroh pasteurisieren: Wenn ihr Stroh verwendet, schneidet es in kleine Stücke (ca. 5-10 cm). Weicht das Stroh in einem großen Behälter mit heißem Wasser (ca. 65-70°C) für 1-2 Stunden ein. Dies tötet die meisten unerwünschten Mikroorganismen ab, ohne die Nährstoffe zu zerstören.
2. Kaffeesatz verwenden: Kaffeesatz ist bereits pasteurisiert, da er während des Brühvorgangs erhitzt wurde. Stellt sicher, dass ihr frischen Kaffeesatz verwendet und ihn nicht zu lange stehen lasst, da er sonst schimmeln kann.
3. Holzspäne verwenden: Holzspäne sollten ebenfalls pasteurisiert werden. Dies kann durch Dämpfen in einem Topf oder durch Einweichen in heißem Wasser erfolgen.
2. Substrat und Brut mischen
Nachdem das Substrat vorbereitet wurde, ist es Zeit, es mit der Pilzbrut zu mischen.
1. Reinigung: Reinigt eure Arbeitsfläche und eure Hände gründlich mit Desinfektionsmittel. Tragt Handschuhe, um Kontaminationen zu vermeiden.
2. Mischen: Nehmt euren Behälter und schichtet das Substrat und die Pilzbrut abwechselnd ein. Beginnt mit einer Schicht Substrat, dann eine Schicht Brut, dann wieder Substrat usw. Die oberste Schicht sollte Substrat sein.
3. Verhältnis: Das Verhältnis von Brut zu Substrat sollte etwa 1:10 betragen. Das bedeutet, dass ihr für 1 kg Substrat etwa 100 g Brut benötigt.
4. Verdichten: Drückt das Substrat leicht an, um sicherzustellen, dass es gut mit der Brut in Kontakt kommt.
3. Inkubation
Die Inkubation ist die Phase, in der die Pilzbrut das Substrat besiedelt.
1. Platzierung: Stellt den Behälter an einen dunklen, warmen Ort (ca. 20-24°C). Eine Speisekammer oder ein Schrank sind gute Optionen.
2. Belüftung: Während der Inkubation benötigen die Pilze etwas Belüftung. Wenn ihr einen Beutel verwendet, könnt ihr kleine Löcher hineinstechen. Wenn ihr einen Eimer verwendet, lasst den Deckel leicht geöffnet.
3. Beobachtung: Überprüft den Behälter regelmäßig auf Schimmel. Wenn ihr Schimmel seht, entfernt den betroffenen Bereich sofort.
4. Dauer: Die Inkubationsphase dauert in der Regel 2-3 Wochen. Während dieser Zeit sollte das Substrat vollständig von einem weißen, flaumigen Myzel überzogen sein.
4. Fruchtung
Sobald das Substrat vollständig besiedelt ist, ist es Zeit, die Pilze zum Fruchten zu bringen.
1. Licht: Bringt den Behälter an einen Ort mit indirektem Licht. Direkte Sonneneinstrahlung kann die Pilze austrocknen.
2. Luftfeuchtigkeit: Austernpilze benötigen eine hohe Luftfeuchtigkeit (ca. 80-90%). Besprüht das Substrat mehrmals täglich mit Wasser, um die Feuchtigkeit aufrechtzuerhalten. Ihr könnt auch eine Plastiktüte über den Behälter stülpen, um die Luftfeuchtigkeit zu erhöhen. Achtet jedoch darauf, dass genügend Belüftung vorhanden ist, um Schimmelbildung zu vermeiden.
3. Temperatur: Die ideale Temperatur für die Fruchtung liegt bei 15-20°C.
4. Belüftung: Eine gute Belüftung ist wichtig, um die Ansammlung von Kohlendioxid zu verhindern.
5. Beobachtung: Innerhalb weniger Tage solltet ihr kleine Pilzköpfe (Primordia) sehen, die aus dem Substrat wachsen.
5. Ernte
Die Pilze sind erntereif, wenn die Hüte vollständig ausgewachsen sind und sich die Ränder leicht nach oben biegen.
1. Ernten: Dreht die Pilze vorsichtig ab oder schneidet sie mit einem scharfen Messer ab.
2. Reinigung: Entfernt alle Substratreste von den Pilzen.
3. Lagerung: Lagert die Pilze im Kühlschrank in einem Papiersack. Sie sind etwa eine Woche haltbar.
6. Zweite Ernte (und mehr!)
Nach der ersten Ernte könnt ihr in der Regel noch weitere Ernten erzielen.
1. Vorbereitung: Entfernt alle Pilzreste vom Substrat.
2. Bewässerung: Weicht das Substrat für 24 Stunden in kaltem Wasser ein.
3. Wiederholung: Wiederholt die Schritte 4 und 5.
Ihr könnt in der Regel 2-3 Ernten von einem Substratblock erzielen. Danach ist das Substrat erschöpft und kann kompostiert werden.
Häufige Probleme und Lösungen
Auch bei sorgfältiger Arbeit können Probleme auftreten. Hier sind einige häufige Probleme und wie ihr sie beheben könnt:
* Schimmel: Schimmel ist ein häufiges Problem bei der Pilzzucht. Um Schimmel zu vermeiden, ist es wichtig, das Substrat richtig zu pasteurisieren und eine saubere Arbeitsumgebung zu gewährleisten. Wenn ihr Schimmel seht, entfernt den betroffenen Bereich sofort.
*
Conclusion
Embarking on the journey of home mushroom growing is more than just a culinary adventure; it’s a rewarding experience that connects you with nature and provides a sustainable source of fresh, delicious food. We’ve explored the ins and outs of cultivating your own fungi, from selecting the right species to mastering the art of creating the perfect growing environment. The benefits are undeniable: you gain access to varieties often unavailable in stores, control the growing process to ensure organic practices, and enjoy the unparalleled satisfaction of harvesting your own bounty.
This DIY approach to mushroom cultivation is a must-try for several compelling reasons. First, it empowers you to bypass the often-high costs associated with purchasing specialty mushrooms. Imagine having a constant supply of oyster mushrooms for stir-fries, shiitake for hearty soups, or even the delicate lion’s mane for a gourmet touch, all without breaking the bank. Second, it’s an incredibly educational and engaging hobby. You’ll learn about the fascinating life cycle of fungi, the importance of environmental factors, and the subtle nuances that influence growth and flavor. It’s a hands-on science lesson that yields delicious results.
But the real magic lies in the customization. While we’ve covered the fundamentals, there’s ample room for experimentation and personalization. Consider exploring different substrates beyond the standard straw or sawdust. Coffee grounds, cardboard, and even certain types of wood chips can be viable options, each imparting subtle variations in flavor and texture to your mushrooms. You can also experiment with different growing containers, from repurposed buckets and tubs to elaborate tiered systems designed for maximum yield.
Furthermore, don’t be afraid to venture beyond the common varieties. While oyster and shiitake mushrooms are excellent starting points, the world of edible fungi is vast and diverse. Explore the possibilities of growing enoki, reishi (for medicinal purposes), or even the elusive morel (though this requires more advanced techniques). Each species presents its own unique challenges and rewards, keeping the learning process fresh and exciting.
Ultimately, the success of your home mushroom growing endeavor hinges on your willingness to learn, adapt, and experiment. Pay close attention to the specific needs of the mushroom species you choose, maintain a clean and controlled environment, and be patient. The rewards – fresh, flavorful mushrooms grown with your own hands – are well worth the effort.
We wholeheartedly encourage you to give this DIY trick a try. Start small, learn from your mistakes, and celebrate your successes. Once you’ve experienced the joy of harvesting your own mushrooms, you’ll be hooked. And most importantly, we want to hear about your experiences! Share your tips, tricks, and triumphs in the comments below. Let’s build a community of home mushroom growers and learn from each other. Your insights could inspire others to embark on this rewarding journey and unlock the potential of their own backyards. So, grab your spores, prepare your substrate, and get ready to cultivate your own delicious fungi!
Frequently Asked Questions (FAQ)
What are the easiest mushrooms to grow at home for beginners?
Oyster mushrooms are widely considered the easiest mushrooms for beginners to cultivate. They are fast-growing, relatively forgiving of environmental fluctuations, and can thrive on a variety of substrates, including straw, coffee grounds, and even cardboard. Shiitake mushrooms are another good option, although they require a bit more patience as they have a longer incubation period. Both oyster and shiitake mushrooms are readily available in spawn form and offer a satisfying yield for novice growers.
What is the best substrate for growing mushrooms at home?
The best substrate depends on the type of mushroom you’re growing. For oyster mushrooms, pasteurized straw is a popular and effective choice. Shiitake mushrooms typically thrive on hardwood sawdust or logs. Other options include coffee grounds (especially for oyster mushrooms), cardboard (also good for oyster mushrooms), and various types of wood chips. It’s crucial to research the specific substrate requirements of the mushroom species you’re cultivating to ensure optimal growth. Proper pasteurization or sterilization of the substrate is also essential to eliminate competing molds and bacteria.
How do I pasteurize or sterilize my substrate?
Pasteurization aims to reduce the number of competing organisms in the substrate without completely eliminating them, while sterilization aims to eliminate all living organisms. For straw, a common pasteurization method involves soaking it in hot water (around 160-180°F or 71-82°C) for 1-2 hours. For sawdust or other denser substrates, sterilization is often recommended. This can be achieved by using a pressure cooker or autoclave, following the manufacturer’s instructions for the specific substrate and container size. Always allow the substrate to cool completely before inoculating it with mushroom spawn.
How long does it take to grow mushrooms at home?
The time it takes to grow mushrooms varies depending on the species, substrate, and environmental conditions. Oyster mushrooms are known for their rapid growth, often fruiting within a few weeks of inoculation. Shiitake mushrooms, on the other hand, can take several months to fruit, especially when grown on logs. Factors such as temperature, humidity, and light exposure also play a significant role in the growth rate. Consistent monitoring and adjustments to the growing environment can help optimize the fruiting process.
What are the ideal temperature and humidity conditions for growing mushrooms?
The ideal temperature and humidity conditions vary depending on the mushroom species. Oyster mushrooms generally prefer temperatures between 60-75°F (15-24°C) and high humidity levels (85-95%). Shiitake mushrooms typically thrive in cooler temperatures, around 50-65°F (10-18°C), and also require high humidity. Maintaining consistent humidity is crucial for successful mushroom cultivation. This can be achieved by using a humidifier, misting the growing area regularly, or enclosing the mushrooms in a humidity tent or greenhouse.
How do I know when my mushrooms are ready to harvest?
The signs of maturity vary depending on the mushroom species. Oyster mushrooms are typically ready to harvest when the caps have fully expanded and the edges are still slightly curled downwards. Shiitake mushrooms are ready when the caps have flattened out and the gills are visible. It’s important to harvest mushrooms at the right stage of maturity to ensure optimal flavor and texture. Overripe mushrooms may become tough or develop an unpleasant taste.
What are some common problems I might encounter when growing mushrooms at home, and how can I fix them?
Common problems include contamination by molds or bacteria, slow growth, and lack of fruiting. Contamination can be prevented by using sterile techniques, pasteurizing or sterilizing the substrate properly, and maintaining a clean growing environment. Slow growth can be caused by inadequate temperature, humidity, or light. Adjusting these factors can often resolve the issue. Lack of fruiting can be due to a variety of factors, including insufficient humidity, poor air circulation, or improper substrate preparation. Researching the specific needs of the mushroom species you’re growing and troubleshooting accordingly can help overcome these challenges.
Can I grow mushrooms indoors without any special equipment?
Yes, you can grow mushrooms indoors without extensive equipment. A simple setup can involve using a plastic tub or container as a growing chamber, misting the mushrooms regularly to maintain humidity, and providing adequate light (indirect sunlight or artificial light). However, investing in a humidifier, temperature controller, and grow lights can significantly improve your success rate and yield.
Is it safe to eat mushrooms I grow at home?
Yes, it is generally safe to eat mushrooms you grow at home, provided you have correctly identified the species and followed proper growing techniques. It’s crucial to only cultivate edible mushroom species and to avoid consuming any mushrooms that you are unsure about. If you are new to mushroom cultivation, it’s best to start with well-known and easily identifiable species like oyster or shiitake mushrooms. Always consult with a knowledgeable mycologist or mushroom expert if you have any doubts about the identity or safety of your homegrown mushrooms.
Leave a Comment