
Increase Watermelon Yield Fast? Absolutely! Imagine biting into a juicy, homegrown watermelon, bursting with flavor, knowing you nurtured it from seed to sweet success. That’s the dream, right? But sometimes, our watermelon plants seem to be taking their sweet time, leaving us wondering if we’ll ever get to enjoy that summer treat.
Watermelons have a rich history, dating back thousands of years to Africa, where they were initially valued for their water content in arid regions. Over time, cultivation techniques evolved, and watermelons spread across the globe, becoming a symbol of summer and refreshment. Now, we’re bringing that tradition to our own backyards!
Let’s face it, waiting for watermelons to ripen can feel like an eternity. That’s why I’m sharing some tried-and-true DIY tricks and hacks to help you increase watermelon yield fast. These aren’t just random tips; they’re practical, easy-to-implement strategies that can make a real difference in your harvest. Whether you’re a seasoned gardener or just starting out, these techniques will empower you to maximize your watermelon production and enjoy a bountiful harvest. I’m excited to share these secrets with you, so let’s dive in and get those watermelons growing!
Wassermelonen-Ernte beschleunigen: Mein DIY-Leitfaden für üppige Früchte
Hallo liebe Gartenfreunde! Ich liebe Wassermelonen, und nichts ist befriedigender, als eine saftige, selbst angebaute Melone zu genießen. Aber manchmal dauert es einfach ewig, bis die Früchte reif sind. Deshalb habe ich im Laufe der Jahre einige Tricks und Kniffe gelernt, um die Wassermelonen-Ernte zu beschleunigen und den Ertrag zu maximieren. Hier teile ich meine bewährten Methoden mit euch, damit auch ihr bald eine reiche Ernte einfahren könnt!
Die Grundlagen: Was Wassermelonen zum Wachsen brauchen
Bevor wir uns den speziellen Tricks widmen, ist es wichtig, die grundlegenden Bedürfnisse von Wassermelonen zu verstehen. Sie sind nämlich kleine Diven, wenn es um ihre Vorlieben geht!
* Sonne, Sonne, Sonne: Wassermelonen lieben die Sonne. Sie brauchen mindestens 6-8 Stunden direkte Sonneneinstrahlung pro Tag. Wähle also einen sonnigen Standort in deinem Garten.
* Warmer Boden: Wassermelonen gedeihen am besten in warmem Boden. Die Bodentemperatur sollte idealerweise zwischen 21°C und 32°C liegen.
* Gut durchlässiger Boden: Staunässe ist der Feind! Der Boden sollte gut durchlässig sein, damit die Wurzeln nicht faulen.
* Nährstoffreicher Boden: Wassermelonen sind hungrig! Sie brauchen einen Boden, der reich an Nährstoffen ist, insbesondere Stickstoff, Phosphor und Kalium.
* Ausreichend Platz: Wassermelonenpflanzen brauchen viel Platz, da sie sich weit ausbreiten. Plane genügend Raum ein, damit sie sich entfalten können.
Phase 1: Vorbereitung ist alles – Der perfekte Start für deine Wassermelonen
Ein guter Start ist die halbe Miete! Diese Schritte helfen dir, die Grundlage für eine erfolgreiche Ernte zu legen.
1. Bodenvorbereitung: Beginne im Frühjahr, sobald der Boden aufgetaut ist und sich erwärmt hat. Lockere den Boden gründlich auf und entferne Steine und Unkraut. Arbeite reichlich Kompost oder gut verrotteten Mist ein, um den Boden mit Nährstoffen anzureichern. Ich verwende gerne auch etwas Knochenmehl, um den Phosphorgehalt zu erhöhen.
2. Vorkultur (optional, aber empfehlenswert): In kühleren Regionen empfehle ich, die Wassermelonenpflanzen im Haus vorzuziehen. Beginne etwa 4-6 Wochen vor dem letzten erwarteten Frost. Säe die Samen in kleine Töpfe mit Anzuchterde. Halte die Erde feucht und stelle die Töpfe an einen warmen, hellen Ort.
3. Direktsaat (wenn das Wetter mitspielt): Wenn du in einer Region mit langen, warmen Sommern lebst, kannst du die Samen auch direkt ins Freiland säen. Warte, bis die Bodentemperatur mindestens 21°C erreicht hat. Säe die Samen etwa 2-3 cm tief und halte die Erde feucht.
4. Pflanzabstand beachten: Wenn du vorgezogene Pflanzen ins Freiland setzt, achte auf den richtigen Pflanzabstand. Wassermelonenpflanzen brauchen viel Platz, daher empfehle ich einen Abstand von mindestens 1 Meter zwischen den Pflanzen und 2 Meter zwischen den Reihen.
5. Mulchen: Eine Mulchschicht hilft, den Boden warm und feucht zu halten und Unkraut zu unterdrücken. Ich verwende gerne Stroh oder dunkle Mulchfolie. Die dunkle Folie erwärmt den Boden zusätzlich und fördert das Wachstum.
Phase 2: Wachstumsbooster – So bringst du deine Wassermelonen zum Explodieren
Jetzt geht es darum, das Wachstum der Pflanzen zu fördern und sicherzustellen, dass sie alles bekommen, was sie brauchen.
1. Regelmäßiges Gießen: Wassermelonen brauchen viel Wasser, besonders während der Fruchtbildung. Gieße regelmäßig und gründlich, besonders bei trockenem Wetter. Vermeide es, die Blätter zu benetzen, um Pilzkrankheiten vorzubeugen. Ich gieße am liebsten früh morgens, damit die Blätter tagsüber abtrocknen können.
2. Düngung: Wassermelonen sind hungrig! Dünge die Pflanzen regelmäßig mit einem ausgewogenen Dünger. Ich verwende gerne einen organischen Dünger, der reich an Stickstoff, Phosphor und Kalium ist. Beginne mit der Düngung etwa 2 Wochen nach dem Auspflanzen und wiederhole sie alle 2-3 Wochen. Während der Fruchtbildung kannst du den Kaliumgehalt im Dünger erhöhen, um die Fruchtentwicklung zu fördern.
3. Beschneiden (optional): Das Beschneiden von Wassermelonenpflanzen kann helfen, die Fruchtbildung zu fördern und die Größe der Früchte zu erhöhen. Entferne Seitentriebe, die keine Blüten tragen. Lasse pro Pflanze nur 2-3 Früchte reifen, um sicherzustellen, dass die Pflanze genügend Energie für die Entwicklung der Früchte hat.
4. Bestäubung unterstützen: Wassermelonen sind auf die Bestäubung durch Bienen und andere Insekten angewiesen. Wenn du wenig Insekten in deinem Garten hast, kannst du die Bestäubung von Hand unterstützen. Verwende dazu einen kleinen Pinsel, um den Pollen von den männlichen Blüten auf die weiblichen Blüten zu übertragen. Die weiblichen Blüten erkennst du an dem kleinen Fruchtansatz direkt unter der Blüte.
5. Schutz vor Schädlingen und Krankheiten: Achte auf Schädlinge wie Blattläuse und Schnecken. Bekämpfe sie bei Bedarf mit natürlichen Mitteln. Auch Pilzkrankheiten können ein Problem sein. Sorge für eine gute Belüftung der Pflanzen und vermeide es, die Blätter zu benetzen. Bei Bedarf kannst du ein Fungizid verwenden.
Phase 3: Die Tricks für eine schnellere Ernte
Hier kommen die Geheimnisse, die ich im Laufe der Jahre entdeckt habe, um die Reifezeit der Wassermelonen zu verkürzen.
1. Verwendung von dunkler Mulchfolie: Wie bereits erwähnt, erwärmt dunkle Mulchfolie den Boden und fördert das Wachstum der Pflanzen. Dies kann die Reifezeit um einige Wochen verkürzen.
2. Abdecken mit Vlies: In kühleren Regionen kann es sinnvoll sein, die Pflanzen mit Vlies abzudecken, um sie vor Kälte zu schützen. Dies kann das Wachstum beschleunigen und die Reifezeit verkürzen. Entferne das Vlies, sobald die Pflanzen zu groß werden oder die Temperaturen steigen.
3. Wärmespeichernde Steine: Lege große, dunkle Steine um die Pflanzen. Die Steine speichern die Wärme der Sonne und geben sie nachts wieder ab. Dies hilft, den Boden warm zu halten und das Wachstum zu fördern.
4. Reflektierende Folie: Lege reflektierende Folie um die Pflanzen. Die Folie reflektiert das Sonnenlicht und sorgt für eine bessere Ausleuchtung der Früchte. Dies kann die Reifezeit verkürzen und die Süße der Früchte erhöhen.
5. Bewässerung mit warmem Wasser: Gieße die Pflanzen mit warmem Wasser (nicht heiß!). Dies hilft, den Boden warm zu halten und das Wachstum zu fördern. Ich lasse das Wasser in der Sonne stehen, damit es sich erwärmt, bevor ich es zum Gießen verwende.
6. Epsom-Salz (Bittersalz): Epsom-Salz enthält Magnesium, das für das Wachstum und die Fruchtbildung von Wassermelonen wichtig ist. Löse 1 Esslöffel Epsom-Salz in 4 Litern Wasser auf und gieße die Pflanzen alle 2-3 Wochen damit.
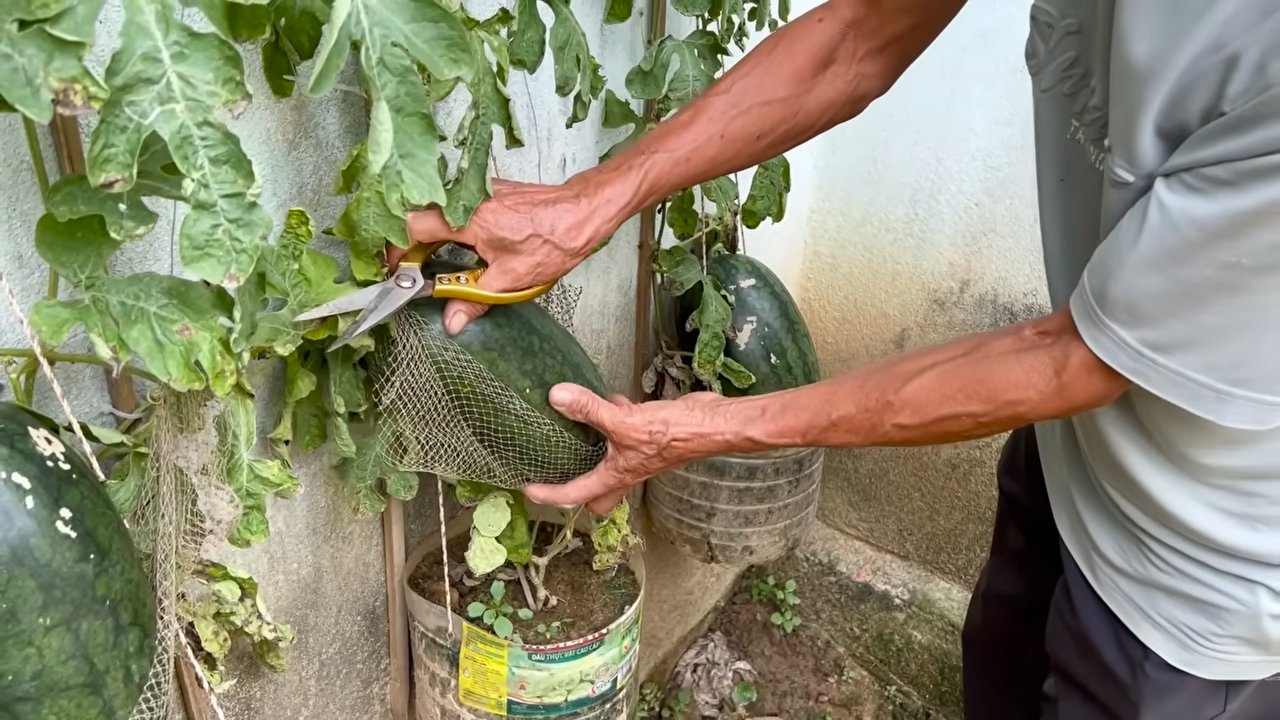
7. Melonen-BHs (ja, wirklich!): Wenn die Früchte größer werden, kannst du sie mit “Melonen-BHs” schützen. Das sind kleine Netze oder Stoffbeutel, die du um die Früchte legst. Sie schützen die Früchte vor Schädlingen, Sonnenbrand und Bodenkontakt. Außerdem reflektieren sie das Sonnenlicht und fördern die Reifung. Du kannst sie im Gartenfachhandel kaufen oder einfach selbst aus alten Stoffresten nähen.
8. Regelmäßige Kontrolle: Überprüfe die Früchte regelmäßig auf Reifezeichen. Eine reife Wassermelone klingt hohl, wenn man darauf klopft. Die Stelle, an der die Melone auf dem Boden liegt, sollte gelblich sein. Die Ranke, die mit der Melone verbunden ist, sollte trocken und braun sein.
Phase 4: Die Ernte – Der L

Conclusion
So, there you have it! This simple, yet incredibly effective DIY trick to increase watermelon yield fast is a game-changer for any home gardener, whether you’re a seasoned pro or just starting out. We’ve walked you through the steps, explained the science behind it, and hopefully, inspired you to give it a try.
Why is this a must-try? Because who doesn’t want bigger, juicier, and more abundant watermelons? Imagine the satisfaction of harvesting a bumper crop of these summer delights, knowing you played a direct role in their success. This method isn’t just about quantity; it’s about quality too. By providing your watermelon plants with the right support and encouraging strong vine growth, you’re setting them up for optimal nutrient absorption, leading to sweeter, more flavorful fruit.
But don’t stop there! Feel free to experiment and adapt this technique to your specific garden conditions. For instance, if you live in a particularly windy area, you might consider using sturdier supports or creating a windbreak to protect your vines. If you’re growing different varieties of watermelon, observe how they respond to the training and adjust your approach accordingly. Some gardeners have even found success using this method with other vine crops like cantaloupe and honeydew melons, so feel free to explore those possibilities as well.
Consider these variations to further enhance your watermelon growing experience:
* Companion Planting: Plant basil or marigolds near your watermelons to deter pests and attract beneficial insects.
* Mulching: Apply a layer of organic mulch around your plants to retain moisture, suppress weeds, and regulate soil temperature.
* Watering Techniques: Water deeply and infrequently, focusing on the base of the plant to avoid wetting the foliage and promoting fungal diseases. Drip irrigation is an excellent option.
* Fertilizing: Supplement with a balanced fertilizer specifically formulated for fruiting plants, following the package instructions carefully. Avoid over-fertilizing, as this can lead to excessive foliage growth at the expense of fruit production.
* Pollination Assistance: If you’re experiencing pollination issues, consider hand-pollinating your watermelon flowers, especially in areas with limited bee activity.
Ultimately, the best way to discover what works best for you is to get your hands dirty and try it out. We’re confident that you’ll be amazed by the results.
We’re incredibly excited to hear about your experiences with this DIY trick to increase watermelon yield fast. Did you notice a significant difference in the size and number of your watermelons? Did you try any variations or adaptations that worked particularly well? Share your stories, tips, and photos in the comments below! Let’s create a community of watermelon enthusiasts and learn from each other’s successes. Your insights could be invaluable to other gardeners looking to maximize their watermelon harvests. Happy growing!
Frequently Asked Questions (FAQ)
Why is vine training important for watermelons?
Vine training is crucial for several reasons. First, it helps to maximize sunlight exposure to all parts of the plant, which is essential for photosynthesis and fruit development. Second, it improves air circulation around the vines, reducing the risk of fungal diseases. Third, it allows you to manage the plant’s growth and direct its energy towards fruit production rather than excessive foliage. Finally, it makes harvesting easier and prevents the watermelons from sitting directly on the soil, which can lead to rot. By strategically training your watermelon vines, you’re essentially optimizing their growing environment for increased yield and healthier fruit.
What kind of support system should I use?
The best support system depends on the size and weight of your watermelons. For smaller varieties, a simple trellis or fence may suffice. However, for larger varieties, you’ll need a sturdier structure, such as a wooden frame or a metal cage. The key is to ensure that the support system is strong enough to bear the weight of the mature watermelons without collapsing. You can also use slings made from fabric or netting to support individual fruits as they grow larger. Ensure the material is breathable to prevent moisture buildup.
How often should I water my watermelons after training the vines?
After training the vines, it’s important to maintain consistent watering to support the plant’s growth and fruit development. Water deeply and infrequently, allowing the soil to dry out slightly between waterings. Avoid overwatering, as this can lead to root rot and other problems. The frequency of watering will depend on the weather conditions and the type of soil you have. As a general rule, watermelons need about 1-2 inches of water per week. Check the soil moisture regularly and adjust your watering schedule accordingly.
Can I use this technique for other types of melons?
Yes, this vine training technique can be adapted for other types of melons, such as cantaloupe, honeydew, and even some varieties of squash. The principles are the same: provide support for the vines, improve air circulation, and direct the plant’s energy towards fruit production. However, you may need to adjust the support system and training methods depending on the specific growth habits of the melon variety you’re growing. Experiment and observe how your plants respond to the training, and make adjustments as needed.
What if my watermelon plant isn’t producing any fruit?
If your watermelon plant isn’t producing any fruit, there could be several reasons why. One common cause is poor pollination. Watermelons require pollination to set fruit, so if there aren’t enough bees or other pollinators in your area, you may need to hand-pollinate the flowers. Another possible cause is nutrient deficiency. Watermelons need a balanced supply of nutrients to produce fruit, so make sure you’re fertilizing your plants regularly with a fertilizer specifically formulated for fruiting plants. Other factors that can affect fruit production include inadequate sunlight, improper watering, and pest or disease problems.
How do I know when my watermelons are ripe?
Knowing when a watermelon is ripe can be tricky, but there are a few telltale signs to look for. First, check the tendril closest to the watermelon stem. If it’s brown and dry, the watermelon is likely ripe. Second, look at the spot where the watermelon rests on the ground. This spot should be yellow or cream-colored, not white or green. Third, thump the watermelon with your knuckles. A ripe watermelon will sound hollow and deep. Finally, consider the number of days since planting. Most watermelon varieties take 70-90 days to mature.
Is it too late to try this method if my watermelons are already growing?
No, it’s not too late to try this method even if your watermelons are already growing. While it’s best to start training the vines early in the season, you can still benefit from it later on. Gently guide the vines towards the support system and secure them with ties. Be careful not to damage the vines or the developing watermelons. Even if you only train a portion of the vines, you can still improve air circulation and sunlight exposure, which can lead to healthier and more productive plants.
What are some common pests and diseases that affect watermelons?
Watermelons are susceptible to a variety of pests and diseases, including aphids, squash bugs, vine borers, powdery mildew, and fusarium wilt. To prevent these problems, practice good garden hygiene, such as removing weeds and debris, and rotate your crops regularly. Inspect your plants regularly for signs of pests or diseases, and take action promptly if you notice any problems. There are many organic and conventional pest control and disease management options available, so choose the ones that are best suited for your garden.
Can I grow watermelons in containers using this method?
Yes, you can grow watermelons in containers using this method, but you’ll need to choose a large container that’s at least 24 inches in diameter and 24 inches deep. Use a high-quality potting mix and provide adequate drainage. You’ll also need to provide a sturdy support system for the vines, such as a trellis or a tomato cage. Container-grown watermelons will need more frequent watering and fertilizing than those grown in the ground. Choose a compact or bush variety of watermelon that’s well-suited for container growing.
How does this DIY trick specifically help to increase watermelon yield fast?
This DIY trick helps to increase watermelon yield fast by optimizing the plant’s growing environment. By training the vines, you’re maximizing sunlight exposure, improving air circulation, and directing the plant’s energy towards fruit production. This leads to faster growth, healthier plants, and more abundant fruit. Additionally, the support system helps to prevent the watermelons from sitting directly on the soil, which can lead to rot and other problems. By implementing this simple technique, you can significantly boost your watermelon harvest and enjoy a bountiful crop of delicious, homegrown fruit.
Leave a Comment