
Indoor peanut planting might sound like a whimsical dream, conjuring images of sprawling fields within your living room. But trust me, it’s not as far-fetched as you think! Have you ever wondered where your favorite peanut butter comes from, or felt a pang of curiosity about the journey of that crunchy snack from farm to jar? Well, what if I told you that you could witness that journey firsthand, right on your windowsill?
Peanuts, also known as groundnuts, have a rich history, dating back thousands of years to South America. They were a staple food for indigenous populations and eventually spread across the globe, becoming a beloved snack and a crucial agricultural commodity. Now, you can participate in this fascinating agricultural story, even without a sprawling farm.
In today’s fast-paced world, connecting with nature can be a challenge. Indoor peanut planting offers a unique opportunity to bring a touch of the outdoors inside, fostering a sense of calm and connection. Plus, it’s a fantastic educational experience for kids (and adults!), teaching them about plant life cycles and the origins of their food. Imagine the satisfaction of harvesting your own peanuts, grown with your own hands! This DIY project is not only rewarding but also surprisingly simple. So, let’s dive in and discover the secrets to successfully growing peanuts indoors!
Erdnüsse im Haus anbauen: Dein DIY-Leitfaden für den Anbau von Erdnüssen in Innenräumen
Hey Pflanzenfreunde! Hast du jemals darüber nachgedacht, deine eigenen Erdnüsse im Haus anzubauen? Es mag verrückt klingen, aber es ist tatsächlich machbar und macht unglaublich viel Spaß! Ich habe es selbst ausprobiert und war begeistert, wie einfach es ist. In diesem Artikel zeige ich dir, wie du deine eigenen kleinen Erdnusspflanzen in Innenräumen züchten kannst. Los geht’s!
Was du brauchst: Die Vorbereitung
Bevor wir loslegen, lass uns sicherstellen, dass wir alles haben, was wir brauchen. Hier ist eine Liste der Materialien und Werkzeuge, die du benötigst:
* Rohe, ungesalzene Erdnüsse: Das ist das A und O! Achte darauf, dass sie roh und ungesalzen sind, da gesalzene Erdnüsse nicht keimen. Du findest sie in den meisten Supermärkten oder Bioläden.
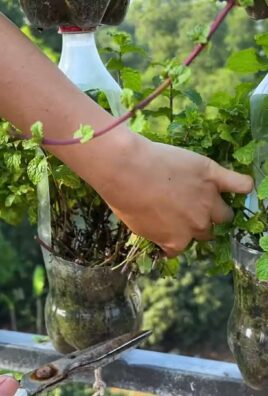
* Töpfe: Wähle Töpfe mit einem Durchmesser von mindestens 20 cm und einer Tiefe von 25 cm. Erdnüsse brauchen Platz zum Wachsen.
* Hochwertige Blumenerde: Verwende eine gut durchlässige Blumenerde. Du kannst auch etwas Sand oder Perlit hinzufügen, um die Drainage zu verbessern.
* Wasser: Klares, sauberes Wasser zum Gießen.
* Sprühflasche: Zum Befeuchten der Erde.
* Sonnenlicht: Ein sonniger Standort ist entscheidend. Ein Südfenster ist ideal.
* Optional: Anzuchttöpfe oder Eierkartons für die Vorkeimung.
* Optional: Pflanzenetiketten, um den Überblick zu behalten.
Schritt-für-Schritt-Anleitung: So pflanzt du deine Erdnüsse
Jetzt, wo wir alles vorbereitet haben, können wir mit dem Pflanzen beginnen. Folge diesen Schritten, um deine eigenen Erdnüsse im Haus anzubauen:
1. Erdnüsse vorbereiten:
* Wähle die besten Erdnüsse aus. Achte auf pralle, unbeschädigte Erdnüsse.
* Weiche die Erdnüsse für 12-24 Stunden in lauwarmem Wasser ein. Das hilft, die Keimung zu beschleunigen.
* Optional: Du kannst die Erdnüsse vorsichtig schälen, aber das ist nicht unbedingt notwendig. Ich habe festgestellt, dass sie auch mit Schale keimen.
2. Vorkeimung (optional, aber empfohlen):
* Fülle Anzuchttöpfe oder Eierkartons mit feuchter Blumenerde.
* Lege in jeden Topf oder jede Mulde eine Erdnuss.
* Bedecke die Erdnüsse leicht mit Erde.
* Besprühe die Erde mit Wasser, um sie feucht zu halten.
* Stelle die Anzuchttöpfe an einen warmen, hellen Ort.
* Halte die Erde feucht, aber nicht nass.
* Nach etwa einer Woche sollten die ersten Keimlinge erscheinen.
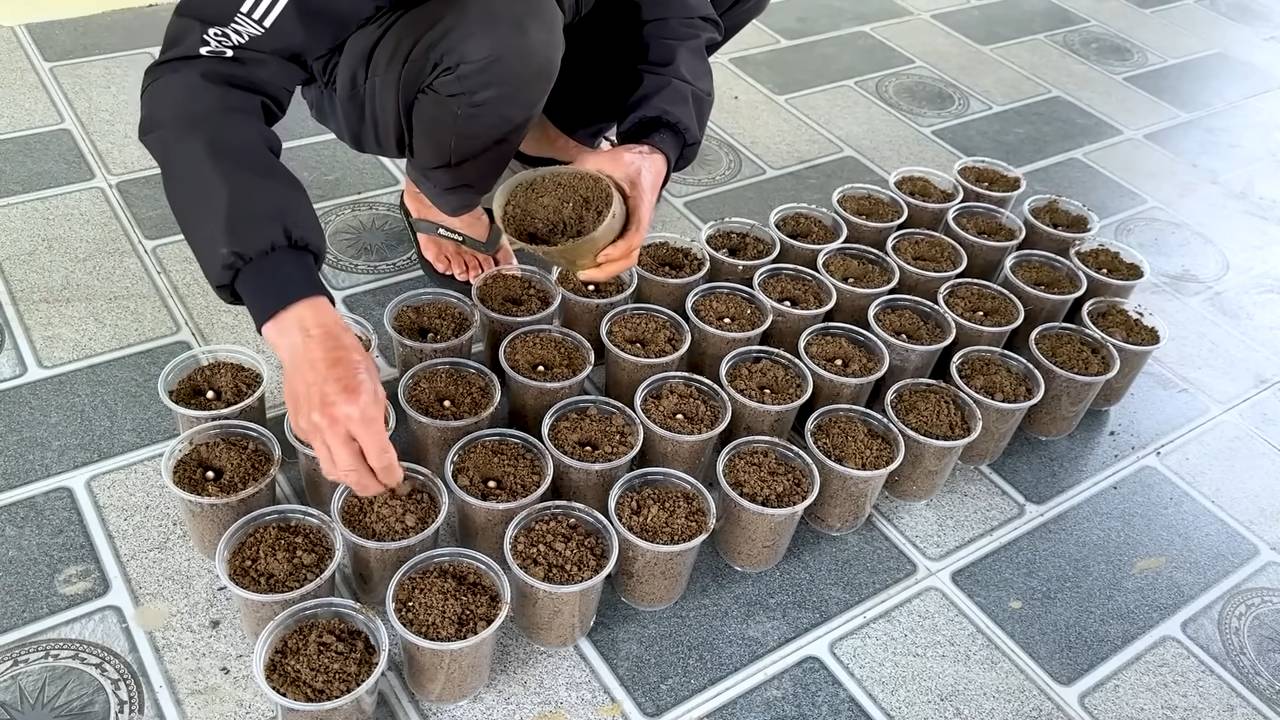
3. Töpfe vorbereiten:
* Fülle die Töpfe mit Blumenerde. Lasse etwa 2-3 cm Platz bis zum Rand.
* Drücke die Erde leicht an.
* Gieße die Erde, bis sie feucht ist, aber nicht durchnässt.
4. Erdnüsse pflanzen:
* Wenn du die Erdnüsse vorgekeimt hast, pflanze die Keimlinge vorsichtig in die Töpfe. Achte darauf, die Wurzeln nicht zu beschädigen.
* Wenn du die Erdnüsse nicht vorgekeimt hast, pflanze sie direkt in die Töpfe. Lege 2-3 Erdnüsse pro Topf in die Erde.
* Bedecke die Erdnüsse mit etwa 2-3 cm Erde.
* Drücke die Erde leicht an.
* Besprühe die Erde mit Wasser, um sie feucht zu halten.
5. Standort und Pflege:
* Stelle die Töpfe an einen sonnigen Standort. Erdnüsse brauchen mindestens 6-8 Stunden Sonnenlicht pro Tag.
* Halte die Erde feucht, aber nicht nass. Gieße regelmäßig, aber vermeide Staunässe.
* Besprühe die Blätter regelmäßig mit Wasser, um die Luftfeuchtigkeit zu erhöhen.
* Dünge die Pflanzen alle 2-3 Wochen mit einem ausgewogenen Flüssigdünger.
* Achte auf Schädlinge und Krankheiten. Bei Bedarf behandeln.
Die Pflege: So bringst du deine Erdnüsse zum Wachsen
Die Pflege deiner Erdnusspflanzen ist entscheidend für eine erfolgreiche Ernte. Hier sind einige Tipps, die dir helfen, deine Pflanzen gesund und glücklich zu halten:
* Gießen: Erdnüsse mögen es feucht, aber nicht nass. Gieße, wenn sich die oberste Erdschicht trocken anfühlt. Vermeide Staunässe, da dies zu Wurzelfäule führen kann.
* Licht: Erdnüsse brauchen viel Sonnenlicht. Stelle die Töpfe an einen sonnigen Standort, z. B. an ein Südfenster. Wenn du nicht genügend Sonnenlicht hast, kannst du eine Pflanzenlampe verwenden.
* Düngen: Dünge die Pflanzen alle 2-3 Wochen mit einem ausgewogenen Flüssigdünger. Achte darauf, die Anweisungen auf der Verpackung zu befolgen.
* Luftfeuchtigkeit: Erdnüsse mögen eine hohe Luftfeuchtigkeit. Besprühe die Blätter regelmäßig mit Wasser oder stelle die Töpfe auf eine mit Wasser gefüllte Schale mit Kieselsteinen.
* Schädlinge und Krankheiten: Achte auf Schädlinge wie Blattläuse oder Spinnmilben. Bei Bedarf behandeln. Achte auch auf Anzeichen von Krankheiten wie Mehltau.
* Stützen: Wenn die Pflanzen größer werden, kann es notwendig sein, sie zu stützen. Du kannst Bambusstäbe oder andere Stützen verwenden, um die Pflanzen aufrecht zu halten.
Die Blüte und Fruchtbildung: Der spannende Teil
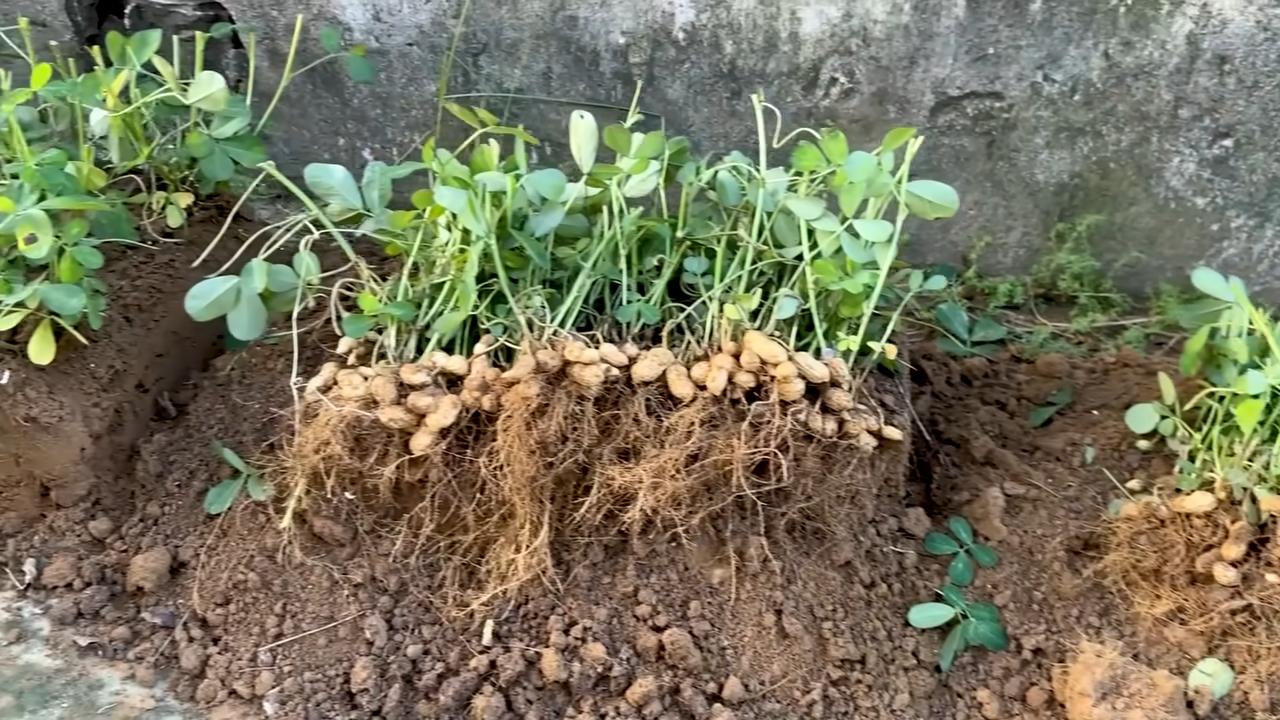
Nach etwa 2-3 Monaten sollten deine Erdnusspflanzen blühen. Die Blüten sind klein und gelb. Nach der Bestäubung biegen sich die Blütenstiele nach unten und bohren sich in die Erde. Dort entwickeln sich die Erdnüsse.
* Die Blüten: Die Blüten sind selbstbestäubend, du musst also nichts tun, um die Bestäubung zu fördern.
* Die Fruchtbildung: Die Erdnüsse entwickeln sich unter der Erde. Achte darauf, dass die Erde locker und gut durchlässig ist, damit die Erdnüsse sich gut entwickeln können.
* Geduld: Die Erdnussentwicklung dauert einige Zeit. Sei geduldig und gib den Pflanzen die Zeit, die sie brauchen.
Die Ernte: Dein Lohn für die Mühe
Nach etwa 4-5 Monaten sind deine Erdnüsse reif für die Ernte. Hier sind einige Anzeichen, dass es Zeit ist zu ernten:
* Die Blätter werden gelb und braun.
* Die Pflanzen beginnen zu welken.
* Du kannst vorsichtig eine Pflanze aus der Erde ziehen und sehen, ob die Erdnüsse reif sind.
So erntest du deine Erdnüsse:
1. Ziehe die Pflanzen vorsichtig aus der Erde.
2. Schüttle die Erde von den Wurzeln.
3. Entferne die Erdnüsse von den Wurzeln.
4. Wasche die Erdnüsse gründlich.
5. Trockne die Erdnüsse an einem warmen, trockenen Ort für etwa 1-2 Wochen.
Die Nachbereitung: Was du mit deinen Erdnüssen machen kannst
Nachdem du deine Erdnüsse geerntet und getrocknet hast, kannst du sie rösten, kochen oder roh essen. Du kannst sie auch für die Herstellung von Erdnussbutter verwenden.
* Rösten: Röste die Erdnüsse im Ofen bei 175°C für etwa 15-20 Minuten, bis sie goldbraun sind.
* Kochen: Koche die Erdnüsse in Salzwasser für etwa 30-45 Minuten, bis sie weich sind.
* Erdnussbutter: Mahle die gerösteten Erdnüsse in einer Küchenmaschine, bis sie cremig sind. Füge nach Bedarf Salz oder Honig
Conclusion
So, there you have it! Transforming your living space into a mini peanut farm is not only surprisingly simple, but also incredibly rewarding. Forget those store-bought, often bland peanuts – imagine the satisfaction of harvesting your own, bursting with fresh, nutty flavor. This DIY indoor peanut planting trick is a game-changer for anyone looking to add a touch of green to their home and enjoy a unique, homegrown snack.
Why is this a must-try? Because it’s more than just growing peanuts. It’s about connecting with nature, learning about the life cycle of a plant, and experiencing the joy of nurturing something from seed to harvest. It’s a fantastic project for families, a calming hobby for individuals, and a conversation starter for guests. Plus, let’s be honest, who wouldn’t be impressed by a thriving peanut plant in your living room?
Beyond the basic method, there are plenty of ways to personalize your indoor peanut planting experience. Experiment with different peanut varieties – Virginia peanuts for larger nuts, Spanish peanuts for a sweeter taste, or Runner peanuts for a classic flavor. Consider using different types of containers, from decorative pots to repurposed buckets, to add a touch of your own style. You can even try companion planting, adding herbs like basil or rosemary to your peanut pot to deter pests and enhance the flavor of your peanuts.
Don’t be intimidated by the thought of growing peanuts indoors. With a little patience, the right conditions, and this simple DIY trick, you’ll be enjoying your own homegrown peanuts in no time. We’ve laid out all the steps, answered the most common questions, and provided tips for success. Now, it’s your turn to get your hands dirty and experience the magic of indoor peanut planting.
We’re confident that you’ll find this DIY project both enjoyable and fruitful. But the real fun begins when you share your experience with others! We encourage you to try this DIY trick and share your journey with us. Post pictures of your peanut plants, share your tips and tricks, and let us know what you learned along the way. Together, we can create a community of indoor peanut growers and inspire others to embrace the joy of homegrown food. So, grab some peanuts, prepare your pot, and get ready to embark on this exciting adventure! Happy planting!
Frequently Asked Questions (FAQ)
What kind of peanuts should I use for planting?
You’ll want to use raw, unsalted peanuts that are still in their shells. Roasted or salted peanuts won’t germinate. Look for peanuts specifically labeled for planting at your local garden center or online. Virginia peanuts are a popular choice for their large size, but Spanish or Runner peanuts will also work well. Ensure the peanuts are organic if you want to avoid any potential chemical treatments.
How long does it take for peanuts to grow indoors?
From planting to harvest, it typically takes around 120-150 days (4-5 months) to grow peanuts indoors. Germination usually occurs within 7-10 days. Be patient, as the process can be slower depending on the environmental conditions. Consistent watering, adequate sunlight, and proper soil are crucial for optimal growth.
What kind of soil is best for growing peanuts indoors?
Peanuts thrive in well-draining, sandy loam soil. A mixture of potting soil, sand, and compost is ideal. The soil should be slightly acidic to neutral (pH 6.0-7.0). Avoid heavy clay soils, as they can become waterlogged and hinder peanut development. Good drainage is essential to prevent root rot.
How much sunlight do indoor peanut plants need?
Peanut plants need at least 6-8 hours of direct sunlight per day. Place your peanut plant near a sunny window, preferably facing south or west. If you don’t have enough natural light, you can supplement with a grow light. Position the grow light about 6-12 inches above the plant.
How often should I water my indoor peanut plant?
Water your peanut plant regularly, keeping the soil consistently moist but not waterlogged. Water when the top inch of soil feels dry to the touch. Avoid overwatering, as this can lead to root rot. During the flowering and pegging stages (when the plant starts producing peanuts), ensure the soil remains consistently moist.
What are “pegs” and why are they important?
“Pegs” are the stems that grow from the peanut plant’s flowers and burrow into the soil to form the peanuts. This is a crucial stage in peanut development. Ensure the soil around the base of the plant is loose and easy for the pegs to penetrate. You can gently mound soil around the base of the plant to encourage pegging.
Do I need to fertilize my indoor peanut plant?
Yes, fertilizing your peanut plant can help promote healthy growth and a better yield. Use a balanced fertilizer (e.g., 10-10-10) diluted to half strength. Fertilize every 2-3 weeks during the growing season. Avoid over-fertilizing, as this can burn the roots.
How do I know when my peanuts are ready to harvest?
The leaves of the peanut plant will start to turn yellow and brown when the peanuts are ready to harvest. You can also gently dig up a few peanuts to check their maturity. The shells should be hard and the kernels should be plump and well-formed.
How do I harvest and cure my peanuts?
To harvest, carefully dig up the entire plant, being careful not to damage the peanuts. Gently shake off the excess soil. Hang the entire plant upside down in a warm, dry, and well-ventilated place for 2-3 weeks to cure the peanuts. Curing allows the peanuts to dry properly and develop their flavor.
Are there any common pests or diseases that affect indoor peanut plants?
Common pests that can affect indoor peanut plants include aphids, spider mites, and whiteflies. Regularly inspect your plant for signs of infestation. You can control pests with insecticidal soap or neem oil. Root rot can be a problem if the soil is not well-draining or if you overwater. Ensure proper drainage and avoid overwatering to prevent root rot.
Can I grow peanuts in a container without drainage holes?
While it’s not recommended, you can grow peanuts in a container without drainage holes if you are extremely careful with watering. The key is to create a layer of gravel or pebbles at the bottom of the container to provide drainage and prevent the soil from becoming waterlogged. Water sparingly and monitor the soil moisture closely. However, a container with drainage holes is always the preferred option for healthier peanut growth.
What if my peanut plant flowers but doesn’t produce peanuts?
Several factors can contribute to a lack of peanut production. Insufficient sunlight, poor soil, inadequate watering, or a lack of pollination can all play a role. Ensure your plant receives at least 6-8 hours of direct sunlight per day, use well-draining soil, water consistently, and gently shake the plant to encourage pollination. You can also try hand-pollinating the flowers with a small brush.
Is indoor peanut planting worth the effort?
Absolutely! While it requires some patience and attention, the reward of harvesting your own homegrown peanuts is well worth the effort. It’s a fun and educational project that connects you with nature and provides a unique and delicious snack. Plus, it’s a great conversation starter!
Leave a Comment