
Mushroom Bowl Gardening Indoors: Ever dreamt of foraging for fresh, delicious mushrooms without even stepping outside your door? I know I have! Imagine the satisfaction of harvesting your own gourmet fungi right from your kitchen countertop. It’s not just a whimsical fantasy; it’s entirely achievable with a simple and rewarding DIY project: mushroom bowl gardening indoors!
For centuries, cultivating mushrooms has been a revered practice in many cultures, from ancient China where they were prized for their medicinal properties to European traditions where mushroom hunting was a cherished autumn ritual. Now, we’re bringing this age-old practice into the modern home, making it accessible to everyone, regardless of their gardening experience.
Why should you try mushroom bowl gardening indoors? Well, beyond the sheer novelty and fun, it’s a fantastic way to add fresh, healthy ingredients to your meals. Store-bought mushrooms can be expensive and lack the vibrant flavor of freshly harvested ones. Plus, this DIY project is incredibly space-efficient, perfect for apartment dwellers or anyone with limited outdoor space. It’s also a sustainable way to reduce your carbon footprint by growing your own food. So, let’s dive in and discover how you can create your own thriving mushroom bowl garden indoors!
Mushroom Bowl Gardening: A Fun and Easy Indoor Project!
Hey there, fellow gardening enthusiasts! Ever thought about growing your own mushrooms indoors? It’s way easier than you might think, and it’s a super rewarding project that brings a little bit of the forest right into your home. Plus, fresh, homegrown mushrooms taste amazing! I’m going to walk you through creating your very own mushroom bowl garden. Get ready to get your hands dirty (in a good way!).
What You’ll Need: The Mushroom Gardener’s Toolkit
Before we dive in, let’s gather our supplies. This is crucial for a smooth and successful mushroom-growing adventure.
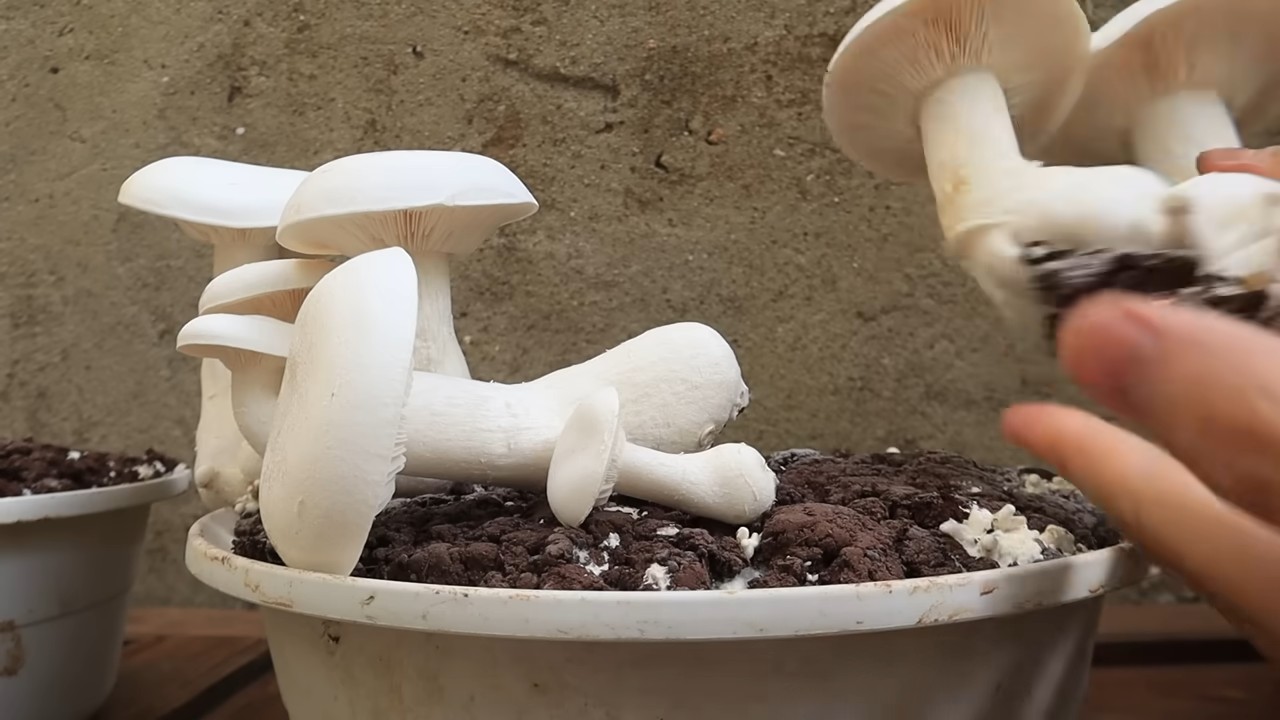
* A Bowl (or Container): Think about the size you want your mushroom garden to be. A wide, shallow bowl works best, but any container with good surface area will do. I’ve used everything from ceramic bowls to plastic tubs – just make sure it’s clean!
* Mushroom Spawn: This is the heart of your operation! Mushroom spawn is basically mushroom “seeds.” You can find it online or at your local garden center. Oyster mushrooms are a great choice for beginners because they’re relatively easy to grow and very prolific. You can also experiment with other varieties like shiitake or lion’s mane once you get the hang of it.
* Substrate: This is what your mushrooms will grow in. Straw, coffee grounds, and hardwood sawdust are all excellent options. I personally love using pasteurized straw because it’s readily available and provides a good balance of nutrients and aeration.
* Spray Bottle: You’ll need this to keep your substrate nice and moist.
* Plastic Wrap or a Humidity Dome: This helps create a humid environment, which is essential for mushroom growth.
* Optional: Hydrogen peroxide (3%) for pasteurization, gloves, a thermometer, and a well-ventilated space.
Preparing the Substrate: Setting the Stage for Mushroom Magic
The substrate is the foundation of your mushroom garden, so it’s important to get it right. We need to pasteurize it to kill off any competing organisms that might hinder our mushroom growth.
1. Chop the Straw (if using): If you’re using straw, chop it into smaller pieces (2-3 inches long). This makes it easier for the mushroom mycelium (the “roots” of the mushroom) to colonize.
2. Pasteurize the Substrate: There are a few ways to pasteurize your substrate. Here’s my favorite method using hot water:
* Heat Water: Bring a large pot of water to around 160-180°F (71-82°C). You don’t want it boiling, just hot enough to kill off unwanted organisms.
* Soak the Substrate: Place the chopped straw (or other substrate) in a large container (like a bucket or tub). Pour the hot water over the substrate, making sure it’s completely submerged.
* Let it Sit: Let the substrate soak in the hot water for at least 1-2 hours. This will effectively pasteurize it.
* Drain and Cool: After soaking, drain the excess water from the substrate. You want it to be moist but not dripping wet. Let it cool down to room temperature before moving on to the next step. You should be able to squeeze a handful of the substrate and only have a few drops of water come out.
3. Alternative Pasteurization Method (Hydrogen Peroxide): If you’re short on time or don’t want to deal with hot water, you can use hydrogen peroxide. Mix 1 part 3% hydrogen peroxide with 9 parts water. Soak your substrate in this solution for 1-2 hours, then drain and cool as described above.
Inoculating the Substrate: Planting the Mushroom Seeds
Now for the fun part – introducing the mushroom spawn to the substrate! This is where the magic really begins.
1. Clean Your Workspace: Before you start, clean your workspace and wash your hands thoroughly. This helps prevent contamination.
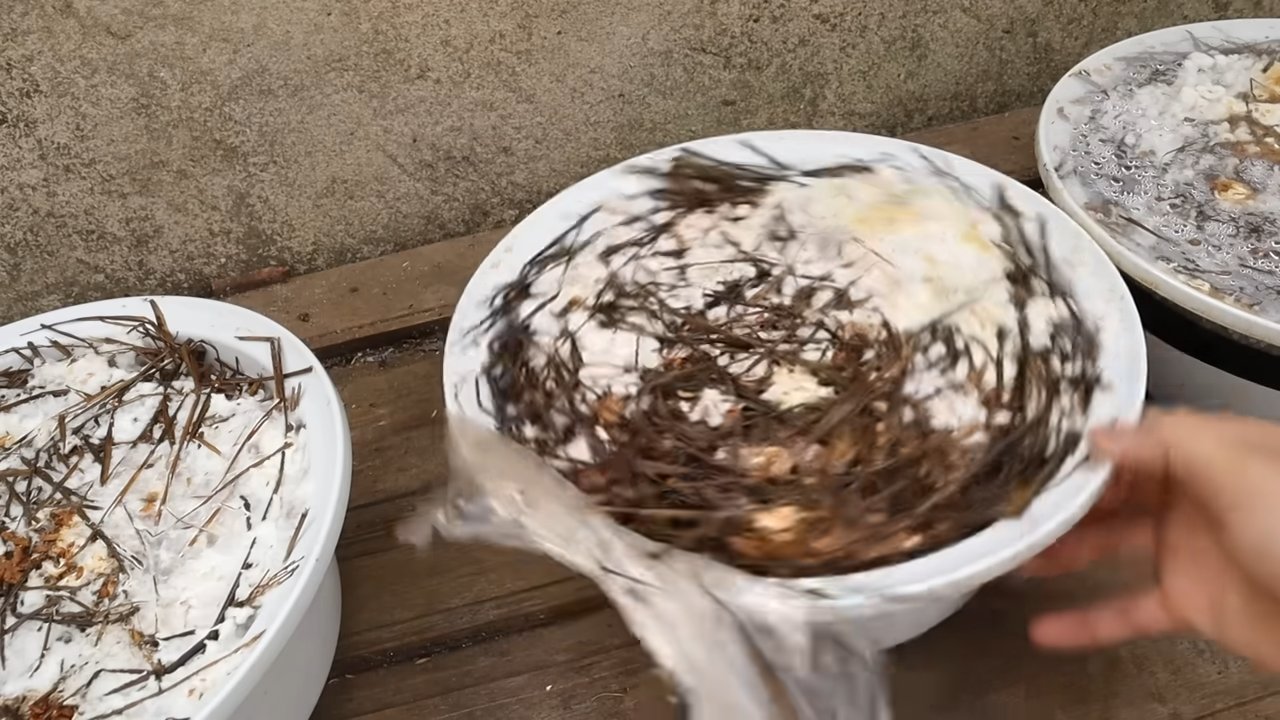
2. Layer the Substrate and Spawn: In your bowl or container, create a layer of pasteurized substrate. Then, sprinkle a layer of mushroom spawn over the substrate. Repeat this process, layering substrate and spawn, until your container is almost full. The final layer should be substrate. I usually aim for about 4-5 layers.
3. Gently Press Down: Gently press down on the substrate to compact it slightly. This helps the spawn make good contact with the substrate.
4. Cover with Plastic Wrap or a Humidity Dome: Cover the bowl with plastic wrap or a humidity dome to create a humid environment. Make sure there are a few small holes for air circulation.
Incubation: The Waiting Game (But It’s Worth It!)
Now comes the patience part. The mycelium needs time to colonize the substrate.
1. Find a Suitable Location: Place your mushroom bowl in a dark, cool, and well-ventilated location. A basement, closet, or spare room works well. The ideal temperature for oyster mushroom colonization is around 65-75°F (18-24°C).
2. Maintain Humidity: Check the humidity regularly. The substrate should be moist but not soggy. If it starts to dry out, mist it lightly with a spray bottle.
3. Wait for Colonization: This process can take anywhere from 2-4 weeks, depending on the type of mushroom and the environmental conditions. You’ll know the substrate is fully colonized when it’s covered in a white, fuzzy growth – that’s the mycelium!
Fruiting: Time to Harvest Your Bounty!
Once the substrate is fully colonized, it’s time to trigger fruiting – the formation of mushrooms!
1. Increase Light Exposure: Move your mushroom bowl to a location with indirect light. Mushrooms need some light to fruit properly.
2. Increase Humidity: Maintain high humidity levels. You can do this by misting the bowl regularly or by placing it in a humidity tent (a plastic bag with holes).
3. Lower the Temperature (Optional): Some mushroom varieties, like oyster mushrooms, fruit best when the temperature is slightly cooler. Try lowering the temperature a few degrees.
4. Watch for Pinheads: After a few days to a week, you should start to see tiny mushroom “pinheads” forming. These are the beginnings of your mushrooms!
5. Harvest Your Mushrooms: Harvest your mushrooms when they’re fully developed but before they start to drop spores. For oyster mushrooms, this is usually when the caps are still slightly curled under. To harvest, gently twist and pull the mushrooms from the substrate.
Post-Harvest Care: Keeping the Mushroom Party Going
Even after your first harvest, your mushroom bowl can continue to produce more mushrooms!
1. Soak the Substrate: After harvesting, soak the substrate in cold water for 12-24 hours. This rehydrates the substrate and encourages further fruiting.
2. Drain and Repeat: Drain the excess water and place the bowl back in its fruiting location. Repeat the soaking process after each harvest.
3. Monitor for Contamination: Keep an eye out for any signs of contamination, such as mold or unusual colors. If you see any contamination, remove the affected area immediately.
4. Enjoy Multiple Flushes: You can usually get several “flushes” (harvests) from a single mushroom bowl. Eventually, the substrate will become depleted of nutrients, and the mushroom production will slow down. When this happens, you can compost the spent substrate and start a new batch!
Troubleshooting: When Things Don’t Go According to Plan
Sometimes, things don’t go exactly as planned. Here are a few common problems and how to fix them:
* No Colonization: If the substrate isn’t colonizing, it could be due to several factors:
* Temperature: Make sure the temperature is within the ideal range for your mushroom variety.
* Humidity: Ensure the humidity is high enough.
* Contamination: Check for signs of contamination.
* Spawn Quality: Make sure your mushroom spawn is fresh and viable.
* Slow Growth: Slow growth can be caused by low temperatures, low humidity, or poor ventilation.
* Contamination: Contamination is a common problem. To prevent it, make sure to pasteurize your substrate properly and maintain a clean workspace. If you see contamination, remove the affected area immediately.
* Small Mushrooms: Small mushrooms can be caused by low humidity or insufficient nutrients.
Tips and Tricks for Mushroom Growing Success
Here are a few extra tips to help you become a mushroom-growing pro:
* Experiment with Different Substrates: Try different substrates to see what works best for your mushroom variety and your local environment.
* Maintain Good Ventilation: Good ventilation is essential for preventing contamination and promoting healthy mushroom growth.
*
Conclusion
So, there you have it! Transforming humble kitchen scraps into a thriving indoor garden with our **Mushroom Bowl Gardening Indoors** method is not just a fun project; it’s a sustainable, educational, and surprisingly rewarding experience. Forget those expensive mushroom kits and embrace the satisfaction of cultivating your own delicious fungi from the comfort of your home.
Why is this a must-try? Because it’s a win-win-win. You’re reducing food waste by giving those mushroom stems a second life. You’re learning about the fascinating world of mycology and the incredible power of nature. And, most importantly, you’re harvesting fresh, flavorful mushrooms that elevate your culinary creations. Imagine adding homegrown oyster mushrooms to your pasta dishes, stir-fries, or even a simple omelet. The possibilities are endless!
But the fun doesn’t stop there. Feel free to experiment with different types of mushrooms. While oyster mushrooms are generally the easiest to start with, you can try your hand at growing shiitake or even lion’s mane mushrooms once you’ve mastered the basics. Just be sure to research the specific growing conditions required for each variety.
Consider adding other nutrient-rich materials to your substrate. Coffee grounds, finely shredded cardboard, or even spent grain from brewing can provide additional food for your mushroom mycelium. Remember to sterilize these materials properly to prevent contamination.
Another variation to explore is the container itself. While a bowl is a convenient starting point, you can also use plastic tubs, buckets, or even repurposed containers like yogurt tubs. Just make sure the container is clean and has adequate drainage.
We’re confident that you’ll be amazed by the results of this simple yet effective DIY trick. It’s a fantastic way to connect with nature, reduce your environmental impact, and enjoy the delicious rewards of your labor.
Don’t be intimidated if your first attempt isn’t perfect. Mushroom cultivation can be a bit of a learning curve, but with patience and persistence, you’ll be harvesting your own homegrown mushrooms in no time.
So, what are you waiting for? Gather your mushroom stems, prepare your substrate, and embark on your own **Mushroom Bowl Gardening Indoors** adventure today! We can’t wait to hear about your experiences. Share your photos, tips, and questions in the comments below. Let’s build a community of indoor mushroom growers and inspire others to embrace the magic of mycology!
Share Your Success!
We encourage you to document your journey and share your successes (and even your challenges!) with the online community. Tag us in your social media posts and use the hashtag #MushroomBowlGardening. Let’s spread the word about this amazing DIY trick and inspire others to grow their own food.
Experiment and Innovate
Don’t be afraid to experiment with different techniques and variations. The world of mycology is vast and fascinating, and there’s always something new to learn. Try different substrates, different containers, and different mushroom varieties. The more you experiment, the more you’ll learn and the more successful you’ll become.
Join the Community
Connect with other mushroom growers online and share your experiences. There are many online forums and social media groups dedicated to mushroom cultivation. These communities are a great resource for learning new techniques, troubleshooting problems, and getting inspiration.
Frequently Asked Questions (FAQ)
What types of mushrooms are best for Mushroom Bowl Gardening Indoors?
Oyster mushrooms are generally considered the easiest and most reliable choice for beginners. They are fast-growing, relatively tolerant of different conditions, and produce abundant yields. Other suitable options include shiitake mushrooms, although they may require a bit more patience and attention to detail. Lion’s mane mushrooms can also be grown indoors, but they have specific requirements for humidity and ventilation. Avoid trying to grow wild mushrooms indoors, as they may be difficult to cultivate and could potentially be toxic.
How do I sterilize the substrate to prevent contamination?
Sterilization is crucial to prevent unwanted molds and bacteria from outcompeting your mushroom mycelium. The most effective method is to use a pressure cooker. Place your substrate in a heat-resistant container, add water, and pressure cook for at least 90 minutes at 15 PSI. If you don’t have a pressure cooker, you can pasteurize the substrate by heating it in a large pot of water for 1-2 hours. However, pasteurization is less effective than sterilization and may result in a higher risk of contamination.
How long does it take to grow mushrooms using this method?
The time it takes to grow mushrooms will vary depending on the type of mushroom, the growing conditions, and the quality of your substrate. Oyster mushrooms typically take 2-3 weeks to colonize the substrate and another 1-2 weeks to produce fruiting bodies. Shiitake mushrooms may take several months to colonize the substrate and several weeks to fruit. Be patient and monitor your mushrooms closely.
What are the ideal growing conditions for Mushroom Bowl Gardening Indoors?
Mushrooms generally prefer cool, humid, and dark environments. The ideal temperature range for most edible mushrooms is between 60-75°F (15-24°C). Humidity should be maintained at 80-90%. You can increase humidity by misting the mushrooms regularly or by placing a plastic bag over the bowl. Mushrooms also need fresh air exchange to prevent the buildup of carbon dioxide. Provide adequate ventilation by opening the bag or container for a few minutes each day.
How do I know when the mushrooms are ready to harvest?
Mushrooms are typically ready to harvest when the caps are fully developed and the edges are starting to curl upwards. The gills underneath the cap should be visible and the mushrooms should feel firm to the touch. Harvest the mushrooms by gently twisting them off the substrate. Avoid pulling them, as this can damage the mycelium.
What if my Mushroom Bowl Gardening Indoors project gets contaminated?
Contamination is a common problem in mushroom cultivation. If you notice any mold or discoloration on your substrate, it’s important to take action immediately. Remove the contaminated area with a clean knife or spoon. If the contamination is widespread, it’s best to discard the entire project and start over. To prevent contamination, always sterilize your substrate properly and maintain a clean growing environment.
Can I reuse the substrate after harvesting mushrooms?
Yes, you can often get multiple flushes (harvests) from the same substrate. After harvesting the first flush, soak the substrate in water for 24 hours to rehydrate it. Then, drain the water and place the substrate back in its growing environment. You may get another flush of mushrooms in a few weeks. However, the yield of subsequent flushes may be lower than the first flush. Eventually, the substrate will become depleted of nutrients and will no longer produce mushrooms. At that point, you can compost the substrate and use it to enrich your garden soil.
Is Mushroom Bowl Gardening Indoors safe?
Yes, growing edible mushrooms indoors is generally safe, as long as you follow proper hygiene practices and only cultivate known edible species. Always wash your hands thoroughly before handling the substrate or mushrooms. Avoid breathing in the spores, as they can cause allergic reactions in some people. If you are unsure about the identity of a mushroom, do not eat it.
Where can I find more information about Mushroom Bowl Gardening Indoors?
There are many resources available online and in libraries about mushroom cultivation. Search for books, articles, and videos on mushroom growing techniques. You can also join online forums and social media groups dedicated to mushroom cultivation. These communities are a great resource for learning new techniques, troubleshooting problems, and getting inspiration.
Leave a Comment