
Mushroom cultivation plastic bottles – sounds like something out of a sci-fi movie, right? But trust me, it’s a surprisingly simple and incredibly rewarding way to grow your own delicious fungi right at home! Forget those expensive grocery store mushrooms; imagine harvesting fresh, flavorful varieties you’ve nurtured yourself, all while giving those pesky plastic bottles a new lease on life.
For centuries, mushroom cultivation has been a revered practice in many cultures, particularly in East Asia, where it’s not just about food but also about traditional medicine and spiritual connection. While large-scale mushroom farms are common today, the beauty of this DIY project lies in bringing that ancient knowledge into your own kitchen, balcony, or even a small corner of your apartment.
Why should you try mushroom cultivation plastic bottles? Well, for starters, it’s incredibly eco-friendly! We’re all looking for ways to reduce our plastic waste, and this is a fantastic way to repurpose those bottles that would otherwise end up in a landfill. Plus, growing your own mushrooms is a fantastic way to ensure you’re eating fresh, organic produce free from harmful pesticides. And let’s be honest, there’s something incredibly satisfying about watching those little mushrooms sprout from your recycled containers – it’s like a mini science experiment with a delicious payoff! So, are you ready to turn those plastic bottles into a gourmet mushroom farm? Let’s dive in!
Pilzzucht im Eigenbau: Austernpilze in Plastikflaschen ziehen
Hallo liebe Pilzfreunde! Habt ihr euch jemals gefragt, wie ihr eure eigenen köstlichen Austernpilze zu Hause züchten könnt? Und das auch noch nachhaltig, indem ihr Plastikflaschen recycelt? Dann seid ihr hier genau richtig! Ich zeige euch, wie ihr mit einfachen Mitteln und ein bisschen Geduld eure eigenen Pilze in Plastikflaschen ziehen könnt. Es ist einfacher als ihr denkt und macht richtig Spaß!
Was ihr für die Pilzzucht in Plastikflaschen benötigt:
* Plastikflaschen: Am besten eignen sich PET-Flaschen (z.B. von Wasser oder Saft). Sie sollten sauber und unbeschädigt sein. Je größer die Flasche, desto mehr Pilze könnt ihr ernten.
* Austernpilzbrut: Die bekommt ihr im Fachhandel, online oder manchmal auch in Gärtnereien. Achtet darauf, dass die Brut frisch und vital aussieht. Es gibt verschiedene Austernpilzarten, wählt einfach eure Lieblingssorte!
* Substrat: Hier gibt es verschiedene Möglichkeiten. Stroh (Weizen- oder Roggenstroh) ist eine gute und günstige Option. Alternativ könnt ihr auch Kaffeesatz (frisch und abgekühlt), Sägemehl (von unbehandeltem Holz) oder eine Mischung aus beidem verwenden.
* Kalk: Um den pH-Wert des Substrats zu regulieren, benötigt ihr etwas Kalk. Gartenkalk oder kohlensaurer Kalk sind gut geeignet.
* Sprühflasche: Zum Befeuchten des Substrats und der Umgebung.
* Desinfektionsmittel: Um die Flaschen und eure Hände zu desinfizieren und Kontaminationen zu vermeiden.
* Bohrmaschine oder Messer: Zum Anbringen der Fruchtungsöffnungen in den Flaschen.
* Handschuhe: Um eure Hände sauber zu halten und Kontaminationen zu vermeiden.
* Geduld: Pilzzucht braucht Zeit!
Vorbereitung ist alles: Die Flaschen und das Substrat
Bevor wir loslegen, ist eine gute Vorbereitung das A und O. Sauberkeit ist extrem wichtig, um Schimmelbildung und andere unerwünschte Gäste zu vermeiden.
1. Die Flaschen reinigen und desinfizieren:
* Spült die Plastikflaschen gründlich mit heißem Wasser und Spülmittel aus. Entfernt alle Etiketten und Klebereste.
* Desinfiziert die Flaschen anschließend mit einem Desinfektionsmittel. Ich verwende dafür Isopropylalkohol (70%), aber auch andere Desinfektionsmittel sind geeignet. Sprüht die Flaschen innen und außen ein und lasst sie gut trocknen.
2. Das Substrat vorbereiten:
Die Vorbereitung des Substrats hängt davon ab, welches Material ihr verwendet. Hier sind die gängigsten Methoden:
* Stroh:
* Schneidet das Stroh in kurze Stücke (ca. 5-10 cm). Das geht am besten mit einer Gartenschere oder einem Häcksler.
* Weicht das Stroh für mindestens 24 Stunden in einem großen Behälter mit Wasser ein. Das Stroh sollte vollständig mit Wasser bedeckt sein.
* Nach dem Einweichen das Stroh abgießen und für ca. 1 Stunde in einem großen Topf oder Kessel kochen oder pasteurisieren. Dadurch werden unerwünschte Mikroorganismen abgetötet.
* Lasst das Stroh nach dem Kochen abkühlen und drückt überschüssiges Wasser aus. Es sollte feucht, aber nicht tropfnass sein.
* Mischt das Stroh mit Kalk. Die Menge hängt vom Kalk ab, aber in der Regel reichen 1-2% Kalk bezogen auf das Trockengewicht des Strohs. Der Kalk hilft, den pH-Wert zu stabilisieren und Schimmelbildung vorzubeugen.
* Kaffeesatz:
* Verwendet nur frischen, abgekühlten Kaffeesatz.
* Kaffeesatz ist von Natur aus relativ steril, daher ist keine weitere Behandlung notwendig.
* Mischt den Kaffeesatz mit etwas Kalk (ca. 1% bezogen auf das Gewicht des Kaffeesatzes).
* Sägemehl:
* Verwendet nur Sägemehl von unbehandeltem Holz.
* Feuchtet das Sägemehl mit Wasser an, bis es feucht, aber nicht tropfnass ist.
* Sterilisiert das Sägemehl im Backofen (ca. 1 Stunde bei 120°C) oder im Dampfkochtopf (ca. 1 Stunde).
* Lasst das Sägemehl abkühlen und mischt es mit etwas Kalk (ca. 1% bezogen auf das Gewicht des Sägemehls).
Die Flaschen befüllen und beimpfen:
Jetzt kommt der spannende Teil: Wir befüllen die Flaschen mit dem Substrat und beimpfen sie mit der Austernpilzbrut.
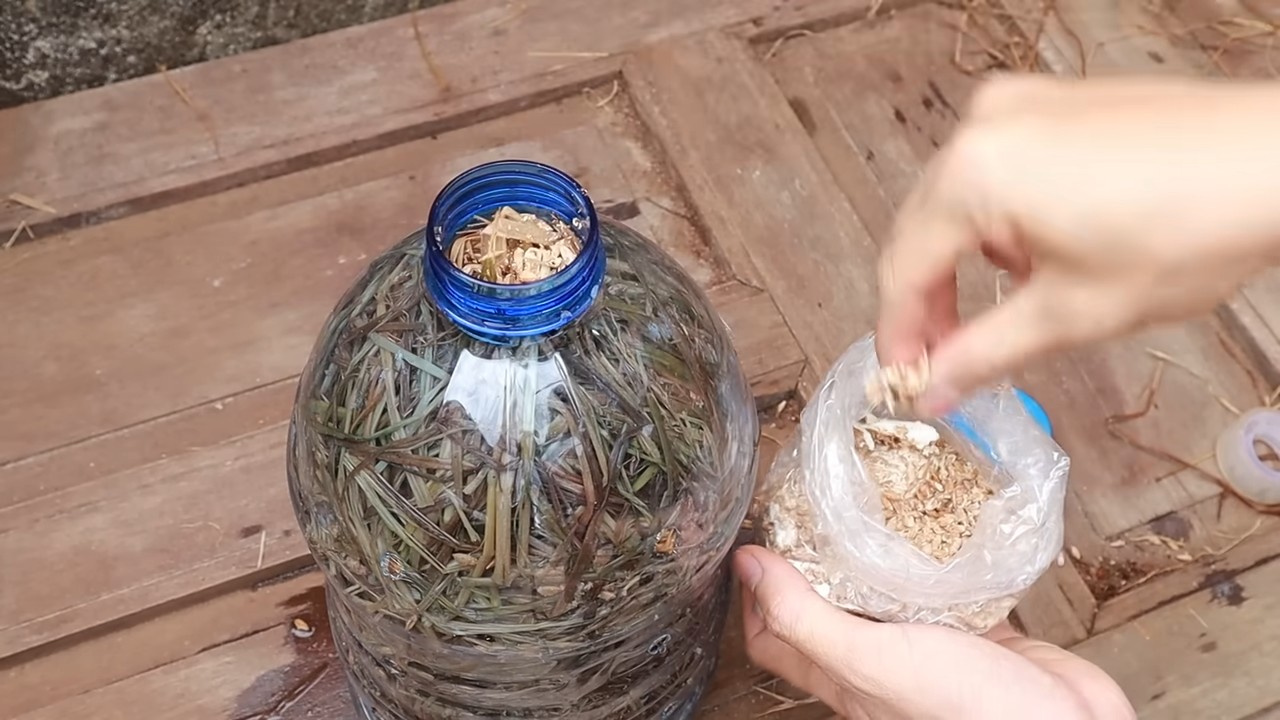
3. Die Flaschen befüllen:
* Tragt Handschuhe, um Kontaminationen zu vermeiden.
* Schichtet das Substrat und die Austernpilzbrut abwechselnd in die Flaschen. Beginnt mit einer Schicht Substrat, dann eine Schicht Brut, dann wieder Substrat usw. Die oberste Schicht sollte immer Substrat sein.
* Drückt das Substrat leicht an, aber nicht zu fest. Es sollte noch genügend Luftzirkulation möglich sein.
* Lasst oben in der Flasche etwas Platz (ca. 5-10 cm).
4. Die Fruchtungsöffnungen anbringen:
* Bohrt oder schneidet mit einem Messer kleine Löcher (ca. 1-2 cm Durchmesser) in die Flaschen. Diese Löcher dienen als Fruchtungsöffnungen, durch die die Pilze später wachsen werden.
* Verteilt die Löcher gleichmäßig über die Flasche. Ich mache meistens 4-6 Löcher pro Flasche.
* Achtet darauf, dass die Löcher nicht zu groß sind, damit das Substrat nicht herausfällt.
Die Inkubationsphase: Warten und beobachten
Nachdem die Flaschen befüllt und beimpft sind, beginnt die Inkubationsphase. In dieser Phase wächst das Myzel (das Pilzgeflecht) durch das Substrat.
5. Die Flaschen lagern:
* Lagert die Flaschen an einem dunklen, warmen (ca. 20-25°C) und gut belüfteten Ort.
* Vermeidet direkte Sonneneinstrahlung.
* Die Luftfeuchtigkeit sollte relativ hoch sein (ca. 70-80%). Ihr könnt die Flaschen in einen Plastiksack stellen und diesen leicht befeuchten, um die Luftfeuchtigkeit zu erhöhen.
* Überprüft die Flaschen regelmäßig auf Schimmelbildung. Wenn ihr Schimmel entdeckt, entfernt die betroffene Flasche sofort, um eine Ausbreitung zu verhindern.
6. Die Inkubationszeit:
* Die Inkubationszeit beträgt in der Regel 2-4 Wochen.
* In dieser Zeit wird das Myzel das gesamte Substrat durchwachsen. Ihr könnt das daran erkennen, dass das Substrat weißlich wird.
* Wenn das Substrat vollständig durchwachsen ist, ist es Zeit für die nächste Phase: die Fruchtung.
Die Fruchtungsphase: Endlich Pilze!
Jetzt kommt der aufregendste Teil: Die Pilze beginnen zu wachsen!
7. Die Bedingungen für die Fruchtung schaffen:
* Stellt die Flaschen an einen helleren Ort, aber vermeidet direkte Sonneneinstrahlung.
* Die Temperatur sollte etwas niedriger sein als in der Inkubationsphase (ca. 15-20°C).
* Die Luftfeuchtigkeit sollte hoch sein (ca. 80-90%). Besprüht die Flaschen und die Umgebung regelmäßig mit Wasser, um die Luftfeuchtigkeit zu erhöhen.
* Sorgt für eine gute Belüftung.
8. Die Pilze wachsen lassen:
* Nach einigen Tagen werden sich an den Fruchtungsöffnungen kleine Pilzansätze bilden.
* Diese Pilzansätze wachsen schnell zu ausgewachsenen Austernpilzen heran.
* Besprüht die Pilze regelmäßig mit Wasser, um sie feucht zu halten.
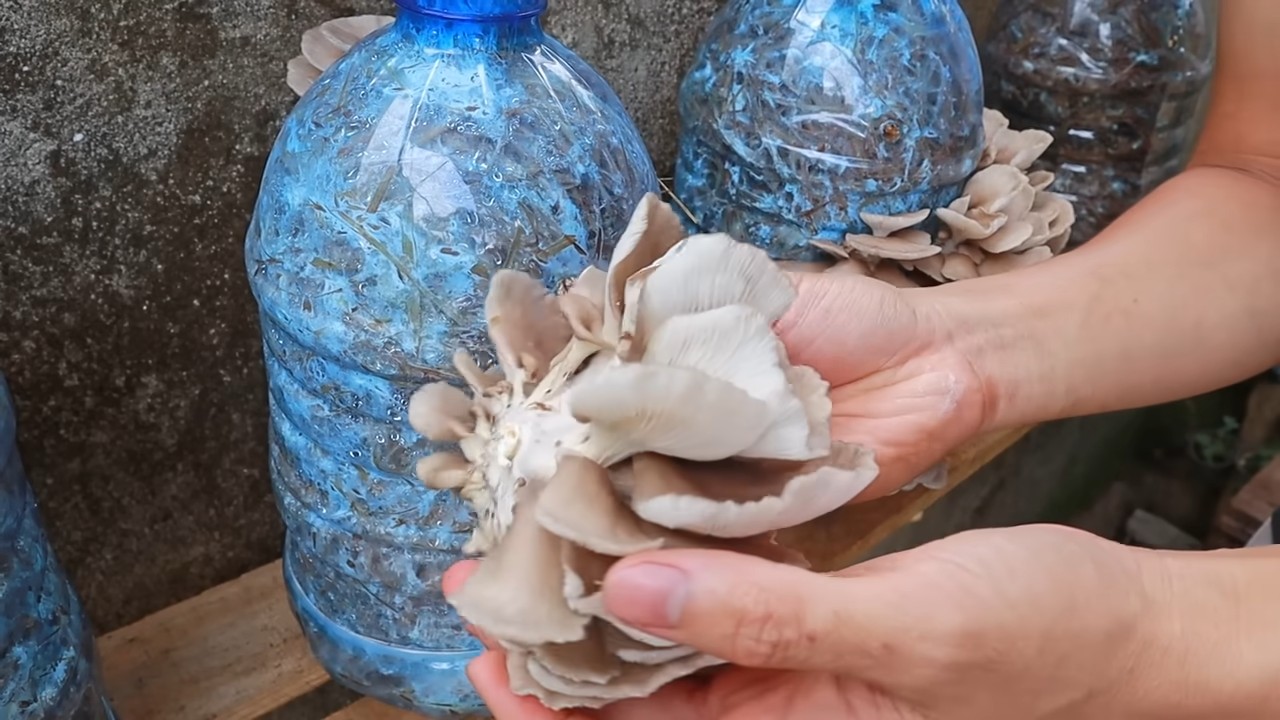
9. Die Ernte:
* Die Austernpilze sind erntereif, wenn die Hüte sich leicht nach oben biegen und die Ränder leicht wellig sind.
* Erntet die Pilze, indem ihr sie vorsichtig abdreht oder
Conclusion
So, there you have it! Transforming humble plastic bottles into thriving mushroom cultivation vessels is not just a clever upcycling project; it’s a gateway to fresh, homegrown mushrooms right in your own home. We’ve explored the simple steps, from preparing the bottles to inoculating them with your chosen mushroom spawn. But why is this DIY trick a must-try?
Firstly, it’s incredibly sustainable. We’re all becoming more aware of our environmental impact, and this method offers a tangible way to reduce plastic waste. Instead of those bottles ending up in landfills, they become fertile ground for delicious and nutritious fungi. Secondly, it’s cost-effective. Compared to buying pre-made mushroom growing kits, this approach significantly reduces your expenses. You’re essentially using materials you already have or can easily acquire for free. Thirdly, it’s incredibly rewarding. There’s something deeply satisfying about nurturing life from scratch, and watching your mushrooms sprout and flourish is an experience that connects you to the natural world.
But the beauty of this DIY project lies in its adaptability. Feel free to experiment with different mushroom varieties. Oyster mushrooms are a great starting point due to their resilience and fast growth, but you could also try shiitake, lion’s mane, or even wine cap mushrooms once you’ve gained some experience. Consider varying the substrate mix as well. While we recommended a blend of straw, coffee grounds, and sawdust, you can adjust the ratios to see what works best for your chosen mushroom species and local climate. You can also experiment with different bottle sizes and configurations. Larger bottles might require more substrate but could potentially yield larger harvests. Smaller bottles are great for experimenting with different strains simultaneously.
Don’t be afraid to get creative with your growing environment too. While a dark, humid space is generally ideal, you can fine-tune the conditions to optimize growth. Consider using a humidity tent or a simple spray bottle to maintain the necessary moisture levels. Proper ventilation is also crucial to prevent mold growth, so ensure there’s adequate airflow around your bottles.
Ultimately, this **mushroom cultivation** method using plastic bottles is about more than just growing mushrooms; it’s about embracing sustainability, fostering creativity, and connecting with the natural world. It’s a project that’s both educational and enjoyable, offering a tangible way to reduce waste and enjoy fresh, homegrown food.
We wholeheartedly encourage you to give this DIY trick a try. It’s easier than you might think, and the rewards are well worth the effort. And most importantly, we want to hear about your experiences! Share your successes, your challenges, and your creative adaptations in the comments below. Let’s build a community of mushroom enthusiasts who are passionate about sustainability and delicious food. What mushroom varieties did you try? What substrate mix worked best for you? What challenges did you encounter, and how did you overcome them? Your insights will help others learn and grow, and together, we can make a positive impact on the environment while enjoying the fruits (or rather, fungi) of our labor. So, grab some plastic bottles, gather your supplies, and embark on your mushroom growing adventure today!
Frequently Asked Questions (FAQ)
What types of plastic bottles are best for mushroom cultivation?
Ideally, you should use food-grade plastic bottles, such as those used for water, juice, or soda. These are generally made from PET (polyethylene terephthalate) or HDPE (high-density polyethylene), which are considered safe for growing food. Avoid using bottles that have contained harsh chemicals or cleaning products, as these could contaminate your mushrooms. Thoroughly clean and sanitize the bottles before use, regardless of their previous contents. Inspect the bottles for any cracks or damage that could compromise their structural integrity or allow contaminants to enter.
How do I sterilize the substrate to prevent contamination?
Sterilizing the substrate is crucial to eliminate competing organisms that could hinder mushroom growth. The most effective method is to use a pressure cooker. Place the hydrated substrate in heat-resistant bags or jars, leaving some headspace. Seal the containers and pressure cook at 15 PSI for 90 minutes. If you don’t have a pressure cooker, you can pasteurize the substrate by heating it in a large pot of water for 1-2 hours. However, pasteurization is less effective than sterilization and may result in a higher risk of contamination. Make sure to let the substrate cool completely before inoculating it with mushroom spawn.
How much mushroom spawn do I need per bottle?
A general guideline is to use about 5-10% spawn by weight of the substrate. For example, if you have 1 kilogram of substrate, you would use 50-100 grams of spawn. It’s better to err on the side of using more spawn rather than less, as this will help the mushroom mycelium colonize the substrate more quickly and effectively, reducing the risk of contamination. Distribute the spawn evenly throughout the substrate to ensure uniform colonization.
How long does it take for mushrooms to grow in plastic bottles?
The time it takes for mushrooms to grow depends on several factors, including the mushroom species, the substrate composition, the environmental conditions, and the amount of spawn used. Generally, oyster mushrooms are among the fastest-growing, often producing their first flush within 2-3 weeks of inoculation. Other species, such as shiitake, may take several months to fruit. Maintain optimal humidity, temperature, and ventilation to encourage rapid growth.
What are the ideal environmental conditions for mushroom cultivation in plastic bottles?
Most mushroom species prefer a dark, humid environment with temperatures between 60-75°F (15-24°C). Maintain humidity levels of 80-90% by misting the bottles regularly or using a humidity tent. Ensure adequate ventilation to prevent the buildup of carbon dioxide and promote healthy growth. Avoid direct sunlight, as it can overheat the bottles and damage the mycelium. A basement, closet, or shaded outdoor area are all suitable locations for mushroom cultivation.
How do I harvest the mushrooms from the plastic bottles?
Harvest the mushrooms when the caps are fully developed but before they begin to release spores. Gently twist or cut the mushrooms from the substrate, being careful not to damage the mycelium. After harvesting, the substrate may produce additional flushes of mushrooms. To encourage subsequent flushes, soak the substrate in water for 12-24 hours and then return it to its growing environment.
What if I see mold growing in my mushroom cultivation bottles?
Mold contamination is a common problem in mushroom cultivation. If you see mold, it’s important to act quickly to prevent it from spreading. If the mold is localized, you can try to carefully remove the affected area with a clean spoon or knife. However, if the mold is widespread, it’s best to discard the entire bottle to prevent contamination of other cultures. To minimize the risk of mold, sterilize the substrate thoroughly, maintain proper ventilation, and avoid overwatering.
Can I reuse the plastic bottles for mushroom cultivation after harvesting?
Yes, you can reuse the plastic bottles for multiple rounds of mushroom cultivation. After harvesting the final flush of mushrooms, remove the spent substrate and thoroughly clean and sanitize the bottles. You may need to sterilize the bottles again to eliminate any remaining contaminants. However, keep in mind that the plastic may degrade over time, so it’s important to inspect the bottles for any cracks or damage before reusing them.
What can I do with the spent substrate after harvesting the mushrooms?
The spent substrate is a valuable resource that can be used in a variety of ways. It’s an excellent soil amendment for gardens, providing nutrients and improving soil structure. You can also compost the spent substrate to create nutrient-rich compost for your plants. Additionally, the spent substrate can be used as animal feed or as a substrate for other types of fungi. Don’t throw it away; recycle it!
Are there any safety precautions I should take when cultivating mushrooms at home?
While mushroom cultivation is generally safe, it’s important to take certain precautions to protect your health. Always wash your hands thoroughly after handling the substrate or mushrooms. Avoid inhaling spores, as they can cause allergic reactions in some individuals. If you have a compromised immune system, consult with your doctor before cultivating mushrooms at home. And most importantly, only consume mushrooms that you have positively identified as edible. If you’re unsure about the identity of a mushroom, don’t eat it.
Leave a Comment