
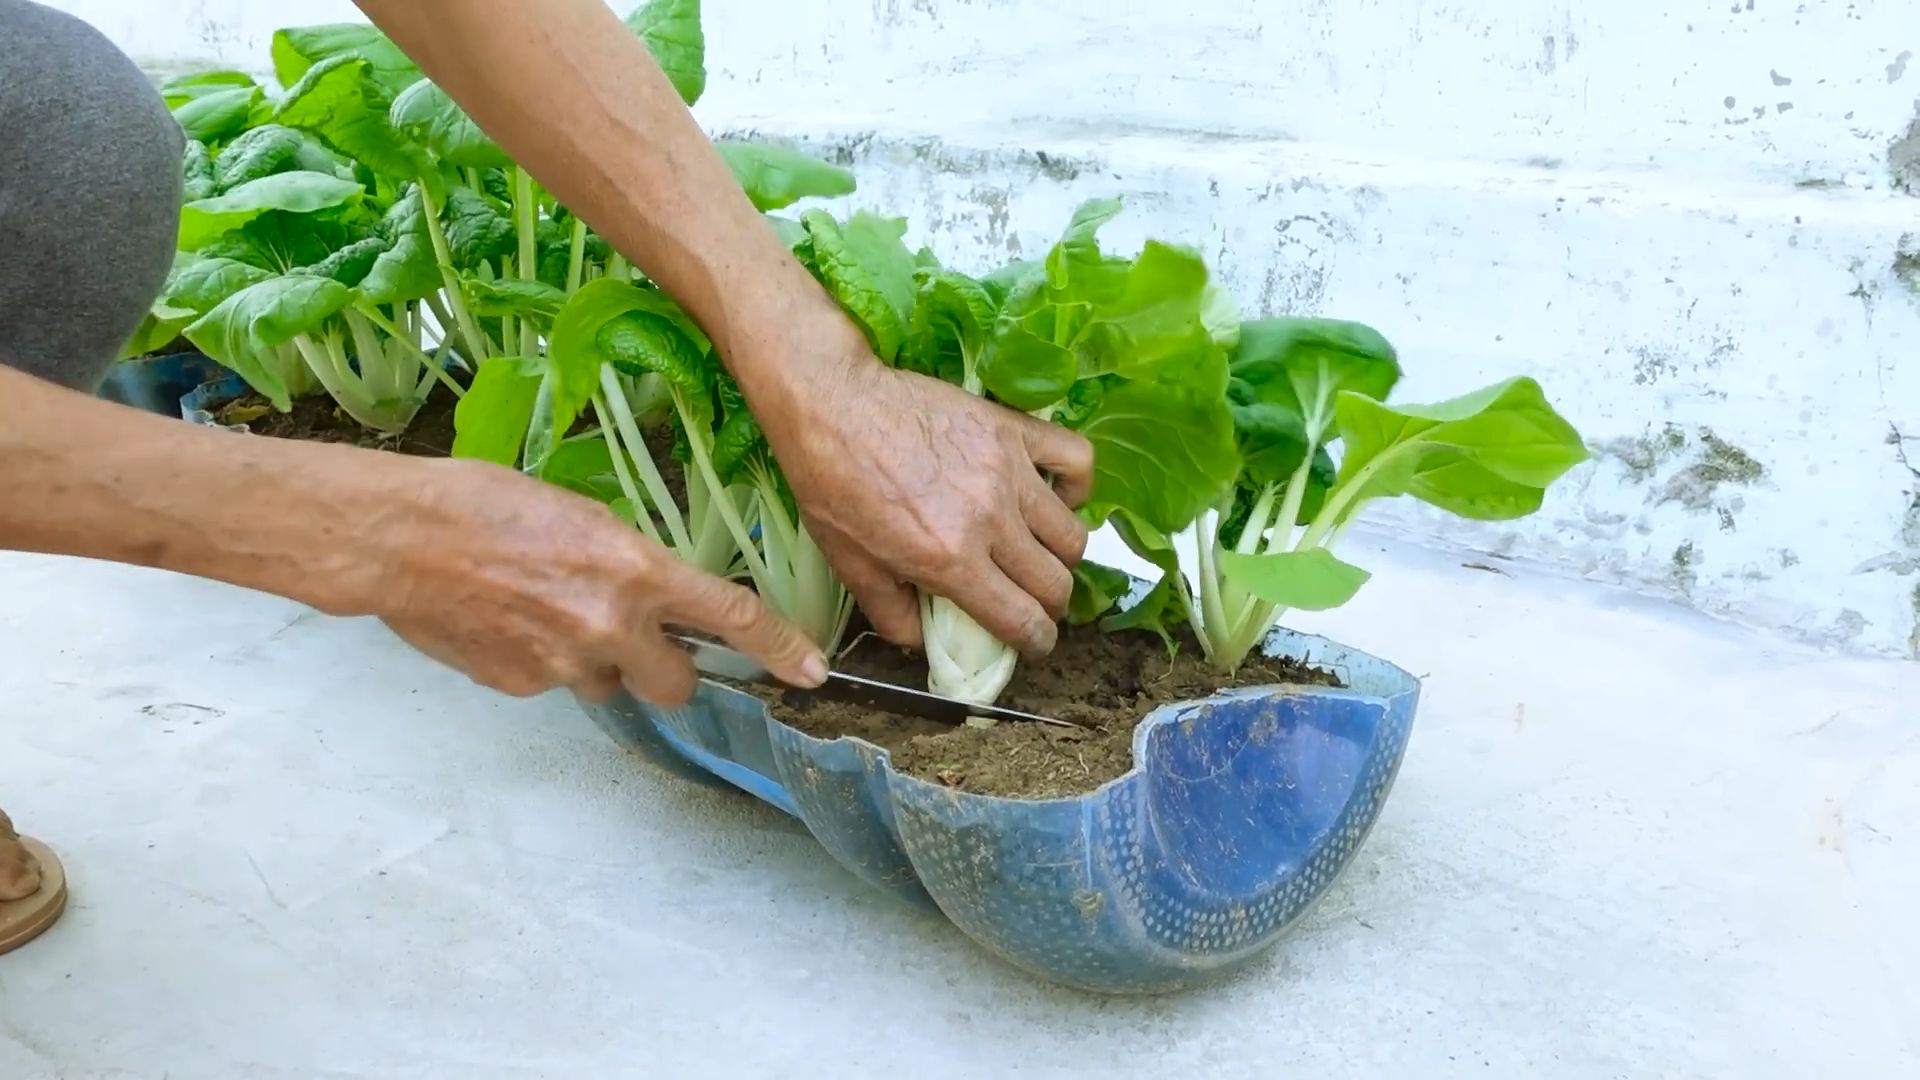
Grow Bok Choy Indoors? Absolutely! Imagine fresh, crisp bok choy, ready to harvest right from your windowsill, even in the dead of winter. Forget those sad, wilted greens at the grocery store – with a few simple tricks, you can cultivate your own vibrant supply of this nutritious vegetable, bringing a touch of Asian culinary tradition right into your home.
Bok choy, also known as pak choi, has been a staple in Chinese cuisine for centuries, prized for its mild flavor and versatility. From stir-fries to soups, this leafy green adds a delightful crunch and a boost of vitamins. But you don’t need a sprawling garden to enjoy its benefits.
In today’s world, where access to fresh produce can be limited or expensive, learning how to grow bok choy indoors is more valuable than ever. It’s not just about saving money; it’s about connecting with nature, reducing your carbon footprint, and enjoying the satisfaction of nurturing your own food. Plus, it’s a fun and rewarding project for the whole family! So, let’s dive into these easy DIY tricks and hacks that will have you harvesting your own bok choy in no time!
Balcony Chili Gardening: From Seed to Spice Rack!
Hey there, fellow spice enthusiasts! Ever dreamt of having a fiery little chili garden right on your balcony? Well, I’m here to tell you it’s totally doable, even if you’re a beginner like I was! I’m going to walk you through everything I’ve learned, from choosing the right chili varieties to harvesting your own homegrown heat. Get ready to add some zing to your life (and your meals!).
Choosing Your Chili Champions
Before we dive into the dirt, let’s talk chili varieties. The sheer number of options can be overwhelming, but don’t worry, I’ll help you narrow it down. Consider these factors:
* Heat Level: This is crucial! Do you want a gentle warmth, a fiery kick, or something that’ll melt your face off? Scoville Heat Units (SHU) measure chili heat. Look for varieties with SHU ratings that match your tolerance. For beginners, I recommend starting with milder options like Anaheim (500-2,500 SHU) or Poblano (1,000-2,000 SHU). If you’re feeling brave, try Jalapeño (2,500-8,000 SHU) or Serrano (10,000-25,000 SHU).
* Plant Size: Balcony space is precious! Look for compact or dwarf varieties that won’t outgrow their pots. Some great choices include:
* Thai Chili: These are small, prolific, and pack a punch!
* Bird’s Eye Chili: Another compact and fiery option.
* Peter Pepper: A novelty chili with a… unique shape. (And surprisingly mild heat!)
* Jalapeño: Many dwarf varieties are available.
* Growing Conditions: Consider your balcony’s sunlight exposure. Most chili peppers need at least 6-8 hours of direct sunlight per day. If your balcony is shadier, choose varieties that are more tolerant of partial shade.
* Personal Preference: Ultimately, choose chilies you enjoy eating! Do some research, read reviews, and pick varieties that sound delicious to you.
Gathering Your Gardening Gear
Okay, now that we’ve chosen our chili champions, let’s gather our supplies. Here’s what you’ll need:
* Chili Seeds: You can buy these online, at garden centers, or even save seeds from store-bought chilies (though the results may be unpredictable).
* Seed Starting Tray or Small Pots: For starting your seeds indoors.
* Seed Starting Mix: A light, well-draining mix specifically formulated for seedlings.
* Larger Pots: Choose pots that are at least 12 inches in diameter for mature chili plants.
* Potting Mix: A good quality potting mix that drains well. Avoid using garden soil, as it can compact in pots.
* Watering Can or Hose: For watering your plants.
* Fertilizer: A balanced fertilizer or one specifically formulated for peppers.
* Plant Labels: To keep track of your chili varieties.
* Gardening Gloves: To protect your hands.
* Optional:
* Heat Mat: To speed up germination.
* Grow Light: If you don’t have enough natural sunlight.
* Pruning Shears: For trimming your plants.
* Pest Control: Insecticidal soap or neem oil for dealing with pests.
Starting Your Chili Seeds: From Tiny Sprouts to Strong Seedlings
This is where the magic begins! Starting your seeds indoors gives them a head start, especially if you live in a cooler climate.
1. Sow Your Seeds: Fill your seed starting tray or small pots with seed starting mix. Moisten the mix thoroughly. Sow your chili seeds about ¼ inch deep. I usually plant 2-3 seeds per cell or pot, just in case some don’t germinate.
2. Provide Warmth and Light: Chili seeds need warmth to germinate. A heat mat can help speed things up. Place your seed starting tray or pots in a warm location, ideally around 75-85°F (24-29°C). If you don’t have enough natural sunlight, use a grow light.
3. Keep the Soil Moist: Water gently to keep the soil consistently moist, but not soggy. I like to use a spray bottle to avoid disturbing the seeds.
4. Be Patient: Chili seeds can take anywhere from 7 to 21 days to germinate, depending on the variety and conditions. Don’t give up if you don’t see sprouts right away!
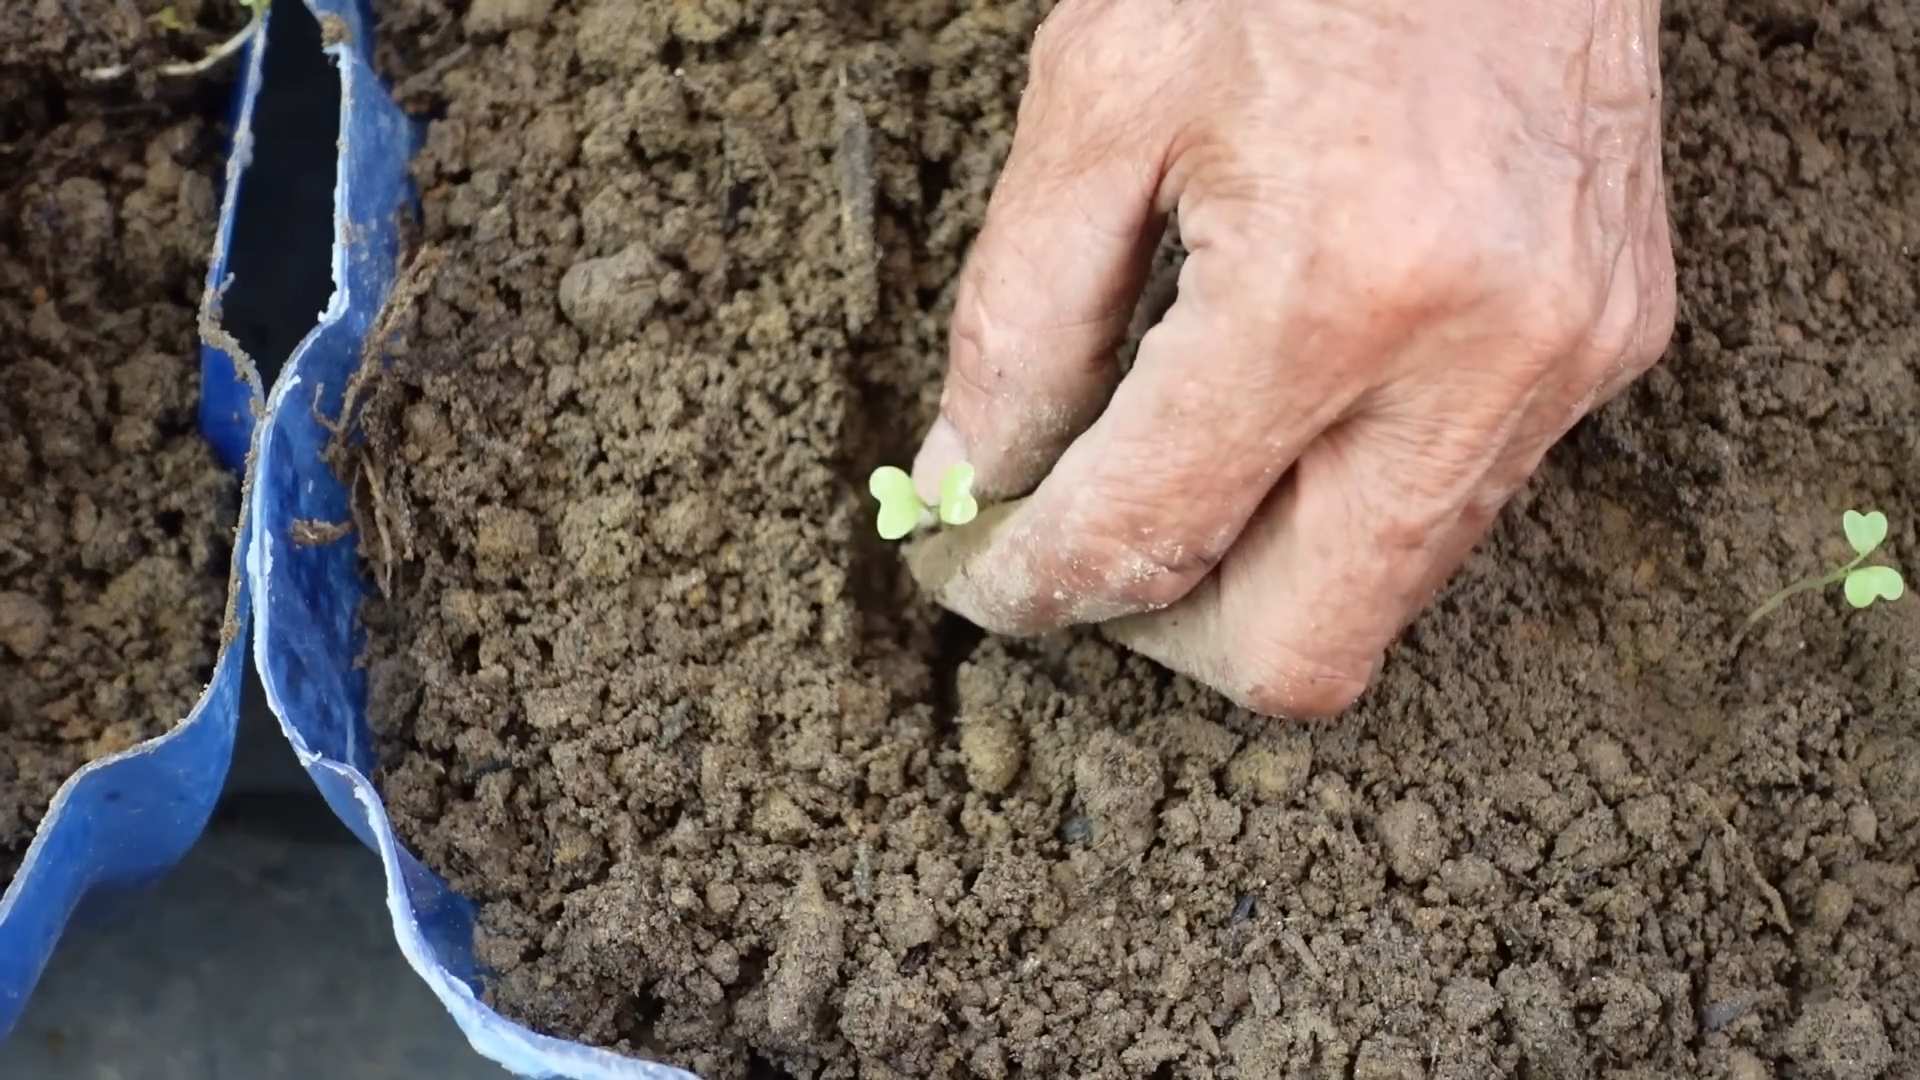
5. Thin Your Seedlings: Once your seedlings have emerged and have a few sets of true leaves (the leaves that look like miniature versions of the adult leaves), thin them out, leaving only the strongest seedling in each cell or pot.
6. Harden Off Your Seedlings: Before transplanting your seedlings outdoors, you need to “harden them off.” This gradually acclimates them to the outdoor environment. Start by placing your seedlings outdoors in a sheltered location for an hour or two each day, gradually increasing the amount of time they spend outside over the course of a week or two.
Transplanting Your Chili Seedlings: Giving Them Room to Grow
Once your seedlings are strong and the weather is warm enough (no danger of frost!), it’s time to transplant them into their larger pots.
1. Choose the Right Pots: Select pots that are at least 12 inches in diameter. Make sure they have drainage holes to prevent waterlogging.
2. Prepare Your Potting Mix: Fill your pots with a good quality potting mix.
3. Gently Remove Your Seedlings: Carefully remove your seedlings from their seed starting tray or small pots. Be gentle to avoid damaging the roots.
4. Plant Your Seedlings: Dig a hole in the potting mix that is large enough to accommodate the root ball of your seedling. Place the seedling in the hole and gently backfill with potting mix.
5. Water Thoroughly: Water your newly transplanted seedlings thoroughly.
6. Provide Support: If you’re growing taller chili varieties, you may need to provide support with stakes or cages.
Caring for Your Chili Plants: Sunshine, Water, and Love!
Now that your chili plants are in their permanent homes, it’s time to provide them with the care they need to thrive.
1. Sunlight: Chili peppers need at least 6-8 hours of direct sunlight per day. Place your pots in a sunny location on your balcony. If you don’t have enough natural sunlight, use a grow light.
2. Watering: Water your chili plants regularly, especially during hot, dry weather. Allow the soil to dry out slightly between waterings. Avoid overwatering, as this can lead to root rot. I usually check the soil moisture by sticking my finger about an inch deep. If it feels dry, it’s time to water.
3. Fertilizing: Feed your chili plants regularly with a balanced fertilizer or one specifically formulated for peppers. Follow the instructions on the fertilizer package. I like to fertilize every 2-3 weeks during the growing season.
4. Pruning: Pruning can help to improve air circulation and encourage bushier growth. Remove any dead or yellowing leaves. You can also pinch off the tips of the branches to encourage more branching.
5. Pest Control: Keep an eye out for pests such as aphids, spider mites, and whiteflies. If you spot any pests, treat them with insecticidal soap or neem oil. I always try to use organic pest control methods whenever possible.
6. Pollination: Chili peppers are self-pollinating, but you can help them along by gently shaking the plants or using a small paintbrush to transfer pollen from one flower to another. This is especially important if you’re growing your plants indoors.
Harvesting Your Chili Peppers: The Fruits of Your Labor!
The moment you’ve been waiting for! Harvesting your own homegrown chili peppers is incredibly rewarding.
1. Know When to Harvest: Chili peppers are typically ready to harvest when they have reached their mature color and size. The color will vary depending on the variety. For example, Jalapeños are typically harvested when they are dark green, while Serrano peppers are harvested when they are red.
2. Use Pruning Shears or Scissors: Use pruning shears or scissors to cut the peppers from the plant. Avoid pulling them off, as this can damage the plant.
3. Handle with Care: Be careful when handling chili peppers, especially hot varieties. Wear gloves to protect your hands from the capsaicin, the compound that makes chilies hot. Avoid touching your eyes or face after handling chili peppers.
4. Enjoy Your Harvest: Use your freshly harvested chili peppers in
Conclusion
So, there you have it! Growing your own bok choy indoors is not only achievable, but it’s also incredibly rewarding. Imagine fresh, crisp bok choy readily available, adding a vibrant touch to your stir-fries, soups, and salads, all year round. This DIY trick transforms your kitchen into a miniature garden, offering a sustainable and cost-effective way to enjoy this nutritious leafy green.
Why is this a must-try? Because it puts you in control. You dictate the growing conditions, ensuring your bok choy is free from harmful pesticides and herbicides. You harvest at peak freshness, maximizing flavor and nutritional value. And let’s be honest, there’s a certain satisfaction that comes from nurturing a plant from seed to table. It’s a connection to nature, even within the confines of your home.
But the beauty of this indoor gardening adventure lies in its adaptability. Feel free to experiment with different varieties of bok choy. Baby bok choy, with its tender leaves and mild flavor, is a fantastic option for quick salads. Or, try Shanghai bok choy, known for its spoon-shaped leaves and slightly sweeter taste. You can also play around with different growing mediums. While we’ve focused on soil, hydroponics is another viable option for indoor bok choy cultivation, offering a soilless and often faster-growing alternative.
Consider companion planting within your indoor garden. Herbs like basil or chives can thrive alongside your bok choy, potentially deterring pests and enhancing the overall flavor profile. Just be mindful of spacing and ensure each plant receives adequate light and nutrients.
Don’t be afraid to get creative with your lighting setup. While a sunny windowsill can work, supplemental grow lights can significantly boost growth, especially during the darker winter months. Experiment with different light spectrums to see what works best for your bok choy.
The key to success with this DIY trick is observation and adaptation. Pay close attention to your plants. Are the leaves wilting? Are they turning yellow? These are signs that something might be amiss. Adjust your watering schedule, lighting, or nutrient levels accordingly.
We wholeheartedly encourage you to embark on this indoor gardening journey. Growing bok choy indoors is a simple yet profound way to connect with nature, enhance your culinary creations, and embrace a more sustainable lifestyle. It’s a project that’s both educational and delicious.
So, grab your seeds, prepare your soil, and get ready to witness the magic of indoor bok choy cultivation. And most importantly, don’t forget to share your experiences with us! We’d love to hear about your successes, your challenges, and any unique tips or tricks you discover along the way. Share your photos and stories in the comments below – let’s build a community of indoor bok choy enthusiasts! Let us know if you found this DIY trick helpful.
Frequently Asked Questions (FAQ)
What is the best variety of bok choy to grow indoors?
While most bok choy varieties can be grown indoors, smaller varieties like baby bok choy or Shanghai bok choy tend to be more manageable and thrive well in containers. Their compact size makes them ideal for limited indoor spaces. Experimenting with different varieties is encouraged to find what grows best in your specific indoor environment. Consider the amount of space you have available and the size of the mature plant when making your selection.
How much light does indoor bok choy need?
Bok choy requires at least 6 hours of direct sunlight per day. If you don’t have a sufficiently sunny windowsill, you’ll need to supplement with grow lights. Fluorescent or LED grow lights are excellent options. Position the lights about 6-12 inches above the plants and ensure they provide a broad spectrum of light. Monitor your plants closely; if they appear leggy (tall and spindly), they likely need more light. Adjust the height of the lights or increase the duration of light exposure as needed.
What type of soil is best for growing bok choy indoors?
A well-draining potting mix is crucial for growing bok choy indoors. Avoid using garden soil, as it can become compacted and doesn’t drain well in containers. A mix of peat moss, perlite, and vermiculite provides excellent drainage and aeration. You can also add compost to enrich the soil with nutrients. Ensure the pH of the soil is slightly acidic to neutral (around 6.0 to 7.0).
How often should I water my indoor bok choy?
Water your bok choy regularly, keeping the soil consistently moist but not waterlogged. Check the soil moisture by sticking your finger about an inch deep. If it feels dry, it’s time to water. Avoid overwatering, as this can lead to root rot. Ensure your containers have drainage holes to allow excess water to escape. The frequency of watering will depend on factors such as temperature, humidity, and the size of your container.
What are some common pests and diseases that affect indoor bok choy, and how can I prevent them?
Common pests that can affect indoor bok choy include aphids, spider mites, and whiteflies. Regularly inspect your plants for signs of infestation. You can control these pests by spraying your plants with insecticidal soap or neem oil. Ensure good air circulation around your plants to prevent fungal diseases. Avoid overwatering, as this can create a favorable environment for fungal growth. If you notice any signs of disease, such as yellowing or spotting on the leaves, remove the affected leaves immediately.
How long does it take to grow bok choy indoors?
Bok choy typically takes about 30-45 days to mature from seed to harvest. Baby bok choy can be harvested even earlier, around 20-30 days. The exact time will depend on factors such as temperature, light, and nutrient levels.
How do I harvest bok choy?
You can harvest bok choy by cutting the entire plant at the base or by harvesting individual leaves as needed. If you harvest individual leaves, start with the outer leaves, allowing the inner leaves to continue growing. This method allows for a continuous harvest over a longer period.
Can I grow bok choy from cuttings?
While growing bok choy from seed is the most common method, it is possible to propagate it from cuttings, although it’s not as reliable. Take a cutting from a mature plant, ensuring it has a few leaves and a portion of the stem. Place the cutting in water until roots develop, then transplant it into a pot with well-draining soil.
What are some signs that my bok choy is not thriving indoors?
Signs that your bok choy is not thriving indoors include yellowing leaves, wilting, stunted growth, and the presence of pests or diseases. If you notice any of these signs, assess your growing conditions and make adjustments as needed. Check the soil moisture, light levels, and nutrient levels.
Can I fertilize my indoor bok choy?
Yes, fertilizing your indoor bok choy can help promote healthy growth. Use a balanced liquid fertilizer diluted to half strength. Fertilize every 2-3 weeks, following the instructions on the fertilizer label. Avoid over-fertilizing, as this can burn the roots.
Leave a Comment