
Plastic bottle pepper garden: Ever dreamt of harvesting a vibrant array of peppers right outside your kitchen window, even if you’re short on space? I know I have! Forget sprawling gardens and back-breaking labor; we’re diving into the wonderful world of upcycling and creating a thriving pepper paradise using something you probably already have lying around – plastic bottles!
The beauty of container gardening, especially with repurposed materials, isn’t just a modern trend. For centuries, resourceful gardeners have found innovative ways to cultivate food in limited spaces. From ancient rooftop gardens to modern-day urban farms, the spirit of making the most of what you have is deeply rooted in our history. And let’s be honest, who doesn’t love a good DIY project that’s both eco-friendly and yields delicious results?
But why a plastic bottle pepper garden, you ask? Well, imagine this: fresh, flavorful peppers readily available for your favorite dishes, all grown with minimal effort and maximum sustainability. No more trips to the grocery store for subpar peppers! This DIY trick is perfect for apartment dwellers, balcony gardeners, or anyone looking to add a touch of green to their lives without breaking the bank. Plus, it’s a fantastic way to reduce plastic waste and contribute to a healthier planet. So, grab those empty bottles, and let’s get growing!
DIY Upside-Down Pepper Garden from Plastic Bottles
Hey there, fellow gardening enthusiasts! Are you short on space but dreaming of fresh, homegrown peppers? Well, I’ve got just the project for you! We’re going to create an awesome upside-down pepper garden using recycled plastic bottles. It’s a fun, budget-friendly, and surprisingly effective way to grow your favorite peppers, even if you only have a balcony or small patio. Let’s get started!
What You’ll Need
Before we dive in, let’s gather our supplies. Here’s a list of everything you’ll need to create your upside-down pepper garden:
* Plastic Bottles: Choose sturdy plastic bottles, like 2-liter soda bottles or larger juice bottles. The bigger the bottle, the more soil you can use, which is better for your pepper plant. I recommend using clear or translucent bottles so you can monitor the soil moisture.
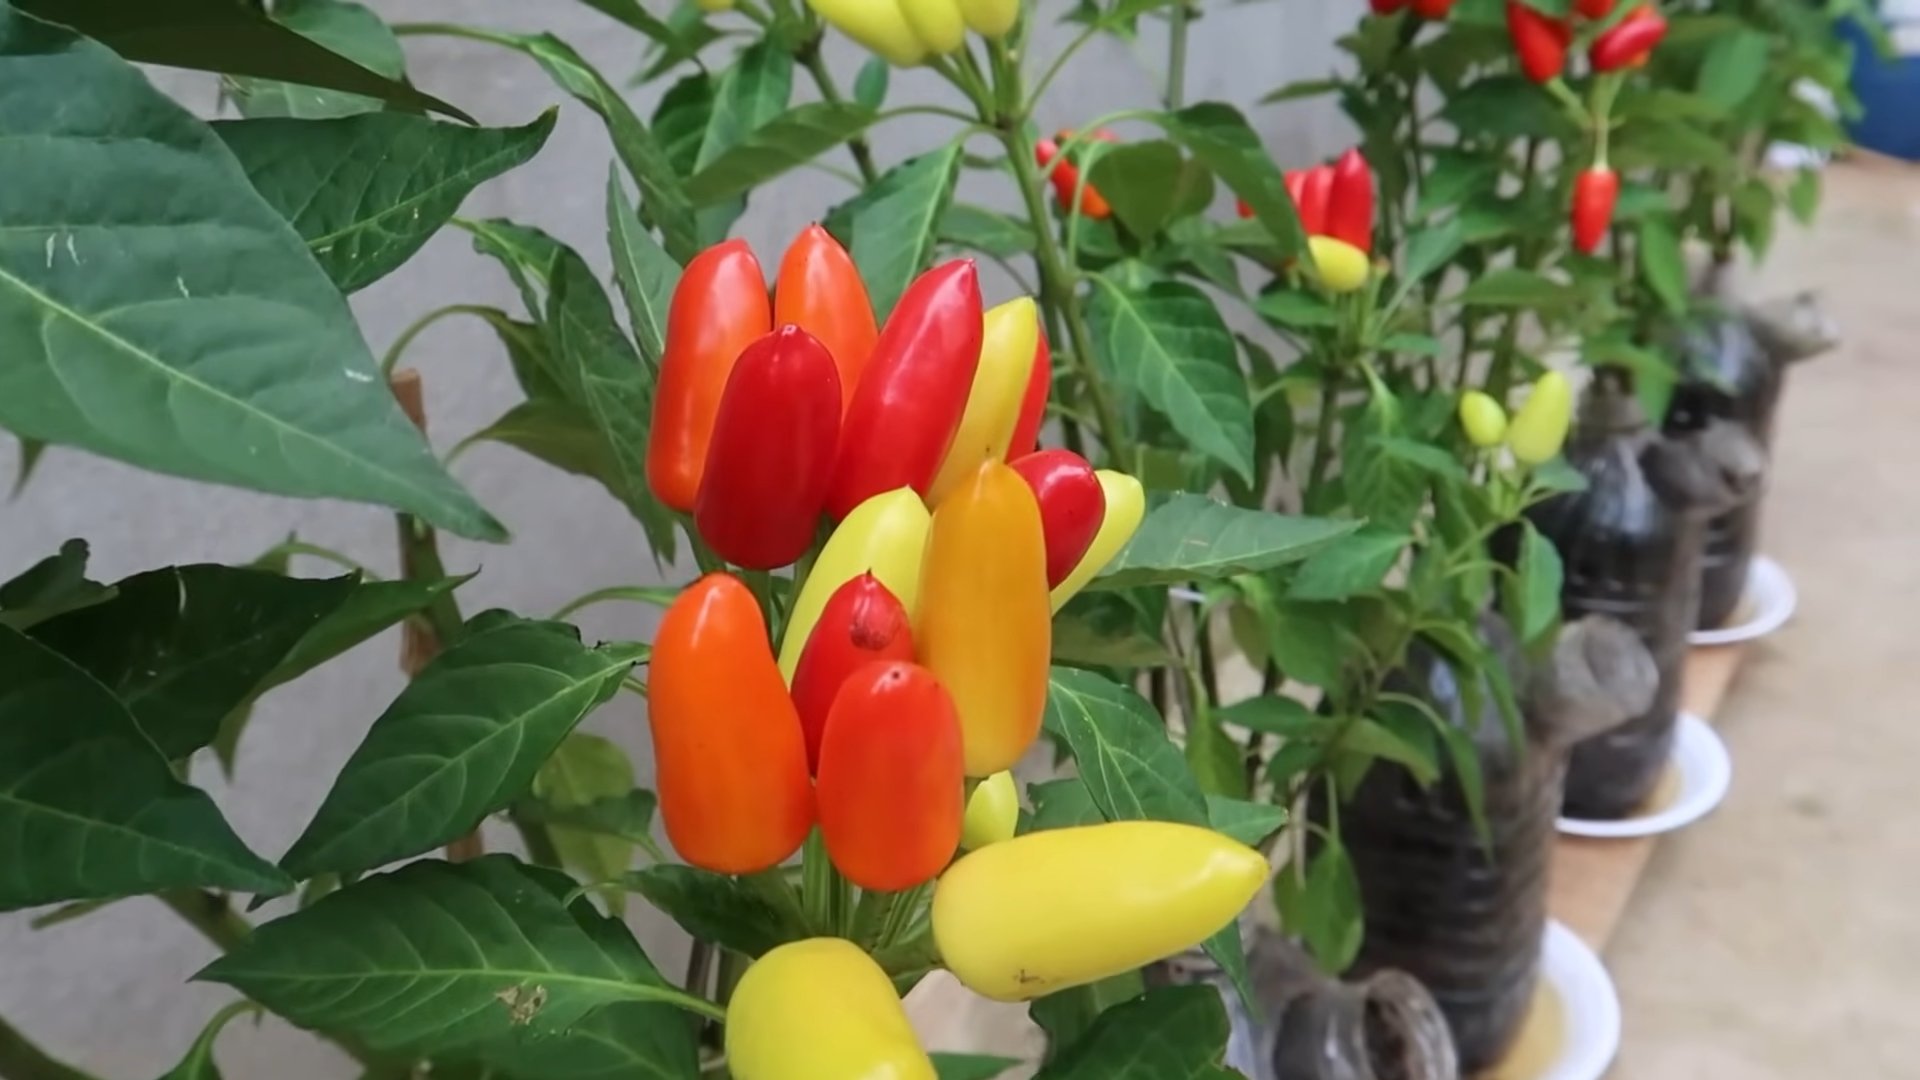
* Pepper Seedling: Select a healthy pepper seedling from your local nursery or garden center. Make sure it’s a variety that you enjoy eating! Bell peppers, jalapenos, or even smaller chili peppers work great.
* Potting Soil: Use a good quality potting mix that drains well. Avoid using garden soil, as it can become compacted in the bottle and hinder root growth.
* Scissors or Utility Knife: For cutting the plastic bottle. Be careful!
* Drill or Awl: To create drainage holes and a hole for the seedling.
* Measuring Tape or Ruler: To ensure accurate cuts and hole placement.
* Permanent Marker: For marking cutting lines.
* Wire or Sturdy Twine: For hanging your upside-down planter.
* Watering Can or Hose: For watering your pepper plant.
* Gloves (Optional): To protect your hands while working with soil and tools.
Preparing the Plastic Bottle
Okay, let’s get our hands dirty! The first step is to prepare the plastic bottle to become our upside-down planter.
1. Clean the Bottle: Thoroughly wash the plastic bottle with soap and water to remove any residue. Rinse it well and let it dry completely. This is important to prevent any contamination of the soil.
2. Mark the Cutting Line: Using your measuring tape or ruler and permanent marker, mark a line around the bottle about 4-6 inches from the bottle cap. This will be the bottom of our planter. We’re essentially cutting off the bottom portion of the bottle.
3. Cut the Bottle: Carefully use your scissors or utility knife to cut along the marked line. Be extra cautious when using a utility knife! I find it helpful to start with a small puncture and then follow the line. You should now have two pieces: the main body of the bottle and the bottom piece you just cut off. Discard or recycle the bottom piece.
4. Drill Drainage Holes: Using your drill or awl, create several small drainage holes in the bottle cap. These holes are crucial for preventing waterlogging and ensuring healthy root growth. I usually make about 4-6 holes, evenly spaced.
5. Drill Seedling Hole: Now, we need to create a hole in the bottle cap large enough to accommodate the stem of your pepper seedling. Start with a small hole and gradually enlarge it until the seedling’s stem can pass through snugly. You want it to be snug enough to hold the seedling in place but not so tight that it damages the stem.
Planting the Pepper Seedling
Now comes the fun part – planting our pepper seedling!
1. Prepare the Seedling: Gently remove the pepper seedling from its container. Loosen the roots slightly to encourage them to spread out in the new environment. Be careful not to damage the delicate roots.
2. Insert the Seedling: Carefully thread the pepper seedling’s stem through the hole in the bottle cap from the inside of the bottle. Gently pull the seedling through until the root ball is resting against the bottle cap. The leaves and stem should be hanging down outside the bottle.
3. Add Potting Soil: Slowly add potting soil to the bottle, filling it around the root ball of the pepper seedling. Gently tap the bottle to settle the soil and eliminate any air pockets. Fill the bottle almost to the top, leaving about an inch or two of space at the top.
4. Water Thoroughly: Once the bottle is filled with soil, water the pepper plant thoroughly until water drains out of the drainage holes in the bottle cap. This will help settle the soil and ensure that the roots are well-hydrated.
Hanging the Upside-Down Planter
Almost there! Now we need to create a way to hang our upside-down pepper garden.
1. Create Hanging Loops: Drill two small holes on opposite sides of the bottle, near the top rim. These holes will be used to attach the wire or twine for hanging.
2. Attach Hanging Wire or Twine: Cut two pieces of wire or sturdy twine, each about 18-24 inches long. Thread one piece of wire or twine through each hole and tie a secure knot to create a loop.
3. Hang the Planter: Find a suitable location to hang your upside-down pepper garden. Choose a spot that receives at least 6-8 hours of sunlight per day. A sturdy hook, branch, or railing will work well. Hang the planter by the loops you created.
Caring for Your Upside-Down Pepper Garden
Congratulations! You’ve successfully created your own upside-down pepper garden. Now, let’s talk about how to care for it so you can enjoy a bountiful harvest.
* Watering: Water your pepper plant regularly, especially during hot and dry weather. Check the soil moisture by sticking your finger into the soil. If the top inch feels dry, it’s time to water. Water slowly and thoroughly until water drains out of the drainage holes. Avoid overwatering, as this can lead to root rot.
* Fertilizing: Feed your pepper plant with a balanced liquid fertilizer every 2-3 weeks. Follow the instructions on the fertilizer package. This will provide the necessary nutrients for healthy growth and abundant pepper production.
* Sunlight: Ensure that your pepper plant receives at least 6-8 hours of sunlight per day. If you live in a very hot climate, you may need to provide some afternoon shade to prevent the plant from getting scorched.
* Pest Control: Keep an eye out for pests, such as aphids, whiteflies, and spider mites. If you notice any pests, treat them with an appropriate insecticide or insecticidal soap. You can also try using natural pest control methods, such as introducing beneficial insects like ladybugs.
* Pruning: Prune your pepper plant regularly to encourage bushier growth and more pepper production. Remove any yellowing or dead leaves. You can also pinch off the tips of the branches to promote branching.
* Support: As your pepper plant grows and produces peppers, it may become heavy. You may need to provide additional support to prevent the plant from breaking. You can use stakes or twine to support the branches.
Troubleshooting
Even with the best care, you might encounter some challenges along the way. Here are a few common problems and how to address them:
* Yellowing Leaves: Yellowing leaves can be a sign of overwatering, underwatering, nutrient deficiency, or pest infestation. Check the soil moisture, fertilize the plant, and inspect for pests.
* Blossom Drop: Blossom drop is when the flowers fall off the plant without producing peppers. This can be caused by temperature stress, lack of pollination, or nutrient deficiency. Ensure that the plant is getting enough sunlight and water, and fertilize it with a blossom booster fertilizer. You can also try hand-pollinating the flowers by gently shaking the plant or using a small brush to transfer pollen from one flower to another.
* Slow Growth: Slow growth can be caused by lack of sunlight, poor soil, or nutrient deficiency. Ensure that the plant is getting enough sunlight, use a good quality potting mix, and fertilize it regularly.
Enjoying Your Harvest
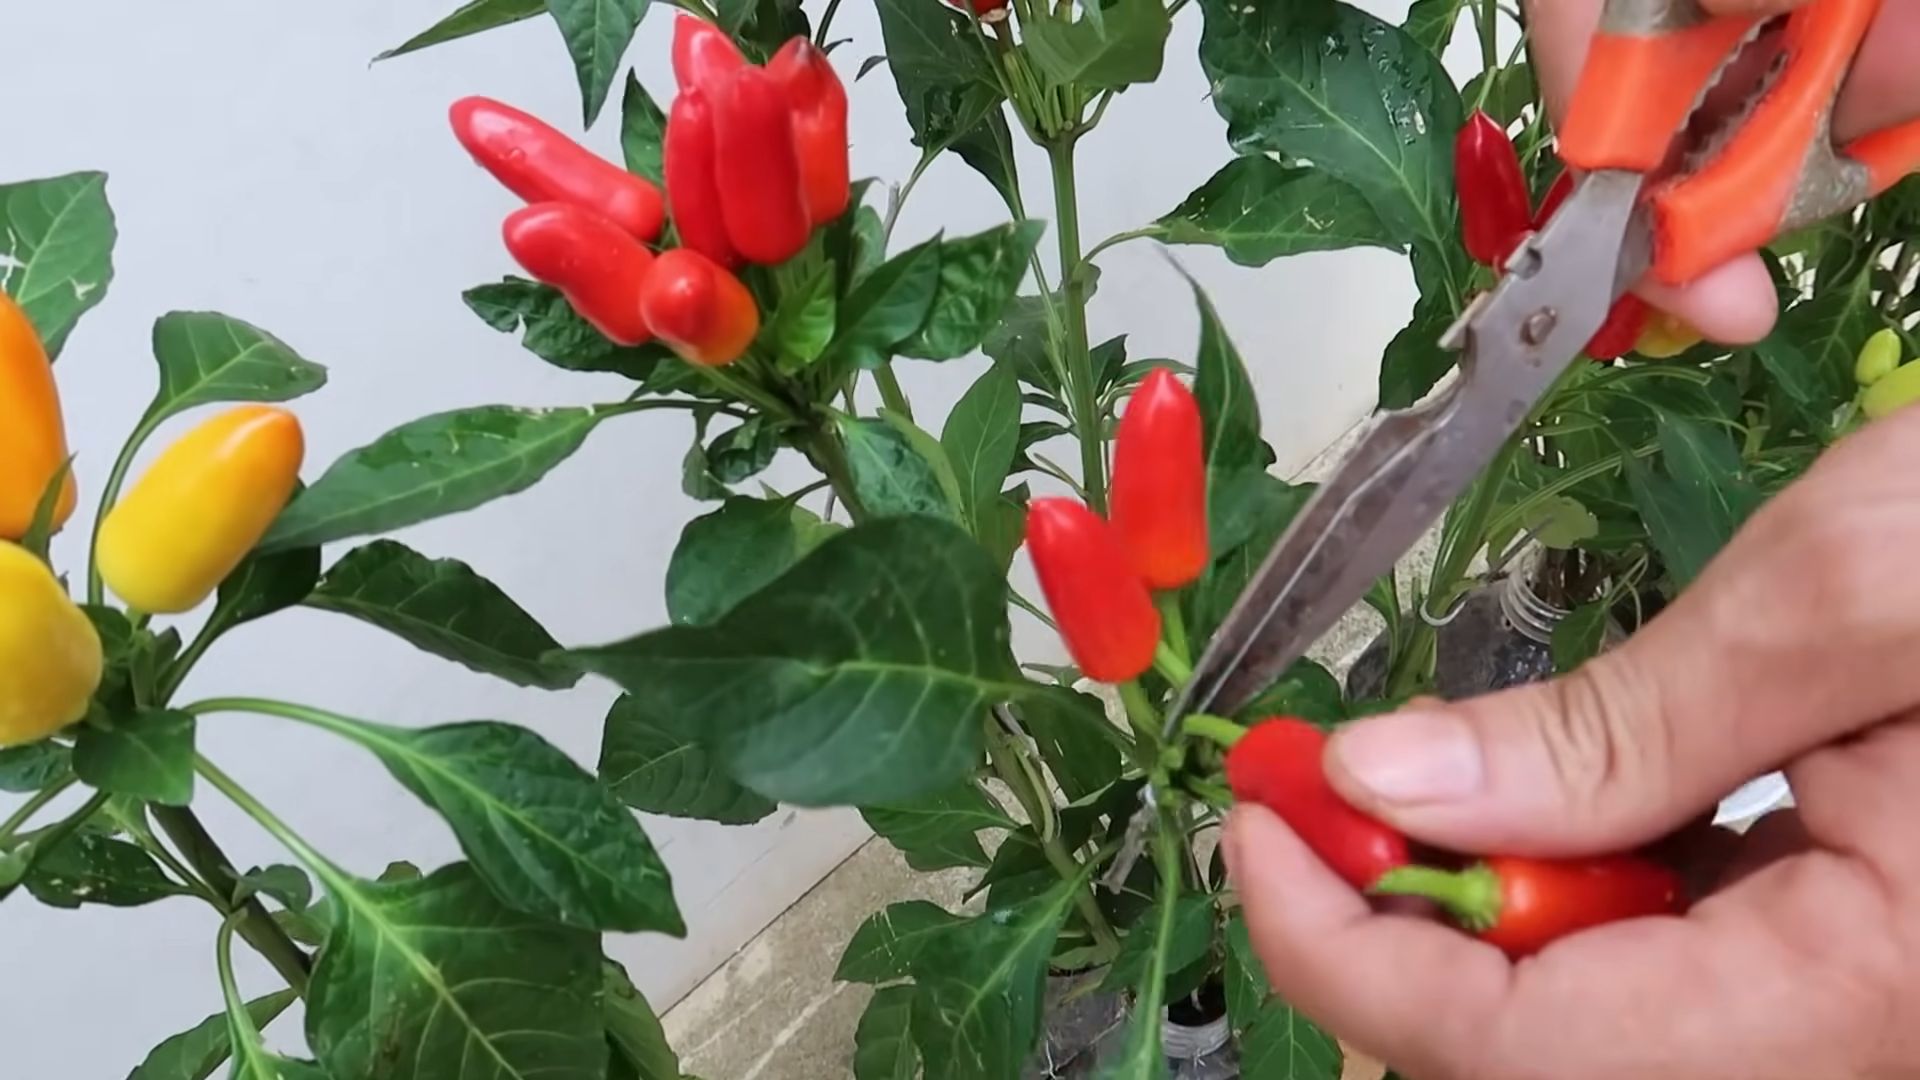
The best part of gardening is, of course, the harvest! Once your peppers are ripe and ready, carefully harvest them by cutting them off the plant with scissors or pruning shears. Enjoy your fresh, homegrown peppers in your favorite recipes!
I hope you found this guide helpful. Happy gardening!
Conclusion
So, there you have it! Transforming a simple plastic bottle into a thriving pepper garden is not just a fun project; it’s a sustainable, space-saving, and incredibly rewarding way to grow your own fresh produce. We’ve walked you through the steps, highlighting the ease and affordability of this DIY trick. But why is this a must-try?
Firstly, it’s about reclaiming and repurposing. Instead of contributing to plastic waste, you’re giving those bottles a new lease on life, turning them into miniature ecosystems for your pepper plants. This aligns with a more conscious and eco-friendly lifestyle, something we can all strive for.
Secondly, it’s about accessibility. Whether you live in a sprawling suburban home or a compact city apartment, space is often a limiting factor when it comes to gardening. This plastic bottle pepper garden solution eliminates that barrier, allowing you to cultivate delicious peppers even on a small balcony, patio, or windowsill. Imagine the satisfaction of harvesting your own homegrown peppers, knowing they were nurtured in a recycled container!
Thirdly, it’s about control. When you grow your own peppers, you have complete control over the growing environment and the inputs. You can choose organic soil, avoid harmful pesticides, and ensure your peppers are grown with love and care. This translates to healthier, tastier, and more nutritious produce for you and your family.
But the beauty of this DIY project lies in its adaptability. Feel free to experiment with different types of peppers. From fiery habaneros to sweet bell peppers, the possibilities are endless. You can also explore different bottle sizes and configurations to create a vertical garden that suits your aesthetic preferences. Consider painting the bottles to add a splash of color to your space or using different types of growing mediums to see what works best for your climate.
Don’t be afraid to get creative and personalize your plastic bottle pepper garden!
We encourage you to give this DIY trick a try. It’s a simple, cost-effective, and environmentally friendly way to enjoy fresh, homegrown peppers. Once you’ve set up your own plastic bottle pepper garden, we’d love to hear about your experience. Share your photos, tips, and variations in the comments below. Let’s build a community of resourceful gardeners who are passionate about sustainability and delicious peppers!
Growing your own food is empowering, and this plastic bottle pepper garden is a fantastic starting point. So, grab a plastic bottle, some soil, and your favorite pepper seeds, and get ready to embark on a rewarding gardening adventure. Happy growing!
Frequently Asked Questions (FAQ)
What type of plastic bottle is best for this project?
Ideally, you should use PET (Polyethylene Terephthalate) plastic bottles, which are commonly used for water and soda. These bottles are generally considered food-safe and durable enough to withstand the elements. Avoid using bottles made from PVC (Polyvinyl Chloride), as they can leach harmful chemicals into the soil. Make sure to thoroughly clean the bottles before using them to remove any residue.
What kind of soil should I use for my plastic bottle pepper garden?
A well-draining potting mix is essential for healthy pepper growth. You can purchase a pre-made potting mix from your local garden center or create your own by combining equal parts of peat moss, perlite, and vermiculite. Avoid using garden soil, as it can be too dense and may not provide adequate drainage. Adding compost to your potting mix will provide essential nutrients for your pepper plants.
How often should I water my plastic bottle pepper plants?
The frequency of watering will depend on the climate, the size of the bottle, and the type of pepper you are growing. Generally, you should water your plants when the top inch of soil feels dry to the touch. Avoid overwatering, as this can lead to root rot. Ensure that the bottles have adequate drainage holes to prevent water from accumulating at the bottom.
How much sunlight do pepper plants need?
Pepper plants thrive in full sun, which means they need at least 6-8 hours of direct sunlight per day. If you are growing your plants indoors, place them near a sunny window or use grow lights to supplement the natural light. Insufficient sunlight can result in leggy growth and reduced pepper production.
What kind of fertilizer should I use for my pepper plants?
Pepper plants are heavy feeders and require regular fertilization to produce abundant fruit. You can use a balanced liquid fertilizer, such as a 10-10-10 or 20-20-20 formula, diluted to half strength. Fertilize your plants every 2-3 weeks during the growing season. You can also use organic fertilizers, such as compost tea or fish emulsion.
How do I protect my pepper plants from pests and diseases?
Regularly inspect your plants for signs of pests, such as aphids, spider mites, and whiteflies. You can control these pests by spraying your plants with insecticidal soap or neem oil. To prevent fungal diseases, ensure that your plants have good air circulation and avoid overwatering. Remove any infected leaves or stems promptly.
Can I grow different types of peppers in the same plastic bottle garden?
While it’s possible to grow different types of peppers in the same garden, it’s generally recommended to keep similar varieties together. This is because different pepper varieties may have different watering and nutrient requirements. Additionally, cross-pollination can occur between different pepper varieties, which can affect the flavor and appearance of the fruit.
How long does it take for pepper plants to produce fruit?
The time it takes for pepper plants to produce fruit depends on the variety and growing conditions. Generally, it takes about 60-90 days from transplanting for pepper plants to start producing fruit. Hot peppers typically take longer to mature than sweet peppers.
What do I do if my pepper plants are not producing fruit?
There are several reasons why your pepper plants may not be producing fruit. These include insufficient sunlight, lack of pollination, nutrient deficiencies, and extreme temperatures. Ensure that your plants are getting enough sunlight, fertilize them regularly, and provide adequate watering. You can also hand-pollinate the flowers by gently shaking the plants or using a small brush to transfer pollen from one flower to another.
How do I harvest peppers from my plastic bottle garden?
Harvest peppers when they have reached their mature size and color. Use a sharp knife or scissors to cut the peppers from the plant, leaving a small stem attached. Handle the peppers carefully to avoid bruising them. Store harvested peppers in a cool, dry place.
Leave a Comment