
Potato Tub Gardening: Ever dreamt of harvesting a mountain of potatoes from your own backyard, even if you’re short on space? I know I have! Forget sprawling fields and back-breaking labor; the answer might just be simpler (and more contained) than you think. This DIY guide unlocks the secrets to bountiful potato harvests using just a humble tub.
Growing potatoes in containers isn’t a newfangled trend. In fact, container gardening has roots stretching back centuries, with evidence suggesting ancient civilizations used pots and raised beds to cultivate food in limited spaces. While not specifically “potato tub gardening” in the modern sense, the principle of maximizing yield in small areas is a time-honored tradition.
But why should *you* embrace potato tub gardening? Well, for starters, it’s incredibly space-efficient, perfect for balconies, patios, or even small urban gardens. Plus, it offers better control over soil quality and pest management, leading to healthier, more productive plants. Imagine the satisfaction of digging into your own homegrown potatoes, knowing exactly where they came from and how they were grown. This DIY project is not only rewarding but also a sustainable way to enjoy fresh produce. So, let’s dive in and discover how easy it is to master potato tub gardening and enjoy a potato feast!
Grow Your Own Spuds: A Beginner’s Guide to Potato Tub Gardening
Hey there, fellow garden enthusiasts! Ever dreamed of harvesting a mountain of potatoes from your own backyard, even if you don’t have a sprawling garden? Well, I’m here to tell you it’s totally possible with potato tub gardening! It’s a fun, easy, and incredibly rewarding way to grow your own spuds, and I’m going to walk you through every step.
What You’ll Need: Gathering Your Supplies
Before we get our hands dirty, let’s make sure we have everything we need. This is crucial for a smooth and successful potato-growing adventure.
* A Large Container: Think big! A 20-gallon container or larger is ideal. You can use a plastic tub, a large pot, a half-barrel, or even a repurposed trash can (just make sure it’s clean and has drainage holes). The bigger the container, the more potatoes you’ll potentially harvest.
* Seed Potatoes: These aren’t your regular grocery store potatoes. Seed potatoes are specifically grown for planting and are certified disease-free. You can find them at your local garden center or online. Choose a variety that suits your taste – Yukon Gold, Russet, Red Pontiac, the choice is yours!
* Potting Mix: Don’t use garden soil directly in your container. It’s too heavy and can compact, hindering drainage. Opt for a well-draining potting mix. You can also create your own mix by combining equal parts compost, peat moss (or coconut coir), and perlite or vermiculite.
* Fertilizer: Potatoes are heavy feeders, so a slow-release fertilizer is essential. Look for one specifically formulated for vegetables or a balanced fertilizer like 10-10-10.
* Watering Can or Hose: You’ll need a way to keep your potato plants well-hydrated.
* Optional:
* Chitting Tray or Egg Carton: For sprouting your seed potatoes (more on this later).
* Gloves: To keep your hands clean.
* Trowel or Small Shovel: For planting and adding soil.
Step-by-Step: Planting Your Seed Potatoes
Okay, now for the fun part! Let’s get those potatoes in the ground (or rather, in the tub!).
1. Chitting (Optional but Recommended): Chitting, or sprouting, your seed potatoes before planting gives them a head start. About 2-3 weeks before planting, place your seed potatoes in a cool, bright location (but not direct sunlight) in a chitting tray or egg carton. You’ll notice small “eyes” or sprouts starting to emerge. This process encourages faster growth once planted. If your seed potatoes already have sprouts, great! You can skip this step.
2. Cut Your Seed Potatoes (If Necessary): If your seed potatoes are large (bigger than an egg), you can cut them into smaller pieces. Each piece should have at least one or two “eyes” or sprouts. Let the cut pieces air dry for a day or two to allow the cut surfaces to callous over. This helps prevent rotting. If your seed potatoes are small, you can plant them whole.
3. Prepare Your Container: Make sure your container has adequate drainage holes. If not, drill a few. Add about 4-6 inches of potting mix to the bottom of the container.
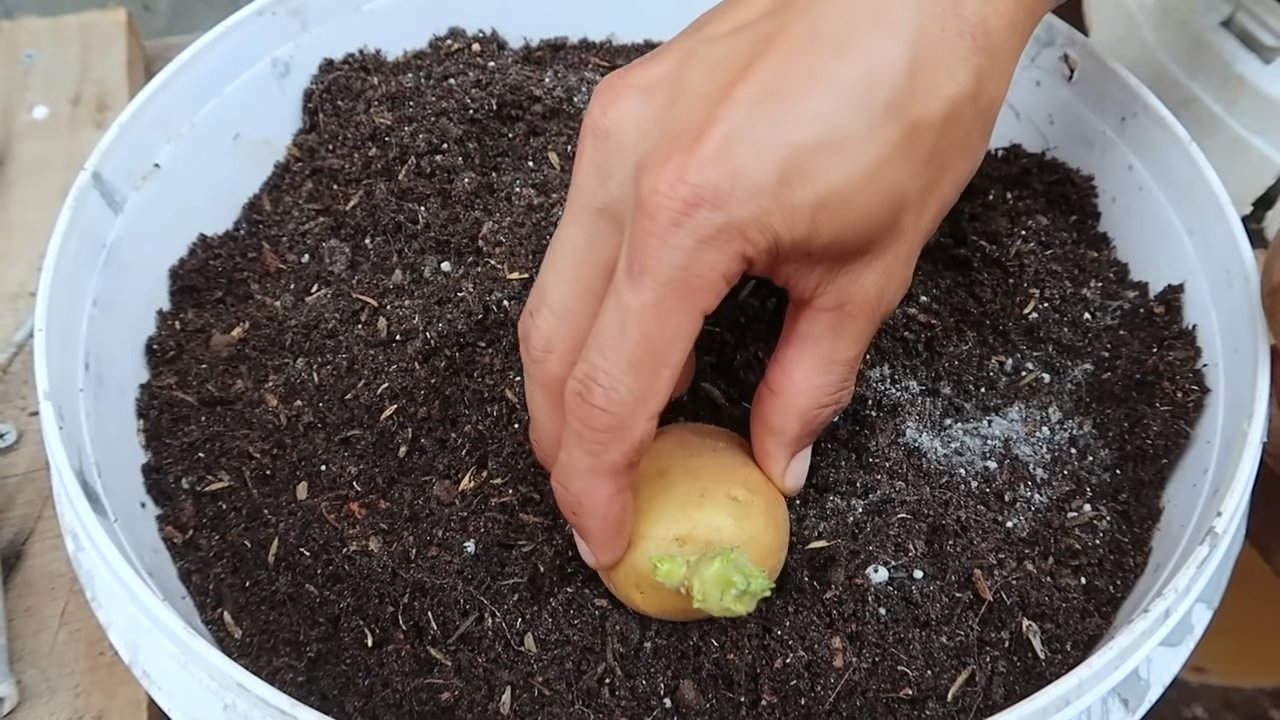
4. Plant Your Seed Potatoes: Place the seed potato pieces (or whole seed potatoes) on top of the soil, with the sprouts facing upwards. Space them evenly, about 8-10 inches apart. If you’re using a very large container, you can plant more than one seed potato.
5. Cover with Soil: Cover the seed potatoes with another 4-6 inches of potting mix. Gently water the soil until it’s moist but not soggy.
6. Fertilize: Sprinkle a small amount of slow-release fertilizer on top of the soil, following the instructions on the fertilizer package.
7. Place in a Sunny Location: Potatoes need at least 6-8 hours of sunlight per day. Choose a sunny spot in your yard or on your patio.
The “Hilling” Process: Encouraging More Potatoes
This is where the magic happens! “Hilling” is the process of adding more soil to the container as the potato plants grow. This encourages the plants to produce more potatoes along the buried stems.
1. Wait for Growth: Once the potato plants emerge from the soil and reach about 6-8 inches tall, it’s time to start hilling.
2. Add More Soil: Add another 4-6 inches of potting mix to the container, burying the lower portion of the stems. Leave the top few inches of leaves exposed.
3. Repeat the Process: Continue to add soil every few weeks as the plants grow, until the container is almost full. This process encourages the plant to produce more potatoes along the buried stem.
4. Water Regularly: Keep the soil consistently moist, but not waterlogged. Water deeply whenever the top inch of soil feels dry.
5. Fertilize Again: About halfway through the growing season, give your potato plants another dose of slow-release fertilizer.
Caring for Your Potato Plants: Keeping Them Happy and Healthy
A little TLC goes a long way in ensuring a bountiful harvest.
1. Watering: As I mentioned before, consistent watering is key. Potatoes need plenty of moisture, especially during hot weather. Check the soil moisture regularly and water accordingly.
2. Fertilizing: Potatoes are heavy feeders, so don’t skimp on the fertilizer. Follow the instructions on your fertilizer package for application rates and frequency.
3. Pest Control: Keep an eye out for common potato pests like aphids, potato beetles, and flea beetles. You can control these pests with insecticidal soap, neem oil, or by hand-picking them off the plants.
4. Disease Prevention: Potatoes can be susceptible to diseases like early blight and late blight. To prevent these diseases, ensure good air circulation around the plants, avoid overhead watering, and use disease-resistant potato varieties.
5. Sunlight: Ensure your potato plants are getting at least 6-8 hours of sunlight per day. If they’re not getting enough sunlight, the plants will be leggy and produce fewer potatoes.
Harvest Time: Digging Up Your Treasure
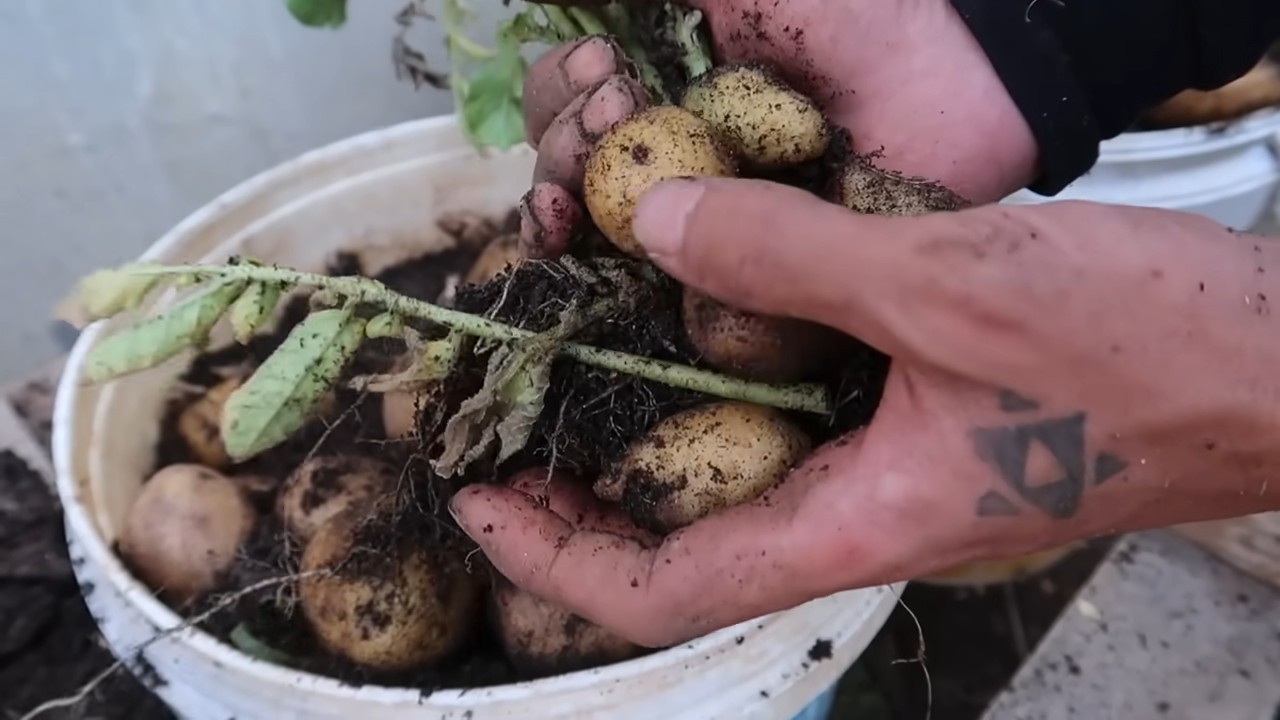
This is the moment you’ve been waiting for! Harvesting your own potatoes is incredibly satisfying.
1. When to Harvest: You can start harvesting “new potatoes” (small, tender potatoes) about 2-3 weeks after the plants flower. To harvest new potatoes, carefully dig around the base of the plant and remove a few potatoes. Be careful not to disturb the rest of the plant. For mature potatoes, wait until the foliage starts to turn yellow and die back. This usually happens about 80-100 days after planting.
2. How to Harvest: Gently tip the container onto its side and carefully remove the soil, searching for the potatoes. You can also use a garden fork to loosen the soil and lift out the potatoes. Be careful not to damage the potatoes during harvesting.
3. Curing Your Potatoes: After harvesting, cure your potatoes by spreading them out in a cool, dark, and well-ventilated place for about a week. This allows the skins to harden and helps prevent rotting during storage.
4. Storing Your Potatoes: Store your cured potatoes in a cool, dark, and dry place, such as a root cellar or a basement. Avoid storing them in the refrigerator, as this can cause them to convert starch to sugar, making them taste sweet.
Troubleshooting: Common Problems and Solutions
Even with the best planning, you might encounter a few hiccups along the way. Here are some common problems and how to fix them:
* Yellowing Leaves: This could be a sign of overwatering, underwatering, nutrient deficiency, or disease. Check the soil moisture, fertilize if necessary, and look for signs of pests or diseases.
* Leggy Plants: This usually indicates insufficient sunlight. Move your container to a sunnier location.
* Small Potatoes: This could be due to insufficient watering, nutrient deficiency, or overcrowding. Make sure you’re watering regularly, fertilizing properly, and using a large enough container.
* Rotting Potatoes: This is usually caused by overwatering or poor drainage. Ensure your container has adequate drainage holes and avoid overwatering.
Enjoy Your Homegrown Potatoes!
And there you have it! You’ve successfully grown your own potatoes in a tub. Now you can enjoy the fruits (or rather, the vegetables) of your labor. Use your homegrown potatoes in your favorite recipes, share them with friends and family, or simply savor the satisfaction of knowing you grew them yourself. Happy gardening!
Conclusion
So, there you have it! Potato tub gardening is more than just a quirky gardening trend; it’s a genuinely effective and rewarding way to grow your own delicious potatoes, even if you’re short on space or gardening experience. We’ve walked you through the process, from selecting the right seed potatoes to understanding the “hilling” technique that maximizes your yield. But why should you actually give this a try?
Firstly, the sheer convenience of potato tub gardening is undeniable. No more back-breaking digging in vast garden beds! Everything is contained, manageable, and easily accessible. This makes it perfect for balconies, patios, or even small yards. Secondly, the yield from a single tub can be surprisingly impressive. You’ll be amazed at the abundance of fresh, homegrown potatoes you can harvest from such a compact space. Imagine the satisfaction of serving a meal featuring potatoes you nurtured from sprout to spud!
Beyond the practical benefits, potato tub gardening offers a unique connection to your food. You get to witness the entire life cycle of the potato, from the initial planting to the final harvest. This hands-on experience is incredibly educational and deeply satisfying. It’s a fantastic way to teach children about where their food comes from and to foster a love for gardening.
Looking for variations? Absolutely! Experiment with different potato varieties to discover your favorites. Russets, Yukon Golds, red potatoes – the possibilities are endless. You can also try companion planting in your tub. Marigolds, for example, can help deter pests, while herbs like basil can enhance the flavor of your potatoes. Consider adding a layer of compost tea every few weeks to give your plants an extra boost of nutrients.
Don’t be afraid to get creative with your container. While a standard plastic tub works perfectly well, you can also use repurposed barrels, large buckets, or even old tires (just be sure to drill drainage holes). The key is to choose a container that’s large enough to accommodate the growing potato plants and provides adequate drainage.
We strongly encourage you to embrace the joys of potato tub gardening. It’s a fun, easy, and rewarding way to grow your own food, regardless of your gardening experience. The taste of freshly harvested, homegrown potatoes is simply unbeatable.
Now, it’s your turn! Grab a tub, some seed potatoes, and get planting. We’re confident that you’ll be thrilled with the results. And most importantly, we want to hear about your experiences. Share your photos, tips, and stories with us in the comments below. Let’s build a community of potato tub gardening enthusiasts and inspire others to grow their own food! Happy gardening!
Frequently Asked Questions (FAQ)
What are seed potatoes and where can I get them?
Seed potatoes are potatoes specifically grown to be planted and grown into new potato plants. They are different from the potatoes you buy at the grocery store, which may have been treated to prevent sprouting. Seed potatoes are certified disease-free and are more likely to produce a healthy and abundant crop. You can purchase seed potatoes from local nurseries, garden centers, or online retailers specializing in gardening supplies. Look for varieties that are well-suited to your climate and growing conditions.
How do I prepare my seed potatoes before planting?
Chitting, or pre-sprouting, your seed potatoes can give them a head start and result in an earlier harvest. To chit your potatoes, place them in a cool, bright location (but not in direct sunlight) for a few weeks before planting. You’ll notice small, green sprouts emerging from the “eyes” of the potato. Once the sprouts are about an inch long, they’re ready to be planted. If your seed potatoes are large, you can cut them into smaller pieces, ensuring that each piece has at least one or two eyes. Allow the cut surfaces to dry and callous over for a day or two before planting to prevent rotting.
What kind of soil should I use for potato tub gardening?
Potatoes prefer well-draining, slightly acidic soil. A good potting mix is essential for successful potato tub gardening. Avoid using garden soil, as it can be too heavy and compacted, hindering drainage and root growth. A mix of equal parts potting soil, compost, and peat moss or coco coir is ideal. This combination provides good drainage, aeration, and nutrient retention. You can also add a slow-release fertilizer to the soil mix to provide a steady supply of nutrients throughout the growing season.
How often should I water my potato tub?
Watering frequency depends on the weather conditions and the size of your tub. Generally, you should water your potato plants when the top inch of soil feels dry to the touch. Avoid overwatering, as this can lead to root rot. During hot, dry weather, you may need to water daily. In cooler, wetter weather, you may only need to water every few days. Ensure that the water drains freely from the bottom of the tub.
What does “hilling” mean, and why is it important?
Hilling is the process of adding more soil to the base of the potato plants as they grow. This encourages the plants to produce more potatoes along the buried stems. As the potato plants grow taller, gradually add more soil to the tub, covering the lower portion of the stems. Leave only the top few inches of the plant exposed. Repeat this process every few weeks until the tub is nearly full. Hilling is crucial for maximizing your potato yield.
How do I know when my potatoes are ready to harvest?
The timing of your potato harvest depends on the variety you’re growing. Generally, potatoes are ready to harvest when the plants begin to flower. You can harvest “new potatoes” (small, tender potatoes) a few weeks after flowering. For larger, more mature potatoes, wait until the foliage begins to yellow and die back. This indicates that the potatoes have stopped growing and are ready to be harvested.
How do I harvest my potatoes from the tub?
Harvesting potatoes from a tub is much easier than digging them up from a garden bed. Simply tip the tub over and gently sift through the soil to find the potatoes. Be careful not to damage the potatoes with your hands or tools. Once you’ve harvested all the potatoes, you can reuse the soil for other gardening projects.
What are some common pests and diseases that affect potato plants?
Common pests that can affect potato plants include aphids, potato beetles, and flea beetles. Diseases include blight, scab, and root rot. Regularly inspect your plants for signs of pests or diseases. You can use organic pest control methods, such as insecticidal soap or neem oil, to control pests. Ensure good drainage to prevent root rot. Choose disease-resistant potato varieties whenever possible.
Can I grow potatoes in a container indoors?
While it’s possible to grow potatoes indoors, it’s more challenging than growing them outdoors. Potatoes need plenty of sunlight to thrive. If you don’t have a sunny window, you’ll need to supplement with grow lights. Indoor potato plants may also be more susceptible to pests and diseases. For best results, we recommend growing potatoes outdoors in a tub or container.
What do I do with my potatoes after harvesting them?
After harvesting, cure your potatoes by spreading them out in a cool, dry, and dark place for a week or two. This allows the skins to harden, which helps to prevent spoilage. Store your cured potatoes in a cool, dark, and well-ventilated place, such as a root cellar or basement. Properly stored potatoes can last for several months.

Leave a Comment