
Pumpkin harvest tips are essential for any gardener dreaming of carving spooky jack-o’-lanterns or baking delicious pumpkin pies this fall! Imagine this: you’ve nurtured your pumpkin patch all summer, carefully watering and weeding, envisioning a bountiful harvest. But what if you pick them too early, or worse, let them rot on the vine? That’s where these crucial tips come in.
Pumpkins have a rich history, dating back thousands of years to Central America, where they were valued for both their flesh and their seeds. Native American cultures even used dried pumpkin shells as bowls and containers! Today, pumpkins are a symbol of autumn and a beloved ingredient in countless recipes. But getting the timing right for your pumpkin harvest tips is key to enjoying all that these versatile gourds have to offer.
I know, I know, gardening can sometimes feel like a guessing game. But with a little knowledge and these simple DIY tricks, you can ensure a successful pumpkin harvest. We’ll cover everything from identifying signs of ripeness to proper harvesting techniques and even storage solutions. So, ditch the guesswork and get ready to reap the rewards of your hard work! Let’s dive in and make this pumpkin season your best one yet!
Kürbisernte leicht gemacht: Dein DIY-Leitfaden für eine reiche Ernte
Hallo liebe Gartenfreunde! Die Blätter färben sich, die Luft wird kühler und die Kürbisse leuchten in allen Farben – es ist Erntezeit! Aber wann genau ist der richtige Zeitpunkt, um deine Kürbisse zu ernten, und wie machst du das am besten? Keine Sorge, ich zeige dir in diesem Artikel alles, was du wissen musst, um eine reiche und erfolgreiche Kürbisernte einzufahren.
Wann ist der richtige Zeitpunkt für die Kürbisernte?
Das ist die Millionen-Dollar-Frage, oder? Es gibt ein paar klare Anzeichen, die dir verraten, wann deine Kürbisse bereit sind für die Ernte:
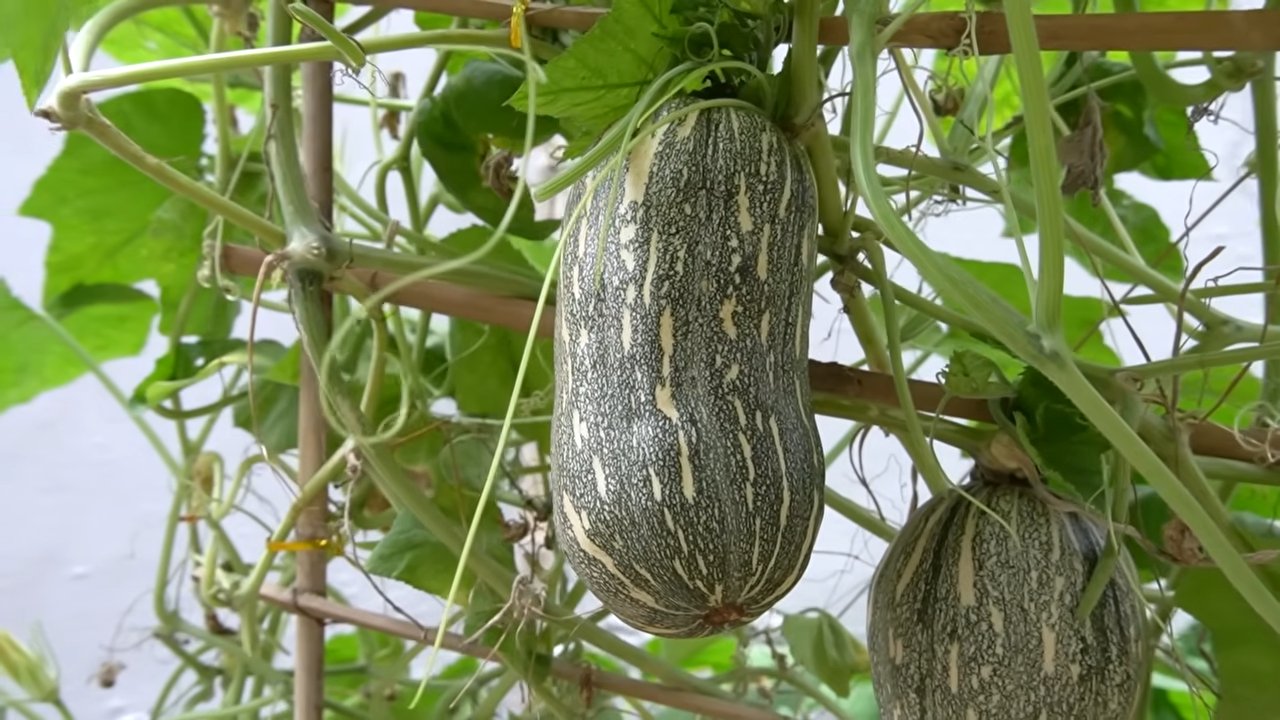
* Die Farbe: Die Kürbisse sollten ihre endgültige, sortentypische Farbe erreicht haben. Ein Hokkaidokürbis sollte also leuchtend orange sein, ein Butternutkürbis ein sattes Beige.
* Die Schale: Die Schale sollte hart und widerstandsfähig sein. Mach den Klopf-Test! Wenn du auf den Kürbis klopfst und er hohl klingt, ist das ein gutes Zeichen.
* Der Stiel: Der Stiel sollte trocken, holzig und leicht braun sein. Wenn der Stiel noch grün und saftig ist, ist der Kürbis noch nicht reif.
* Die Blätter: Die Blätter der Kürbispflanze beginnen zu welken und abzusterben. Das ist ein Zeichen dafür, dass die Pflanze ihre Energie in die Reifung der Früchte steckt.
* Die Fingernagelprobe: Versuche, mit deinem Fingernagel die Schale des Kürbisses einzudrücken. Wenn das nicht gelingt, ist der Kürbis reif.
Achtung: Ernte deine Kürbisse unbedingt vor dem ersten Frost! Frost kann die Kürbisse beschädigen und ihre Lagerfähigkeit beeinträchtigen.
Werkzeug und Vorbereitung für die Kürbisernte
Bevor du loslegst, solltest du dir das richtige Werkzeug bereitlegen:
* Ein scharfes Messer oder eine Gartenschere: Damit schneidest du den Stiel des Kürbisses ab.
* Handschuhe: Kürbispflanzen können stachelig sein, also schütze deine Hände.
* Eine Schubkarre oder einen stabilen Korb: Damit transportierst du die geernteten Kürbisse.
* Eine weiche Bürste oder ein Tuch: Damit reinigst du die Kürbisse von Erde und Schmutz.
* Desinfektionsmittel: Um das Messer/die Schere vor und nach dem Schneiden zu desinfizieren.
Schritt-für-Schritt-Anleitung zur Kürbisernte
Jetzt geht’s ans Eingemachte! Folge diesen Schritten, um deine Kürbisse sicher und erfolgreich zu ernten:
1. Wähle den richtigen Tag: Ernte deine Kürbisse an einem trockenen, sonnigen Tag. So können sie gut abtrocknen und sind weniger anfällig für Fäulnis.
2. Schneide den Stiel ab: Schneide den Stiel des Kürbisses mit einem scharfen Messer oder einer Gartenschere ab. Lass dabei etwa 5-10 cm Stiel am Kürbis. Wichtig: Reiße den Stiel nicht ab, da dies die Kürbisse beschädigen kann.
3. Reinige die Kürbisse: Entferne vorsichtig Erde und Schmutz von den Kürbissen mit einer weichen Bürste oder einem Tuch.
4. Transportiere die Kürbisse: Lege die Kürbisse vorsichtig in eine Schubkarre oder einen stabilen Korb und transportiere sie an einen trockenen, gut belüfteten Ort.
5. Lass die Kürbisse aushärten: Lass die Kürbisse etwa 1-2 Wochen an einem warmen, trockenen Ort aushärten. Dadurch härtet die Schale aus und die Kürbisse sind länger haltbar.
Die Aushärtungsphase: So machst du deine Kürbisse haltbar
Die Aushärtungsphase ist entscheidend für die Lagerfähigkeit deiner Kürbisse. Hier sind ein paar Tipps, wie du sie optimal gestaltest:
* Der richtige Ort: Wähle einen warmen, trockenen und gut belüfteten Ort. Ein Gewächshaus, eine Garage oder ein Schuppen sind ideal.
* Die richtige Temperatur: Die Temperatur sollte zwischen 20 und 25 Grad Celsius liegen.
* Die richtige Luftfeuchtigkeit: Die Luftfeuchtigkeit sollte niedrig sein, um Fäulnis zu vermeiden.
* Die richtige Lagerung: Lege die Kürbisse nebeneinander, so dass sie sich nicht berühren. Achte darauf, dass der Stiel nach oben zeigt.
* Kontrolle: Überprüfe die Kürbisse regelmäßig auf Anzeichen von Fäulnis. Entferne beschädigte Kürbisse sofort, um die Ausbreitung von Fäulnis zu verhindern.
Kürbisse richtig lagern: Tipps für eine lange Haltbarkeit
Nach der Aushärtungsphase kannst du deine Kürbisse lagern. Hier sind ein paar Tipps, wie du sie möglichst lange haltbar machst:
* Der richtige Ort: Lagere die Kürbisse an einem kühlen, trockenen und dunklen Ort. Ein Keller oder eine Speisekammer sind ideal.
* Die richtige Temperatur: Die Temperatur sollte zwischen 10 und 15 Grad Celsius liegen.
* Die richtige Lagerung: Lege die Kürbisse nebeneinander, so dass sie sich nicht berühren. Achte darauf, dass der Stiel nach oben zeigt.
* Kontrolle: Überprüfe die Kürbisse regelmäßig auf Anzeichen von Fäulnis. Entferne beschädigte Kürbisse sofort, um die Ausbreitung von Fäulnis zu verhindern.
* Sortenspezifische Lagerung: Einige Kürbissorten sind länger haltbar als andere. Hokkaidokürbisse können zum Beispiel bis zu 6 Monate gelagert werden, während Butternutkürbisse etwa 3 Monate haltbar sind. Informiere dich über die spezifischen Lageranforderungen deiner Kürbissorten.
Häufige Fehler bei der Kürbisernte und wie du sie vermeidest
Auch bei der Kürbisernte kann man Fehler machen. Hier sind ein paar häufige Fehler und wie du sie vermeidest:
* Zu frühe Ernte: Ernte deine Kürbisse nicht zu früh, da sie dann nicht richtig reifen und nicht lange haltbar sind. Warte, bis die oben genannten Reifezeichen deutlich erkennbar sind.
* Beschädigung des Stiels: Beschädige den Stiel beim Abschneiden nicht, da dies die Kürbisse anfälliger für Fäulnis macht. Schneide den Stiel sauber mit einem scharfen Messer oder einer Gartenschere ab.
* Beschädigung der Schale: Beschädige die Schale der Kürbisse nicht, da dies ebenfalls die Anfälligkeit für Fäulnis erhöht. Behandle die Kürbisse vorsichtig und vermeide Stöße und Kratzer.
* Falsche Lagerung: Lagere die Kürbisse nicht an einem feuchten oder warmen Ort, da dies die Fäulnis fördert. Wähle einen kühlen, trockenen und dunklen Ort.
* Vernachlässigung der Kontrolle: Überprüfe die Kürbisse regelmäßig auf Anzeichen von Fäulnis. Entferne beschädigte Kürbisse sofort, um die Ausbreitung von Fäulnis zu verhindern.
Kürbisernte und das Wetter: Was du beachten musst
Das Wetter spielt eine wichtige Rolle bei der Kürbisernte. Hier sind ein paar Dinge, die du beachten solltest:
* Regen: Ernte deine Kürbisse nicht, wenn es regnet, da sie dann zu feucht sind und anfälliger für Fäulnis. Warte auf einen trockenen Tag.
* Frost: Ernte deine Kürbisse unbedingt vor dem ersten Frost, da Frost die Kürbisse beschädigen und ihre Lagerfähigkeit beeinträchtigen kann.
* Sonne: Lass die Kürbisse nach der Ernte nicht zu lange in der prallen Sonne liegen, da sie sonst austrocknen können.
Kürbisernte und Schädlinge: So schützt du deine Ernte
Auch Schädlinge können deine Kürbisernte beeinträchtigen. Hier sind ein paar Tipps, wie du deine Ernte schützen kannst:
* Schnecken: Schnecken können an den Kürbissen fressen
Conclusion
So, there you have it! Mastering these pumpkin harvest tips isn’t just about bringing in a beautiful bounty; it’s about ensuring you enjoy the fruits (or rather, vegetables!) of your labor for months to come. From carefully assessing ripeness to employing the right cutting techniques and providing proper curing conditions, each step plays a crucial role in maximizing the flavor, texture, and longevity of your pumpkins.
Why is this a must-try? Because store-bought pumpkins, while convenient, often lack the depth of flavor and the sheer satisfaction that comes from nurturing your own crop. Plus, knowing exactly when and how to harvest your pumpkins allows you to select the perfect specimens for pies, soups, decorations, or even carving masterpieces. You’ll be amazed at the difference in taste and texture compared to pumpkins that have been sitting on grocery store shelves for weeks.
Don’t be afraid to experiment with variations! Try different curing locations – a sunny porch versus a cool, dry basement – and observe how it affects the pumpkin’s storage life. Consider leaving a slightly longer stem on some pumpkins for decorative purposes, while trimming others closer for easier storage. You can even try different cleaning methods, such as gently wiping them down with a diluted vinegar solution to further inhibit mold growth.
We wholeheartedly encourage you to put these pumpkin harvest tips into practice this season. Whether you’re a seasoned gardener or a first-time pumpkin grower, the rewards of a successful harvest are well worth the effort. Imagine the delicious pies, the heartwarming soups, and the festive decorations you’ll create with your homegrown pumpkins!
And most importantly, we want to hear about your experience! Share your photos, stories, and any additional tips you’ve discovered in the comments below. Let’s create a community of pumpkin-loving gardeners who can learn from each other and celebrate the joy of the harvest. Happy harvesting!
Frequently Asked Questions (FAQ)
Q: How do I know when my pumpkins are truly ripe and ready to harvest?
A: Determining pumpkin ripeness is crucial for optimal flavor and storage. Look for several key indicators. First, the pumpkin’s skin should be a deep, rich color appropriate for its variety – whether that’s a vibrant orange, a deep green, or a creamy white. The skin should also be hard and resistant to scratching. You can test this by gently pressing your fingernail into the skin; if it doesn’t easily puncture, the pumpkin is likely ripe. Another telltale sign is the stem. A ripe pumpkin will have a stem that is dry, hard, and brown. If the stem is still green and pliable, the pumpkin needs more time to mature. Finally, listen to the sound the pumpkin makes when you tap it. A ripe pumpkin will produce a hollow sound, indicating that the flesh inside has matured.
Q: What’s the best way to cut the pumpkin from the vine without damaging it?
A: Using the right cutting technique is essential to prevent rot and extend the pumpkin’s storage life. Always use a sharp, clean knife or pruning shears. Cut the stem, leaving at least 3-4 inches attached to the pumpkin. Avoid pulling or twisting the pumpkin from the vine, as this can damage the stem and create an entry point for bacteria and fungi. Make a clean, angled cut to prevent water from pooling on the cut surface. Handle the pumpkin carefully to avoid bruising or scratching the skin.
Q: What are the ideal conditions for curing pumpkins after harvest?
A: Curing pumpkins is a vital step in preparing them for long-term storage. The ideal curing environment is warm, dry, and well-ventilated. A temperature range of 80-85°F (27-29°C) is optimal. Place the pumpkins in a single layer on a clean surface, such as a wooden pallet or a sheet of cardboard. Ensure that the pumpkins are not touching each other to allow for proper air circulation. Cure the pumpkins for 10-14 days, turning them occasionally to ensure even curing. Avoid curing pumpkins in direct sunlight, as this can cause them to overheat and spoil.
Q: How long can I expect my pumpkins to last after harvesting and curing them properly?
A: With proper harvesting and curing, most pumpkin varieties can last for 2-3 months, and some can even last longer. The key is to store them in a cool, dry, and well-ventilated location. An ideal storage temperature is between 50-60°F (10-15°C). Avoid storing pumpkins in areas that are prone to freezing or extreme temperature fluctuations. Regularly inspect your pumpkins for any signs of rot or soft spots. If you notice any problems, remove the affected pumpkin immediately to prevent the spread of spoilage to other pumpkins.
Q: What are some common mistakes to avoid when harvesting and storing pumpkins?
A: Several common mistakes can shorten the lifespan of your harvested pumpkins. One of the biggest mistakes is harvesting pumpkins before they are fully ripe. Another common error is damaging the stem during harvest, which can create an entry point for rot. Failing to cure pumpkins properly is another frequent mistake, as curing helps to harden the skin and prevent moisture loss. Storing pumpkins in a damp or poorly ventilated location can also lead to spoilage. Finally, handling pumpkins roughly and causing bruises or scratches can compromise their storage life.
Q: Can I harvest pumpkins after a light frost?
A: A light frost usually won’t damage mature pumpkins, but it’s best to harvest them before a hard freeze. If your pumpkins have been exposed to a light frost, inspect them carefully for any signs of damage. If the skin is still firm and undamaged, you can proceed with harvesting and curing as usual. However, if the pumpkins have been exposed to a hard freeze, they are likely to be damaged and will not store well. In this case, it’s best to use them as soon as possible.
Q: What if my pumpkin has a small bruise or scratch? Can I still store it?
A: Small bruises or scratches can sometimes be salvaged, but it’s important to monitor them closely. If the damage is minor, you can try applying a thin layer of petroleum jelly or beeswax to seal the area and prevent infection. However, if the bruise or scratch is deep or shows signs of rot, it’s best to use the pumpkin as soon as possible or discard it to prevent the spread of spoilage.
Q: Are there any specific pumpkin varieties that store better than others?
A: Yes, some pumpkin varieties are known for their excellent storage capabilities. Varieties like ‘Long Island Cheese,’ ‘Jarrahdale,’ and ‘Lakota’ are often praised for their long shelf life. These varieties tend to have thicker skins and denser flesh, which makes them more resistant to rot and moisture loss. When selecting pumpkin varieties for your garden, consider choosing those that are known for their storage potential if you plan to keep them for an extended period.
Q: Can I eat the seeds from my harvested pumpkins?
A: Absolutely! Pumpkin seeds are a delicious and nutritious snack. To prepare them, rinse the seeds thoroughly to remove any pulp. Spread them out in a single layer on a baking sheet and roast them in a preheated oven at 300°F (150°C) for 45-60 minutes, or until they are golden brown and crispy. Season them with salt, pepper, or your favorite spices for added flavor. Pumpkin seeds are a great source of protein, fiber, and healthy fats.
Leave a Comment