
Rooftop Bok Choy Gardening: Imagine stepping onto your rooftop and harvesting fresh, crisp Bok Choy right in the heart of the city! Sounds like a dream, right? Well, it doesn’t have to be! This DIY guide will unlock the secrets to successfully growing your own vibrant Bok Choy garden, even if you only have a small rooftop space.
Bok Choy, also known as Chinese cabbage, has been a staple in Asian cuisine for centuries. Its cultivation dates back to the 5th century in China, where it was prized for its nutritional value and versatility. Now, you can bring this ancient tradition to your own home, adding a touch of history and flavor to your meals.
Why should you try this DIY trick? Because fresh, homegrown produce tastes infinitely better than anything you can buy at the store! Plus, with rising food costs and concerns about pesticides, knowing exactly where your food comes from is more important than ever. Rooftop Bok Choy Gardening is not only a fun and rewarding hobby, but it’s also a sustainable way to supplement your diet with healthy, delicious greens. I’m excited to share my tips and tricks to help you get started, even if you’re a complete beginner. Let’s transform your rooftop into a thriving edible oasis!
Dein eigener Bok Choy Garten auf dem Dach: Eine Schritt-für-Schritt Anleitung
Hallo Gartenfreunde! Habt ihr schon mal darüber nachgedacht, euren eigenen Bok Choy auf dem Dach anzubauen? Es ist einfacher als ihr denkt und bringt frisches Gemüse direkt vor eure Haustür. Ich zeige euch, wie es geht!
Was du brauchst: Die Materialliste
Bevor wir loslegen, hier eine Liste mit allem, was du für deinen Dachgarten benötigst:
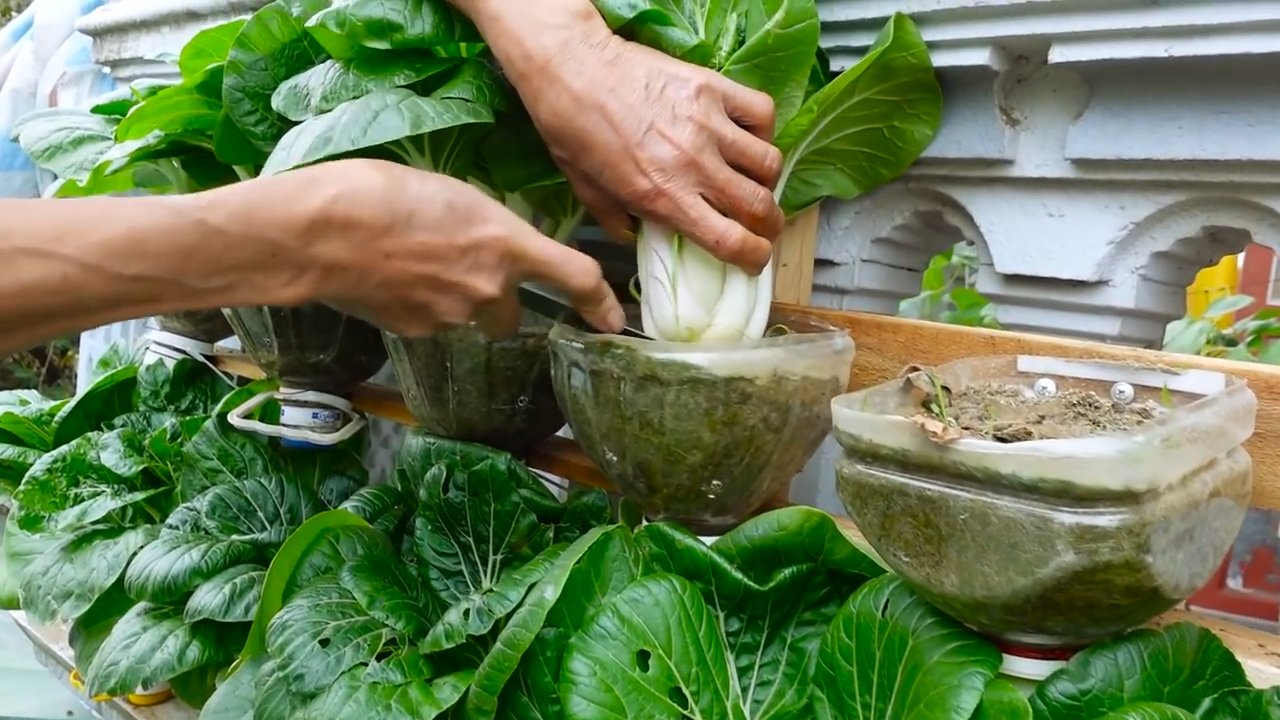
* Geeignete Pflanzgefäße: Wähle leichte, aber robuste Behälter mit guter Drainage. Denk daran, dass sie das Gewicht des Bodens und der Pflanzen tragen müssen. Kunststofftöpfe, Pflanzsäcke oder sogar recycelte Behälter (mit Löchern!) sind super.
* Hochwertige Pflanzerde: Verwende eine gut drainierende und nährstoffreiche Erde. Spezielle Gemüseerde ist ideal, aber du kannst auch Blumenerde mit Kompost mischen.
* Bok Choy Samen oder Jungpflanzen: Du kannst entweder mit Samen beginnen oder Jungpflanzen kaufen, um schneller Ergebnisse zu sehen. Ich persönlich mag es, mit Samen anzufangen, weil es so befriedigend ist, die kleinen Pflänzchen wachsen zu sehen.
* Drainagematerial: Kies, Blähton oder Tonscherben helfen, Staunässe zu vermeiden.
* Gießkanne oder Schlauch: Zum Bewässern deiner Pflanzen.
* Dünger: Ein organischer Gemüsedünger versorgt deine Pflanzen mit den nötigen Nährstoffen.
* Schaufel oder Kelle: Zum Befüllen der Pflanzgefäße.
* Handschuhe: Um deine Hände sauber zu halten.
* (Optional) Schneckenzaun oder Kupferband: Bok Choy ist leider sehr beliebt bei Schnecken.
* (Optional) Schattennetz: Wenn dein Dach sehr sonnig ist, kann ein Schattennetz die Pflanzen vor Verbrennungen schützen.
Vorbereitung ist alles: Der richtige Standort und die Pflanzgefäße
1. Standortwahl: Bok Choy braucht mindestens 4-6 Stunden Sonnenlicht pro Tag. Achte darauf, dass dein Dachgarten genügend Sonne abbekommt. Überprüfe auch, ob der Standort windgeschützt ist, da starker Wind die Pflanzen beschädigen kann.
2. Dachinspektion: Bevor du loslegst, solltest du sicherstellen, dass dein Dach das Gewicht der Pflanzgefäße tragen kann. Wenn du dir unsicher bist, frage einen Fachmann.
3. Pflanzgefäße vorbereiten: Reinige deine Pflanzgefäße gründlich. Lege eine Schicht Drainagematerial auf den Boden, um Staunässe zu vermeiden. Fülle die Gefäße dann mit Pflanzerde, aber lasse etwa 5 cm Platz bis zum Rand.
Aussaat oder Einpflanzen: Der Start deines Bok Choy Gartens
Aussaat von Bok Choy Samen
1. Aussaatzeitpunkt: Bok Choy ist ein kühles Wetter Gemüse. Die beste Zeit für die Aussaat ist im Frühjahr (März/April) oder im Spätsommer (August/September).
2. Aussaat: Säe die Samen etwa 1 cm tief und 2-3 cm auseinander in die Erde. Bedecke sie leicht mit Erde und gieße sie vorsichtig an.
3. Keimung: Die Samen keimen in der Regel innerhalb von 5-10 Tagen. Halte die Erde feucht, aber nicht nass.
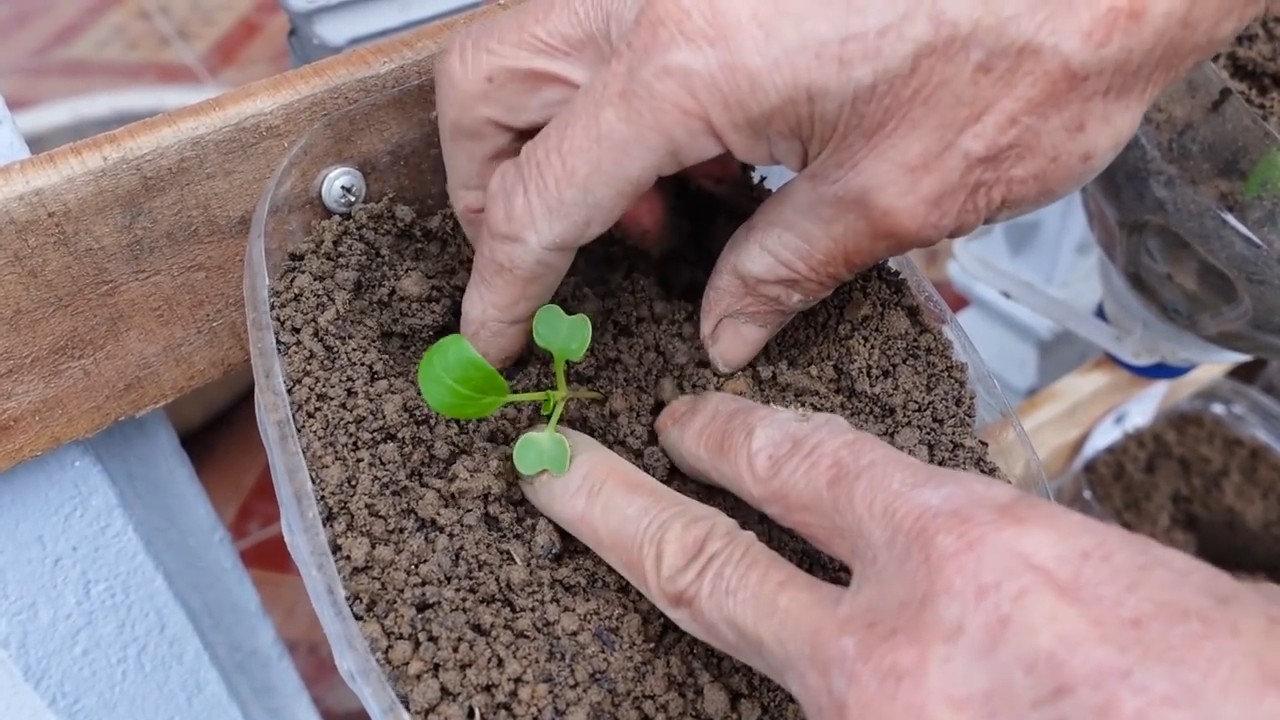
4. Vereinzeln: Sobald die Sämlinge ein paar Blätter haben, vereinzele sie, sodass die Pflanzen etwa 15-20 cm Abstand zueinander haben. Das gibt ihnen genug Platz zum Wachsen.
Einpflanzen von Bok Choy Jungpflanzen
1. Jungpflanzen auswählen: Wähle gesunde Jungpflanzen mit kräftigen Blättern. Vermeide Pflanzen, die gelb oder welk aussehen.
2. Einpflanzen: Grabe ein Loch, das groß genug für den Wurzelballen ist. Setze die Jungpflanze hinein und fülle das Loch mit Erde. Drücke die Erde leicht an und gieße die Pflanze gut an. Achte darauf, dass die Pflanzen etwa 15-20 cm Abstand zueinander haben.
Pflege und Gießen: Damit dein Bok Choy prächtig gedeiht
1. Gießen: Bok Choy braucht regelmäßige Bewässerung, besonders während trockener Perioden. Gieße die Pflanzen am besten früh morgens oder spät abends, um Verdunstung zu vermeiden. Die Erde sollte immer leicht feucht sein, aber nicht nass.
2. Düngen: Dünge deine Bok Choy Pflanzen alle 2-3 Wochen mit einem organischen Gemüsedünger. Befolge die Anweisungen auf der Verpackung.
3. Unkraut entfernen: Halte deine Pflanzgefäße unkrautfrei, da Unkraut Nährstoffe und Wasser raubt.
4. Schutz vor Schädlingen: Bok Choy ist anfällig für Schnecken und Kohlweißlinge. Sammle Schnecken regelmäßig ab oder verwende einen Schneckenzaun oder Kupferband. Gegen Kohlweißlinge kannst du ein Netz über die Pflanzen spannen.
5. Schattennetz (optional): Wenn die Sonne zu stark ist, verwende ein Schattennetz, um die Pflanzen vor Verbrennungen zu schützen. Besonders junge Pflanzen sind empfindlich.
Erntezeit: Dein selbst angebauter Bok Choy
1. Erntezeitpunkt: Bok Choy kann geerntet werden, sobald die Blätter groß genug sind. Das ist in der Regel etwa 4-6 Wochen nach dem Einpflanzen oder 6-8 Wochen nach der Aussaat der Fall.
2. Ernten: Du kannst entweder die ganze Pflanze ernten, indem du sie knapp über dem Boden abschneidest, oder nur einzelne Blätter, um die Pflanze weiter wachsen zu lassen. Wenn du einzelne Blätter erntest, beginne mit den äußeren Blättern.
3. Lagerung: Bok Choy ist im Kühlschrank etwa eine Woche haltbar. Wickle ihn in ein feuchtes Tuch, um ihn frisch zu halten.
Zusätzliche Tipps und Tricks für deinen Bok Choy Dachgarten
* Fruchtfolge: Um Krankheiten und Schädlinge zu vermeiden, solltest du Bok Choy nicht jedes Jahr am selben Standort anbauen. Wechsle die Pflanzen mit anderen Gemüsesorten ab.
* Begleitpflanzen: Pflanze Ringelblumen oder Kapuzinerkresse in der Nähe deines Bok Choy, um Schädlinge abzuschrecken.
* Mulchen: Eine Schicht Mulch (z.B. Stroh oder Holzhackschnitzel) hilft, die Feuchtigkeit im Boden zu halten und Unkraut zu unterdrücken.
* Beobachtung: Beobachte deine Pflanzen regelmäßig auf Anzeichen von Krankheiten oder Schädlingen. Je früher du Probleme erkennst, desto einfacher ist es, sie zu beheben.
* Sortenwahl: Es gibt verschiedene Bok Choy Sorten. Probiere verschiedene Sorten aus, um herauszufinden, welche dir am besten schmeckt und am besten auf deinem Dachgarten gedeiht. Beliebte Sorten sind ‘Joi Choi’, ‘Mei Qing Choi’ und ‘Shanghai Green’.
* Vertikale Gärten: Wenn du wenig Platz hast, kannst du auch einen vertikalen Garten anlegen. Verwende hängende Töpfe oder eine vertikale Pflanzwand, um deinen Bok Choy anzubauen.
* Recycling: Verwende recycelte Behälter als Pflanzgefäße. Alte Eimer, Plastikflaschen oder sogar Autoreifen können in tolle Pflanzgefäße verwandelt werden. Achte nur darauf, dass sie Löcher für die Drainage haben.
* Kompost: Verwende deinen eigenen Kompost, um deine Pflanzen mit Nährstoffen zu versorgen. Kompost ist ein toller organischer Dünger und hilft, Abfall zu reduzieren.
* Experimentieren: Hab keine Angst, zu experimentieren! Gartenarbeit ist ein Lernprozess. Probiere verschiedene Techniken aus und finde heraus, was für dich am besten funktioniert.
Ich hoffe, diese Anleitung hilft dir dabei, deinen eigenen Bok Choy Garten auf dem Dach anzulegen. Es ist ein tolles Gefühl, frisches Gemüse selbst anzubauen und zu ernten. Viel Spaß beim Gärtnern! Und denk daran: Auch wenn mal etwas schief geht, lass dich nicht entmutigen. Jeder Gärtner
Conclusion
So, there you have it! Transforming your rooftop into a thriving bok choy garden is not only achievable but also incredibly rewarding. We’ve walked you through the essential steps, from selecting the right containers and soil to nurturing your plants and protecting them from the elements. But why is this DIY rooftop bok choy gardening endeavor a must-try?
Firstly, imagine the satisfaction of harvesting fresh, crisp bok choy just steps from your kitchen. No more trips to the grocery store, no more wondering about the origins of your produce. You’ll have complete control over the growing process, ensuring that your bok choy is organic, pesticide-free, and bursting with flavor. This is especially important in urban environments where access to fresh, locally grown produce can be limited.
Secondly, rooftop gardening offers a fantastic way to utilize otherwise unused space. If you live in an apartment or condo with limited yard space, your rooftop can become a valuable asset, providing you with a green oasis in the midst of the concrete jungle. It’s a chance to reconnect with nature, reduce your carbon footprint, and create a beautiful and productive space for yourself and your family.
Thirdly, growing your own bok choy is a surprisingly therapeutic activity. The simple act of tending to your plants, watching them grow, and nurturing them to maturity can be incredibly calming and stress-relieving. It’s a chance to slow down, disconnect from the digital world, and reconnect with the natural rhythms of life.
But the possibilities don’t stop there! Feel free to experiment with different varieties of bok choy, such as baby bok choy or Shanghai bok choy. You can also companion plant your bok choy with other vegetables and herbs, such as radishes, carrots, or cilantro, to create a diverse and thriving rooftop ecosystem. Consider adding a small composting system to recycle kitchen scraps and enrich your soil naturally. You could even incorporate a rainwater harvesting system to conserve water and further reduce your environmental impact.
Don’t be afraid to get creative and personalize your rooftop garden to suit your own tastes and preferences. Add some colorful flowers, decorative stones, or even a small water feature to create a truly unique and inviting space.
We understand that starting a rooftop garden can seem daunting at first, but we encourage you to take the plunge and give it a try. The rewards are well worth the effort. And remember, even if you encounter some challenges along the way, don’t give up! Gardening is a learning process, and every mistake is an opportunity to grow and improve.
So, grab your gardening gloves, gather your supplies, and get ready to transform your rooftop into a bountiful bok choy paradise. We’re confident that you’ll be amazed at what you can achieve.
We’d love to hear about your experiences with rooftop bok choy gardening. Share your tips, tricks, and photos in the comments below. Let’s create a community of rooftop gardeners and inspire others to embrace the joys of growing their own food. Happy gardening!
Frequently Asked Questions (FAQ)
What are the best containers for growing bok choy on a rooftop?
Choosing the right containers is crucial for successful rooftop bok choy gardening. Opt for containers that are at least 12 inches deep and wide to provide ample space for the roots to grow. Consider the weight of the containers, especially when filled with soil and water, to ensure that your rooftop can support them. Lightweight materials like plastic or fiberglass are good options. Drainage is also essential, so make sure your containers have drainage holes to prevent waterlogging. Fabric pots are another excellent choice as they allow for good drainage and aeration, preventing root rot. Remember to consider the aesthetic appeal as well – choose containers that complement your rooftop space and personal style.
How often should I water my rooftop bok choy plants?
Watering frequency depends on several factors, including the weather, the type of container you’re using, and the stage of growth of your bok choy plants. Generally, you should water your plants when the top inch of soil feels dry to the touch. During hot, sunny weather, you may need to water them daily, while during cooler, cloudy weather, you may only need to water them every few days. Avoid overwatering, as this can lead to root rot. Water deeply, ensuring that the water reaches the roots. Consider using a watering can or a soaker hose to deliver water directly to the soil, avoiding wetting the leaves, which can increase the risk of fungal diseases. Mulching around your plants can also help to retain moisture in the soil.
What kind of soil is best for rooftop bok choy gardening?
Bok choy thrives in well-draining, fertile soil that is rich in organic matter. A good potting mix specifically formulated for vegetables is an excellent choice. Avoid using garden soil, as it can be too heavy and compacted for container gardening. Amend your potting mix with compost or other organic matter to improve its fertility and drainage. You can also add a slow-release fertilizer to provide your plants with a steady supply of nutrients. The ideal soil pH for bok choy is between 6.0 and 7.5. You can test your soil pH using a soil testing kit and adjust it accordingly.
How do I protect my rooftop bok choy plants from pests and diseases?
Rooftop gardens can be susceptible to various pests and diseases. Regularly inspect your plants for signs of infestation or disease, such as aphids, cabbage worms, or fungal spots. Handpick any pests you find and dispose of them properly. You can also use organic pest control methods, such as insecticidal soap or neem oil, to control infestations. To prevent fungal diseases, ensure good air circulation around your plants and avoid overwatering. Remove any diseased leaves promptly. Consider using row covers to protect your plants from pests and harsh weather conditions. Companion planting with herbs like rosemary or thyme can also help to deter pests.
What are some tips for maximizing my bok choy harvest on a rooftop?
To maximize your bok choy harvest, ensure that your plants receive at least 6 hours of sunlight per day. Fertilize your plants regularly with a balanced fertilizer to provide them with the nutrients they need to grow. Harvest your bok choy when the leaves are young and tender, typically about 30-45 days after planting. You can harvest individual leaves as needed or harvest the entire plant at once. Succession planting, where you plant new seeds every few weeks, can help to ensure a continuous supply of bok choy throughout the growing season. Consider using vertical gardening techniques to maximize space on your rooftop.
Can I grow bok choy on my rooftop during the winter?
Whether you can grow bok choy on your rooftop during the winter depends on your climate. Bok choy is a cool-season crop that can tolerate light frost. In mild climates, you may be able to grow bok choy outdoors throughout the winter. In colder climates, you may need to provide your plants with protection from the cold, such as a greenhouse or cold frame. You can also grow bok choy indoors under grow lights. Choose a variety of bok choy that is specifically bred for winter growing.
What are some creative ways to use my rooftop-grown bok choy?
The possibilities are endless! Bok choy is a versatile vegetable that can be used in a variety of dishes. You can stir-fry it, steam it, grill it, or add it to soups and stews. It’s also delicious in salads and slaws. Try adding it to your favorite Asian-inspired recipes, such as stir-fries, noodle dishes, and dumplings. You can also use it as a substitute for spinach or kale in other recipes. Get creative and experiment with different flavors and cooking methods to discover your favorite ways to enjoy your rooftop-grown bok choy. Consider pickling or fermenting your bok choy for a unique and flavorful condiment. You can even use the leaves to make bok choy chips or smoothies.
Leave a Comment