
Rooftop Chayote Growing Method: Unlock the secrets to a bountiful harvest right above your head! Have you ever dreamed of transforming your unused rooftop into a lush, edible paradise? I know I have! Imagine stepping outside your door and picking fresh, vibrant chayote squash, ready to be transformed into delicious meals. This isn’t just a whimsical fantasy; it’s an achievable reality with the right knowledge and a little bit of elbow grease.
Chayote, also known as vegetable pear or mirliton, has a rich history, particularly in Mesoamerica, where it has been cultivated for centuries. It’s a versatile and nutritious vegetable, and bringing this tradition to your own home is incredibly rewarding. But why choose a rooftop? Well, for many of us living in urban environments, space is a precious commodity. The rooftop chayote growing method offers a fantastic solution, maximizing otherwise unused space and bringing a touch of nature to the concrete jungle.
This DIY guide is your key to success. I’ll walk you through every step, from selecting the right containers and soil to providing the necessary support for your chayote vines. You’ll learn how to optimize sunlight exposure, manage watering, and even tackle common pests and diseases. With this guide, you’ll be well on your way to enjoying a thriving rooftop garden and a delicious harvest of homegrown chayote. Let’s get started!
DIY Rooftop Chayote Garden: A Step-by-Step Guide
Hey there, fellow gardening enthusiasts! Ever thought about turning your rooftop into a lush, productive garden? I’m here to share my experience with growing chayote (also known as mirliton or vegetable pear) on my rooftop, and trust me, it’s easier and more rewarding than you might think! Chayote is a vigorous vine, so a rooftop provides the perfect space for it to sprawl. Plus, you get delicious fruits, edible leaves, and even the starchy roots are usable! Let’s dive in!
What You’ll Need:
Before we get started, let’s gather our supplies. This will make the whole process smoother.
* **Chayote Fruit:** This is your “seed.” Choose a mature, healthy fruit from a reliable source. Look for one that’s starting to sprout.
* **Large Container(s):** Think big! Chayote vines are vigorous and need plenty of room for their roots. I recommend containers at least 24 inches in diameter and depth.
* **Potting Mix:** A well-draining potting mix is crucial. I like to use a mix of compost, perlite, and peat moss.
* **Trellis or Support Structure:** This is essential for the vine to climb. You can use a sturdy trellis, a fence, or even a repurposed metal structure. Make sure it’s strong enough to support a heavy vine laden with fruit.
* **Watering Can or Hose:** For regular watering.
* **Gardening Gloves:** To protect your hands.
* **Hand Trowel:** For planting.
* **Fertilizer:** A balanced, slow-release fertilizer will help your chayote vine thrive.
* **Pruning Shears:** For occasional trimming.
* **Optional: Mulch:** To help retain moisture and suppress weeds.
Phase 1: Sprouting the Chayote Fruit
This is the most crucial step. You need to get that chayote fruit to sprout before planting it.
1. **Choose Your Fruit Wisely:** Select a mature chayote fruit that shows signs of sprouting. You might see a small shoot emerging from the broader end of the fruit. If you can’t find one already sprouting, don’t worry! You can encourage sprouting.
2. **Prepare the Sprouting Environment:** There are a couple of ways to do this. I’ve had success with both:
* **Method 1: The Paper Towel Method:** Wrap the chayote fruit in a damp paper towel. Place it in a plastic bag or container to maintain humidity. Store it in a warm, dark place (like a cupboard) for several weeks. Check regularly to ensure the paper towel stays moist.
* **Method 2: Partial Burial:** Partially bury the chayote fruit in a pot filled with moist potting mix. Leave the top third of the fruit exposed. Place the pot in a warm, bright location, but avoid direct sunlight. Keep the soil consistently moist.
3. **Patience is Key:** Sprouting can take anywhere from 2 to 8 weeks, so don’t get discouraged if you don’t see results immediately. Just keep the environment moist and warm.
4. **Monitor for Growth:** Once you see a healthy sprout emerging, it’s time to move on to the next phase. The sprout should be several inches long and have some small leaves.
Phase 2: Planting the Sprouted Chayote
Now that your chayote fruit has sprouted, it’s time to give it a permanent home in your rooftop garden.
1. **Prepare the Container:** Fill your large container with the well-draining potting mix. Leave a few inches of space at the top.
2. **Planting the Fruit:** Gently dig a hole in the center of the container large enough to accommodate the chayote fruit. Carefully place the sprouted fruit in the hole, ensuring the sprout is pointing upwards. Cover the fruit with soil, leaving the sprout exposed.
3. **Water Thoroughly:** Water the newly planted chayote fruit thoroughly until water drains from the bottom of the container. This will help settle the soil and encourage root growth.
4. **Provide Support:** Immediately install your trellis or support structure near the container. The chayote vine will start to climb as it grows, so it needs something to hold onto.
Phase 3: Caring for Your Chayote Vine
This is where the real work begins, but it’s also the most rewarding part!
1. **Watering:** Chayote vines need consistent moisture, especially during hot weather. Water deeply whenever the top inch of soil feels dry to the touch. Avoid overwatering, as this can lead to root rot.
2. **Fertilizing:** Feed your chayote vine with a balanced, slow-release fertilizer every few months. You can also supplement with liquid fertilizer during the growing season. Follow the instructions on the fertilizer packaging.
3. **Sunlight:** Chayote vines thrive in full sun, so make sure your rooftop garden receives at least 6-8 hours of direct sunlight per day.
4. **Pruning:** Pruning is essential for managing the size and shape of your chayote vine. Trim back any excessive growth or dead leaves. You can also prune to encourage more fruit production. I usually prune after the main fruiting season.
5. **Pest and Disease Control:** Keep an eye out for common garden pests like aphids, spider mites, and squash bugs. Treat any infestations promptly with organic pest control methods. Chayote vines are generally resistant to diseases, but good air circulation can help prevent fungal problems.
6. **Training the Vine:** As the vine grows, gently guide it along the trellis or support structure. This will help it climb properly and maximize sunlight exposure. Use soft ties or clips to secure the vine to the support.
Phase 4: Harvesting Your Chayote
The moment you’ve been waiting for!
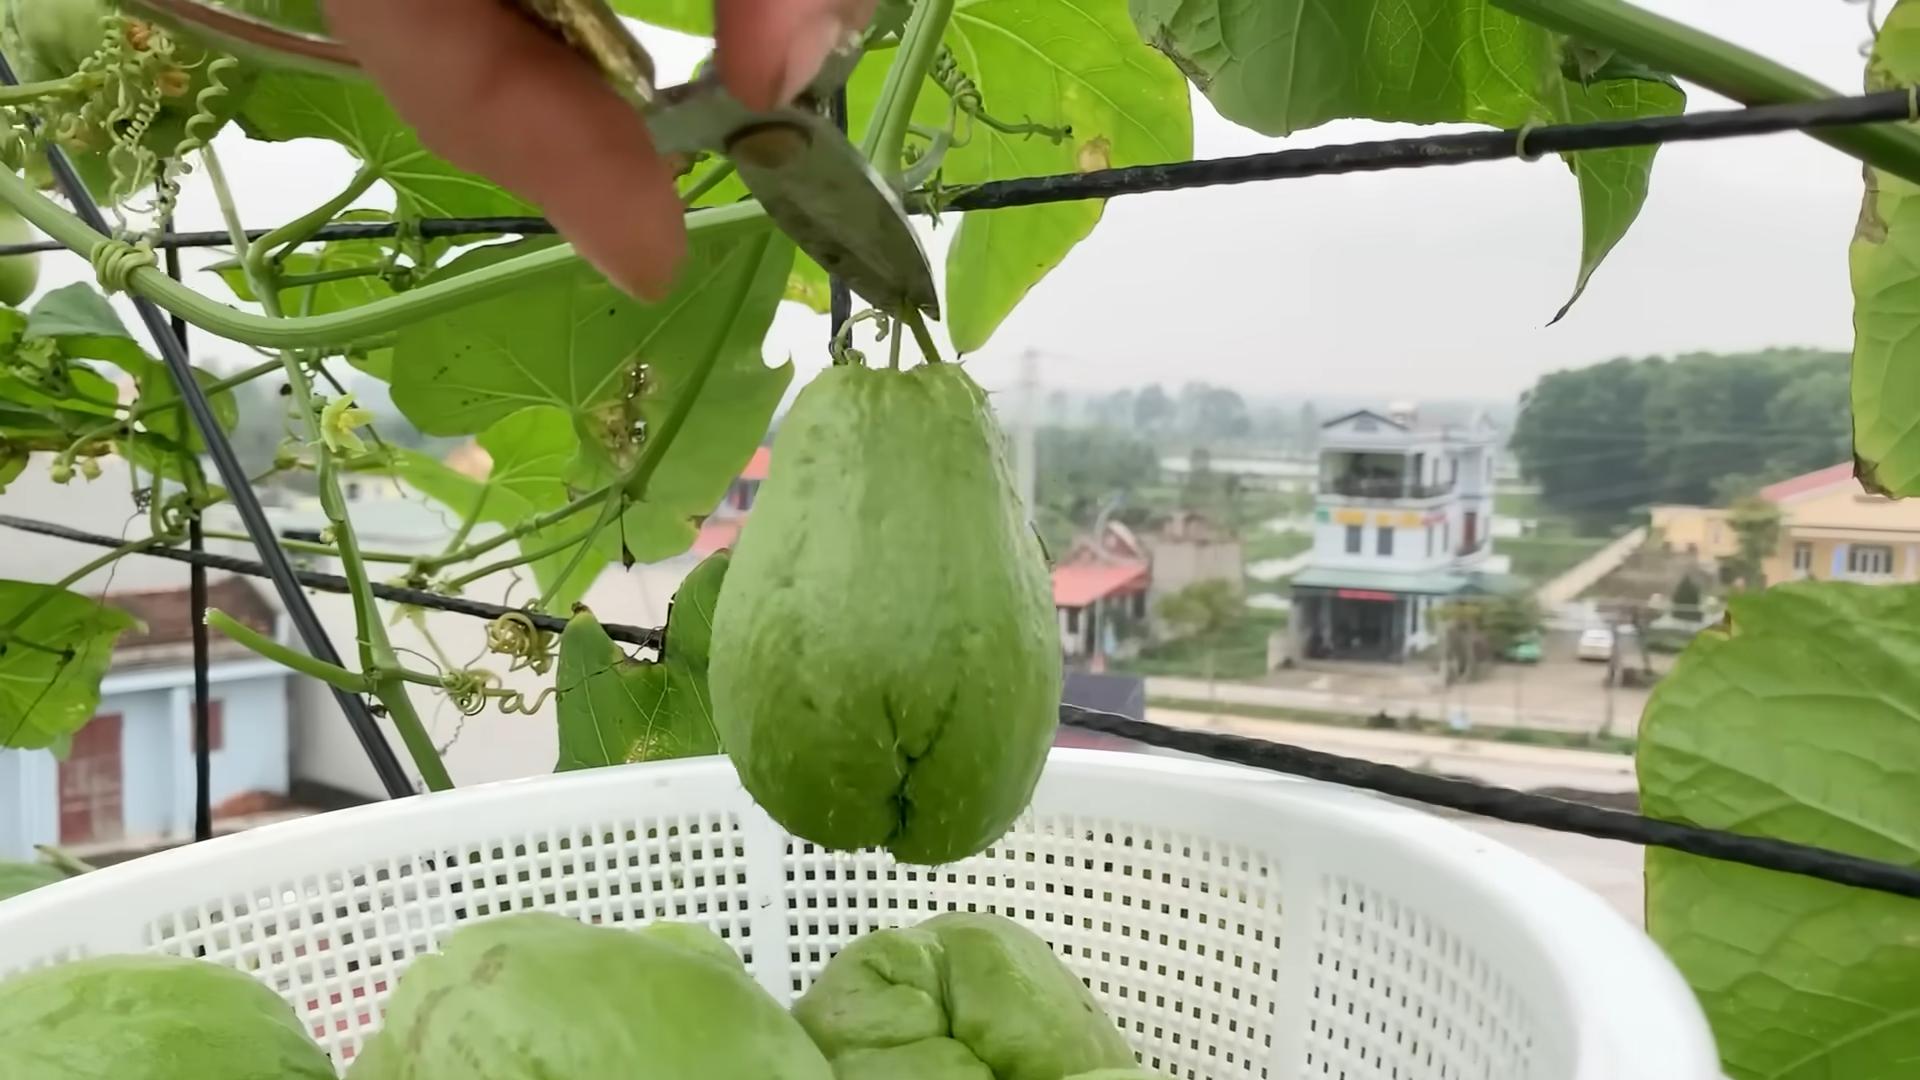
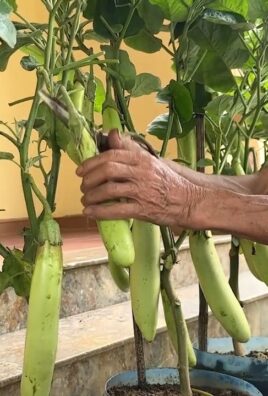
1. **Knowing When to Harvest:** Chayote fruits are typically ready to harvest about 4-6 weeks after flowering. The fruits should be firm and smooth, with a light green color. They should also be relatively small, about the size of a pear.
2. **Harvesting the Fruit:** Use pruning shears or a sharp knife to cut the fruit from the vine. Leave a small stem attached to the fruit.
3. **Harvesting the Leaves and Shoots:** The leaves and shoots of the chayote vine are also edible and can be harvested throughout the growing season. Choose young, tender leaves and shoots.
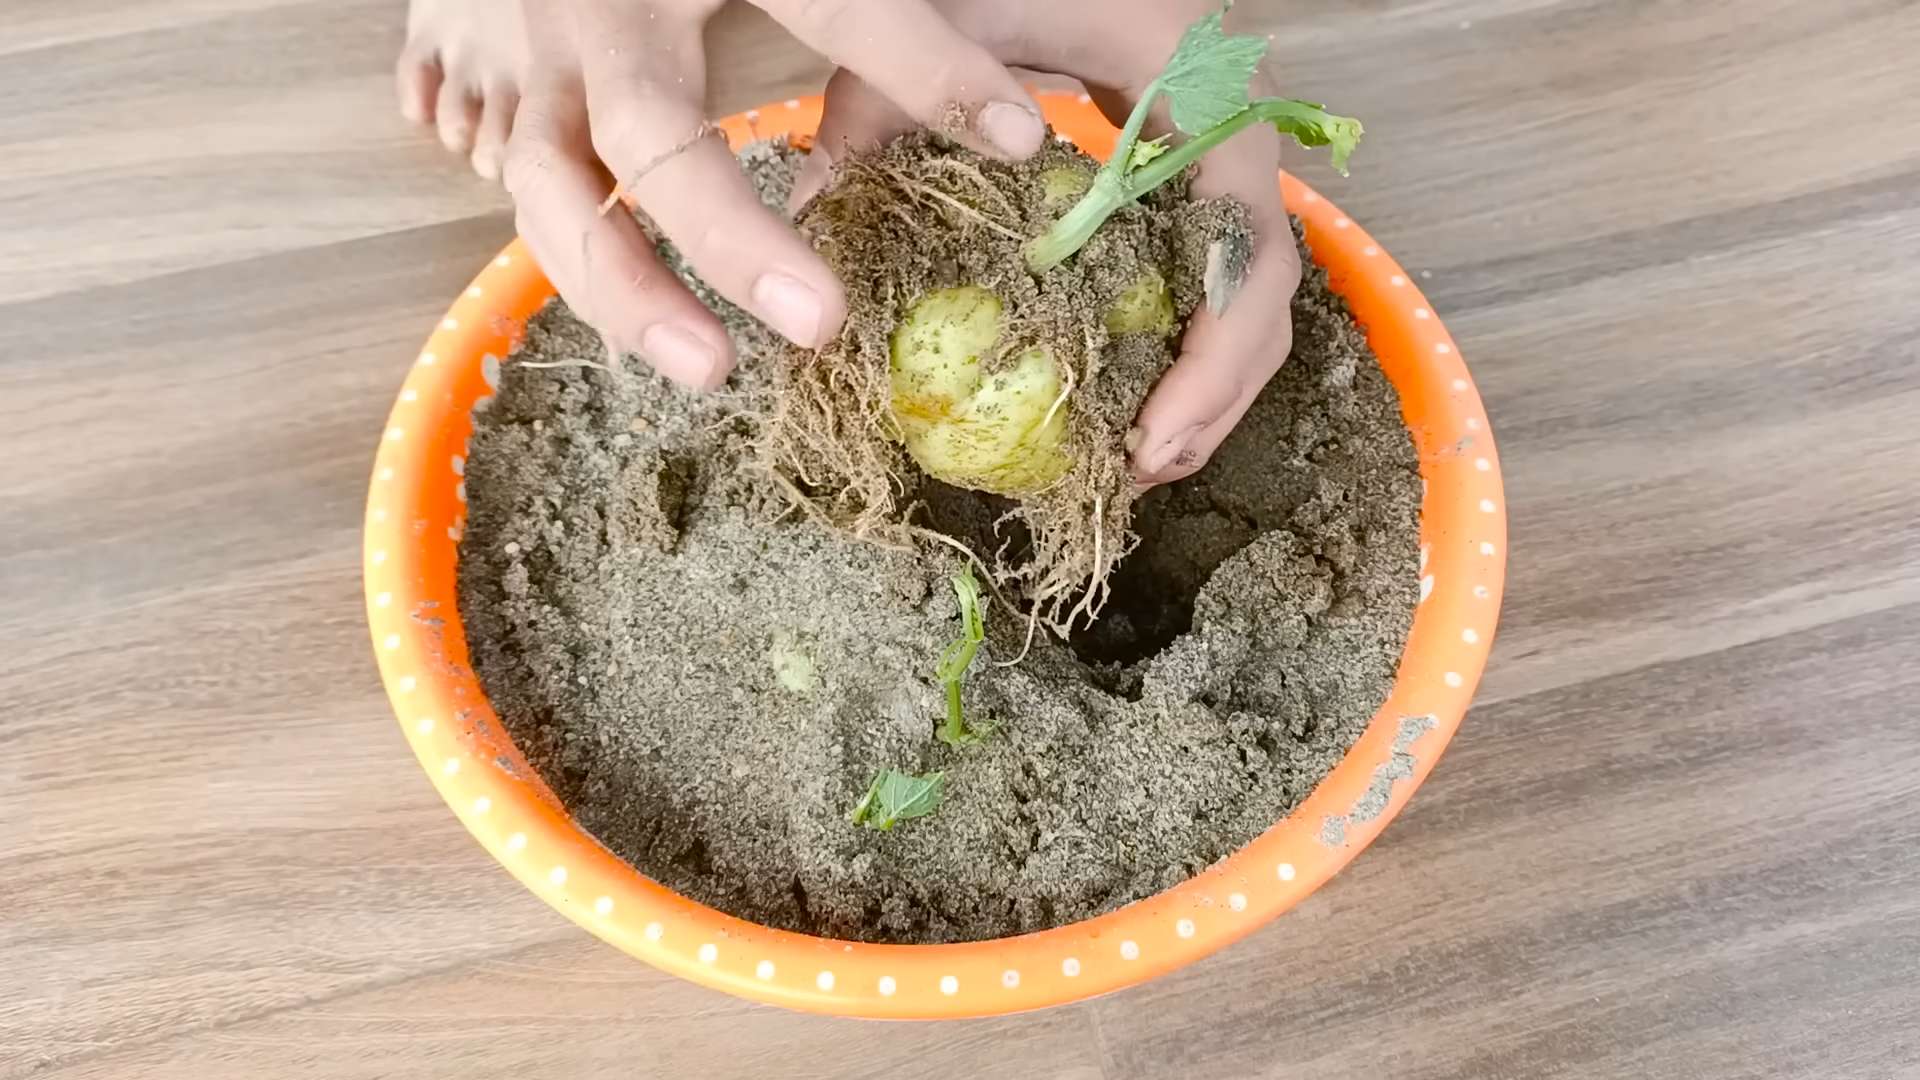
4. **Harvesting the Roots (Optional):** The roots of the chayote vine are starchy and can be used like potatoes. However, harvesting the roots will kill the plant, so only do this if you’re not planning to grow chayote in the same container again.
Tips for Success:
* Choose the Right Location: Make sure your rooftop garden receives plenty of sunlight and has good drainage.
* Use High-Quality Potting Mix: A well-draining potting mix is essential for healthy root growth.
* Provide Adequate Support: Chayote vines are heavy, so make sure your trellis or support structure is strong enough to handle the weight.
* Water Regularly: Chayote vines need consistent moisture, especially during hot weather.
* Fertilize Regularly: A balanced fertilizer will help your chayote vine thrive.
* Prune Regularly: Pruning will help manage the size and shape of your vine and encourage more fruit production.
* Be Patient: Growing chayote can take time, so don’t get discouraged if you don’t see results immediately.
Troubleshooting:
* No Fruit Production: This could be due to a lack of sunlight, poor pollination, or insufficient fertilizer. Make sure your vine is getting enough sunlight, consider hand-pollinating the flowers, and fertilize regularly.
* Yellowing Leaves: This could be due to overwatering, underwatering, or nutrient deficiencies. Check the soil moisture and adjust your watering schedule accordingly. Fertilize with a balanced fertilizer.
* Pest Infestations: Treat any pest infestations promptly with organic pest control methods.
Growing chayote on your rooftop is a fun and rewarding experience. With a little patience and care, you can enjoy a bountiful harvest of delicious fruits, leaves, and shoots. Happy gardening!
Conclusion
So, there you have it – a comprehensive guide to transforming your rooftop into a thriving chayote paradise! We’ve explored the ins and outs of this unique growing method, highlighting its efficiency, space-saving benefits, and the sheer joy of harvesting your own fresh produce right above your head. But why is this DIY rooftop chayote growing method a must-try?
Firstly, it’s about reclaiming unused space. Many urban dwellers dream of a garden but lack the ground space. Your rooftop, often overlooked, becomes a valuable asset, a green oasis in the concrete jungle. Imagine stepping outside and picking fresh, crisp chayote squash for your dinner – a truly rewarding experience.
Secondly, it’s about sustainability. Growing your own food reduces your carbon footprint, minimizes reliance on commercially grown produce (often transported long distances), and allows you to control the quality and safety of what you eat. You know exactly what goes into your chayote, ensuring it’s free from harmful pesticides and chemicals.
Thirdly, it’s about the sheer satisfaction of nurturing life. Watching your chayote vine climb and flourish, bearing abundant fruit, is an incredibly fulfilling experience. It connects you to nature, provides a sense of accomplishment, and offers a welcome respite from the stresses of modern life.
But the beauty of this method lies in its adaptability. Feel free to experiment with different trellising systems. Instead of a traditional trellis, consider using repurposed materials like old ladders, metal fencing, or even sturdy ropes to create a unique and visually appealing structure. You can also explore companion planting. Marigolds, for example, can help deter pests, while basil can improve the flavor of your chayote.
Consider different varieties of chayote as well. While the most common type is the light green, pear-shaped fruit, there are also varieties with darker green skin, spiny skin, or even different shapes. Experiment to find the varieties that thrive best in your specific climate and that appeal to your taste.
Don’t be afraid to get creative with your container choices. While large pots are ideal, you can also use repurposed containers like old bathtubs, large plastic bins, or even wooden crates. Just ensure they have adequate drainage and are strong enough to support the weight of the mature vine and its fruit.
Finally, remember that patience is key. Chayote vines can take some time to establish themselves and start producing fruit. Don’t get discouraged if you don’t see results immediately. With proper care and attention, your rooftop chayote garden will eventually reward you with a bountiful harvest.
We wholeheartedly encourage you to give this DIY rooftop chayote growing method a try. It’s a rewarding, sustainable, and space-saving way to enjoy fresh, homegrown produce. And most importantly, we want to hear about your experiences! Share your photos, tips, and challenges in the comments below. Let’s build a community of rooftop chayote growers and learn from each other. Happy growing!
Frequently Asked Questions (FAQ)
What kind of soil is best for growing chayote on a rooftop?
Chayote vines thrive in well-draining, fertile soil that is rich in organic matter. A good mix would be equal parts of potting soil, compost, and perlite or vermiculite. The potting soil provides a base for nutrients, the compost adds essential organic matter and improves drainage, and the perlite or vermiculite enhances aeration and prevents the soil from becoming compacted. Avoid using heavy clay soils, as they can retain too much water and lead to root rot. Before planting, consider amending the soil with a slow-release fertilizer to provide a steady supply of nutrients throughout the growing season. You can also add bone meal to promote strong root development and flowering. Regularly monitor the soil pH, which should ideally be between 6.0 and 7.0. You can use a soil testing kit to check the pH and adjust it accordingly with lime (to raise the pH) or sulfur (to lower the pH).
How much sunlight does a rooftop chayote vine need?
Chayote vines require at least 6-8 hours of direct sunlight per day to thrive and produce abundant fruit. Choose a location on your rooftop that receives ample sunlight throughout the day. If your rooftop is partially shaded, try to position the vine so that it receives morning sun, which is less intense than afternoon sun. Insufficient sunlight can lead to weak growth, reduced flowering, and smaller fruit. If you live in a particularly hot climate, providing some afternoon shade during the hottest part of the day can help prevent the leaves from scorching. You can use shade cloth or strategically position the vine near a taller structure that provides some natural shade. Observe your vine closely and adjust its position or provide additional shade as needed to ensure it receives the optimal amount of sunlight.
What is the best way to trellis a chayote vine on a rooftop?
Trellising is essential for supporting the vigorous growth of chayote vines and maximizing fruit production. The best trellising method for a rooftop chayote vine depends on the available space and your aesthetic preferences. A sturdy, vertical trellis made of wood, metal, or bamboo is a popular choice. Ensure the trellis is tall enough to accommodate the vine’s growth, which can reach up to 30 feet. You can also use a horizontal trellis, such as a pergola or arbor, which provides ample support and creates a shaded area. Another option is to train the vine along a fence or railing, but make sure the structure is strong enough to support the weight of the mature vine and its fruit. When attaching the vine to the trellis, use soft ties or twine to avoid damaging the stems. Regularly prune the vine to maintain its shape and prevent it from becoming too dense. This will also improve air circulation and reduce the risk of fungal diseases.
How often should I water my rooftop chayote vine?
Watering frequency depends on the climate, soil type, and container size. Generally, chayote vines need consistent moisture, especially during hot and dry periods. Water deeply whenever the top inch of soil feels dry to the touch. Avoid overwatering, as this can lead to root rot. Ensure the container has adequate drainage to prevent water from pooling at the bottom. During the growing season, you may need to water daily or even twice a day in very hot weather. In cooler weather, you can reduce the watering frequency. Mulching around the base of the vine can help retain moisture and suppress weeds. Use organic mulches like straw, wood chips, or compost. Monitor the vine closely for signs of water stress, such as wilting leaves or stunted growth. Adjust your watering schedule accordingly to ensure the vine receives the optimal amount of moisture.
How do I fertilize my rooftop chayote vine?
Chayote vines are heavy feeders and require regular fertilization to support their vigorous growth and fruit production. Start by amending the soil with compost or other organic matter before planting. During the growing season, fertilize every 2-3 weeks with a balanced fertilizer that is rich in nitrogen, phosphorus, and potassium. You can use a liquid fertilizer or a slow-release granular fertilizer. Follow the instructions on the fertilizer label carefully to avoid over-fertilizing, which can damage the vine. In addition to a balanced fertilizer, you can also supplement with micronutrients, such as iron, zinc, and manganese. These nutrients are essential for healthy growth and can help prevent nutrient deficiencies. Foliar feeding, which involves spraying the leaves with a diluted fertilizer solution, can also be beneficial. This allows the vine to absorb nutrients directly through its leaves. Monitor the vine closely for signs of nutrient deficiencies, such as yellowing leaves or stunted growth. Adjust your fertilization schedule accordingly to ensure the vine receives the nutrients it needs.
How do I deal with pests and diseases on my rooftop chayote vine?
Rooftop gardens can be less prone to pests and diseases than ground-level gardens, but it’s still important to be vigilant and take preventative measures. Common pests that may affect chayote vines include aphids, spider mites, and squash bugs. You can control these pests with insecticidal soap, neem oil, or by handpicking them off the vine. Regularly inspect the vine for signs of infestation and take action promptly to prevent the pests from spreading. Common diseases that may affect chayote vines include powdery mildew, downy mildew, and root rot. To prevent these diseases, ensure good air circulation around the vine, avoid overwatering, and use disease-resistant varieties. If you notice signs of disease, remove the affected leaves or stems and treat the vine with a fungicide. You can also use organic fungicides, such as copper sulfate or baking soda, to control fungal diseases. Encourage beneficial insects, such as ladybugs and lacewings, to help control pests naturally.
When and how do I harvest chayote squash from my rooftop vine?
Chayote squash is typically ready to harvest about 4-6 weeks after flowering. The fruit should be firm, smooth, and light green in color. You can harvest the fruit at any stage of maturity, but it is generally best to harvest it when it is young and tender. To harvest, simply cut the stem of the fruit with a sharp knife or pruning shears. Handle the fruit carefully to avoid bruising it. Chayote squash can be stored in the refrigerator for several weeks. You can also freeze it for longer storage. To freeze, blanch the squash in boiling water for a few minutes, then cool it in ice water. Drain the squash and pack it into freezer bags or containers. Chayote squash can be used in a variety of dishes, including soups, stews, salads, and
Leave a Comment