
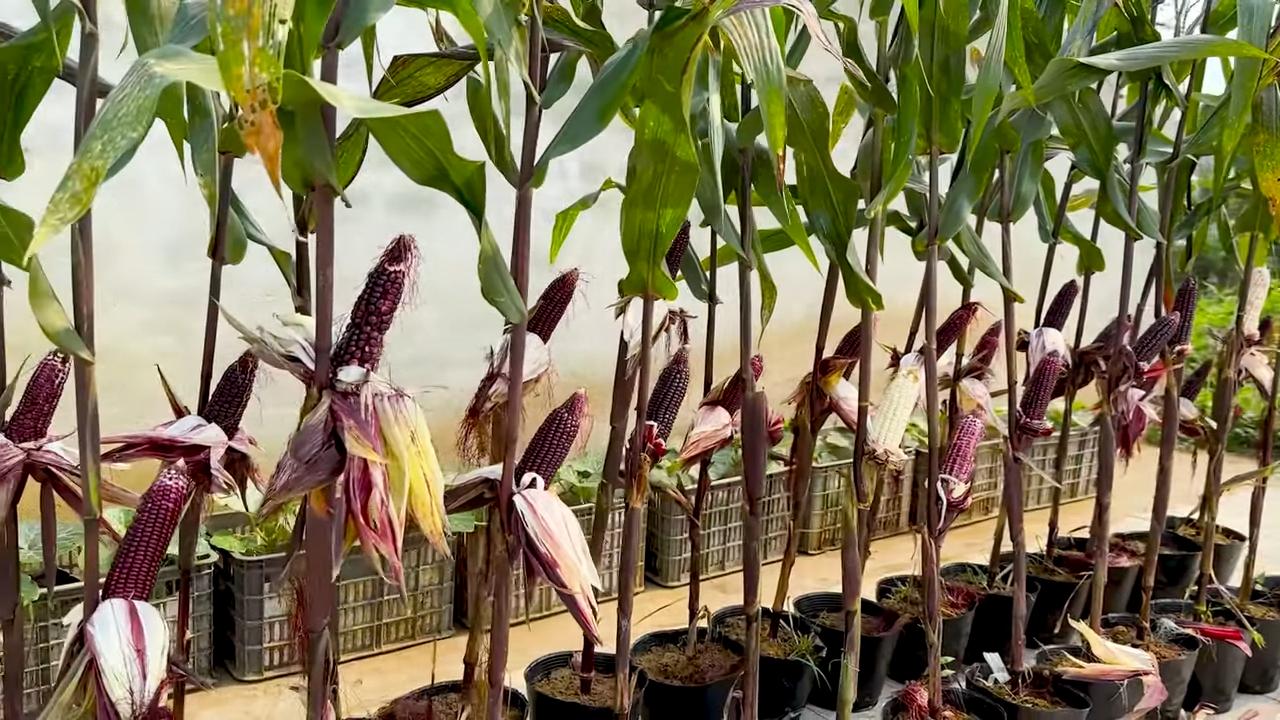
Rooftop Corn Growing Tips: Imagine stepping onto your rooftop and being greeted by the sight of lush, green corn stalks swaying gently in the breeze. Sounds like something out of a movie, right? Well, it doesn’t have to be! I’m here to tell you that growing corn on your rooftop is not only possible, but it can be a surprisingly rewarding experience.
For centuries, corn has been a staple crop, deeply woven into the cultures of many civilizations. From ancient Mayan rituals to modern-day barbecues, corn holds a special place in our hearts (and stomachs!). But who says you need acres of farmland to enjoy the taste of freshly grown corn?
In today’s world, where space is a premium and sustainability is key, urban gardening is booming. And that’s where these rooftop corn growing tips come in! Whether you’re a seasoned gardener or a complete newbie, I’m going to share some simple yet effective DIY tricks and hacks that will help you cultivate your own little cornfield in the sky. Think of the satisfaction of harvesting your own sweet corn, knowing exactly where it came from and how it was grown. Plus, it’s a fantastic way to add a touch of green to your urban landscape and impress your friends and neighbors. So, grab your gardening gloves, and let’s get started on this exciting rooftop adventure!
Dachgarten-Maisanbau: Dein DIY-Leitfaden für eine reiche Ernte über den Wolken
Hallo liebe Gartenfreunde! Habt ihr schon mal darüber nachgedacht, Mais auf eurem Dach anzubauen? Klingt verrückt, oder? Aber mit ein bisschen Planung und den richtigen Kniffen ist es absolut machbar und macht riesig Spaß! Ich zeige euch, wie ihr euren eigenen kleinen Maisacker über den Dächern der Stadt erschaffen könnt.
Was du für deinen Dachgarten-Mais brauchst
Bevor wir loslegen, hier eine Liste mit allem, was du benötigst:
* Geeignete Behälter: Große, stabile Pflanzgefäße oder Kübel (mindestens 45 Liter Fassungsvermögen pro Pflanze). Denk daran, dass Mais tief wurzelt!
* Hochwertige Pflanzerde: Eine Mischung aus Gartenerde, Kompost und Kokosfaser ist ideal. Sie sorgt für gute Drainage und ausreichend Nährstoffe.
* Mais-Saatgut: Wähle eine Sorte, die für den Anbau in Behältern geeignet ist. Zwergmaissorten oder frühe Sorten sind oft eine gute Wahl.
* Dünger: Ein Langzeitdünger oder regelmäßige Flüssigdüngergaben sind wichtig, um den hohen Nährstoffbedarf von Mais zu decken.
* Gießkanne oder Schlauch: Mais braucht viel Wasser, besonders während der Blütezeit.
* Stützmaterial: Bambusstäbe oder ähnliches, um die Pflanzen bei starkem Wind zu stabilisieren.
* Werkzeug: Schaufel, Spaten, Handschuhe.
* Geduld und Liebe: Das Wichtigste überhaupt!
Die Vorbereitung: Der Schlüssel zum Erfolg
Bevor wir mit dem Pflanzen beginnen, müssen wir ein paar Vorbereitungen treffen. Das ist wie beim Kochen: Die richtige Mise en Place ist die halbe Miete!
1. Behälter vorbereiten: Stelle sicher, dass deine Behälter ausreichend Drainagelöcher haben. Eine Schicht Kies oder Blähton am Boden hilft zusätzlich, Staunässe zu vermeiden.
2. Erde mischen: Mische deine Pflanzerde mit Kompost und Kokosfaser. Das sorgt für eine lockere, nährstoffreiche Grundlage.
3. Standort wählen: Mais braucht viel Sonne! Wähle einen Standort auf deinem Dach, der mindestens 6-8 Stunden direkte Sonneneinstrahlung pro Tag bekommt. Achte auch darauf, dass der Standort windgeschützt ist, da hohe Maispflanzen leicht umknicken können.
4. Boden testen (optional): Ein Bodentest kann dir Aufschluss über den pH-Wert und den Nährstoffgehalt deiner Erde geben. Das hilft dir, die Düngung optimal anzupassen.
Aussaat und Anzucht: Der Start in ein maisiges Abenteuer
Jetzt geht’s ans Eingemachte! Die Aussaat ist der erste Schritt zu deiner eigenen Maisernte.
1. Aussaatzeitpunkt bestimmen: Mais ist frostempfindlich. Warte, bis keine Frostgefahr mehr besteht, bevor du mit der Aussaat beginnst. In den meisten Regionen ist das Mitte Mai bis Anfang Juni.
2. Samen aussäen: Säe die Maiskörner etwa 2-3 cm tief in die Erde. Lege 3-4 Körner pro Behälter, um sicherzustellen, dass mindestens eine Pflanze keimt.
3. Angießen: Gieße die Erde nach der Aussaat vorsichtig an. Achte darauf, dass die Erde feucht, aber nicht nass ist.
4. Geduld haben: Die Keimung dauert in der Regel 7-14 Tage. Halte die Erde während dieser Zeit feucht.
5. Pikieren (optional): Wenn mehrere Pflanzen in einem Behälter keimen, kannst du die schwächsten entfernen, um der stärksten Pflanze mehr Platz zu geben.
Die Pflege: Damit dein Mais prächtig gedeiht
Mais ist zwar relativ pflegeleicht, aber ein paar Dinge solltest du beachten, damit er optimal wächst und eine reiche Ernte liefert.
1. Gießen: Mais braucht viel Wasser, besonders während der Blütezeit. Gieße regelmäßig, besonders an heißen Tagen. Achte darauf, dass die Erde nicht austrocknet. Am besten gießt du morgens, damit die Blätter bis zum Abend abtrocknen können und Pilzkrankheiten vorgebeugt wird.
2. Düngen: Mais ist ein Starkzehrer und benötigt viele Nährstoffe. Dünge regelmäßig mit einem Langzeitdünger oder Flüssigdünger. Achte auf einen hohen Stickstoffgehalt, besonders während des Wachstums.
3. Stützen: Hohe Maispflanzen können bei starkem Wind leicht umknicken. Stütze sie mit Bambusstäben oder ähnlichem. Binde die Pflanzen locker an den Stäben fest.
4. Unkraut entfernen: Halte die Behälter unkrautfrei, damit der Mais nicht um Nährstoffe konkurrieren muss.
5. Bestäubung unterstützen: Mais ist windbestäubt. Wenn dein Dachgarten windgeschützt ist, kannst du die Bestäubung unterstützen, indem du die männlichen Blütenstände (die Fahnen oben an der Pflanze) vorsichtig schüttelst, um den Pollen zu verteilen. Du kannst auch mit einem Pinsel den Pollen von den männlichen auf die weiblichen Blüten (die Seidenfäden an den Kolben) übertragen.
6. Schädlinge und Krankheiten: Achte auf Schädlinge wie Blattläuse oder Maiszünsler. Bei Bedarf kannst du biologische Schädlingsbekämpfungsmittel einsetzen. Pilzkrankheiten können durch zu hohe Luftfeuchtigkeit oder Staunässe entstehen. Sorge für gute Belüftung und vermeide Staunässe.
Die Ernte: Der Lohn deiner Mühe
Nach all der Arbeit und Pflege ist es endlich soweit: Die Ernte steht vor der Tür!
1. Erntezeitpunkt bestimmen: Der Mais ist reif, wenn die Seidenfäden an den Kolben braun und trocken sind. Die Kolben sollten sich prall anfühlen und die Körner sollten milchig sein, wenn man sie ansticht.
2. Ernten: Breche die Kolben vorsichtig von der Pflanze ab.
3. Verarbeiten: Du kannst den Mais sofort frisch genießen, grillen, kochen oder einfrieren. Du kannst ihn auch trocknen und zu Maismehl verarbeiten.
Zusätzliche Tipps für den Dachgarten-Maisanbau
* Sortenwahl: Wähle eine Sorte, die für den Anbau in Behältern geeignet ist. Zwergmaissorten oder frühe Sorten sind oft eine gute Wahl. Informiere dich im Fachhandel oder online über geeignete Sorten für deine Region.
* Windschutz: Sorge für ausreichend Windschutz, da hohe Maispflanzen leicht umknicken können. Du kannst Windschutznetze oder Hecken verwenden.
* Gewicht: Achte auf das Gewicht der Behälter, besonders wenn sie mit Erde und Wasser gefüllt sind. Stelle sicher, dass dein Dach die Last tragen kann.
* Nachbarn: Informiere deine Nachbarn über dein Dachgarten-Projekt. Vielleicht haben sie ja auch Lust mitzumachen!
* Dokumentation: Mache Fotos von deinem Maisgarten, um den Fortschritt zu dokumentieren und deine Erfahrungen mit anderen zu teilen.
Häufige Fehler vermeiden
* Zu wenig Sonne: Mais braucht viel Sonne, um optimal zu wachsen. Wähle einen Standort, der mindestens 6-8 Stunden direkte Sonneneinstrahlung pro Tag bekommt.
* Zu wenig Wasser: Mais braucht viel Wasser, besonders während der Blütezeit. Gieße regelmäßig, besonders an heißen Tagen.
* Zu wenig Dünger: Mais ist ein Starkzehrer und benötigt viele Nährstoffe. Dünge regelmäßig mit einem Langzeitdünger oder Flüssigdünger.
* Falsche Behälter: Verwende große, stabile Pflanzgefäße oder Kübel mit ausreichend Drainagelöchern.
* Zu späte Aussaat: Mais ist frostempfindlich. Warte, bis keine Frostgefahr mehr besteht, bevor du mit der Aussaat beginnst.
Ich hoffe, dieser Leitfaden hilft dir dabei, deinen eigenen kleinen Maisacker auf dem Dach zu erschaffen. Viel Spaß beim Gärtnern und eine reiche Ernte! Und denk daran: Gärtnern ist wie das Leben selbst – es braucht Geduld, Liebe und ein bisschen Glück!

Conclusion
So, there you have it! Transforming your rooftop into a thriving cornfield might seem like a whimsical dream, but with these simple yet effective DIY rooftop corn growing tips, it’s entirely within reach. We’ve explored everything from selecting the right varieties and preparing the ideal growing medium to ensuring proper pollination and protecting your precious stalks from the elements.
Why is this a must-try? Because beyond the sheer novelty of growing your own corn high above the ground, you’re tapping into a sustainable food source, reducing your carbon footprint, and adding a unique touch of green to your urban landscape. Imagine the satisfaction of harvesting your own sweet, juicy corn, knowing you nurtured it from seed to table right on your rooftop!
But the benefits don’t stop there. Rooftop gardening, in general, offers a myriad of advantages, including improved air quality, reduced stormwater runoff, and even insulation for your building. And when you choose to grow corn, you’re not just growing food; you’re creating a conversation starter, a testament to your ingenuity, and a vibrant ecosystem in the heart of the city.
Don’t be afraid to experiment with variations! Try different corn varieties to see which ones thrive best in your specific rooftop environment. Consider companion planting with beans and squash, following the traditional “Three Sisters” method, to enhance soil health and pest control. You could even explore vertical growing techniques to maximize your space and create a stunning green wall of corn.
Remember to adapt these rooftop corn growing tips to your unique circumstances. Factors like sunlight exposure, wind conditions, and available space will all play a role in your success. Observe your plants closely, adjust your watering and fertilization schedules as needed, and don’t be discouraged by setbacks. Gardening is a learning process, and every challenge is an opportunity to grow, both literally and figuratively.
We’re confident that with a little planning, effort, and these DIY rooftop corn growing tips, you can create a flourishing corn patch that will be the envy of your neighbors. So, grab your seeds, prepare your containers, and get ready to embark on this exciting rooftop gardening adventure.
We can’t wait to hear about your experiences! Share your photos, tips, and challenges in the comments below. Let’s build a community of rooftop corn growers and inspire others to embrace the joys of urban agriculture. Happy growing!
Frequently Asked Questions (FAQ)
1. What are the best corn varieties for rooftop growing?
Choosing the right corn variety is crucial for success in a rooftop environment. Look for shorter, more compact varieties that are well-suited to container gardening. Some excellent options include:
* **’On Deck’ Hybrid:** This variety is specifically bred for container growing and produces delicious, sweet corn on compact plants.
* **’Golden Bantam’:** A classic heirloom variety that is relatively short and early-maturing, making it a good choice for shorter growing seasons.
* **’Trinity’:** A multi-colored ornamental corn that adds visual appeal to your rooftop garden while also providing edible kernels.
* **’Blue Hopi’:** A drought-tolerant variety that is well-suited to hot, sunny rooftops.
Consider your local climate and growing season when selecting your corn variety. Check seed catalogs or consult with local gardening experts for recommendations specific to your region.
2. What size containers do I need for growing corn on my rooftop?
Corn plants require ample space for their roots to develop, so choose large containers that are at least 12-18 inches in diameter and depth. Larger containers will also help retain moisture and prevent the plants from drying out too quickly.
Consider using durable, weather-resistant containers made from materials like plastic, wood, or metal. Make sure the containers have drainage holes to prevent waterlogging. You can also use grow bags, which are lightweight and breathable, making them a good option for rooftop gardens.
3. What type of soil should I use for growing corn in containers?
Corn plants need a well-draining, nutrient-rich soil to thrive. A good potting mix for container-grown corn should consist of:
* **Compost:** Provides essential nutrients and improves soil structure.
* **Peat moss or coco coir:** Helps retain moisture and improve drainage.
* **Perlite or vermiculite:** Improves aeration and drainage.
* **Slow-release fertilizer:** Provides a steady supply of nutrients throughout the growing season.
Avoid using garden soil in containers, as it can become compacted and poorly drained. You can also purchase pre-mixed potting mixes specifically formulated for vegetables.
4. How often should I water my rooftop corn plants?
Rooftop gardens tend to dry out quickly, especially during hot, sunny weather. Water your corn plants deeply and regularly, especially during the critical pollination period. Check the soil moisture daily and water when the top inch feels dry to the touch.
Consider using a soaker hose or drip irrigation system to deliver water directly to the roots of the plants. Mulching around the base of the plants with straw or wood chips can also help retain moisture.
5. How do I pollinate corn on my rooftop?
Corn is wind-pollinated, so you’ll need to ensure that the pollen from the tassels (male flowers) reaches the silks (female flowers) on the ears of corn. On a rooftop, wind may not be sufficient. You can hand-pollinate your corn by:
* **Gently shaking the tassels:** This will release pollen into the air.
* **Collecting pollen from the tassels:** Use a small brush or cotton swab to collect pollen and then gently brush it onto the silks.
* **Planting corn in blocks:** Planting multiple rows of corn close together will increase the chances of successful pollination.
Pollination is most effective in the morning when the silks are receptive. Repeat the hand-pollination process for several days to ensure that all the silks are pollinated.
6. How do I protect my rooftop corn plants from pests and diseases?
Rooftop gardens can be susceptible to various pests and diseases. To protect your corn plants:
* **Inspect plants regularly:** Look for signs of pests or diseases, such as aphids, corn earworms, or fungal infections.
* **Use organic pest control methods:** Introduce beneficial insects, such as ladybugs or lacewings, to control aphids. Use Bacillus thuringiensis (Bt) to control corn earworms.
* **Practice good sanitation:** Remove any dead or diseased leaves or stalks to prevent the spread of disease.
* **Provide good air circulation:** Space your plants adequately to allow for good air circulation, which can help prevent fungal diseases.
* **Use row covers:** Row covers can protect your plants from pests and diseases, especially during the early stages of growth.
7. How do I know when my rooftop corn is ready to harvest?
Corn is typically ready to harvest about 20-25 days after the silks emerge. To check for ripeness:
* **Feel the ears:** The ears should feel plump and full.
* **Check the silks:** The silks should be dry and brown.
* **Pierce a kernel:** Pierce a kernel with your fingernail. If the liquid is milky, the corn is ready to harvest. If the liquid is clear, the corn is not yet ripe. If the liquid is doughy, the corn is overripe.
Harvest your corn in the morning when the sugars are at their peak. Enjoy your freshly harvested rooftop corn!
Leave a Comment