
Rooftop gardening Swiss chard: Sounds like a fancy restaurant dish, doesn’t it? But trust me, it’s way more rewarding to grow your own! Imagine stepping out onto your roof, not to just enjoy the view, but to harvest vibrant, leafy greens for tonight’s dinner. That’s the magic we’re unlocking today with some clever DIY tricks and hacks.
For centuries, humans have cultivated gardens in unexpected places. From the Hanging Gardens of Babylon to the terraced rice paddies of Asia, we’ve always found ways to bring nature closer, even in the most challenging environments. Rooftop gardening, in particular, has seen a resurgence in recent years, fueled by a desire for fresh, local produce and a connection to the earth, even in the heart of the city.
But why Swiss chard? Well, this leafy green is a nutritional powerhouse, packed with vitamins and minerals. Plus, it’s surprisingly easy to grow, even for beginners. And let’s be honest, store-bought Swiss chard just doesn’t compare to the flavor and freshness of homegrown. In this article, I’m going to share my favorite DIY tricks for successfully growing rooftop gardening Swiss chard, even if you have limited space or experience. We’ll cover everything from choosing the right containers to protecting your plants from the elements. Get ready to transform your rooftop into a thriving edible oasis!

Dein eigener Dachgarten: Schweizer Mangold anbauen – So geht’s!
Hey Gartenfreunde! Hast du auch Lust, deinen eigenen kleinen Gemüsegarten zu haben, aber keinen Garten? Kein Problem! Ein Dachgarten ist die perfekte Lösung, und Schweizer Mangold ist ein super dankbares und leckeres Gemüse, das sich dafür hervorragend eignet. Ich zeige dir, wie du deinen eigenen Dachgarten mit Schweizer Mangold anlegst und pflegst. Los geht’s!
Was du für deinen Dachgarten brauchst:
Bevor wir loslegen, hier eine Liste mit allem, was du brauchst. Keine Sorge, das meiste ist leicht zu besorgen!
* **Geeignete Behälter:** Das A und O! Wähle leichte, aber stabile Pflanzgefäße. Achte auf eine gute Drainage, damit das Wasser ablaufen kann. Große Töpfe, Pflanzkästen oder sogar alte Zinkwannen sind super.
* **Hochwertige Pflanzerde:** Spar hier nicht! Gute Erde ist das Fundament für gesunde Pflanzen. Verwende am besten spezielle Gemüseerde oder mische Blumenerde mit Kompost.
* **Schweizer Mangold Samen oder Jungpflanzen:** Du kannst entweder Samen aussäen oder direkt Jungpflanzen kaufen. Jungpflanzen sind schneller, aber Samen sind günstiger.
* **Drainagematerial:** Blähton, Kies oder Tonscherben helfen, Staunässe zu vermeiden.
* **Gießkanne oder Gartenschlauch:** Zum Bewässern deiner Pflanzen.
* **Gartengeräte:** Eine kleine Schaufel, eine Harke und eventuell eine Pflanzkelle.
* **Dünger:** Organischer Dünger ist ideal, z.B. Kompost, Hornspäne oder Gemüsedünger.
* **Eventuell Rankhilfe:** Je nach Sorte kann Schweizer Mangold recht groß werden. Eine Rankhilfe kann helfen, die Blätter sauber zu halten.
* **Handschuhe:** Zum Schutz deiner Hände.
Sicherheitshinweise für deinen Dachgarten:
Bevor du loslegst, ein paar wichtige Sicherheitshinweise:
* **Statik prüfen:** Das ist das Wichtigste! Bevor du schwere Pflanzgefäße auf dein Dach stellst, lass unbedingt von einem Fachmann (Statiker) prüfen, ob das Dach die Last tragen kann. Sicherheit geht vor!
* **Abdichtung beachten:** Achte darauf, dass die Dachabdichtung nicht beschädigt wird. Verwende Untersetzer oder Vlies unter den Pflanzgefäßen, um die Abdichtung zu schützen.
* **Geländer sichern:** Stelle sicher, dass das Geländer stabil ist und ausreichend hoch, um ein Herunterfallen zu verhindern.
* **Rutschfeste Schuhe tragen:** Auf dem Dach kann es rutschig sein, besonders bei Feuchtigkeit.
* **Bei starkem Wind vorsichtig sein:** Bei starkem Wind können Pflanzgefäße umfallen. Sorge für einen sicheren Stand oder bringe sie vorübergehend in Sicherheit.
Schritt-für-Schritt Anleitung: Schweizer Mangold im Dachgarten anbauen
Jetzt geht’s ans Eingemachte! Hier ist eine detaillierte Anleitung, wie du deinen Schweizer Mangold im Dachgarten anbaust:
1. Vorbereitung der Pflanzgefäße:
1. **Reinigung:** Reinige die Pflanzgefäße gründlich mit Wasser und eventuell etwas Spülmittel.
2. **Drainage:** Fülle eine Schicht Drainagematerial (Blähton, Kies oder Tonscherben) auf den Boden der Pflanzgefäße. Das sorgt für eine gute Drainage und verhindert Staunässe. Ich nehme immer eine ordentliche Schicht, so ca. 5-10 cm, je nach Größe des Gefäßes.
3. **Erde einfüllen:** Fülle die Pflanzgefäße mit hochwertiger Pflanzerde. Lass oben einen Rand von ca. 5 cm frei. Die Erde sollte locker und luftig sein. Ich mische oft noch etwas Kompost unter die Erde, das gibt den Pflanzen einen extra Nährstoffkick.
2. Aussaat oder Einpflanzen:
Hier hast du zwei Möglichkeiten:
* **Aussaat:**
1. **Saatrillen ziehen:** Ziehe mit dem Finger oder einem kleinen Werkzeug Saatrillen in die Erde. Die Rillen sollten ca. 1-2 cm tief sein.
2. **Samen aussäen:** Lege die Schweizer Mangold Samen in die Saatrillen. Achte darauf, dass die Samen nicht zu dicht liegen. Ein Abstand von ca. 5 cm zwischen den Samen ist ideal.
3. **Mit Erde bedecken:** Bedecke die Samen mit einer dünnen Schicht Erde.
4. **Angießen:** Gieße die Erde vorsichtig an, damit die Samen nicht weggespült werden.
5. **Feucht halten:** Halte die Erde feucht, aber nicht nass. Am besten besprühst du die Erde regelmäßig mit einer Sprühflasche.
* **Einpflanzen von Jungpflanzen:**
1. **Pflanzlöcher graben:** Grabe mit einer Pflanzkelle Pflanzlöcher in die Erde. Die Löcher sollten so groß sein, dass die Wurzelballen der Jungpflanzen hineinpassen.
2. **Jungpflanzen einsetzen:** Setze die Jungpflanzen vorsichtig in die Pflanzlöcher.
3. **Mit Erde auffüllen:** Fülle die Pflanzlöcher mit Erde auf und drücke die Erde leicht an.
4. **Angießen:** Gieße die Jungpflanzen gründlich an.
3. Standortwahl:
Schweizer Mangold liebt die Sonne! Wähle einen sonnigen Standort für deinen Dachgarten. Mindestens 6 Stunden Sonne pro Tag sind ideal. Aber auch ein halbschattiger Standort ist möglich, dann wächst der Mangold etwas langsamer. Achte darauf, dass der Standort windgeschützt ist, da starker Wind die Pflanzen beschädigen kann.
4. Bewässerung:
Schweizer Mangold braucht regelmäßig Wasser, besonders während der Wachstumsphase. Gieße die Pflanzen am besten morgens oder abends, wenn die Sonne nicht so stark scheint. Vermeide Staunässe, da dies zu Wurzelfäule führen kann. Die Erde sollte immer leicht feucht sein. Ich mache immer den Fingertest: Wenn sich die oberste Erdschicht trocken anfühlt, ist es Zeit zu gießen.
5. Düngung:
Schweizer Mangold ist ein Starkzehrer und braucht ausreichend Nährstoffe. Dünge die Pflanzen regelmäßig mit organischem Dünger, z.B. Kompost, Hornspäne oder Gemüsedünger. Beginne mit der Düngung ca. 2-3 Wochen nach der Aussaat oder dem Einpflanzen. Ich dünge meine Mangoldpflanzen alle 2-3 Wochen mit Flüssigdünger, das ist super einfach.
6. Pflege:
* **Unkraut entfernen:** Entferne regelmäßig Unkraut, damit es den Mangoldpflanzen keine Nährstoffe wegnimmt.
* **Schädlinge kontrollieren:** Kontrolliere die Pflanzen regelmäßig auf Schädlinge wie Blattläuse oder Schnecken. Bei Bedarf kannst du biologische Schädlingsbekämpfungsmittel einsetzen.
* **Verwelkte Blätter entfernen:** Entferne regelmäßig verwelkte oder beschädigte Blätter, damit die Pflanzen gesund bleiben.
* **Rankhilfe anbringen (optional):** Wenn deine Mangoldsorte sehr groß wird, kannst du eine Rankhilfe anbringen, um die Blätter sauber zu halten und die Pflanzen zu stützen.
7. Ernte:
Du kannst Schweizer Mangold ernten, sobald die Blätter groß genug sind. Schneide die äußeren Blätter mit einem Messer oder einer Schere ab. Die inneren Blätter wachsen weiter und du kannst immer wieder ernten. Die Erntezeit beginnt in der Regel ca. 8-10 Wochen nach der Aussaat oder dem Einpflanzen. Ich liebe es, frischen Mangold direkt aus dem Garten zu holen und ihn sofort zuzubereiten!
Zusätzliche Tipps für deinen Dachgarten:
* **Mischkultur:** Pflanze Schweizer Mangold zusammen mit anderen Gemüsearten, die sich gut ergänzen. Gute Nachbarn sind z.B. Karotten, Radieschen oder Zwiebeln.
* **Sonnenschutz:** An sehr heißen Tagen kann es sinnvoll sein, die Pflanzen mit einem Sonnensegel oder einem Schattiernetz zu schützen.
* **Winterschutz:** Schweizer Mangold ist bedingt winterhart. In milden Wintern kann er draußen überleben, wenn er mit Reisig oder Laub abgedeckt wird. In kalten Wintern solltest du die Pflanzen ins Haus holen oder sie mit einem Vlies schützen.
* **Sortenwahl:** Es gibt verschiedene Schweizer Mangold Sorten mit unterschiedlichen Farben und Formen. Wähle die Sorte,
Conclusion
So, there you have it! Transforming your rooftop into a thriving Swiss chard garden is not only achievable, but also incredibly rewarding. We’ve walked you through the essential steps, from selecting the right containers and soil to nurturing your plants and harvesting your bounty. But why is this DIY trick a must-try?
First and foremost, growing your own Swiss chard offers unparalleled freshness and flavor. Imagine stepping onto your rooftop and picking vibrant, crisp leaves just moments before adding them to your salad, sautéing them with garlic, or incorporating them into a hearty soup. The taste difference compared to store-bought Swiss chard is simply remarkable. You’ll be amazed at the depth of flavor and the satisfying crunch that comes from homegrown produce.
Beyond the superior taste, rooftop gardening with Swiss chard is an environmentally friendly practice. By growing your own food, you reduce your reliance on commercially grown produce, which often travels long distances, contributing to carbon emissions. You also minimize the use of pesticides and herbicides, creating a healthier environment for yourself and your community. Plus, rooftop gardens can help insulate your building, reducing energy consumption and lowering your utility bills.
But the benefits don’t stop there. Gardening is a therapeutic activity that can reduce stress, improve your mood, and connect you with nature. Tending to your Swiss chard plants, watching them grow, and harvesting your own food can be incredibly fulfilling. It’s a chance to slow down, appreciate the simple things in life, and reconnect with the natural world.
And let’s not forget the aesthetic appeal. A rooftop garden adds beauty and vibrancy to your home. Imagine transforming your unused rooftop space into a lush, green oasis, a place where you can relax, entertain guests, and enjoy the beauty of nature. Swiss chard, with its colorful stems and textured leaves, is a particularly attractive plant that can add visual interest to your garden.
Now, for some suggestions and variations to personalize your rooftop Swiss chard garden:
* Experiment with different varieties: Swiss chard comes in a range of colors, from bright red and orange to vibrant yellow and white. Try growing a mix of varieties to add visual appeal to your garden and explore different flavor profiles.
* Companion planting: Consider planting Swiss chard alongside other vegetables and herbs that can benefit from each other. For example, planting onions or garlic near your Swiss chard can help deter pests.
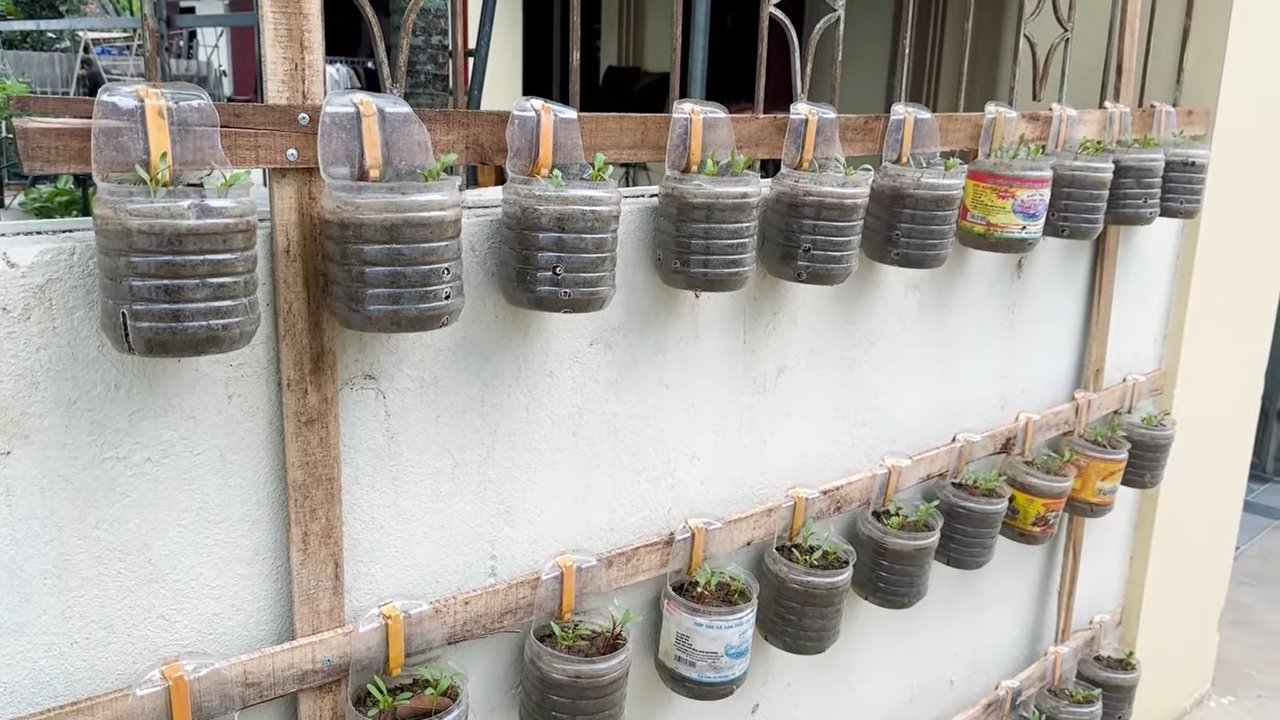
* Vertical gardening: If you have limited rooftop space, consider using vertical gardening techniques to maximize your growing area. You can use hanging baskets, wall planters, or stacked containers to create a vertical Swiss chard garden.
* Extend the growing season: In colder climates, you can extend the Swiss chard growing season by using row covers or a small greenhouse to protect your plants from frost.
We are confident that you will find this DIY trick to be a rewarding and enjoyable experience. So, what are you waiting for? Grab your gardening gloves, gather your supplies, and start your rooftop Swiss chard garden today! We encourage you to share your experiences with us. Post photos of your garden, share your tips and tricks, and let us know how your Swiss chard is growing. We can’t wait to see what you create! Happy gardening!
Frequently Asked Questions (FAQ)
What kind of soil is best for growing Swiss chard on a rooftop?
The ideal soil for rooftop Swiss chard gardening is a well-draining potting mix that is rich in organic matter. Avoid using garden soil, as it can be too heavy and compact for containers. Look for a potting mix that contains ingredients like peat moss, perlite, and vermiculite, which will help retain moisture and provide good drainage. Adding compost to your potting mix will further enrich the soil and provide essential nutrients for your Swiss chard plants. You can also consider using a raised bed mix, which is specifically formulated for raised garden beds and containers.
How much sunlight does Swiss chard need on a rooftop?
Swiss chard thrives in full sun, which means it needs at least six hours of direct sunlight per day. However, it can also tolerate partial shade, especially in hotter climates. If your rooftop receives less than six hours of sunlight, try to position your containers in the sunniest spot possible. You can also supplement with grow lights if needed. Monitor your plants closely and adjust their location as needed to ensure they are getting enough sunlight.
How often should I water my Swiss chard plants on a rooftop?
Watering frequency will depend on several factors, including the weather, the size of your containers, and the type of soil you are using. In general, you should water your Swiss chard plants whenever the top inch of soil feels dry to the touch. Avoid overwatering, as this can lead to root rot. When watering, water deeply and thoroughly, ensuring that the water reaches the roots of the plants. During hot, dry weather, you may need to water your plants more frequently.
What are some common pests and diseases that affect Swiss chard, and how can I prevent them?
Swiss chard is generally a hardy plant, but it can be susceptible to certain pests and diseases. Common pests include aphids, flea beetles, and leaf miners. To prevent pest infestations, inspect your plants regularly and remove any pests you find. You can also use organic pest control methods, such as insecticidal soap or neem oil. Common diseases that can affect Swiss chard include leaf spot and downy mildew. To prevent these diseases, ensure good air circulation around your plants and avoid overhead watering. If you notice any signs of disease, remove the affected leaves immediately.
When is the best time to harvest Swiss chard from my rooftop garden?
You can begin harvesting Swiss chard leaves as soon as they are large enough to eat, typically when they are about 6-8 inches long. Harvest the outer leaves first, leaving the inner leaves to continue growing. You can harvest Swiss chard continuously throughout the growing season. To harvest, simply cut the leaves off at the base of the plant with a sharp knife or scissors. Avoid pulling the leaves off, as this can damage the plant.
Can I grow Swiss chard in containers on a windy rooftop?
Yes, you can grow Swiss chard in containers on a windy rooftop, but you will need to take some precautions to protect your plants from the wind. Choose sturdy containers that are heavy enough to withstand strong winds. You can also place your containers in a sheltered location, such as near a wall or fence. Consider using windbreaks, such as trellises or screens, to protect your plants from the wind. Water your plants regularly, as wind can dry out the soil quickly.
How can I fertilize my Swiss chard plants on a rooftop?
Swiss chard benefits from regular fertilization. You can use a balanced fertilizer, such as a 10-10-10 or 20-20-20, or an organic fertilizer, such as compost tea or fish emulsion. Follow the instructions on the fertilizer package for application rates. Fertilize your plants every 2-3 weeks during the growing season. Avoid over-fertilizing, as this can lead to excessive leaf growth and reduced flavor.
Is Swiss chard a good choice for a beginner rooftop gardener?
Yes, Swiss chard is an excellent choice for beginner rooftop gardeners. It is a relatively easy plant to grow and requires minimal maintenance. It is also a versatile vegetable that can be used in a variety of dishes. With a little care and attention, you can enjoy a bountiful harvest of fresh, delicious Swiss chard from your rooftop garden.


Leave a Comment