
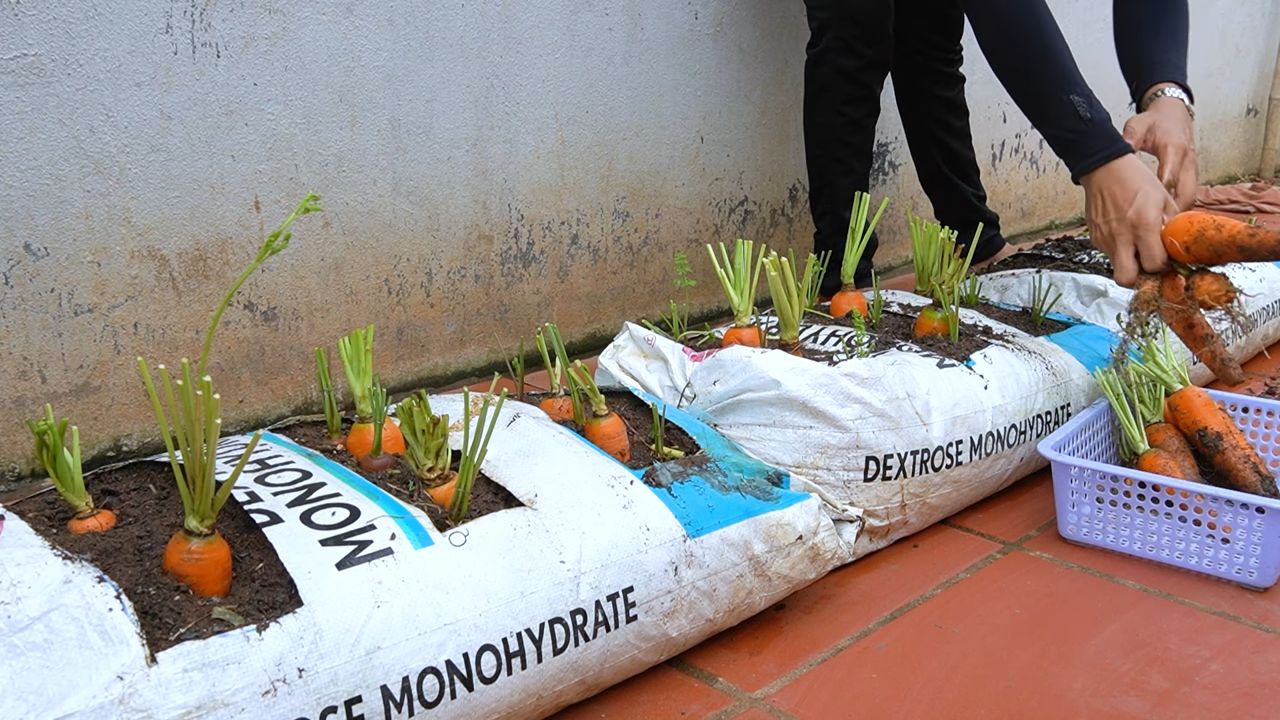
Soil bag carrot growing: who knew such a simple concept could unlock a world of delicious, homegrown goodness right on your doorstep? Forget those perfectly uniform, store-bought carrots – we’re talking about embracing the quirky, character-filled, and undeniably tastier carrots you can cultivate yourself, even without a traditional garden bed!
For centuries, humans have nurtured the earth, coaxing forth sustenance from the soil. While elaborate gardens were once the domain of the wealthy, the desire to grow our own food is deeply ingrained in our collective history. Think of the victory gardens of wartime, a testament to resilience and self-sufficiency. Now, we’re taking that spirit of resourcefulness and applying it to modern living, proving that anyone, anywhere, can experience the joy of harvesting their own vegetables.
But let’s be honest, not everyone has the space, time, or resources for a sprawling garden. That’s where this DIY trick comes in! Soil bag carrot growing is the perfect solution for apartment dwellers, balcony gardeners, or anyone simply looking for a low-effort, high-reward gardening project. Imagine the satisfaction of snipping fresh carrot tops for a salad or roasting your own homegrown carrots for a hearty winter meal. This isn’t just about growing vegetables; it’s about connecting with nature, reducing your carbon footprint, and enjoying the unparalleled flavor of truly fresh produce. So, grab a bag of soil, and let’s get growing!
Grow Carrots in a Soil Bag: A Simple DIY Guide
Hey there, fellow gardening enthusiasts! Are you short on space but dreaming of harvesting your own crunchy, sweet carrots? Well, I’ve got just the project for you: growing carrots in a soil bag! It’s surprisingly easy, requires minimal effort, and is perfect for balconies, patios, or even small backyards. Let’s dive in!
What You’ll Need
Before we get our hands dirty, let’s gather all the necessary supplies. Trust me, having everything ready beforehand will make the whole process smoother and more enjoyable.
* A large bag of potting soil: Look for a bag specifically designed for vegetables. I usually go for a 40-50 liter bag, which gives the carrots plenty of room to grow. Make sure it’s a good quality mix that drains well.
* Carrot seeds: Choose your favorite variety! Nantes, Chantenay, and Parisian carrots are all excellent choices for container gardening. Nantes are my personal favorite because they grow straight and are super sweet.
* A sharp knife or scissors: For cutting drainage holes in the bag.
* Watering can or hose: Essential for keeping your carrots hydrated.
* Optional: Slow-release fertilizer: This will give your carrots an extra boost of nutrients.
* Optional: Horticultural fleece or netting: To protect your seedlings from pests.
Getting Started: Preparing the Soil Bag
This is where the magic begins! We’re going to transform that ordinary bag of soil into a thriving carrot patch.
1. Choose your location: Carrots need at least 6-8 hours of sunlight per day, so pick a sunny spot for your soil bag. Make sure it’s a location where you can easily water them.
2. Prepare the bag: Lay the bag of potting soil flat on the ground. Gently pat it down to even out the soil inside.
3. Cut drainage holes: This is crucial! Carrots hate sitting in soggy soil. Using your knife or scissors, carefully cut several drainage holes in the bottom of the bag. I usually make about 6-8 holes, spaced evenly apart.
4. Open the top of the bag: Carefully cut along the top of the bag, creating a large opening. You can either cut the entire top off or leave a few inches to create a rim. I prefer leaving a rim because it helps to contain the soil and makes watering easier.
5. Loosen the soil: Gently loosen the soil inside the bag with your hands or a small trowel. This will help the carrot roots penetrate the soil more easily. Be careful not to compact the soil.
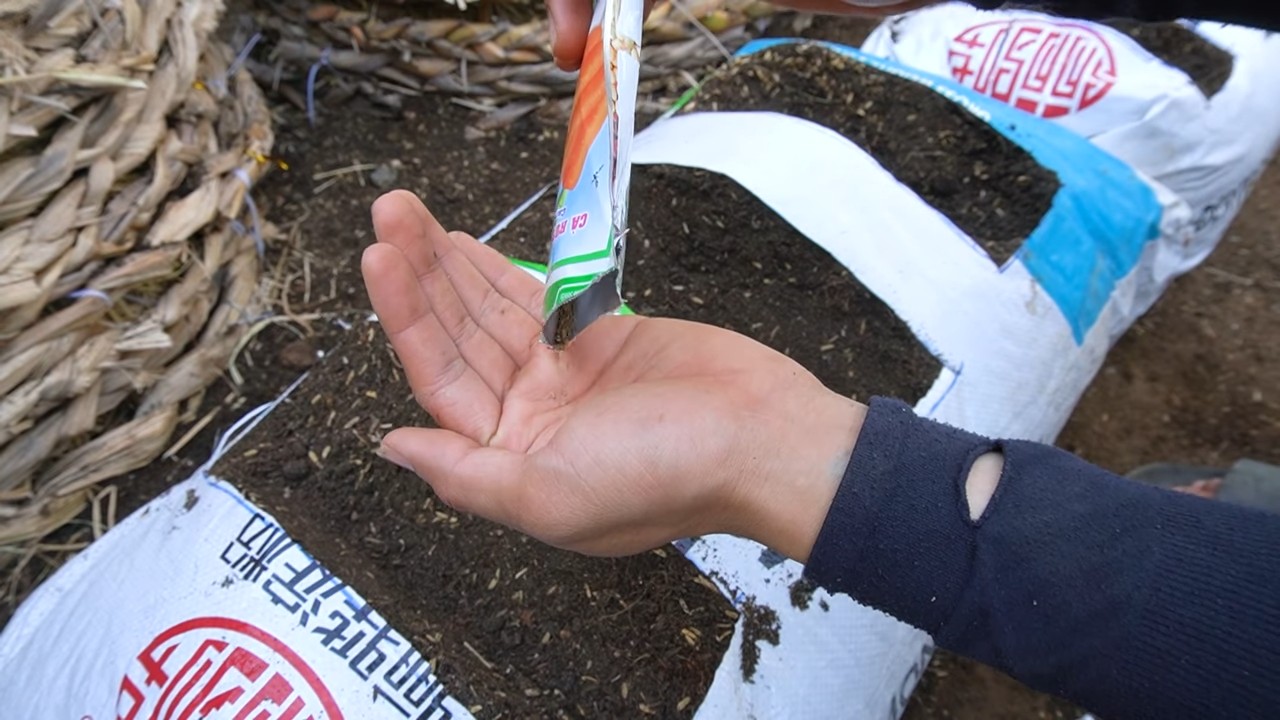
6. Optional: Add slow-release fertilizer: If you’re using slow-release fertilizer, now is the time to mix it into the top few inches of soil. Follow the instructions on the fertilizer package for the correct amount.
Sowing the Seeds: Planting Your Carrot Crop
Now comes the fun part: planting the carrot seeds! This is where your patience will be tested, but trust me, it’s worth it.
1. Water the soil: Before planting, thoroughly water the soil in the bag. This will help the seeds germinate and get off to a good start.
2. Sow the seeds: Carrot seeds are tiny, so it’s easy to sow them too thickly. To avoid this, I like to mix the seeds with a bit of sand before sowing. This helps to space them out more evenly. Sprinkle the seeds evenly over the surface of the soil.
3. Cover the seeds: Gently cover the seeds with a thin layer of soil (about ¼ inch). You can use your hands or a small trowel to do this.
4. Water again: Gently water the soil again, being careful not to wash away the seeds. I use a watering can with a rose attachment to avoid disturbing the soil.
5. Optional: Cover with horticultural fleece or netting: This will protect your seedlings from pests like carrot root fly. Secure the fleece or netting around the bag with pegs or stones.
Caring for Your Carrots: Watering, Thinning, and Feeding
Once your seeds are sown, it’s time to nurture your little carrot plants. Consistent care is key to a successful harvest.
1. Watering: Carrots need consistent moisture to thrive. Water regularly, especially during dry spells. The soil should be moist but not waterlogged. Check the soil moisture by sticking your finger into the soil. If the top inch feels dry, it’s time to water.
2. Thinning: This is probably the most important step! If you don’t thin your carrots, they’ll be overcrowded and won’t develop properly. Once the seedlings are about 1-2 inches tall, thin them out so that they are about 1-2 inches apart. You can use small scissors to snip off the unwanted seedlings at soil level. Don’t pull them out, as this can disturb the roots of the remaining plants. I know it feels wasteful, but trust me, your remaining carrots will thank you!
3. Weeding: Keep the soil bag free of weeds. Weeds compete with your carrots for nutrients and water. Gently pull out any weeds that appear.
4. Feeding: If you didn’t add slow-release fertilizer at planting time, you can feed your carrots with a liquid fertilizer every few weeks. Choose a fertilizer that is high in potassium, which promotes root growth. Follow the instructions on the fertilizer package for the correct amount.
5. Monitor for pests and diseases: Keep an eye out for any signs of pests or diseases. Carrot root fly is a common pest that can damage carrot roots. If you see any signs of infestation, take action immediately. You can use horticultural fleece to prevent carrot root fly from laying their eggs.
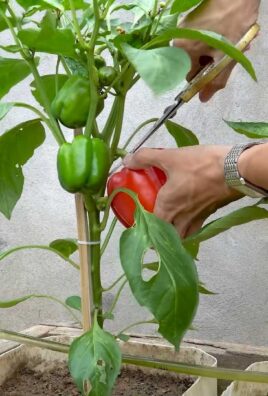
Harvesting Your Carrots: The Sweet Reward
After all your hard work, it’s finally time to harvest your delicious carrots!
1. Check for maturity: Carrots are usually ready to harvest about 60-80 days after sowing, depending on the variety. You can check for maturity by gently pulling back the soil around the top of the carrot to see how big it is.
2. Harvesting: To harvest your carrots, gently loosen the soil around the carrot with a trowel. Then, grasp the carrot by the base of the leaves and gently pull it out of the soil. If the carrot is difficult to pull out, try wiggling it back and forth to loosen it.
3. Enjoy your harvest: Wash your carrots thoroughly and enjoy them fresh from the garden! They’re delicious raw, roasted, steamed, or added to soups and stews.
Troubleshooting: Common Problems and Solutions
Even with the best care, you might encounter a few problems along the way. Here are some common issues and how to fix them:
* Poor germination: If your seeds don’t germinate, it could be due to several factors:
* Old seeds: Carrot seeds have a relatively short shelf life. Make sure you’re using fresh seeds.
* Dry soil: Carrot seeds need consistent moisture to germinate. Keep the soil moist but not waterlogged.
* Cold temperatures: Carrot seeds germinate best in warm soil. If the soil is too cold, they may not germinate.
* Forked or stunted roots: This is often caused by compacted soil or rocks in the soil. Make sure you use a good quality potting mix and remove any rocks or debris.
* Carrot root fly damage: Carrot root fly larvae can tunnel into carrot roots, causing them to become damaged and inedible. Use horticultural fleece to prevent carrot root fly from laying their eggs.
* Bolting: Bolting is when a plant prematurely flowers and goes to seed. This can be caused by stress, such as hot weather or lack of water. Keep your carrots well-watered and protect them from extreme heat.
Tips for Success
Here are a few extra tips to help you grow the best carrots possible:
* Choose the right variety: Some carrot varieties are better suited for container gardening than others. Nantes, Chantenay, and Parisian carrots are all excellent choices.
* Use a good quality potting mix: Don’t skimp on the potting mix! A good quality mix will provide your carrots with the nutrients and drainage they need to thrive.
* Thin your carrots regularly: This is crucial! If you don’t thin your carrots, they’ll be overcrowded and won’t develop properly.
* Water consistently: Carrots need consistent moisture to thrive. Water regularly, especially during dry spells.
* Protect your carrots from pests: Carrot root fly is a common pest that can damage carrot roots. Use horticultural fleece to prevent carrot root fly from laying their eggs.
* Be patient: Carrots take time to grow. Don’t get discouraged if you don’t see results immediately. With a little patience and care, you’ll be harvesting your own delicious carrots in no time!
Conclusion
So, there you have it! Transforming a simple soil bag into a thriving carrot garden is not just a clever gardening hack; it’s a game-changer for anyone looking to maximize space, control soil conditions, and enjoy a bountiful harvest of fresh, delicious carrots. This method offers a level of convenience and control that traditional in-ground gardening often lacks, making it particularly appealing to urban dwellers, balcony gardeners, and those with less-than-ideal native soil.
The beauty of this DIY project lies in its simplicity and adaptability. You’re not confined to a specific carrot variety; experiment with different types, from short and stubby Nantes carrots perfect for shallow bags to longer Imperator varieties if you have a deeper bag. Consider adding companion plants like marigolds or basil around the edges of the bag to deter pests and enhance the overall health of your carrot crop. You can even succession plant, sowing seeds every few weeks to ensure a continuous supply of fresh carrots throughout the growing season.
Beyond the practical benefits, growing carrots in a soil bag is incredibly rewarding. There’s something truly special about nurturing a plant from seed to harvest and then enjoying the fruits (or, in this case, the roots!) of your labor. The vibrant green foliage against the backdrop of the soil bag creates a visually appealing mini-garden, adding a touch of nature to any space.
This DIY soil bag carrot growing method is a must-try for several reasons:
* It’s space-saving, making it ideal for small gardens or balconies.
* It allows for better soil control, ensuring optimal growing conditions for your carrots.
* It’s relatively inexpensive and easy to set up, requiring minimal tools and materials.
* It’s a fun and engaging project for gardeners of all skill levels.
* And most importantly, it yields a delicious and nutritious harvest of homegrown carrots!
Don’t be intimidated if you’re a beginner gardener. This project is incredibly forgiving, and even if you encounter a few bumps along the way, you’ll learn valuable lessons that will help you become a more confident and successful grower.
We wholeheartedly encourage you to give this DIY soil bag carrot growing method a try. We are confident that you’ll be amazed by the results. Once you’ve harvested your first batch of homegrown carrots, be sure to share your experience with us! We’d love to see photos of your soil bag gardens and hear about any tips or tricks you’ve discovered along the way. Let’s inspire others to embrace this simple yet effective gardening technique and enjoy the satisfaction of growing their own food. Happy gardening!
Frequently Asked Questions (FAQ)
What type of soil is best for growing carrots in a soil bag?
The ideal soil for carrots is loose, well-draining, and rich in organic matter. Carrots need to be able to easily push through the soil as they grow, so avoid heavy clay soils that can become compacted. A good mix would be a combination of potting mix, compost, and perlite or vermiculite. The potting mix provides a base of nutrients, the compost adds organic matter and improves drainage, and the perlite or vermiculite helps to aerate the soil and prevent compaction. You can also purchase a pre-mixed vegetable garden soil specifically formulated for root vegetables. Avoid using garden soil directly from your yard, as it may contain weed seeds, pests, or diseases that can harm your carrots.
How often should I water my soil bag carrots?
Watering frequency depends on several factors, including the weather, the size of your soil bag, and the type of soil you’re using. Generally, you should water your carrots whenever the top inch of soil feels dry to the touch. During hot, dry weather, you may need to water daily, while during cooler, wetter periods, you may only need to water every few days. When watering, be sure to soak the soil thoroughly, allowing the water to drain out of the bottom of the bag. Avoid overwatering, as this can lead to root rot. A good way to check if your carrots need water is to stick your finger into the soil about an inch deep. If the soil feels dry, it’s time to water.
How much sunlight do carrots need when grown in a soil bag?
Carrots need at least six hours of direct sunlight per day to thrive. Choose a location for your soil bag that receives plenty of sunlight throughout the day. If you live in a particularly hot climate, you may want to provide some afternoon shade to prevent the soil from drying out too quickly. If you don’t have a sunny spot, you can supplement with grow lights. Position the grow lights a few inches above the foliage and keep them on for 12-14 hours per day.
What are some common pests and diseases that affect carrots, and how can I prevent them?
Common pests that affect carrots include carrot rust flies, aphids, and nematodes. Diseases include leaf blight and root rot. To prevent these problems, start with healthy, disease-free seeds. Practice crop rotation, avoiding planting carrots in the same spot year after year. Keep the area around your soil bag free of weeds, which can harbor pests and diseases. Use organic pest control methods, such as insecticidal soap or neem oil, to control aphids and other pests. Ensure good drainage to prevent root rot. Consider using companion planting, such as planting marigolds near your carrots to deter nematodes.
How do I know when my carrots are ready to harvest from the soil bag?
Carrots are typically ready to harvest 60-80 days after planting, depending on the variety. The best way to determine if your carrots are ready is to check their size. Gently brush away the soil around the top of the carrot to see how thick it is. Most carrot varieties are ready to harvest when they are about 1/2 to 1 inch in diameter at the top. You can also gently pull up a few carrots to check their size and color. If they are the size you want and have a vibrant orange color, they are ready to harvest.
Can I reuse the soil bag for another crop after harvesting the carrots?
Yes, you can reuse the soil bag, but it’s important to replenish the nutrients in the soil. After harvesting the carrots, remove any remaining plant debris and weeds. Amend the soil with fresh compost and organic fertilizer to replenish the nutrients that were used by the carrots. You may also want to add some perlite or vermiculite to improve drainage. Avoid planting the same type of vegetable in the soil bag immediately after harvesting carrots, as this can deplete the soil of certain nutrients. Instead, consider planting a different type of vegetable, such as leafy greens or beans, which have different nutrient requirements.
What are some variations I can try with this soil bag carrot growing method?
There are many ways to customize this method. You can try different types of soil bags, such as burlap bags or grow bags. You can also experiment with different carrot varieties, such as Nantes, Chantenay, or Imperator. Consider adding companion plants, such as onions, garlic, or rosemary, to deter pests and improve the flavor of your carrots. You can also try succession planting, sowing seeds every few weeks to ensure a continuous supply of fresh carrots. Another variation is to use a self-watering soil bag, which can help to reduce watering frequency and prevent overwatering. Finally, you can try growing other root vegetables in a soil bag, such as radishes, beets, or turnips.
Leave a Comment