
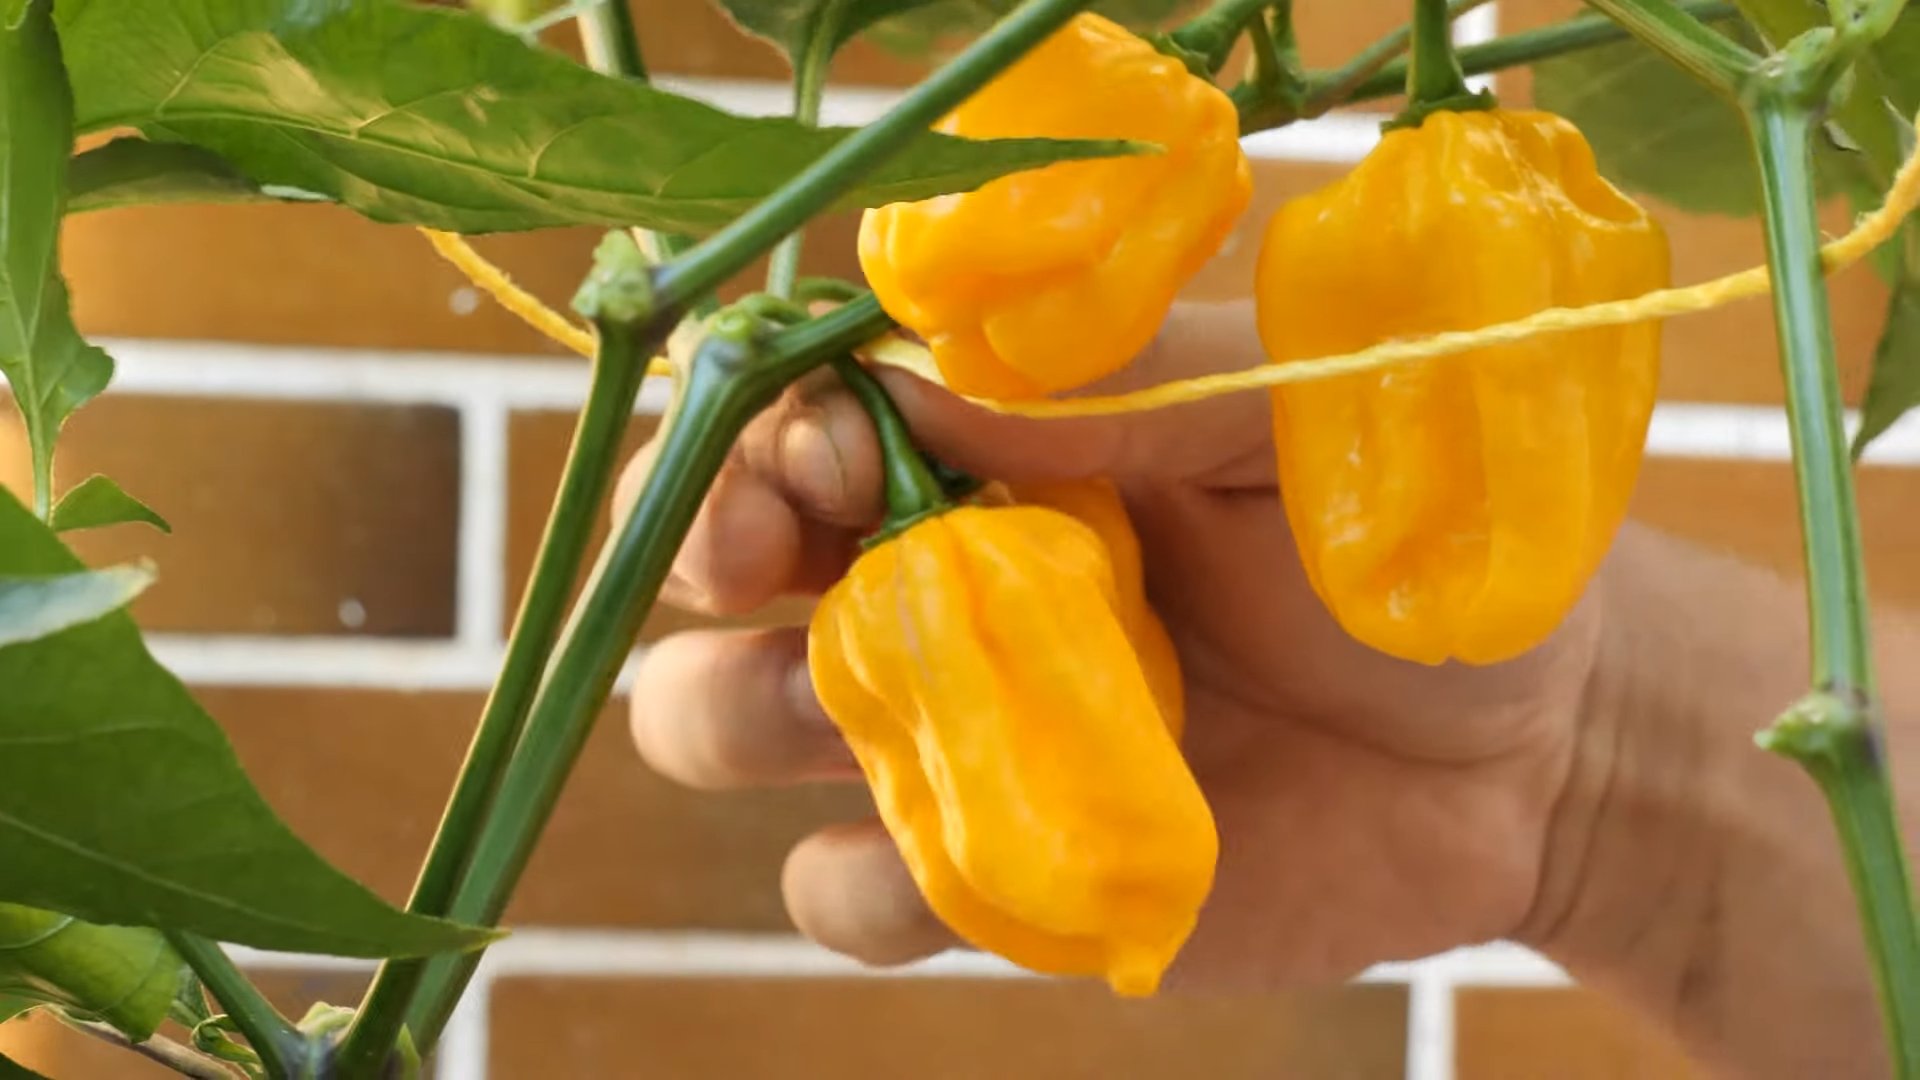
Sprout habanero peppers from seed? Sounds intimidating, right? I get it! But trust me, unlocking the fiery potential of these little dynamos in your own backyard is easier than you think. For centuries, peppers, including the habanero, have been cultivated, not just for their intense heat, but also for their vibrant flavors and medicinal properties. From ancient Mesoamerica, where they were revered as sacred plants, to modern kitchens worldwide, peppers have held a special place in our culinary traditions.
But why bother starting habaneros from seed yourself? Well, for starters, you gain complete control over the process, ensuring you’re growing healthy, robust plants free from unwanted chemicals. Plus, it’s incredibly rewarding to nurture a tiny seed into a thriving pepper plant that produces those coveted, fiery fruits. In this DIY guide, I’m going to share my tried-and-true tricks and hacks to help you successfully sprout habanero peppers from seed, even if you’re a complete beginner. Get ready to add some serious heat to your garden and your plate!
Sprouting Habanero Peppers From Seed: A Fiery DIY Adventure!
Okay, pepperheads, let’s get down to business! Growing habaneros from seed can seem intimidating, but trust me, it’s totally doable, and the reward of those fiery little fruits is SO worth it. I’m going to walk you through every step, from prepping your seeds to transplanting your seedlings. Get ready to add some serious heat to your garden!
Phase 1: Seed Preparation – Waking Up the Fire
Habanero seeds can be a bit slow to germinate, so we’re going to give them a head start. This involves a couple of key steps:
* Seed Scarification (Optional, but Recommended): This involves gently scratching the seed coat to help water penetrate.
* Seed Soaking: Hydrating the seeds to kickstart the germination process.
Step-by-Step Instructions:
1. Gather Your Supplies: You’ll need:
* Habanero pepper seeds (obviously!)
* Fine-grit sandpaper (or a nail file)
* A small bowl or container
* Distilled or filtered water (tap water can sometimes inhibit germination)
* Paper towels
* A zip-top bag
2. Scarify the Seeds (Optional): This step can significantly improve germination rates, especially for older seeds. Gently rub each seed a few times against the fine-grit sandpaper. You’re not trying to grind them down, just lightly scratch the surface. Be careful not to damage the seed embryo! I usually do this for about 5-10 seconds per seed. You can also use a nail file for this.
3. Soak the Seeds: Place the scarified (or un-scarified) seeds in the small bowl and cover them with distilled or filtered water. Let them soak for 12-24 hours. This allows the seeds to absorb moisture and begin the germination process. I usually soak mine overnight.
4. Prepare the Paper Towel: After soaking, gently drain the water. Take a paper towel and dampen it with more distilled or filtered water. You want it damp, not soaking wet. Wring out any excess water.
5. Place Seeds on Paper Towel: Lay the damp paper towel flat and carefully arrange the soaked seeds on one half of the towel, leaving some space between them.
6. Fold and Seal: Fold the other half of the paper towel over the seeds, creating a little seed sandwich. Gently press down to ensure good contact between the seeds and the damp paper towel.
7. Bag It Up: Place the folded paper towel with the seeds inside the zip-top bag. Seal the bag, leaving a small corner slightly open for air circulation. This will help prevent mold growth.
8. Warm and Dark Place: Store the bag in a warm, dark place. A kitchen cabinet or a drawer works well. The ideal temperature for habanero seed germination is between 80-85°F (27-29°C). You can use a heat mat designed for seed starting if you live in a cooler climate.
9. Check Daily: Check the seeds daily for moisture. If the paper towel starts to dry out, lightly mist it with water. Also, keep an eye out for any signs of mold. If you see mold, carefully remove the affected seeds and replace the paper towel.
10. Wait for Sprouts: Within a few days to a week (sometimes longer, be patient!), you should start to see tiny white sprouts emerging from the seeds. Once the sprouts are about 1/4 to 1/2 inch long, they’re ready to be planted!
Phase 2: Planting the Sprouted Seeds – Giving Them a Home
Now that our seeds have sprouted, it’s time to give them a cozy home in some soil. We’ll be using small containers to start, as this allows us to control the environment and easily move them around.
* Choosing the Right Soil: A well-draining seed starting mix is crucial.
* Planting Depth: Don’t bury the sprouts too deep!
* Providing Light: Seedlings need plenty of light to thrive.
Step-by-Step Instructions:
1. Gather Your Supplies: You’ll need:
* Small containers (seed starting trays, small pots, or even recycled yogurt cups with drainage holes)
* Seed starting mix (or a very light, well-draining potting mix)
* A small spoon or tweezers
* A spray bottle filled with water
* A heat mat (optional, but helpful)
* Grow lights (or a very sunny windowsill)
2. Prepare the Containers: Fill the small containers with the seed starting mix, leaving about 1/2 inch of space at the top. Gently tap the containers to settle the soil.
3. Moisten the Soil: Lightly moisten the soil with the spray bottle. You want it damp, but not soggy.
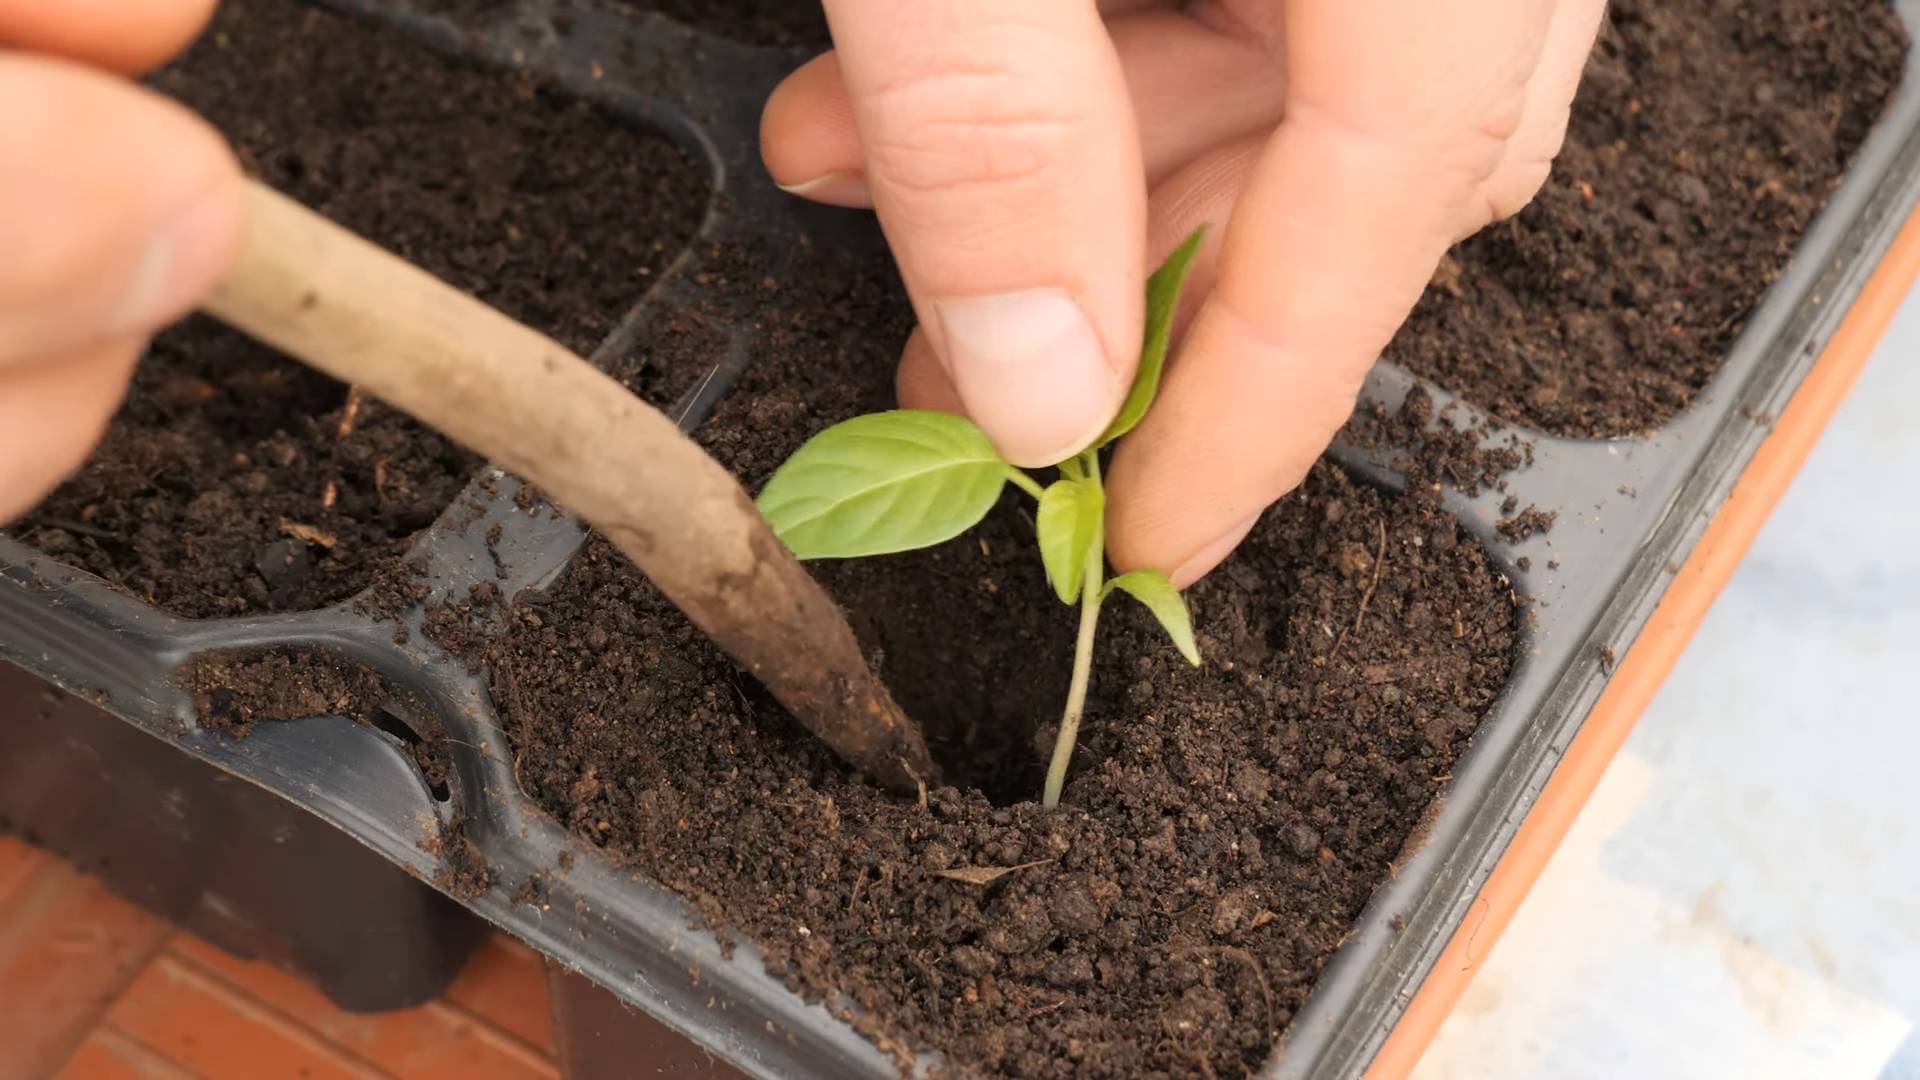
4. Plant the Sprouts: Using a small spoon or tweezers, carefully remove the sprouted seeds from the paper towel. Be extremely gentle, as the sprouts are very delicate.
5. Create a Small Hole: Use your finger or a pencil to create a small hole in the soil, about 1/4 inch deep.
6. Place the Sprout: Gently place the sprouted seed into the hole, with the sprout pointing downwards.
7. Cover Gently: Lightly cover the seed with soil. Don’t pack the soil down too tightly.
8. Water Gently: Lightly mist the soil with the spray bottle to settle the soil around the seed.
9. Provide Warmth: Place the containers on a heat mat (if using) to maintain a consistent temperature. Habaneros love warmth!
10. Provide Light: Place the containers under grow lights or in a very sunny windowsill. Seedlings need at least 14-16 hours of light per day. If using a windowsill, rotate the containers regularly to prevent the seedlings from leaning towards the light.
11. Maintain Moisture: Keep the soil consistently moist, but not soggy. Check the soil daily and mist with water as needed.
Phase 3: Nurturing the Seedlings – From Tiny Sprouts to Strong Plants
Now that our seedlings are growing, it’s time to provide them with the care they need to become strong and healthy plants. This involves:
* Watering: Keeping the soil consistently moist, but not overwatering.
* Fertilizing: Providing essential nutrients for growth.
* Hardening Off: Gradually acclimating the seedlings to outdoor conditions before transplanting.
Step-by-Step Instructions:
1. Watering: Water the seedlings when the top inch of soil feels dry to the touch. Water gently, using a watering can with a fine rose or a spray bottle. Avoid overwatering, as this can lead to root rot.
2. Fertilizing: Once the seedlings have developed their first set of true leaves (the leaves that look like miniature pepper leaves, not the initial seed leaves), you can start fertilizing them with a diluted liquid fertilizer. Use a balanced fertilizer (e.g., 20-20-20) diluted to half strength. Fertilize every 2-3 weeks.
3. Providing Air Circulation: Good air circulation is important to prevent fungal diseases. If you’re growing your seedlings indoors, consider using a small fan to gently circulate the air.
4. Transplanting to Larger Pots (If Necessary): If the seedlings start to outgrow their small containers, transplant them to larger pots (e.g., 4-inch pots). Use a well-draining potting mix.
5. Hardening Off: Before transplanting the seedlings outdoors, you need to harden them off. This process gradually acclimates them to outdoor conditions, such as sunlight, wind, and temperature fluctuations. Start by placing the seedlings outdoors in a sheltered location for a few hours each day, gradually increasing the amount of time they spend outdoors over a period of 1-2 weeks. Protect them from direct sunlight and strong winds during the initial hardening off period.
Phase 4: Transplanting Outdoors – Setting the Stage for Fiery Fruits
The final step is transplanting your hardened-off seedlings into their permanent home in the garden or in larger containers.
* Choosing the Right Location: Habaneros need plenty of sunlight and well-draining soil.
* Preparing the Soil: Amend the soil with compost or other organic matter.
* Spacing: Give your plants enough space to grow.
Step-by-Step Instructions:
1. Choose a Sunny Location: Habaneros need at least 6-8 hours of direct sunlight per day.
2. Prepare the Soil: Amend the soil with compost or other organic matter to improve drainage and fertility. Habaneros
Conclusion
So, there you have it! Sprouting habanero peppers from seed might seem daunting, but with a little patience and the right approach, you can cultivate these fiery gems right in your own home. We’ve walked you through the process, from seed selection to germination techniques, and hopefully, demystified the entire endeavor.
Why is this DIY trick a must-try? Because it offers a level of control and satisfaction that you simply can’t get from buying seedlings. You get to choose the exact variety of habanero you want, ensuring you’re growing peppers that perfectly suit your taste and heat tolerance. Plus, starting from seed is often more economical, especially if you plan on growing a large number of plants. Beyond the practical benefits, there’s an undeniable joy in nurturing a plant from its very beginning, watching it grow from a tiny seed into a vibrant, pepper-producing powerhouse. And let’s be honest, bragging rights for growing your own habaneros are definitely a perk!
But the journey doesn’t have to end with the basic method we’ve outlined. Feel free to experiment! Try different seed starting mediums, like coco coir or rockwool, to see which works best for you. Explore different lighting options, from fluorescent grow lights to LED panels, to optimize seedling growth. Consider using a heat mat to maintain a consistent soil temperature, especially if you live in a cooler climate. You can even try different hardening-off techniques to prepare your seedlings for the great outdoors.
For a unique twist, try fermenting your habanero seeds before planting. Some growers believe this can improve germination rates and seedling vigor. Simply soak the seeds in a diluted solution of water and a small amount of whey or yogurt for a few days before planting. Just be sure to rinse them thoroughly before sowing.
Another variation involves scarifying the seeds. Gently rub the seeds with sandpaper or nick them with a knife to break the outer shell. This can help water penetrate the seed more easily, promoting faster germination. However, be careful not to damage the inner seed.
Ultimately, the best way to learn is by doing. Don’t be afraid to experiment and find what works best for your specific environment and growing style. The world of habanero pepper cultivation is vast and full of possibilities.
We wholeheartedly encourage you to give this DIY trick a try. It’s a rewarding experience that will not only provide you with delicious, fiery peppers but also connect you with the natural world in a meaningful way. Once you’ve successfully sprouted your habanero peppers from seed, we’d love to hear about your experience! Share your tips, tricks, and triumphs in the comments below. Let’s build a community of habanero enthusiasts and learn from each other. Happy growing! Remember, patience is key when sprouting habanero peppers from seed. Don’t get discouraged if you don’t see results immediately. With consistent care and attention, you’ll be rewarded with a bountiful harvest of these flavorful peppers.
FAQ
Frequently Asked Questions About Sprouting Habanero Peppers from Seed
1. How long does it take for habanero pepper seeds to germinate?
Germination time for habanero pepper seeds can vary depending on several factors, including temperature, humidity, and seed quality. Generally, you can expect to see sprouts within 7 to 21 days. However, it’s not uncommon for some seeds to take even longer, up to 30 days or more. Maintaining a consistent soil temperature of 80-85°F (27-29°C) is crucial for optimal germination. Using a heat mat can significantly speed up the process. Be patient and don’t give up too soon!
2. What is the best soil to use for starting habanero pepper seeds?
A well-draining seed starting mix is essential for successful germination. Avoid using garden soil, as it can be too heavy and may contain pathogens that can harm young seedlings. A good seed starting mix typically consists of peat moss, vermiculite, and perlite. You can also use coco coir as an alternative to peat moss. Ensure the mix is moist but not waterlogged. Overwatering can lead to damping-off, a fungal disease that can kill seedlings.
3. Do habanero pepper seeds need light to germinate?
While light isn’t strictly necessary for germination, it can help. Once the seeds have sprouted, they will need plenty of light to grow strong and healthy. Place the seedlings under grow lights or in a sunny window that receives at least 6-8 hours of direct sunlight per day. If using grow lights, position them a few inches above the seedlings and adjust the height as they grow. Insufficient light can result in leggy, weak seedlings.
4. How often should I water habanero pepper seedlings?
Water habanero pepper seedlings when the top inch of soil feels dry to the touch. Avoid overwatering, as this can lead to root rot. Water gently to avoid disturbing the delicate seedlings. A spray bottle or watering can with a fine rose head is ideal. Ensure the seedlings have adequate drainage to prevent water from pooling around the roots.
5. When should I transplant habanero pepper seedlings?
Transplant habanero pepper seedlings when they have developed their first set of true leaves (the leaves that appear after the initial seed leaves, or cotyledons). This usually occurs about 2-3 weeks after germination. Before transplanting, harden off the seedlings by gradually exposing them to outdoor conditions for a week or two. This will help them acclimate to the sun, wind, and temperature changes.
6. What is hardening off, and why is it important?
Hardening off is the process of gradually acclimating seedlings to outdoor conditions before transplanting them into the garden. This is crucial because seedlings grown indoors are accustomed to a controlled environment and can be shocked by the sudden exposure to sun, wind, and temperature fluctuations. To harden off seedlings, start by placing them outdoors in a sheltered location for a few hours each day, gradually increasing the amount of time they spend outside over the course of a week or two. Protect them from direct sunlight and strong winds during the initial hardening-off period.
7. What are some common problems when sprouting habanero pepper seeds, and how can I fix them?
Some common problems include:
* **Poor germination:** This can be due to old or low-quality seeds, improper soil temperature, or overwatering. Ensure you’re using fresh seeds, maintaining a consistent soil temperature, and avoiding overwatering.
* **Damping-off:** This fungal disease can kill seedlings. Prevent it by using a sterile seed starting mix, avoiding overwatering, and providing good air circulation.
* **Leggy seedlings:** This is caused by insufficient light. Provide more light by using grow lights or placing the seedlings in a sunnier location.
* **Slow growth:** This can be due to nutrient deficiencies. Fertilize the seedlings with a diluted liquid fertilizer specifically formulated for seedlings.
8. Can I sprout habanero pepper seeds directly in the garden?
While it’s possible to sprout habanero pepper seeds directly in the garden, it’s generally not recommended, especially in cooler climates. Habanero peppers require a long growing season, and starting them indoors allows you to get a head start. Direct sowing also exposes the seeds to a greater risk of pests, diseases, and unfavorable weather conditions.
9. What is the ideal temperature for growing habanero peppers?
Habanero peppers thrive in warm temperatures. The ideal temperature range for growing habanero peppers is between 70-85°F (21-29°C). They can tolerate temperatures slightly outside of this range, but extreme heat or cold can negatively impact their growth and fruit production.
10. How do I know when my habanero peppers are ripe?
Habanero peppers typically ripen from green to orange or red, depending on the variety. The peppers are ripe when they have reached their mature color and are slightly soft to the touch. The time it takes for habanero peppers to ripen can vary depending on the growing conditions and the specific variety.
Leave a Comment