
Sugarcane container gardening might sound like a tropical dream best left to sprawling plantations, but guess what? I’m here to tell you that you can absolutely cultivate your own sweet stalks, even if you’re working with a small balcony or patio! Forget those visions of endless fields; we’re bringing the sugarcane harvest home, one container at a time.
Sugarcane has a rich history, deeply intertwined with cultures around the globe. From its origins in Southeast Asia to its spread across continents, it has been a vital source of sweetness and energy for centuries. While traditionally grown on a large scale, the beauty of DIY lies in adapting these age-old practices to suit our modern lives and limited spaces.
Why should you try sugarcane container gardening? Well, imagine the satisfaction of harvesting your own natural sweetener, free from artificial additives. Plus, sugarcane plants are surprisingly beautiful, adding a touch of exotic flair to your outdoor space. But more importantly, in a world where we’re increasingly conscious of where our food comes from, growing your own sugarcane allows you to control the entire process, from planting to harvest. So, let’s dive into the simple tricks and hacks that will transform your container garden into a mini sugarcane paradise!
Growing Sugarcane in Containers: A Sweet DIY Project
Hey there, fellow gardening enthusiasts! Ever thought about growing your own sugarcane? It might sound like something only possible on a tropical farm, but guess what? You can totally do it in a container, even if you don’t live in a warm climate year-round! I’m going to walk you through everything you need to know to successfully grow sugarcane in a pot, from choosing the right variety to harvesting your own sweet stalks. Let’s get started!
Choosing Your Sugarcane Variety
Not all sugarcane varieties are created equal, especially when it comes to container gardening. You’ll want to pick a variety that’s well-suited for smaller spaces and potentially cooler climates. Here’s what I recommend:
* Consider Cold Hardiness: If you live in an area with colder winters, look for varieties known for their cold tolerance. Some examples include ‘LSU Purple’ and ‘CP 70-1133’. These can handle slightly cooler temperatures better than other varieties.
* Dwarf Varieties: While true “dwarf” sugarcane varieties are rare, some varieties tend to stay shorter and more manageable in containers. Ask your local nursery for recommendations on varieties that don’t get excessively tall.
* Ornamental Sugarcane: These varieties are often grown for their beautiful foliage rather than sugar production, but they can still be a fun and visually appealing addition to your garden. ‘Variegata’ is a popular choice with striped leaves.
* Local Availability: The best variety for you will often depend on what’s available in your area. Check with local nurseries or online seed suppliers to see what sugarcane varieties they offer.
Gathering Your Supplies
Before you start planting, you’ll need to gather all the necessary supplies. Here’s a checklist to make sure you have everything:
* Sugarcane Seed Pieces (Setts): These are sections of sugarcane stalks with at least one node (the bump where leaves grow). You can often find these at nurseries or online. Make sure they look healthy and plump.
* Large Container: Sugarcane needs room to grow, so choose a large container, at least 20 gallons in size. The bigger, the better! Make sure it has drainage holes.
* Well-Draining Potting Mix: Sugarcane prefers rich, well-draining soil. A mix of potting soil, compost, and perlite works well.
* Slow-Release Fertilizer: This will provide your sugarcane with a steady supply of nutrients throughout the growing season. Choose a fertilizer formulated for vegetables or sugarcane.
* Watering Can or Hose: You’ll need to water your sugarcane regularly, especially during hot weather.
* Gardening Gloves: Protect your hands from dirt and potential irritants.
* Pruning Shears or a Sharp Knife: You’ll need these for harvesting and pruning.
* Mulch (Optional): Mulch helps retain moisture and suppress weeds.
Planting Your Sugarcane
Now for the fun part – planting! Here’s a step-by-step guide to planting your sugarcane setts:
1. Prepare the Container: Fill your large container with the well-draining potting mix, leaving a few inches of space at the top.
2. Prepare the Setts: If your setts have been stored for a while, soak them in water for 24 hours before planting. This will help rehydrate them and encourage sprouting.
3. Planting the Setts: There are two main ways to plant sugarcane setts:
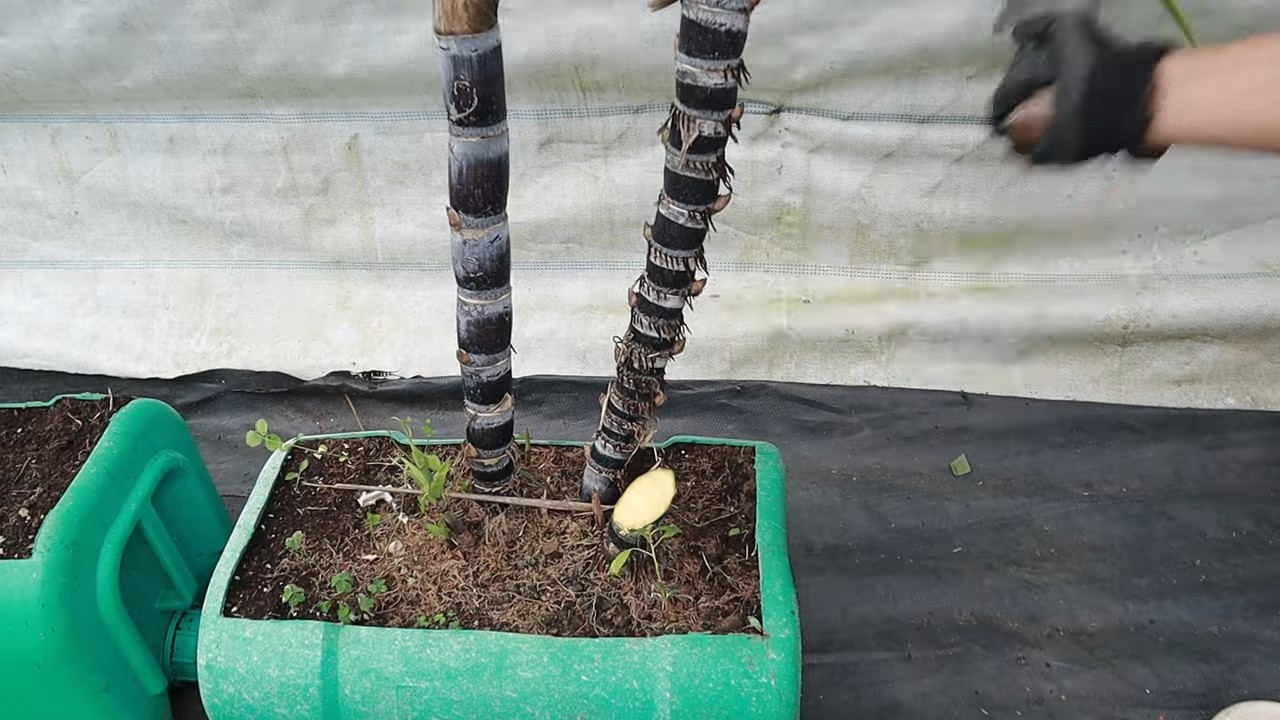
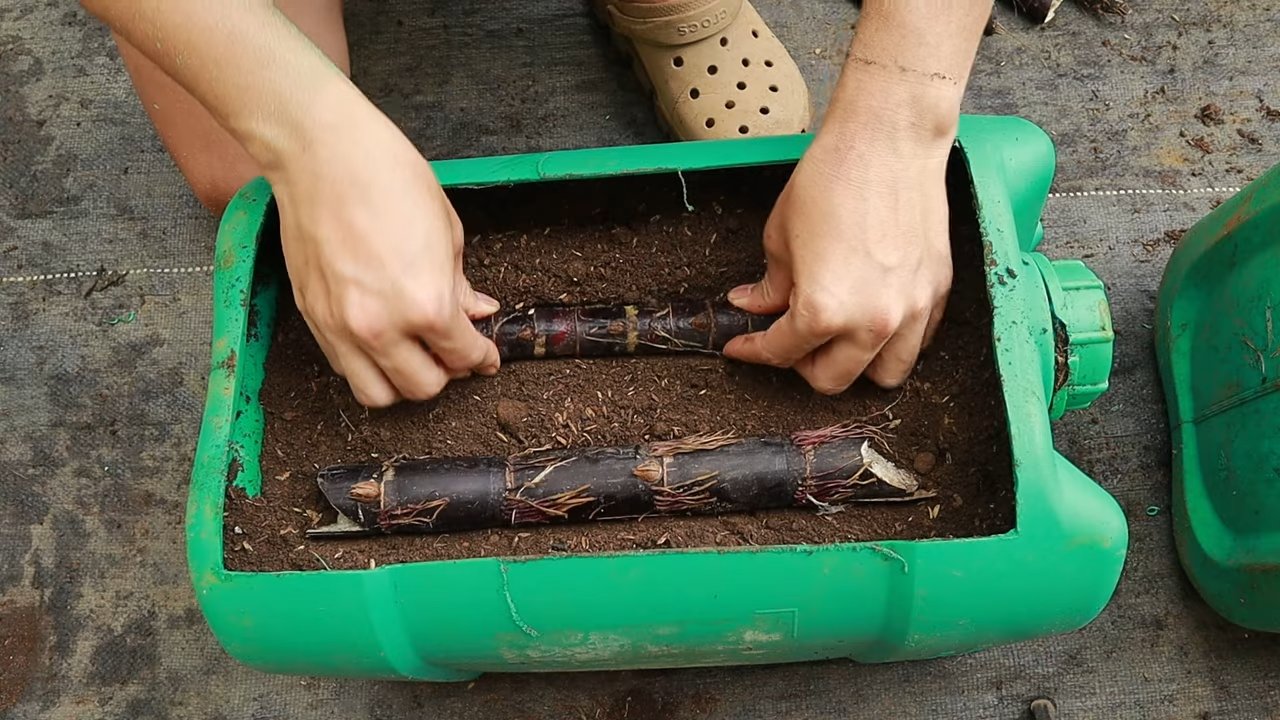
* Horizontal Planting: Lay the sett horizontally on top of the soil. Cover it with about 2-3 inches of soil. This method encourages multiple shoots to emerge.
* Vertical Planting: Plant the sett vertically with the node facing upwards, burying about half of the sett in the soil. This method typically produces a single, strong stalk.
I personally prefer horizontal planting as it tends to give you a bushier plant.
4. Water Thoroughly: After planting, water the soil thoroughly until water drains out of the bottom of the container.
5. Apply Slow-Release Fertilizer: Sprinkle the slow-release fertilizer around the base of the plant, following the instructions on the fertilizer package.
6. Mulch (Optional): Apply a layer of mulch around the base of the plant to help retain moisture and suppress weeds.
Caring for Your Sugarcane
Once your sugarcane is planted, it’s important to provide it with the proper care to ensure healthy growth. Here’s what you need to do:
1. Watering: Sugarcane needs consistent moisture, especially during hot weather. Water deeply whenever the top inch of soil feels dry to the touch. Avoid overwatering, as this can lead to root rot.
2. Sunlight: Sugarcane thrives in full sun, so make sure to place your container in a location that receives at least 6-8 hours of direct sunlight per day.
3. Fertilizing: In addition to the slow-release fertilizer you applied at planting, you can also supplement with a liquid fertilizer every few weeks during the growing season. Use a balanced fertilizer or one specifically formulated for vegetables.
4. Weeding: Keep the container free of weeds, as they can compete with your sugarcane for nutrients and water.
5. Pest and Disease Control: Sugarcane is generally resistant to pests and diseases, but keep an eye out for common garden pests like aphids or spider mites. If you notice any problems, treat them with an appropriate insecticide or fungicide.
6. Support (Optional): As your sugarcane grows taller, it may need some support to prevent it from falling over. You can use stakes or a trellis to provide support.
7. Overwintering (If Necessary): If you live in an area with cold winters, you’ll need to overwinter your sugarcane indoors. Before the first frost, cut back the stalks to about 6-12 inches and move the container to a cool, dark place. Water sparingly during the winter months. In the spring, move the container back outdoors and resume regular watering and fertilizing.
Harvesting Your Sugarcane
Harvesting sugarcane is the most rewarding part of the process! Here’s how to know when your sugarcane is ready to harvest and how to do it:
1. Maturity: Sugarcane typically takes 9-12 months to mature, depending on the variety and growing conditions. You’ll know it’s ready to harvest when the stalks are thick and the leaves start to turn brown.
2. Testing for Sugar Content: The best way to determine if your sugarcane is ready to harvest is to test the sugar content. You can do this by cutting a stalk and chewing on it. If it tastes sweet, it’s ready to go! You can also use a refractometer to measure the sugar content more accurately.
3. Harvesting: To harvest your sugarcane, use pruning shears or a sharp knife to cut the stalks at the base.
4. Processing: After harvesting, you can process your sugarcane to extract the juice. There are several ways to do this, including using a sugarcane juicer, a blender, or even just chewing on the stalks.
Troubleshooting Common Problems
Even with the best care, you may encounter some problems when growing sugarcane in containers. Here are some common issues and how to address them:
* Yellowing Leaves: This can be caused by a variety of factors, including nutrient deficiencies, overwatering, or underwatering. Check the soil moisture and fertilize if necessary.
* Slow Growth: This can be caused by insufficient sunlight, poor soil, or lack of fertilizer. Make sure your sugarcane is getting enough sunlight and fertilize regularly.
* Pest Infestations: Keep an eye out for common garden pests like aphids or spider mites. Treat infestations with an appropriate insecticide.
* Root Rot: This is caused by overwatering and can be fatal to your sugarcane. Make sure your container has good drainage and avoid overwatering.
* Stunted Growth: This can be caused by a variety of factors, including nutrient deficiencies, pests, or diseases. Check the soil, fertilize, and treat any pests or diseases.
Enjoying Your Homegrown Sugarcane
Congratulations! You’ve successfully grown sugarcane in a container. Now it’s time to enjoy the fruits (or rather, stalks) of your labor. Here are some ways to use your homegrown sugarcane:
* Juice: Extract the juice and drink it fresh or use it in cocktails and other beverages.
* Chew: Simply chew on the stalks for a sweet and refreshing treat.
* Sugar: Process the juice to make your own homemade sugar. This is a more involved process, but it’s definitely rewarding.
* Molasses: As a byproduct of sugar production, you can also make your own molasses.
* Animal Feed: The leaves and stalks can be used as feed for livestock.
Conclusion
So, there you have it! Transforming your backyard, patio, or even balcony into a mini sugarcane plantation is not only achievable but also incredibly rewarding. We’ve walked you through the simple steps of sugarcane container gardening, from selecting the right variety to nurturing your plants for a bountiful harvest.
Why is this DIY trick a must-try? Because it offers a unique blend of practicality and aesthetic appeal. Imagine stepping outside to harvest your own fresh sugarcane for juices, desserts, or even just to chew on a hot summer day. Beyond the delicious reward, sugarcane plants add a touch of tropical elegance to any space, with their tall, graceful stalks and vibrant green foliage. It’s a conversation starter, a learning experience, and a source of fresh, natural sweetness all rolled into one.
But the benefits don’t stop there. Growing your own sugarcane allows you to control the entire process, ensuring that your plants are free from harmful pesticides and chemicals. You’ll know exactly where your sugarcane comes from and how it was grown, giving you peace of mind and a healthier product. Plus, the act of gardening itself is a fantastic stress reliever and a great way to connect with nature.
Looking for variations? Absolutely! Consider experimenting with different sugarcane varieties to find your favorite flavor profile. Some varieties are sweeter, while others have a more subtle, grassy taste. You can also try companion planting to enhance the growth and health of your sugarcane. Marigolds, for example, can help deter pests, while legumes can fix nitrogen in the soil, providing a natural fertilizer.
Another fun variation is to create a tiered container garden, with sugarcane as the focal point and other tropical plants like ginger, turmeric, or even small citrus trees surrounding it. This will create a lush, vibrant oasis that will transport you to the tropics every time you step outside.
We encourage you to embrace this DIY project and experience the joy of growing your own sugarcane. It’s easier than you might think, and the rewards are well worth the effort. Don’t be afraid to experiment, adapt the techniques to your specific climate and growing conditions, and most importantly, have fun!
Once you’ve embarked on your sugarcane container gardening journey, we’d love to hear about your experiences. Share your photos, tips, and challenges with us in the comments below. Let’s create a community of sugarcane enthusiasts and inspire others to try this amazing DIY trick. Together, we can bring a little bit of the tropics to our own backyards.
Frequently Asked Questions (FAQ)
1. What is the best type of sugarcane to grow in a container?
The best sugarcane varieties for container gardening are typically those that are shorter and more compact. Look for varieties specifically bred for smaller spaces, such as ‘CP 72-2086’ or ‘Lal Pahari’. These varieties tend to be more manageable in containers and still produce a good yield of sweet stalks. Local nurseries or agricultural extension offices can provide recommendations for varieties that thrive in your specific climate. Remember to research the specific needs of the variety you choose, as some may require more sunlight or water than others.
2. How big of a container do I need for sugarcane?
Sugarcane needs a substantial container to accommodate its root system and support its growth. A container that is at least 24 inches in diameter and 24 inches deep is recommended. The larger the container, the better, as it will provide more room for the roots to spread and access nutrients. Make sure the container has adequate drainage holes to prevent waterlogging, which can lead to root rot. Consider using a heavy-duty plastic or ceramic container to withstand the weight of the soil and the mature sugarcane plant.
3. What kind of soil should I use for sugarcane container gardening?
Sugarcane thrives in well-draining, fertile soil that is rich in organic matter. A good potting mix for sugarcane should consist of a combination of garden soil, compost, and perlite or vermiculite. The garden soil provides structure and nutrients, the compost adds organic matter and improves drainage, and the perlite or vermiculite enhances aeration and prevents compaction. Aim for a slightly acidic to neutral pH level (around 6.0 to 7.0). You can test the pH of your soil using a soil testing kit available at most garden centers.
4. How much sunlight does sugarcane need?
Sugarcane requires at least 6-8 hours of direct sunlight per day to thrive. Choose a location for your container garden that receives ample sunlight throughout the day. If you live in a particularly hot climate, you may need to provide some afternoon shade to prevent the leaves from scorching. If you don’t have access to enough natural sunlight, you can supplement with grow lights. Position the grow lights about 12-18 inches above the plants and provide them with 14-16 hours of light per day.
5. How often should I water my sugarcane plants in containers?
Sugarcane needs consistent moisture, especially during the growing season. Water your plants deeply whenever the top inch of soil feels dry to the touch. Avoid overwatering, as this can lead to root rot. The frequency of watering will depend on the climate, the size of the container, and the type of soil you are using. In hot, dry weather, you may need to water daily, while in cooler, wetter weather, you may only need to water every few days. Check the soil moisture regularly and adjust your watering schedule accordingly.
6. How do I fertilize my sugarcane plants in containers?
Sugarcane is a heavy feeder and requires regular fertilization to support its growth. Use a balanced fertilizer with a ratio of 10-10-10 or 14-14-14. Apply the fertilizer according to the package instructions, usually every 4-6 weeks during the growing season. You can also supplement with organic fertilizers such as compost tea or fish emulsion. These organic fertilizers provide essential nutrients and help improve the soil health. Avoid over-fertilizing, as this can burn the roots and damage the plants.
7. How long does it take for sugarcane to mature in a container?
Sugarcane typically takes 9-12 months to mature, depending on the variety and the growing conditions. You’ll know your sugarcane is ready to harvest when the stalks are thick, firm, and have a sweet aroma. The leaves may also start to turn brown and dry out. To harvest, use a sharp knife or machete to cut the stalks at the base of the plant. You can then peel the outer layer of the stalk and chew on the sweet inner flesh or use it to make juice.
8. Can I grow sugarcane indoors?
While it’s possible to grow sugarcane indoors, it can be challenging due to the plant’s high light requirements. If you want to try growing sugarcane indoors, choose a sunny location near a south-facing window. You’ll also need to supplement with grow lights to provide adequate light. Make sure the container is large enough to accommodate the plant’s root system and that the soil is well-draining. Monitor the plant closely for signs of pests or diseases and adjust your care accordingly.
9. What are some common pests and diseases that affect sugarcane?
Some common pests that can affect sugarcane include aphids, sugarcane borers, and spider mites. Diseases that can affect sugarcane include red rot, smut, and rust. To prevent pests and diseases, keep your plants healthy by providing them with adequate sunlight, water, and nutrients. Inspect your plants regularly for signs of infestation or disease and take action promptly. You can use organic pesticides such as neem oil or insecticidal soap to control pests. For diseases, you may need to use a fungicide.
10. How do I propagate sugarcane from cuttings?
Sugarcane can be propagated from cuttings taken from mature stalks. Choose healthy, disease-free stalks and cut them into sections that are about 6-8 inches long. Each section should have at least one node (the point where leaves emerge). Plant the cuttings horizontally in a well-draining potting mix, with the nodes facing upwards. Keep the soil moist but not waterlogged. The cuttings should root within a few weeks. Once the roots are established, you can transplant the seedlings into larger containers.

Leave a Comment