
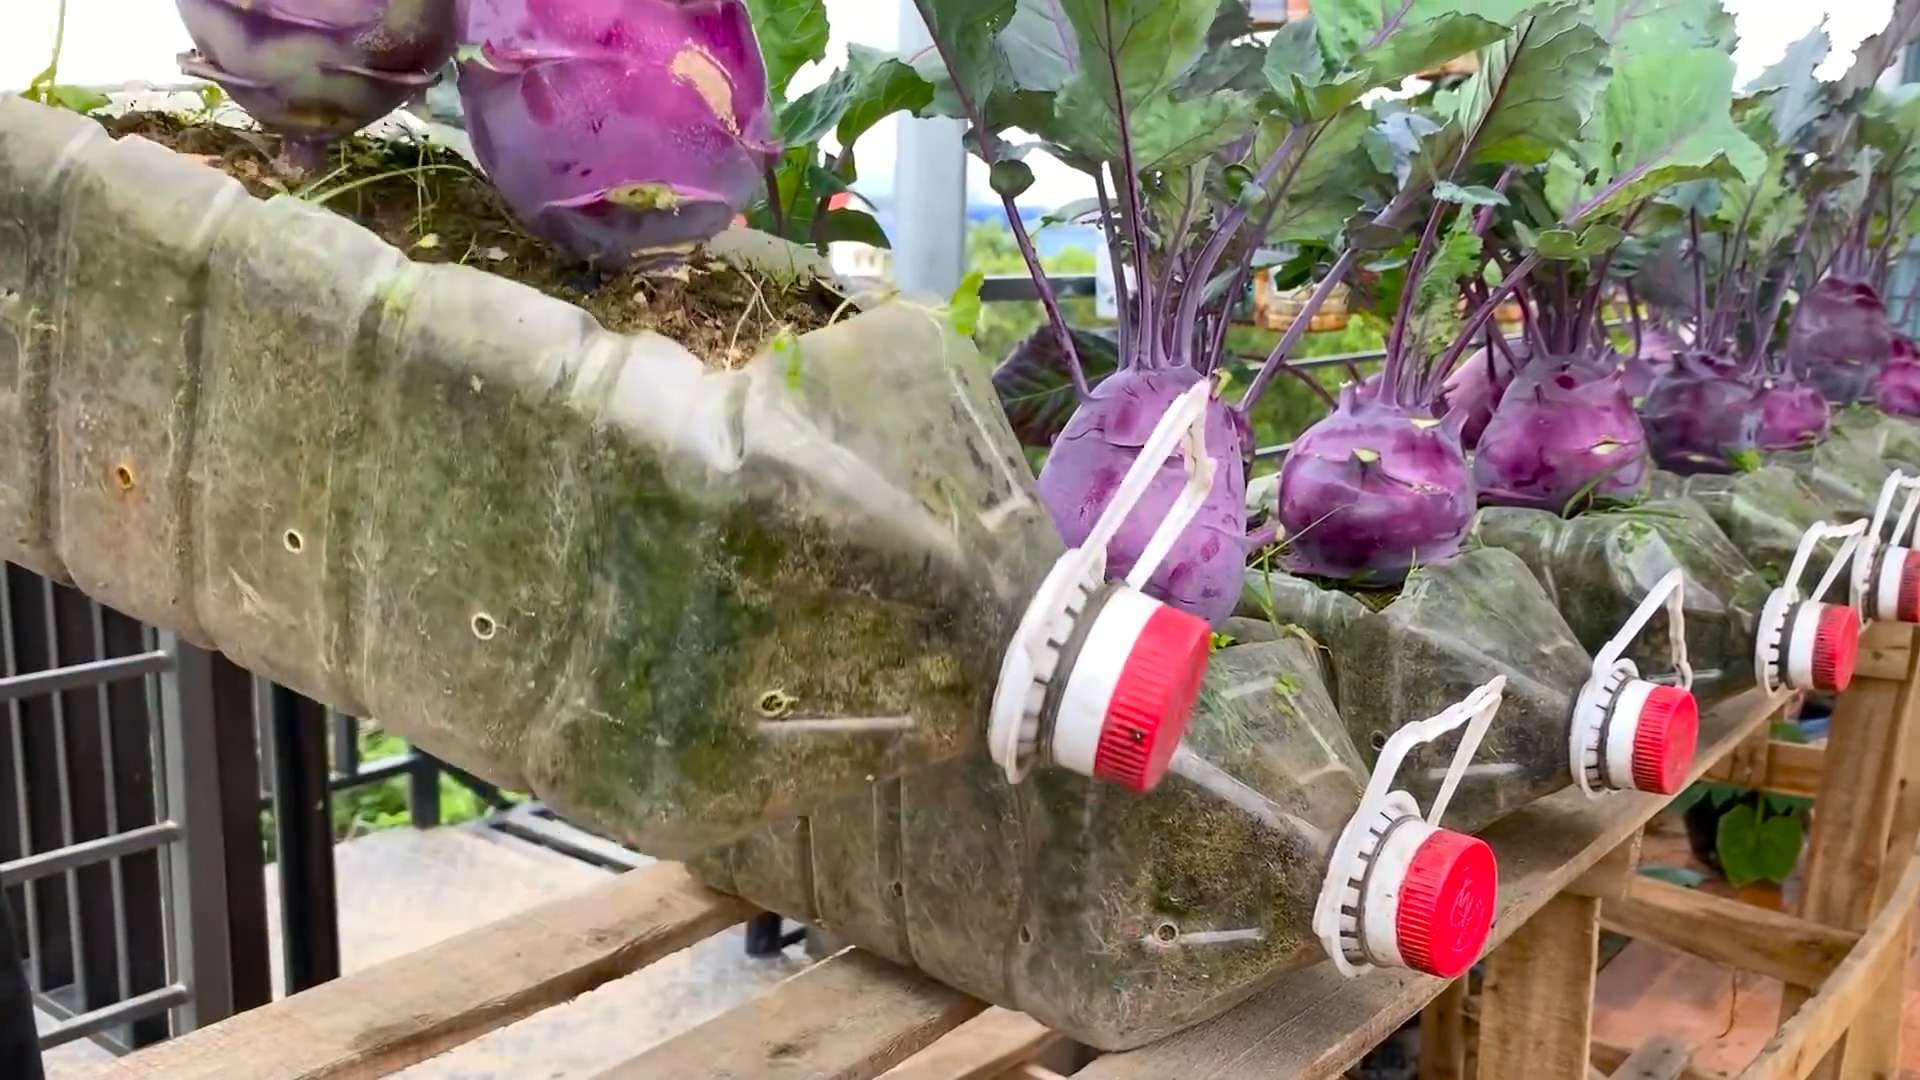
Terrace Grown Kohlrabi: Sounds fancy, doesn’t it? But trust me, you don’t need a sprawling farm to enjoy the crisp, slightly sweet taste of this unique vegetable. I’m here to tell you that even with limited space, you can absolutely cultivate your own kohlrabi right on your terrace!
For centuries, kohlrabi has been a staple in European and Asian cuisines, prized for its versatility and nutritional benefits. Think of it as a cross between a cabbage and a turnip, but with a milder, more palatable flavor. But why should you bother growing it yourself? Well, store-bought kohlrabi often lacks the freshness and vibrancy of homegrown produce. Plus, let’s be honest, there’s something incredibly satisfying about harvesting your own food, knowing exactly where it came from and how it was grown.
This DIY guide is your ticket to unlocking the secrets of successful terrace grown kohlrabi. I’ll walk you through everything from selecting the right varieties for container gardening to mastering essential growing techniques. Imagine stepping onto your terrace and picking fresh kohlrabi for a delicious salad or stir-fry. It’s easier than you think, and I’m excited to show you how! So, grab your gardening gloves, and let’s get started!
Growing Kohlrabi on Your Terrace: A DIY Guide
Hey there, fellow gardening enthusiasts! I’m so excited to share my experience growing kohlrabi right here on my terrace. It’s surprisingly easy, and the fresh, slightly sweet, and crunchy taste of homegrown kohlrabi is absolutely worth the effort. This guide will walk you through every step, from choosing the right container to harvesting your delicious crop. Let’s get started!
Choosing the Right Container and Soil
Before we even think about seeds, we need to set up the perfect home for our kohlrabi.
* Container Size: Kohlrabi needs room to grow, especially its bulbous stem. I recommend a container that’s at least 12 inches deep and 12 inches in diameter. A larger container is always better, as it gives the roots more space to spread out.
* Material: Plastic, terracotta, or even repurposed containers will work. Just make sure they have drainage holes! Waterlogged soil is a kohlrabi killer.
* Drainage: This is crucial! If your container doesn’t have drainage holes, drill some. I usually aim for at least four holes, each about half an inch in diameter.
* Soil: Kohlrabi loves well-draining, fertile soil. I use a mix of:
* Potting mix (about 60%)
* Compost (about 30%) – This adds nutrients and improves drainage.
* Perlite or vermiculite (about 10%) – This helps with aeration and drainage.
Planting Your Kohlrabi Seeds
Now for the fun part – planting!
1. Starting Seeds Indoors (Optional): I often start my kohlrabi seeds indoors about 4-6 weeks before the last expected frost. This gives them a head start.
* Fill seed trays or small pots with your soil mix.
* Sow the seeds about ¼ inch deep.
* Keep the soil consistently moist but not soggy.
* Place the trays in a warm, sunny location or under grow lights.
* Once the seedlings have a few true leaves (not just the seed leaves), they’re ready to be transplanted.
2. Direct Sowing: If you live in a warmer climate or are past the last frost date, you can sow the seeds directly into your container.
* Fill your container with the soil mix, leaving about an inch of space at the top.
* Sow the seeds about ½ inch deep and 2 inches apart.
* Gently water the soil.
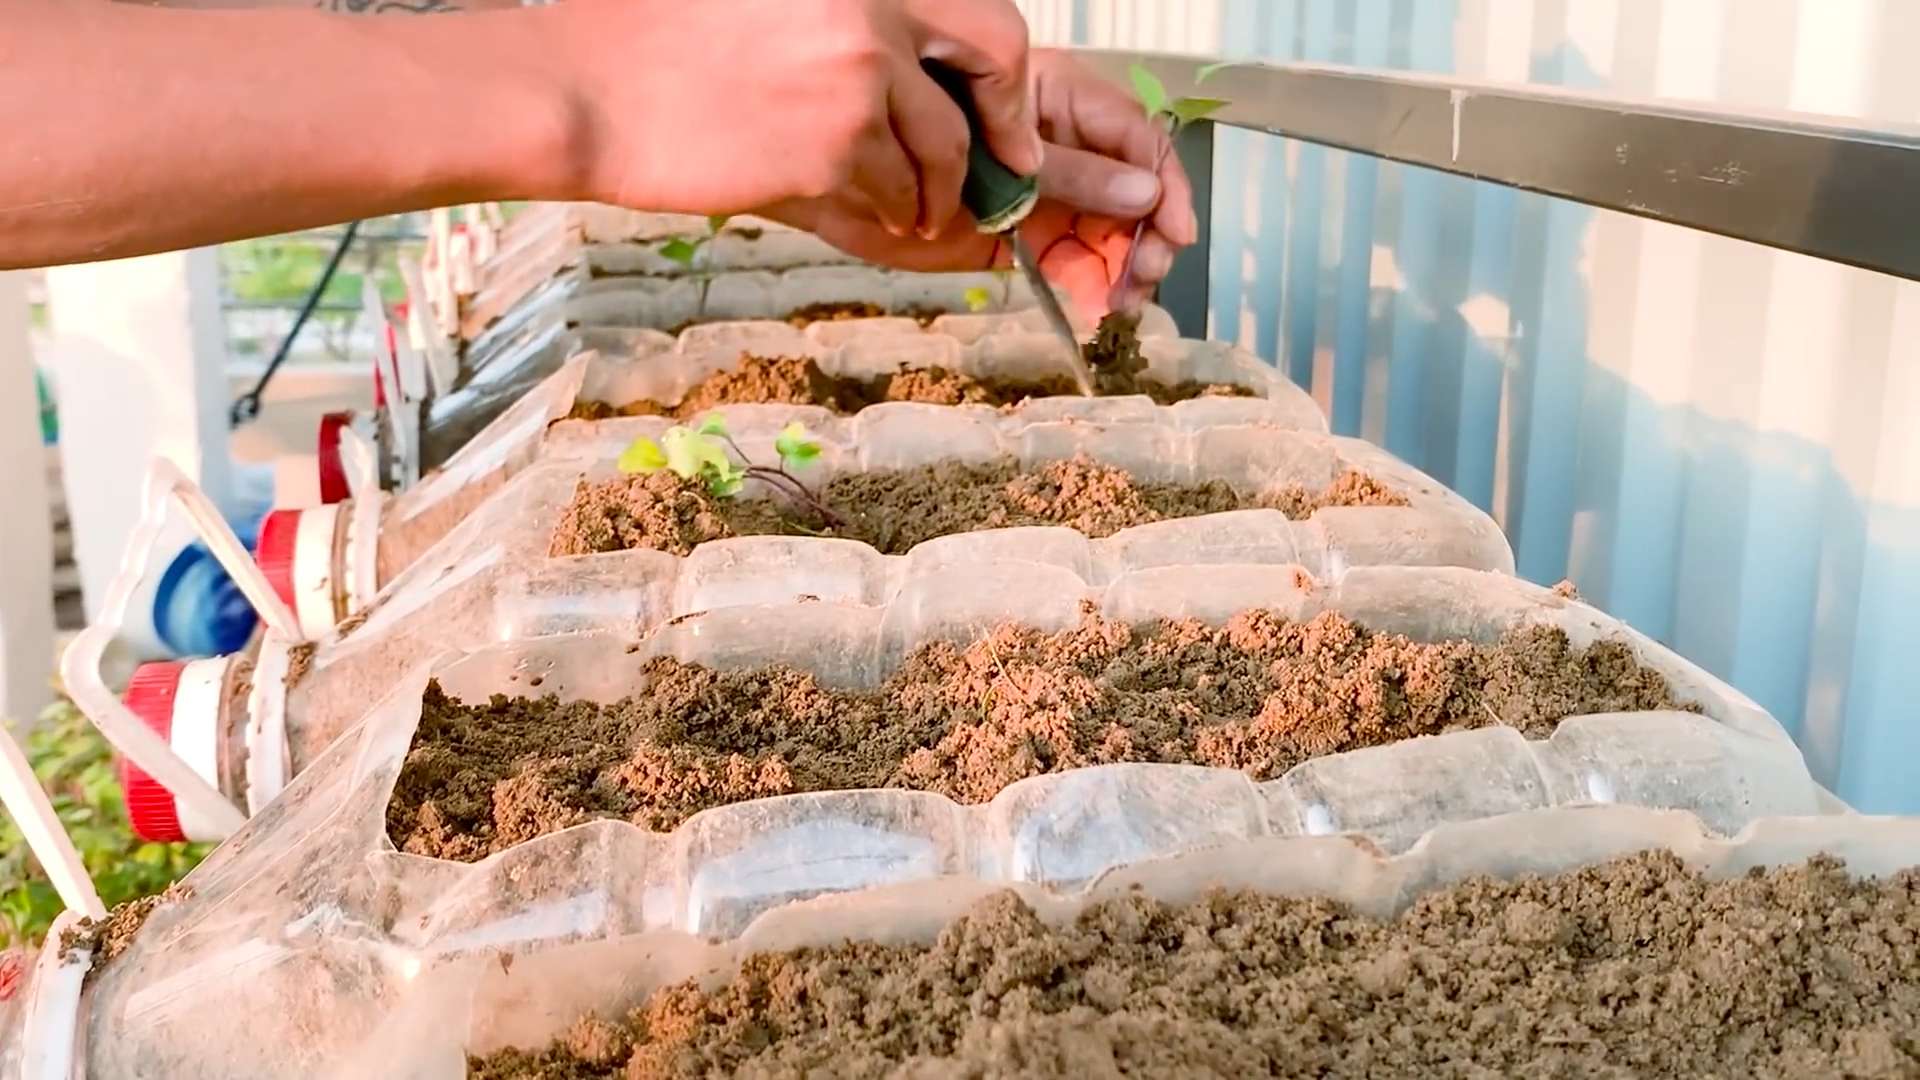
3. Transplanting Seedlings: If you started your seeds indoors, carefully transplant them into your container.
* Dig small holes in the soil, spacing them about 6-8 inches apart.
* Gently remove the seedlings from their trays, being careful not to damage the roots.
* Place the seedlings in the holes and cover the roots with soil.
* Water thoroughly.
4. Thinning: Once the seedlings are a few inches tall, thin them out so that they are spaced about 6-8 inches apart. This gives them enough room to grow. I know it’s hard to remove plants you’ve nurtured, but trust me, it’s necessary for healthy kohlrabi!
Caring for Your Kohlrabi Plants
Consistent care is key to a bountiful harvest.
1. Watering: Kohlrabi needs consistent moisture, especially during hot weather. Water deeply whenever the top inch of soil feels dry to the touch. Avoid overwatering, as this can lead to root rot. I usually water every other day, but it depends on the weather.
2. Sunlight: Kohlrabi needs at least 6 hours of sunlight per day. Place your container in a sunny spot on your terrace. If you don’t have a sunny spot, you can supplement with grow lights.
3. Fertilizing: Kohlrabi is a heavy feeder, so regular fertilization is important. I like to use a balanced liquid fertilizer (like a 10-10-10) every 2-3 weeks. You can also amend the soil with compost tea.
4. Weeding: Keep the container free of weeds. Weeds compete with your kohlrabi for nutrients and water.
5. Pest Control: Keep an eye out for pests like aphids, cabbage worms, and flea beetles.
* Aphids: These tiny pests can suck the sap from your plants. I usually blast them off with a strong stream of water from the hose. You can also use insecticidal soap.
* Cabbage Worms: These green caterpillars can devour your kohlrabi leaves. Handpicking them off the plants is the most effective method. You can also use Bacillus thuringiensis (Bt), a natural insecticide.
* Flea Beetles: These tiny beetles can create small holes in the leaves. I use row covers to protect my plants from flea beetles. You can also use diatomaceous earth.
6. Mulching: Adding a layer of mulch around your kohlrabi plants can help to retain moisture, suppress weeds, and regulate soil temperature. I like to use straw or wood chips.
Harvesting Your Kohlrabi
The moment we’ve all been waiting for!
1. Timing: Kohlrabi is usually ready to harvest about 50-60 days after planting. The bulb should be about 2-3 inches in diameter. Don’t let it get too large, as it can become tough and woody.
2. Harvesting: To harvest, simply cut the bulb from the stem with a sharp knife. You can also harvest the leaves, which are edible and taste similar to kale.
3. Storage: Kohlrabi can be stored in the refrigerator for several weeks. Remove the leaves before storing.
Troubleshooting
Even with the best care, you might encounter some problems. Here are a few common issues and how to address them:
* Bolting (Premature Flowering): This can happen if the weather is too hot or if the plants are stressed. To prevent bolting, provide consistent moisture and shade during hot weather. Choose bolt-resistant varieties.
* Cracking Bulbs: This can be caused by inconsistent watering. Make sure to water regularly and deeply.
* Small Bulbs: This can be caused by poor soil, lack of sunlight, or overcrowding. Make sure to use fertile soil, provide at least 6 hours of sunlight per day, and thin out the plants if necessary.
* Pest Infestations: Regularly inspect your plants for pests and take action immediately if you see any.
Choosing Kohlrabi Varieties
There are several kohlrabi varieties to choose from, each with its own unique characteristics. Here are a few of my favorites:
* Early White Vienna: This is a popular variety that is known for its early maturity and mild flavor.
* Early Purple Vienna: This variety is similar to Early White Vienna, but it has a purple bulb.
* Grand Duke: This variety is known for its large size and excellent flavor.
* Kossak: This is a very large variety that can grow up to 10 pounds!
Enjoying Your Harvest
Now that you’ve harvested your kohlrabi, it’s time to enjoy it! Kohlrabi can be eaten raw or cooked.
* Raw: Peel the bulb and slice it into thin strips. It’s great in salads, slaws, or as a snack with hummus.
* Cooked: Kohlrabi can be steamed, roasted, sautéed, or added to soups and stews. It has a mild, slightly sweet flavor that pairs well with other vegetables.
* Leaves: Don’t forget the leaves! They can be cooked like kale or spinach.
Extending Your Kohlrabi Season
To enjoy kohlrabi for a longer period, consider succession planting. Sow seeds every 2-3 weeks to have a continuous harvest. You can also grow kohlrabi in the fall for a late-season crop.
Why Grow Kohlrabi on Your Terrace?
Besides the delicious taste, growing kohlrabi on your terrace offers several benefits:
* Fresh, Local Produce: You’ll have access to fresh, homegrown kohlrabi whenever you want it.
* Control Over Growing Practices: You can avoid pesticides and herbicides by growing your own kohlrabi.
* Space Saving: Terrace gardening is a great way to grow your own food, even if you don’t have a large yard.
* Therapeutic: Gardening is a relaxing and rewarding activity.
Final Thoughts
Growing kohlrabi on your terrace is a fun and rewarding experience. With a little bit of care and attention, you can enjoy a bountiful harvest of this delicious and nutritious vegetable. So,
Conclusion
So, there you have it! Growing your own kohlrabi, especially when space is limited, is entirely achievable with this simple, effective DIY trick for terrace gardening. We’ve walked you through the process, highlighting how even a small terrace can become a thriving source of fresh, delicious kohlrabi.
But why is this a must-try? Beyond the obvious satisfaction of harvesting your own food, this method offers several key advantages. Firstly, you have complete control over the growing environment. You can ensure your kohlrabi is grown organically, free from harmful pesticides and herbicides. Secondly, it’s incredibly rewarding to witness the entire life cycle of a plant, from seed to table. And thirdly, fresh, homegrown kohlrabi simply tastes better! The flavor is more vibrant, the texture crisper, and the nutritional value at its peak.
Don’t be afraid to experiment with different varieties of kohlrabi. While we focused on a standard green variety, purple kohlrabi adds a beautiful splash of color to your garden and your plate. You can also adjust the size of your containers based on the space you have available. Smaller containers are perfect for dwarf varieties, while larger containers can accommodate more robust plants. Consider companion planting too! Marigolds can help deter pests, while herbs like dill and chamomile can attract beneficial insects.
Another variation to consider is succession planting. By planting new seeds every few weeks, you can ensure a continuous harvest of kohlrabi throughout the growing season. This is especially useful if you enjoy incorporating kohlrabi into your daily meals.
This DIY kohlrabi growing method is more than just a gardening technique; it’s an invitation to connect with nature, embrace sustainability, and enjoy the unparalleled taste of homegrown produce.
We understand that venturing into DIY gardening can sometimes feel daunting, but we assure you, this method is incredibly beginner-friendly. The steps are straightforward, the materials are readily available, and the rewards are well worth the effort.
So, what are you waiting for? Grab your seeds, prepare your containers, and get ready to embark on your kohlrabi growing adventure! We’re confident that you’ll be amazed by the results.
And most importantly, we want to hear about your experience! Share your photos, tips, and stories in the comments below. Let us know what worked well for you, what challenges you faced, and any creative variations you tried. Your feedback will not only inspire other readers but also help us refine and improve this DIY trick for future gardeners. Let’s build a community of kohlrabi enthusiasts, sharing our knowledge and passion for homegrown goodness! We are eager to see your terrace grown kohlrabi.
Frequently Asked Questions (FAQ)
What kind of soil is best for growing kohlrabi in containers?
Kohlrabi thrives in well-draining, fertile soil that is rich in organic matter. A good potting mix for containers should consist of a blend of compost, peat moss (or coconut coir as a sustainable alternative), and perlite or vermiculite. This combination provides the necessary nutrients, moisture retention, and drainage that kohlrabi needs to flourish. Avoid using garden soil directly in containers, as it can become compacted and hinder root growth. The ideal pH level for kohlrabi is between 6.0 and 7.5. You can test your soil’s pH using a home testing kit and amend it accordingly with lime to raise the pH or sulfur to lower it.
How often should I water my kohlrabi plants in containers?
Watering frequency depends on several factors, including the size of your container, the weather conditions, and the stage of growth of your kohlrabi plants. Generally, you should aim to keep the soil consistently moist but not waterlogged. Check the soil moisture level regularly by sticking your finger about an inch deep into the soil. If it feels dry, it’s time to water. During hot, dry weather, you may need to water daily, while during cooler, wetter periods, you may only need to water every few days. Water deeply each time, ensuring that the water drains out of the bottom of the container. Avoid overhead watering, as this can increase the risk of fungal diseases. Instead, water at the base of the plant.
How much sunlight do kohlrabi plants need?
Kohlrabi requires at least six hours of direct sunlight per day to thrive. Choose a location on your terrace that receives ample sunlight throughout the day. If you live in a particularly hot climate, providing some afternoon shade can help prevent the plants from overheating. If you don’t have a spot that receives enough natural sunlight, you can supplement with grow lights. Position the grow lights a few inches above the plants and adjust the height as the plants grow.
When is the best time to harvest kohlrabi?
Kohlrabi is typically ready to harvest about 50-60 days after planting. The ideal time to harvest is when the bulb is about 2-3 inches in diameter. Harvesting at this size ensures that the kohlrabi is tender and flavorful. If you wait too long, the bulb can become tough and woody. To harvest, simply cut the stem just above the bulb. You can also harvest the leaves, which are edible and can be used in salads or cooked like spinach.
What are some common pests and diseases that affect kohlrabi, and how can I prevent them?
Kohlrabi can be susceptible to several pests and diseases, including aphids, cabbage worms, flea beetles, and clubroot. To prevent these problems, practice good garden hygiene. Remove any weeds or debris that can harbor pests and diseases. Rotate your crops each year to prevent soilborne diseases from building up. Inspect your plants regularly for signs of pests or diseases and take action promptly. You can use organic pest control methods, such as insecticidal soap or neem oil, to control aphids, cabbage worms, and flea beetles. To prevent clubroot, ensure that your soil is well-draining and has a pH of at least 7.0. You can also add lime to the soil to raise the pH.
Can I grow kohlrabi in the winter?
In many regions, kohlrabi can be grown as a fall or winter crop. It is relatively cold-hardy and can tolerate light frosts. However, if you live in an area with harsh winters, you may need to provide some protection for your plants. You can cover them with row covers or move them indoors to a greenhouse or sunroom. When growing kohlrabi in the winter, be sure to choose a variety that is specifically bred for cold weather.
How do I store kohlrabi after harvesting?
After harvesting, remove the leaves from the kohlrabi bulb and store them separately. The leaves can be stored in the refrigerator for up to a week. The kohlrabi bulb can be stored in the refrigerator for several weeks. To prevent it from drying out, wrap it in a damp paper towel and place it in a plastic bag. You can also freeze kohlrabi. To do so, peel and chop the bulb into small pieces and blanch it in boiling water for a few minutes. Then, drain the kohlrabi and freeze it in a single layer on a baking sheet. Once frozen, transfer the kohlrabi to a freezer bag or container.
What are some delicious ways to use homegrown kohlrabi?
Kohlrabi is a versatile vegetable that can be used in a variety of dishes. It can be eaten raw, cooked, or pickled. Raw kohlrabi has a crisp, slightly sweet flavor that is similar to a turnip or radish. It can be grated into salads, sliced into crudités, or used as a topping for sandwiches. Cooked kohlrabi can be steamed, boiled, roasted, or stir-fried. It can be added to soups, stews, and casseroles. Kohlrabi leaves can be cooked like spinach or added to salads. Pickled kohlrabi is a popular condiment in many cultures.
Leave a Comment