
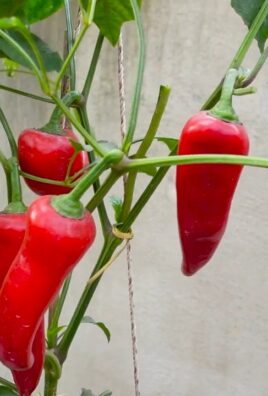
Terrace tomato plant fruiting can be incredibly rewarding, transforming your outdoor space into a vibrant, edible oasis! Imagine stepping onto your terrace and plucking a sun-ripened, juicy tomato, bursting with flavor, straight from your own plant. That’s the magic we’re unlocking today with some simple, yet effective, DIY tricks and hacks.
Growing tomatoes, especially on a terrace, has a rich history. From their origins in South America to their adoption by European explorers and eventual global cultivation, tomatoes have become a staple in cuisines worldwide. But let’s be honest, getting those beautiful red fruits to actually *fruit* on your terrace can sometimes feel like a battle against the elements and various plant ailments.
That’s where these DIY solutions come in! Many of us struggle with getting our terrace tomato plant fruiting abundantly. Maybe you’re seeing lots of leaves but no tomatoes, or perhaps the fruits are small and lackluster. Don’t worry, you’re not alone! This article is packed with easy-to-implement strategies to boost your tomato plant’s fruiting potential. We’ll cover everything from soil amendments and watering techniques to pollination hacks and pest control, all designed to help you achieve a bountiful harvest right on your terrace. Let’s get started and turn your tomato dreams into a delicious reality!

DIY Terrace Tomato Plant Trellis: From Seedling to Spectacular Harvest!
Hey there, fellow gardening enthusiasts! Are you dreaming of juicy, sun-ripened tomatoes bursting with flavor, all grown right on your terrace? I know I am! But let’s face it, tomato plants can get a little… unruly. They sprawl, they droop, and sometimes, they just give up under the weight of their own deliciousness. That’s where a good trellis comes in!
Today, I’m going to walk you through building a super sturdy and stylish trellis that’s perfect for your terrace tomato plants. This isn’t just any trellis; it’s designed to support heavy yields, look great, and be easy to customize to your specific space. Let’s get started!
What You’ll Need: The Supply List
Before we dive in, let’s gather our supplies. I’ve tried to keep this list as budget-friendly as possible, using readily available materials.
* **Wooden Stakes:** Four 6-foot wooden stakes (treated for outdoor use are best). These will be the main supports of our trellis.
* Wooden Planks: Two 4-foot wooden planks (1×4 or 2×4 lumber works great). These will form the top and bottom horizontal supports.
* Heavy-Duty Twine or Garden String:** A large spool of strong twine or garden string. Jute or nylon are good choices.
* Measuring Tape:** Essential for accurate cuts and spacing.
* Saw:** For cutting the wooden planks to size. A hand saw or power saw will do.
* Drill:** With drill bits suitable for wood.
* Screws:** Exterior-grade wood screws (1 1/2 inch or 2 inch).
* Staple Gun:** With staples suitable for outdoor use. (Optional, but highly recommended for securing twine).
* Gloves:** To protect your hands.
* Safety Glasses:** Always a good idea when working with power tools.
* Wood Stain or Paint (Optional):** To protect and beautify your trellis.
* Sandpaper (Optional):** For smoothing rough edges.
Phase 1: Building the Frame
This is where we lay the foundation for our tomato-supporting masterpiece!
1. Prepare the Stakes:** If your wooden stakes have any rough edges, give them a quick sanding. This will prevent splinters and make them easier to handle.
2. Position the Stakes:** Decide where you want to place your trellis in your tomato planter. I usually aim for the corners of the planter, or evenly spaced along the back if it’s a long rectangular planter. Push the stakes firmly into the soil, ensuring they are stable and upright. Aim for at least 1 foot of the stake to be buried in the soil for good stability. The deeper, the better, especially if you anticipate a heavy tomato harvest!
3. Attach the Bottom Plank:** Take one of your 4-foot wooden planks and position it horizontally across the bottom of the stakes. I usually place it about 6-8 inches above the soil line. This will provide a solid base for the trellis.
4. Secure the Bottom Plank:** Using your drill and screws, attach the plank to each stake. Pre-drilling pilot holes will prevent the wood from splitting. Make sure the screws are driven in securely, but don’t overtighten them.
5. Attach the Top Plank:** Repeat steps 3 and 4 with the second 4-foot wooden plank, positioning it at the top of the stakes. This will create the top horizontal support of the trellis.
6. Reinforce the Frame (Optional): For extra stability, you can add diagonal braces between the stakes and the horizontal planks. Cut two additional pieces of wood at a 45-degree angle and attach them with screws. This will create a triangular support structure that will significantly strengthen the frame.
Phase 2: Creating the Twine Grid
Now comes the fun part – creating the grid that will actually support your tomato plants!
1. Prepare the Twine:** Cut a very long length of twine. I usually overestimate to avoid running out mid-way. You can always trim the excess later.
2. Attach the First Vertical Twine Line:** Tie one end of the twine securely to the bottom plank, close to one of the stakes. Make sure the knot is tight and won’t slip.
3. Weave the Vertical Lines:** Run the twine vertically up to the top plank and wrap it around the plank once or twice for added security. Then, bring the twine back down to the bottom plank, spacing it about 6-8 inches away from the first line. Repeat this process until you have vertical lines running across the entire frame.
4. Secure the Vertical Lines:** At each point where the twine wraps around the top and bottom planks, use the staple gun to secure it in place. This will prevent the twine from slipping and keep the grid taut. If you don’t have a staple gun, you can tie the twine securely around the planks instead.
5. Attach the First Horizontal Twine Line:** Now, let’s create the horizontal lines. Tie one end of the twine securely to one of the stakes, close to the bottom plank.
6. Weave the Horizontal Lines:** Weave the twine horizontally across the vertical lines, going over and under each line. This will create a grid pattern.
7. Secure the Horizontal Lines:** At each point where the twine intersects with a vertical line, you can tie a small knot to secure it. This will prevent the horizontal lines from sliding up or down. Alternatively, you can use small zip ties to secure the intersections.
8. Continue Weaving:** Repeat steps 6 and 7 until you have horizontal lines running across the entire frame, spaced about 6-8 inches apart.
9. Secure the End:** Tie the end of the twine securely to the opposite stake, close to the bottom plank.
Phase 3: Finishing Touches and Planting Time!
Almost there! Now for the final touches that will make your trellis both functional and beautiful.
1. Trim Excess Twine:** Use scissors or a utility knife to trim any excess twine hanging from the trellis.
2. Sand Rough Edges (Optional): If you notice any rough edges on the wood, give them a quick sanding to prevent splinters.
3. Stain or Paint (Optional): If you want to protect and beautify your trellis, now is the time to stain or paint it. Choose a color that complements your terrace and your tomato plants. Make sure to use exterior-grade stain or paint that is designed to withstand the elements. Let the stain or paint dry completely before moving on to the next step.
4. Plant Your Tomato Seedlings:** Carefully plant your tomato seedlings at the base of the trellis. Make sure to space them appropriately, according to the variety of tomato you are growing.
5. Train Your Tomato Plants:** As your tomato plants grow, gently guide their stems through the twine grid. Use garden clips or soft ties to secure the stems to the trellis. This will help the plants stay upright and prevent them from sprawling.
6. Water and Fertilize:** Water your tomato plants regularly and fertilize them according to the instructions on your fertilizer.
Tips for Success:
* Choose the Right Tomato Variety:** Some tomato varieties are better suited for trellising than others. Determinate varieties (bush tomatoes) are generally less demanding, while indeterminate varieties (vining tomatoes) require more support. I personally love using indeterminate varieties like ‘Sungold’ or ‘Brandywine’ for trellising because they produce a continuous harvest throughout the season.
* Monitor for Pests and Diseases:** Keep an eye out for common tomato pests and diseases, such as aphids, whiteflies, and blight. Treat any problems promptly to prevent them from spreading.
* Prune Your Tomato Plants:** Pruning your tomato plants can help improve air circulation and prevent disease. Remove any suckers (small shoots that grow between the main stem and the branches) to encourage the plant to focus its energy on producing fruit.
* Harvest Regularly:** Harvest your tomatoes as soon as they are ripe. This will encourage the plant to produce more fruit.
* Consider Container Size: Make sure your container is large enough to support the mature size of your tomato plant. A 15-20 gallon container is generally a good size for most tomato varieties.
* Sunlight is Key: Tomatoes need at least 6-8 hours of sunlight per day to thrive. Choose a location on your terrace that receives plenty of sunlight.
* Soil Matters: Use a high-quality potting mix that is well-draining and rich in nutrients. You can also amend your potting mix with compost or other organic matter.
* Watering Wisely: Water your tomato plants deeply and regularly, especially during hot weather. Avoid overhead watering, as this can promote disease.
* Fertilizing for Success: Fertilize your tomato plants regularly with a balanced fertilizer. Look for a fertilizer that is specifically formulated for tomatoes.
* Patience is a

Conclusion
So, there you have it! Transforming your terrace tomato plant fruiting potential is not just a dream; it’s an achievable reality with a little know-how and this simple, yet incredibly effective, DIY trick. We’ve walked you through the process, highlighting the key steps to ensure your tomato plants are bursting with juicy, flavorful fruit.
Why is this a must-try? Because it empowers you to take control of your tomato harvest. No more relying solely on unpredictable weather patterns or expensive store-bought fertilizers. This method is cost-effective, environmentally friendly, and, most importantly, it works! Imagine the satisfaction of biting into a sun-ripened tomato, knowing you nurtured it from seedling to deliciousness using your own ingenuity.
But the beauty of gardening lies in its adaptability. Feel free to experiment with variations on this DIY trick to suit your specific needs and preferences. For example, if you’re using a larger container, you might need to increase the amount of the amendment you add. Or, if you’re growing a particularly nutrient-hungry variety of tomato, consider supplementing with a diluted liquid fertilizer every few weeks.
Another variation to consider is the type of organic matter you use. While we’ve focused on readily available options, you could also incorporate composted kitchen scraps, well-rotted manure, or even worm castings for an extra boost of nutrients. Just be sure to research the specific needs of your tomato variety to ensure you’re providing the optimal growing conditions.
Don’t be afraid to get creative and personalize this DIY trick to fit your unique gardening style. The most important thing is to observe your plants closely and adjust your approach as needed. Are the leaves turning yellow? Are the fruits developing slowly? These are all clues that your plants may need a little extra attention.
We are confident that this DIY trick will significantly improve your terrace tomato plant fruiting. It’s a game-changer for anyone looking to maximize their harvest and enjoy the freshest, most flavorful tomatoes possible.
Now, it’s your turn! We encourage you to try this DIY trick on your own terrace tomato plants and witness the amazing results firsthand. Don’t be shy about sharing your experiences with us. We’d love to hear about your successes, your challenges, and any variations you’ve discovered along the way. Post pictures of your bountiful harvests on social media using #TerraceTomatoTriumph and inspire other gardeners to unlock the full potential of their tomato plants. Let’s create a community of thriving terrace tomato growers!
Remember, gardening is a journey, not a destination. There will be ups and downs, successes and failures. But with a little patience, perseverance, and the right DIY tricks, you can transform your terrace into a tomato-lover’s paradise. So, get your hands dirty, embrace the process, and enjoy the fruits (literally!) of your labor. Happy gardening!
Frequently Asked Questions (FAQ)
What exactly does this DIY trick do for my tomato plants?
This DIY trick primarily focuses on improving the soil conditions around your terrace tomato plants. It enhances drainage, aeration, and nutrient availability, all of which are crucial for healthy growth and abundant fruiting. By providing the roots with a well-draining, nutrient-rich environment, the plants are better able to absorb water and essential minerals, leading to stronger stems, healthier leaves, and, most importantly, more tomatoes. It also helps to regulate soil pH, creating an optimal environment for tomato plant growth.
How often should I apply this DIY trick to my tomato plants?
The frequency of application depends on several factors, including the size of your container, the type of soil you’re using, and the overall health of your plants. As a general guideline, we recommend applying this DIY trick at the time of planting and then again every 4-6 weeks throughout the growing season. However, if you notice signs of nutrient deficiency, such as yellowing leaves or stunted growth, you may need to apply it more frequently. Always observe your plants closely and adjust your approach accordingly.
Can I use this DIY trick on other types of plants besides tomatoes?
While this DIY trick is specifically tailored to the needs of tomato plants, it can also be beneficial for other fruiting vegetables, such as peppers, eggplants, and cucumbers. These plants share similar nutrient requirements and thrive in well-draining, nutrient-rich soil. However, it’s important to research the specific needs of each plant before applying this DIY trick. Some plants may prefer slightly different soil pH levels or nutrient ratios.
What if I don’t have access to all the ingredients listed in the DIY trick?
Don’t worry! The beauty of this DIY trick is that it’s adaptable. If you don’t have access to all the ingredients, you can substitute them with similar materials. For example, if you don’t have perlite, you can use vermiculite or coarse sand to improve drainage. If you don’t have bone meal, you can use rock phosphate or another phosphorus-rich fertilizer. The key is to understand the purpose of each ingredient and find a suitable alternative that provides similar benefits.
My tomato plants are already fruiting. Is it too late to apply this DIY trick?
No, it’s not too late! While it’s ideal to apply this DIY trick at the time of planting, it can still be beneficial to apply it to established tomato plants that are already fruiting. The added nutrients and improved soil conditions can help to support fruit development and increase the overall yield. Just be careful not to disturb the roots too much when applying the DIY trick around established plants. Gently work the amendment into the top layer of soil and water thoroughly.
Will this DIY trick protect my tomato plants from pests and diseases?
While this DIY trick primarily focuses on improving soil health and nutrient availability, it can indirectly help to protect your tomato plants from pests and diseases. Healthy, well-nourished plants are generally more resistant to stress and disease. However, it’s important to note that this DIY trick is not a substitute for proper pest and disease management practices. You may still need to take additional measures to protect your plants from common tomato pests and diseases, such as aphids, whiteflies, and blight.
How do I know if this DIY trick is working?
You’ll know this DIY trick is working if you observe several positive changes in your tomato plants. These may include:
* Increased growth rate
* Darker green leaves
* Stronger stems
* More abundant flowering
* Larger and more flavorful fruits
* Improved overall plant health
It’s important to monitor your plants closely and compare their growth and development to plants that have not received this DIY trick. This will help you to assess the effectiveness of the method and make any necessary adjustments.
Can I use this DIY trick in conjunction with other fertilizers?
Yes, you can use this DIY trick in conjunction with other fertilizers, but it’s important to do so carefully and avoid over-fertilizing your plants. Start by applying this DIY trick as directed and then monitor your plants closely for signs of nutrient deficiency. If you notice any deficiencies, you can supplement with a diluted liquid fertilizer every few weeks. Be sure to follow the instructions on the fertilizer label and avoid applying too much fertilizer at once, as this can damage your plants.
What type of container is best for terrace tomato plants when using this DIY trick?
The best type of container for terrace tomato plants is one that is large enough to accommodate the plant’s root system and provides adequate drainage. A container that is at least 18 inches in diameter and 12 inches deep is generally recommended. Choose a container made from a durable material, such as plastic, terracotta, or wood. Make sure the container has drainage holes to prevent waterlogging, which can lead to root rot. When using this DIY trick, ensure the container is filled with a well-draining potting mix that is rich in organic matter.
Is there a specific type of tomato plant that benefits most from this DIY trick?
While all tomato plants can benefit from this DIY trick, certain varieties may respond particularly well. Determinate tomato varieties, which tend to produce a large crop of tomatoes all at once, can benefit from the added nutrients and improved soil conditions provided by this DIY trick. Indeterminate tomato varieties, which continue to produce tomatoes throughout the growing season, can also benefit from this DIY trick, as it helps to sustain their growth and fruit production over a longer period. Ultimately, the best way to determine which tomato varieties benefit most from this DIY trick is to experiment and observe the results.


Leave a Comment