
Vegetable growing simple hacks – that’s what we’re diving into today! Have you ever dreamt of stepping into your backyard and harvesting fresh, vibrant vegetables for dinner? It’s a truly rewarding experience, connecting you with nature and providing delicious, healthy food. But let’s be honest, sometimes vegetable gardening can feel a little… daunting.
For centuries, humans have cultivated gardens, from the hanging gardens of Babylon to the meticulously planned kitchen gardens of medieval monasteries. This deep-rooted connection to the earth is part of our heritage. But in our modern, fast-paced lives, who has time for complicated gardening techniques? That’s where these simple hacks come in!
I’m here to tell you that growing your own vegetables doesn’t have to be a chore. It can be fun, easy, and incredibly satisfying. These vegetable growing simple hacks are designed to help you maximize your yield with minimal effort. Whether you’re a seasoned gardener or a complete beginner, you’ll find tips and tricks to make your vegetable garden thrive. From clever container gardening solutions to ingenious pest control methods, we’ll explore ways to overcome common challenges and enjoy a bountiful harvest. So, grab your gardening gloves, and let’s get started!
Simple Vegetable Growing Hacks for a Bountiful Harvest
Okay, let’s dive into some super easy vegetable growing hacks that will seriously boost your harvest, even if you’re a total beginner! I’ve learned these tricks over the years, and trust me, they make a huge difference. We’re talking bigger, healthier, and more delicious veggies with minimal effort.
Seed Starting Secrets
Starting seeds indoors gives you a head start on the growing season, especially if you live in a colder climate. But it can seem intimidating. Don’t worry, these hacks will make it a breeze!
* Egg Carton Seed Starters: Forget buying fancy seed starting trays! Egg cartons are perfect. They’re biodegradable (if you use the cardboard kind), free, and already divided into individual cells.
* Toilet Paper Roll Seedlings: Similar to egg cartons, toilet paper rolls are fantastic. They’re also biodegradable and easy to plant directly into the ground.
* Coffee Filter Seed Germination: This is a game-changer for tricky seeds. It helps you germinate them before planting, ensuring you only plant the viable ones.
Step-by-Step: Egg Carton Seed Starters
1. Gather Your Supplies: You’ll need an empty cardboard egg carton, seed starting mix (or a mix of potting soil and compost), seeds, a spray bottle with water, and a sunny windowsill or grow light.
2. Prepare the Egg Carton: If your egg carton doesn’t have drainage holes, poke a small hole in the bottom of each cell. This is crucial to prevent waterlogging and root rot.
3. Fill the Cells: Fill each cell with your seed starting mix, leaving about half an inch of space at the top.
4. Sow the Seeds: Follow the instructions on your seed packet for the correct planting depth. Generally, small seeds should be sprinkled on the surface and lightly covered with soil, while larger seeds need to be planted a bit deeper. I usually plant 2-3 seeds per cell to increase my chances of germination.
5. Water Gently: Use your spray bottle to gently moisten the soil. Avoid overwatering, as this can cause the seeds to rot.
6. Provide Light and Warmth: Place the egg carton on a sunny windowsill or under a grow light. Seeds need light and warmth to germinate.
7. Keep the Soil Moist: Check the soil daily and mist it with water as needed to keep it consistently moist but not soggy.
8. Thin Seedlings (If Necessary): Once the seedlings emerge and have a couple of true leaves (the second set of leaves), thin them out by snipping off the weaker seedlings at the soil line. Leave only the strongest seedling in each cell.
9. Harden Off Before Transplanting: Before transplanting your seedlings outdoors, you need to “harden them off.” This means gradually exposing them to outdoor conditions over a period of about a week. Start by placing them outside for an hour or two each day, gradually increasing the amount of time they spend outdoors. This will help them adjust to the sun, wind, and temperature changes.
Step-by-Step: Toilet Paper Roll Seedlings
1. Gather Your Supplies: You’ll need empty toilet paper rolls, seed starting mix, seeds, a tray to hold the rolls, scissors, a spray bottle with water, and a sunny windowsill or grow light.
2. Prepare the Rolls: Cut slits about an inch long at the bottom of each roll, spaced evenly around the circumference. Fold these slits inward to create a bottom for the roll. This will help hold the soil in place.
3. Place Rolls in Tray: Arrange the toilet paper rolls upright in your tray.
4. Fill the Rolls: Fill each roll with seed starting mix, leaving about half an inch of space at the top.
5. Sow the Seeds: Follow the instructions on your seed packet for the correct planting depth.
6. Water Gently: Use your spray bottle to gently moisten the soil.
7. Provide Light and Warmth: Place the tray on a sunny windowsill or under a grow light.
8. Keep the Soil Moist: Check the soil daily and mist it with water as needed.
9. Harden Off Before Transplanting: Follow the same hardening off process as described for egg carton seedlings.
10. Planting: When transplanting, you can plant the entire toilet paper roll directly into the ground. The cardboard will decompose over time.
Step-by-Step: Coffee Filter Seed Germination
1. Gather Your Supplies: You’ll need coffee filters, seeds, a spray bottle with water, and a resealable plastic bag.
2. Moisten the Coffee Filter: Lightly dampen a coffee filter with water. You want it to be moist but not dripping wet.
3. Place Seeds on Filter: Spread the seeds evenly on the coffee filter.
4. Fold the Filter: Fold the coffee filter in half or in thirds to enclose the seeds.
5. Place in Plastic Bag: Place the folded coffee filter inside a resealable plastic bag.
6. Label the Bag: Label the bag with the type of seed and the date.
7. Store in a Warm Place: Store the bag in a warm, dark place, such as a kitchen cabinet or drawer.
8. Check Daily: Check the coffee filter daily to ensure it remains moist. If it starts to dry out, lightly mist it with water.
9. Plant Germinated Seeds: Once the seeds have sprouted (you’ll see tiny roots emerging), carefully plant them in seed starting mix.
Watering Wisdom
Proper watering is essential for healthy vegetable growth. But overwatering or underwatering can be detrimental. Here are some hacks to help you water like a pro:
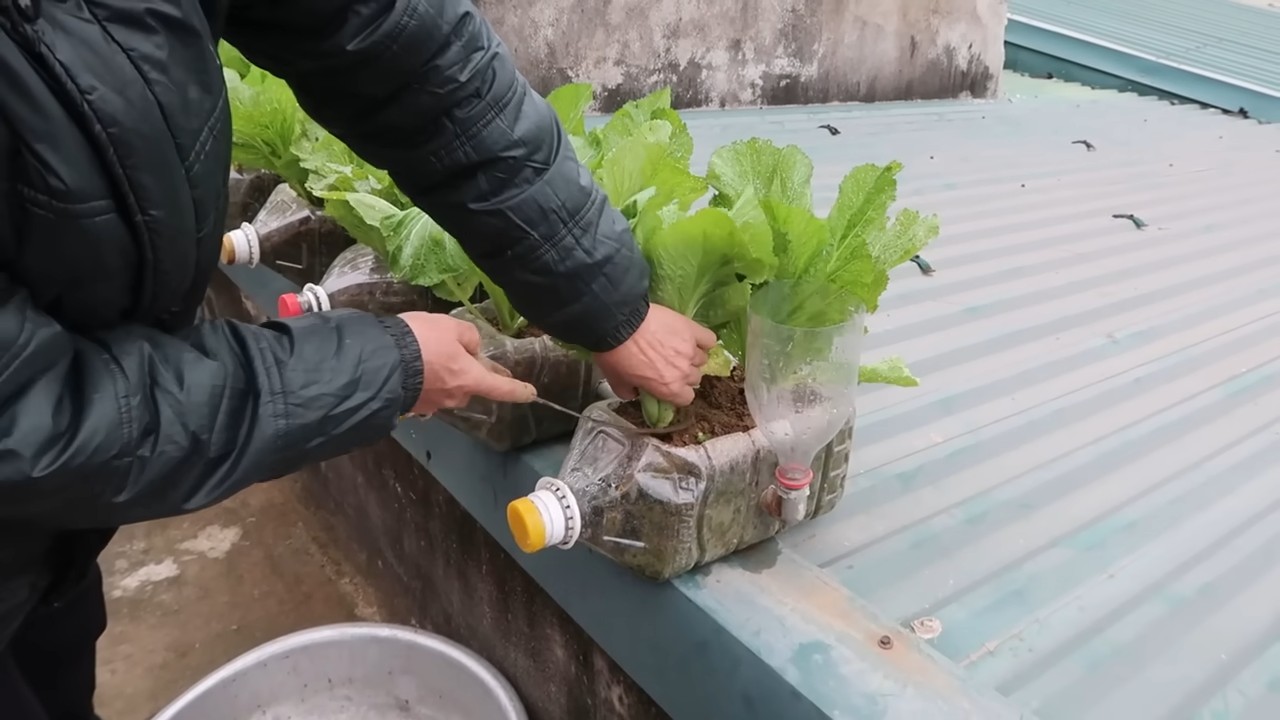
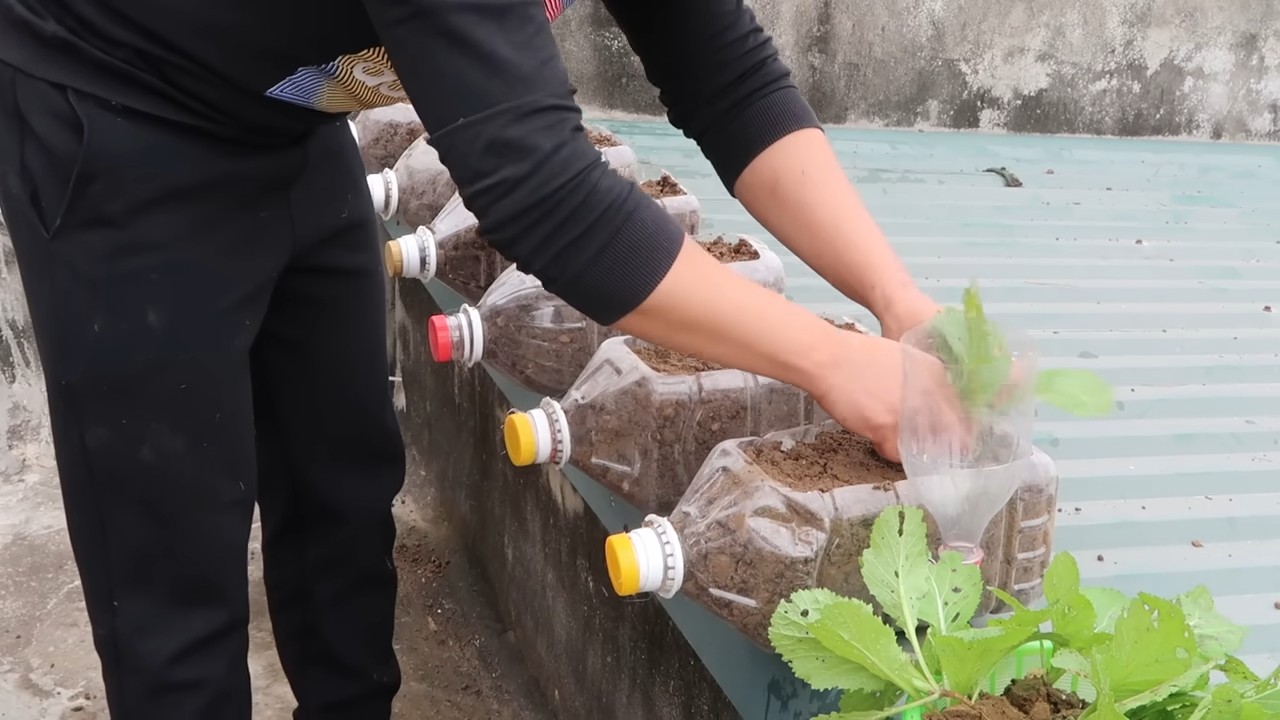
* Self-Watering Bottles: Recycle plastic bottles into self-watering devices.
* Soaker Hoses: These hoses deliver water directly to the roots, minimizing water waste and preventing fungal diseases.
* Watering Deeply and Less Frequently: Encourage deep root growth by watering deeply and less frequently, rather than shallowly and often.
Step-by-Step: Self-Watering Bottles
1. Gather Your Supplies: You’ll need a plastic bottle (2-liter bottles work well), a drill or sharp object, and a knife or scissors.
2. Prepare the Bottle: Clean the plastic bottle thoroughly.
3. Create Drainage Holes: Drill or poke several small holes in the cap of the bottle.
4. Cut Off the Bottom: Carefully cut off the bottom of the bottle using a knife or scissors.
5. Invert and Bury: Invert the bottle and bury it in the soil near your plant, with the cap facing down. Leave the cut-off bottom exposed.
6. Fill with Water: Fill the bottle with water through the exposed bottom.
7. Monitor and Refill: Monitor the water level in the bottle and refill as needed. The water will slowly seep out through the holes in the cap, providing a consistent supply of moisture to the plant’s roots.
Using Soaker Hoses
* Lay the Hose: Simply lay the soaker hose along your rows of vegetables, weaving it between the plants.
* Connect to Water Source: Connect the hose to your water source (garden hose or faucet).
* Water Slowly: Turn on the water slowly and allow it to soak into the soil.
* Watering Time: Water for about 30-60 minutes, depending on the weather and the needs of your plants.
Soil Enrichment Strategies
Healthy soil is the foundation of a thriving vegetable garden. These hacks will help you improve your soil without breaking the bank:
* Composting: Turn kitchen scraps and yard waste into nutrient-rich compost.
* Coffee Grounds: Coffee grounds are a great source of nitrogen and other nutrients.
* Epsom Salts: Epsom salts can help boost magnesium levels in the soil, which is essential for healthy plant growth.
Composting Basics
1. Choose a Location: Select a location for your compost pile that is easily accessible and well-drained.
2. Gather Materials: Collect “green” materials (nitrogen-rich) such as kitchen scraps, grass clippings, and coffee grounds, and “brown” materials (carbon-rich) such as dried leaves, straw, and shredded paper.
3. Layer Materials: Layer the green and brown materials in your compost pile, alternating between layers. A good ratio is about 2 parts brown to 1 part green.
4. Water Regularly: Keep the compost pile moist but not soggy. Water it regularly, especially during dry periods.
5. Turn the Pile: Turn the compost pile every few weeks to aerate it and speed up the decomposition process.
6. Harvest the Compost
Conclusion
So, there you have it! These simple vegetable growing hacks are more than just shortcuts; they’re a pathway to a more abundant, sustainable, and enjoyable gardening experience. We’ve explored how to transform everyday items into valuable tools, optimize your growing space, and nurture your plants with minimal effort. From repurposing plastic bottles for self-watering systems to using eggshells for calcium-rich soil amendments, each hack offers a practical solution to common gardening challenges.
But why should you try these DIY tricks? Because they empower you to take control of your food source, reduce waste, and connect with nature in a meaningful way. Imagine the satisfaction of harvesting your own tomatoes, peppers, or lettuce, knowing that you nurtured them from seed to table using resourceful and eco-friendly methods. These hacks are not just about saving time and money; they’re about fostering a deeper appreciation for the natural world and the food it provides.
Don’t be afraid to experiment and adapt these hacks to suit your specific needs and preferences. Perhaps you’ll discover a new use for coffee grounds as a natural fertilizer, or find that old tires make excellent raised garden beds. The possibilities are endless! Consider these variations to further enhance your vegetable growing journey:
* Vertical Gardening with Pallets: Transform old wooden pallets into vertical gardens for herbs, strawberries, or leafy greens. This is a fantastic space-saving solution for small balconies or patios.
* Composting with Kitchen Scraps: Start a compost bin using your kitchen scraps to create nutrient-rich soil for your plants. This reduces waste and provides a sustainable source of fertilizer.
* Companion Planting: Research companion planting techniques to maximize yields and deter pests naturally. For example, planting basil near tomatoes can improve their flavor and repel insects.
* Seed Starting Indoors: Get a head start on the growing season by starting your seeds indoors using recycled containers like egg cartons or yogurt cups.
* Water Conservation Techniques: Implement water-saving strategies like drip irrigation or mulching to reduce water consumption and keep your plants hydrated.
These vegetable growing hacks are designed to make gardening accessible to everyone, regardless of their experience level or available space. Whether you’re a seasoned gardener or a complete beginner, these tips will help you cultivate a thriving vegetable garden with ease.
We encourage you to try these DIY tricks and share your experiences with us! Post photos of your creations, share your successes (and even your failures!), and let us know how these hacks have transformed your gardening journey. Your feedback will not only inspire others but also help us refine and improve these techniques for future gardeners.
Remember, gardening is a journey of learning and discovery. Embrace the challenges, celebrate the successes, and most importantly, have fun! With these simple vegetable growing hacks, you’ll be well on your way to creating a bountiful and sustainable garden that nourishes your body and soul. So, grab your tools, get your hands dirty, and start growing your own delicious vegetables today! Let’s cultivate a community of resourceful and passionate gardeners who are committed to growing their own food and making a positive impact on the environment.
Frequently Asked Questions (FAQ)
What if I don’t have a lot of space for a garden?
That’s perfectly fine! Many of these vegetable growing hacks are designed for small spaces. Vertical gardening with pallets or repurposed containers is an excellent option for balconies, patios, or even windowsills. You can also focus on growing compact varieties of vegetables that are well-suited for container gardening. Think about herbs, leafy greens, peppers, and even dwarf tomatoes. The key is to maximize your available space and choose plants that thrive in confined environments.
How do I know which vegetables are best to grow in my climate?
Understanding your local climate is crucial for successful vegetable gardening. Research your region’s growing season, average temperatures, and rainfall patterns. Consult with local nurseries or gardening experts to determine which vegetables are best suited for your area. You can also use online resources like the USDA Plant Hardiness Zone Map to identify the plants that will thrive in your specific zone. Consider factors like sunlight exposure, soil type, and drainage when selecting your vegetables.
What if I don’t have a green thumb?
Don’t worry! Gardening is a skill that can be learned and developed over time. Start with easy-to-grow vegetables like lettuce, spinach, radishes, and herbs. These plants are relatively low-maintenance and can tolerate some neglect. Focus on providing them with adequate sunlight, water, and nutrients. Don’t be afraid to experiment and learn from your mistakes. Gardening is a process of trial and error, and even experienced gardeners encounter challenges along the way.
How can I protect my vegetables from pests and diseases?
There are several natural and organic methods you can use to protect your vegetables from pests and diseases. Companion planting can help deter pests and attract beneficial insects. For example, planting marigolds near tomatoes can repel nematodes. You can also use organic pesticides like neem oil or insecticidal soap to control infestations. Regularly inspect your plants for signs of pests or diseases and take action promptly. Proper watering and fertilization can also help strengthen your plants and make them more resistant to problems.
How often should I water my vegetables?
The frequency of watering depends on several factors, including the type of vegetable, the weather conditions, and the soil type. Generally, vegetables need about 1 inch of water per week. Check the soil moisture regularly by sticking your finger about an inch into the soil. If the soil feels dry, it’s time to water. Water deeply and thoroughly, rather than shallowly and frequently. Avoid watering during the hottest part of the day to minimize evaporation. Consider using a soaker hose or drip irrigation system to deliver water directly to the roots of your plants.
Can I use tap water to water my vegetables?
In most cases, tap water is safe to use for watering vegetables. However, if your tap water is heavily chlorinated, it’s best to let it sit out for 24 hours before using it to allow the chlorine to dissipate. You can also use rainwater or well water as alternative sources of water for your garden.
How do I know when my vegetables are ready to harvest?
Each vegetable has its own specific indicators of ripeness. For example, tomatoes should be fully colored and slightly soft to the touch. Cucumbers should be firm and green. Lettuce should be harvested when the leaves are large enough to eat. Research the specific harvesting guidelines for each vegetable you’re growing to ensure you pick them at their peak flavor and nutritional value.
What do I do with my vegetables after I harvest them?
After harvesting your vegetables, wash them thoroughly and store them properly to maintain their freshness. Leafy greens should be stored in the refrigerator in a plastic bag or container. Tomatoes can be stored at room temperature or in the refrigerator, depending on their ripeness. Root vegetables like carrots and potatoes should be stored in a cool, dark place. Consider preserving your vegetables by canning, freezing, or drying them to enjoy them throughout the year.
How can I improve the soil in my garden?
Improving the soil is essential for healthy vegetable growth. Amend your soil with organic matter like compost, manure, or leaf mold to improve its structure, drainage, and fertility. Conduct a soil test to determine the pH level and nutrient content of your soil. Adjust the pH as needed by adding lime or sulfur. Fertilize your plants regularly with organic fertilizers to provide them with the nutrients they need to thrive.
Where can I find more information about vegetable gardening?
There are many resources available to help you learn more about vegetable gardening. Consult with local nurseries, gardening clubs, or extension offices for advice and guidance. Read books, articles, and online resources about vegetable gardening. Attend workshops or seminars to learn new techniques and skills. Don’t be afraid to ask questions and connect with other gardeners to share your experiences and learn from their expertise.
Leave a Comment