
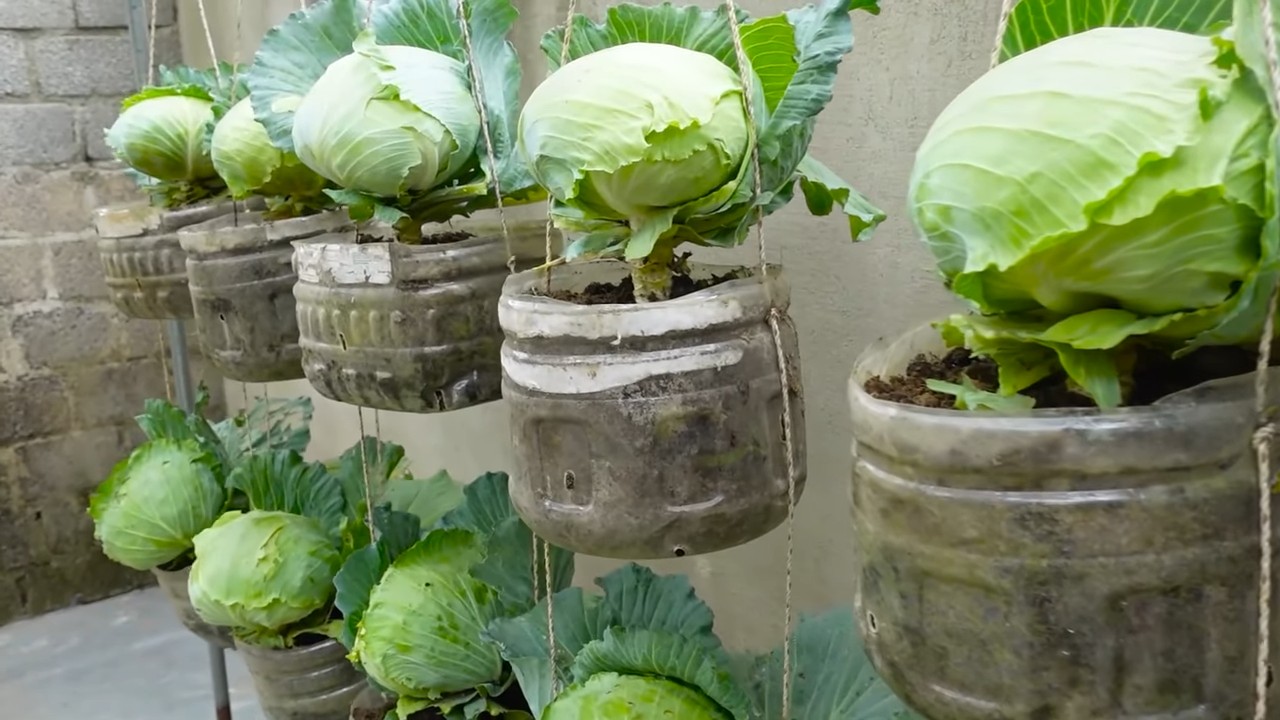
Vertical Cabbage Growing Soil Free – sounds like something out of a sci-fi movie, right? But trust me, it’s a real, and surprisingly simple, way to cultivate delicious, healthy cabbage right in your own backyard (or even balcony!). Forget back-breaking labor and endless weeding; we’re talking about a space-saving, soil-free revolution that’s perfect for urban gardeners and anyone looking to maximize their yield with minimal effort.
Cabbage, a staple in cuisines around the world for centuries, has a rich history. From its humble beginnings as a wild leafy green to its current status as a nutritional powerhouse, cabbage has nourished communities and cultures for generations. But traditional cabbage cultivation can be demanding, requiring ample space and nutrient-rich soil. That’s where our DIY trick comes in!
In today’s world, where space is a premium and time is precious, many of us dream of growing our own food but feel limited by our circumstances. That’s why I’m so excited to share this method of vertical cabbage growing soil free. It’s a game-changer for anyone who wants to enjoy fresh, homegrown cabbage without the hassle of traditional gardening. Imagine plucking crisp, vibrant leaves straight from your vertical garden, knowing exactly where your food came from and how it was grown. Ready to ditch the dirt and embrace a new way to grow? Let’s get started!
DIY Vertical Cabbage Growing: Soil-Free Hydroponics!
Hey there, fellow gardening enthusiasts! Are you short on space but dreaming of a bountiful cabbage harvest? Well, I’ve got just the project for you: a DIY vertical cabbage growing system that’s completely soil-free! That’s right, we’re diving into the world of hydroponics, and trust me, it’s easier than you think. This method is perfect for balconies, patios, or even a sunny corner indoors. Plus, it’s a fantastic way to reduce soilborne diseases and pests. Let’s get started!
What You’ll Need: The Supply List
Before we jump into the building process, let’s gather all the necessary materials. This will save you time and frustration later on.
* **PVC Pipes:**
* A large diameter PVC pipe (e.g., 4-inch or 6-inch) for the main vertical structure. The length will depend on how tall you want your system to be. I recommend starting with a 4-foot section.
* Smaller diameter PVC pipes (e.g., 1-inch or 1.5-inch) for the nutrient solution delivery system. You’ll need enough to run along the top of the main pipe and down to each planting hole.
* PVC pipe fittings: End caps for the main pipe, T-connectors and elbows for the nutrient delivery system.
* **Net Pots:** These will hold your cabbage seedlings and allow the roots to access the nutrient solution. Choose a size that fits comfortably in the holes you’ll be drilling in the main PVC pipe.
* **Hydroponic Nutrients:** Specifically formulated for leafy greens. You can find these at most garden centers or online.
* **Rockwool or Coco Coir:** As a growing medium to support the seedlings in the net pots.
* **Water Pump:** A submersible pump to circulate the nutrient solution. Choose one with a flow rate appropriate for the size of your system.
* **Reservoir:** A container to hold the nutrient solution. A plastic storage bin works well.
* **Drill with Hole Saw Attachment:** To create the planting holes in the main PVC pipe. The hole saw should be slightly smaller than the diameter of your net pots.
* **Drill with Standard Bits:** For drilling smaller holes for the nutrient delivery system.
* **PVC Primer and Cement:** To securely join the PVC pipes and fittings.
* **Measuring Tape or Ruler:** For accurate measurements.
* **Marker:** To mark the cutting and drilling locations.
* **Safety Glasses:** Always protect your eyes!
* **Gloves:** To protect your hands from the PVC primer and cement.
* **Timer:** To control the water pump’s on/off cycles.
* **pH Meter and TDS Meter (Optional but Recommended):** To monitor the pH and nutrient levels of the solution.
* **Cabbage Seedlings:** Choose your favorite variety!
Building Your Vertical Cabbage Garden: Step-by-Step
Okay, let’s get our hands dirty (well, not really, since it’s soil-free!). Follow these steps carefully, and you’ll have your vertical cabbage garden up and running in no time.
Phase 1: Preparing the Main Structure
1. **Measure and Cut the Main PVC Pipe:** Decide on the desired height of your vertical garden. I suggest a 4-foot section to start. Use a saw to cut the PVC pipe to the correct length. Make sure the cut is clean and straight.
2. **Mark the Planting Holes:** Evenly space the planting holes along the length of the PVC pipe. The spacing will depend on the size of your cabbage variety. I recommend leaving at least 8-10 inches between each hole. Use a marker to clearly mark the center of each hole.
3. **Drill the Planting Holes:** Attach the hole saw to your drill. Carefully drill out the planting holes at the marked locations. Make sure the holes are slightly smaller than the diameter of your net pots so they fit snugly.
4. Smooth the Edges: Use sandpaper or a deburring tool to smooth the edges of the drilled holes. This will prevent damage to the net pots and cabbage stems.
5. **Attach the End Cap:** Apply PVC primer to the inside of the end cap and the outside of the bottom end of the main PVC pipe. Then, apply PVC cement to both surfaces and quickly slide the end cap onto the pipe. Hold it firmly in place for a few seconds until the cement sets. This will seal the bottom of the pipe.
Phase 2: Creating the Nutrient Delivery System
1. **Measure and Cut the Smaller PVC Pipes:** Measure the length of the main PVC pipe. Cut a length of the smaller PVC pipe to match. This will be the main supply line.
2. **Drill Holes for the Drip Lines:** Drill small holes (e.g., 1/8-inch) along the length of the smaller PVC pipe, directly above each planting hole in the main pipe. These holes will allow the nutrient solution to drip onto the roots of the cabbage plants.
3. **Assemble the Drip Lines (Optional):** You can use small sections of tubing and drip emitters to create more precise drip lines for each planting hole. This is optional but can help ensure even distribution of the nutrient solution.
4. **Attach the T-Connectors and Elbows:** Use PVC primer and cement to attach T-connectors to the ends of the smaller PVC pipe. Then, attach elbows to the T-connectors to create a closed loop. This will help maintain consistent pressure in the nutrient delivery system.
5. **Connect the Supply Line to the Main Pipe:** Securely attach the smaller PVC pipe (the nutrient supply line) to the top of the main PVC pipe. You can use zip ties, clamps, or even PVC cement (if you want a permanent connection). Make sure the drip holes are positioned directly above the planting holes.
Phase 3: Setting Up the Reservoir and Pump
1. **Place the Main Pipe in the Reservoir:** Position the main PVC pipe vertically inside the reservoir. Make sure the bottom end cap is resting securely on the bottom of the reservoir.
2. **Connect the Water Pump:** Place the submersible water pump inside the reservoir. Attach a length of tubing to the pump’s outlet.
3. **Connect the Tubing to the Nutrient Delivery System:** Run the tubing from the water pump up to one of the T-connectors on the nutrient delivery system. Securely attach the tubing to the T-connector.
4. **Fill the Reservoir with Nutrient Solution:** Mix the hydroponic nutrients according to the manufacturer’s instructions. Fill the reservoir with the nutrient solution.
5. **Test the System:** Plug in the water pump and observe the flow of nutrient solution. Make sure the solution is dripping evenly from the holes in the nutrient delivery system. Adjust the pump’s flow rate if necessary.
Phase 4: Planting Your Cabbage Seedlings
1. **Prepare the Net Pots:** Fill the net pots with rockwool or coco coir. Moisten the growing medium with nutrient solution.
2. **Transplant the Seedlings:** Gently remove the cabbage seedlings from their original containers. Carefully place each seedling into a net pot, ensuring the roots are surrounded by the growing medium.
3. **Place the Net Pots in the Planting Holes:** Insert the net pots into the planting holes in the main PVC pipe. Make sure the net pots are securely in place.
Phase 5: Fine-Tuning and Maintenance
1. **Set the Timer:** Use a timer to control the water pump’s on/off cycles. I recommend starting with 15 minutes on and 45 minutes off. Adjust the timing as needed based on the plants’ growth and the environmental conditions.
2. **Monitor pH and TDS:** Use a pH meter and TDS meter to regularly monitor the pH and nutrient levels of the solution. Adjust the pH and nutrient levels as needed to maintain optimal growing conditions. The ideal pH for cabbage is between 6.0 and 6.5.
3. **Top Up the Reservoir:** As the plants grow, they will absorb water and nutrients from the solution. Regularly top up the reservoir with fresh nutrient solution.
4. **Prune and Support:** Prune any yellowing or damaged leaves. If the cabbage heads become heavy, you may need to provide additional support to prevent the plants from toppling over.
5. **Pest and Disease Control:** Regularly inspect the plants for signs of pests or diseases. Treat any problems promptly with appropriate organic or chemical controls.
Tips for Success
* Sunlight is Key: Cabbage needs at least 6 hours of direct sunlight per day. If you’re growing indoors, you may need to supplement with grow lights.
* Proper Ventilation: Ensure good air circulation around the plants to prevent fungal diseases.
* Nutrient Management: Pay close attention to the nutrient levels in the solution. Over-fertilizing can be just as harmful as under-fertilizing.
* Water Quality: Use clean, filtered water to prepare the nutrient solution.
* Start Small: If
Conclusion
So, there you have it! Vertical cabbage growing, soil-free, is not just a quirky gardening experiment; it’s a game-changer for anyone looking to maximize space, minimize mess, and enjoy a bountiful harvest of fresh, crisp cabbage. We’ve walked you through the process, highlighting the simplicity and efficiency of this method. From selecting the right cabbage varieties to crafting your nutrient-rich water solution, every step is designed to be accessible and rewarding.
Why is this a must-try? Because it tackles several common gardening challenges head-on. Limited space? No problem! Vertical growing allows you to cultivate a surprising amount of produce in a small footprint, perfect for balconies, patios, or even indoor spaces with sufficient light. Tired of battling soilborne pests and diseases? By eliminating soil altogether, you significantly reduce the risk of these issues, leading to healthier, happier cabbage plants. And let’s not forget the sheer satisfaction of watching your cabbages thrive in a clean, controlled environment.
But the beauty of this method lies in its adaptability. Feel free to experiment with different nutrient solutions to find what works best for your specific cabbage variety and local water conditions. Consider adding companion plants like marigolds or nasturtiums to your vertical setup to further deter pests and attract beneficial insects. You could even explore different vertical structures, from repurposed plastic bottles to elaborate hydroponic towers, to create a system that perfectly suits your aesthetic and practical needs.
Don’t be afraid to get creative! Try different lighting arrangements if you’re growing indoors. Explore different support systems for your growing cabbages as they mature. The possibilities are truly endless.
We understand that venturing into soil-free gardening might seem daunting at first, but we assure you, the rewards are well worth the effort. The crisp, fresh taste of homegrown cabbage, the satisfaction of nurturing your own food, and the eco-friendly nature of this method all combine to create a truly fulfilling gardening experience.
So, what are you waiting for? Gather your supplies, follow our guide, and embark on your own vertical cabbage growing adventure. We’re confident that you’ll be amazed by the results. And most importantly, we want to hear about your journey! Share your successes, your challenges, and your unique adaptations in the comments below. Let’s build a community of vertical cabbage growers and learn from each other’s experiences. Your insights could inspire others to take the plunge and discover the joys of soil-free gardening. Let us know what kind of cabbage you are growing and what kind of nutrient solution you are using. We are excited to see your results!
Frequently Asked Questions (FAQ)
What are the best cabbage varieties for vertical, soil-free growing?
While many cabbage varieties can be grown vertically and without soil, some tend to perform better than others. Smaller, more compact varieties like ‘Golden Acre,’ ‘Early Jersey Wakefield,’ and ‘Dwarf Blue Vates’ are generally well-suited for this method. These varieties don’t require as much space or support as larger varieties, making them ideal for vertical systems. However, don’t be afraid to experiment with other varieties! Just be sure to provide adequate support as the cabbages grow larger. Remember to research the specific needs of each variety, including its light requirements, nutrient needs, and susceptibility to pests and diseases.
What kind of nutrient solution should I use for my vertical cabbage garden?
A balanced hydroponic nutrient solution is essential for successful soil-free cabbage growing. Look for solutions specifically formulated for leafy greens or vegetables. These solutions typically contain the necessary macronutrients (nitrogen, phosphorus, potassium) and micronutrients (iron, manganese, zinc, etc.) that cabbages need to thrive. You can find pre-mixed solutions at most garden centers or online retailers. Alternatively, you can create your own nutrient solution using individual nutrient salts. However, this requires more precision and knowledge of plant nutrition. Always follow the manufacturer’s instructions for dilution and application rates. Monitor your plants closely for signs of nutrient deficiencies or toxicities, and adjust the nutrient solution accordingly.
How often should I water my vertical cabbage plants?
The frequency of watering depends on several factors, including the size of your plants, the temperature, and the humidity. In general, you should aim to keep the growing medium consistently moist but not waterlogged. Check the moisture level of the growing medium daily, and water when the top inch feels dry to the touch. During hot, dry weather, you may need to water more frequently. Conversely, during cool, cloudy weather, you may need to water less often. If you’re using a recirculating hydroponic system, the nutrient solution will be constantly circulating, providing a continuous supply of water and nutrients to the plants.
How much light do my vertical cabbage plants need?
Cabbages need at least 6 hours of direct sunlight per day to thrive. If you’re growing your cabbages indoors, you’ll need to supplement with artificial lighting. Grow lights specifically designed for plants are the best option, as they provide the full spectrum of light that plants need for photosynthesis. Position the grow lights close enough to the plants to provide adequate light intensity, but not so close that they burn the leaves. Adjust the height of the lights as the plants grow taller.
How do I prevent pests and diseases in my vertical cabbage garden?
One of the advantages of soil-free growing is that it reduces the risk of soilborne pests and diseases. However, cabbages can still be susceptible to other pests and diseases, such as aphids, cabbage worms, and fungal infections. To prevent these problems, inspect your plants regularly for signs of infestation or disease. Remove any affected leaves or plants immediately. You can also use organic pest control methods, such as insecticidal soap or neem oil, to control pests. Ensure good air circulation around your plants to prevent fungal diseases.
How do I support my vertical cabbage plants as they grow?
As cabbages grow larger, they may need additional support to prevent them from toppling over. You can use stakes, trellises, or cages to support the plants. Tie the stems of the cabbages to the supports with soft twine or plant ties. Be sure to provide adequate support early on, before the cabbages become too heavy.
When is the best time to harvest my vertical cabbage?
Cabbages are typically ready to harvest when the heads are firm and compact. The exact time of harvest will depend on the variety of cabbage you’re growing. Check the seed packet or plant tag for information on the expected maturity date. To harvest, cut the cabbage head from the stem with a sharp knife. Leave a few outer leaves on the stem to protect the cut surface.
Can I grow other vegetables vertically and soil-free?
Absolutely! Many other vegetables can be grown vertically and soil-free, including lettuce, spinach, kale, tomatoes, peppers, and cucumbers. The principles of vertical, soil-free growing are the same for all of these vegetables. Just be sure to choose varieties that are well-suited for vertical growing and provide adequate support as the plants grow.
What are the benefits of vertical cabbage growing, soil-free compared to traditional methods?
Vertical cabbage growing, soil-free, offers several advantages over traditional soil-based methods. These include:
* **Space efficiency:** Vertical systems allow you to grow more cabbages in a smaller space.
* **Reduced pest and disease problems:** Eliminating soil reduces the risk of soilborne pests and diseases.
* **Water conservation:** Hydroponic systems can recycle water, reducing water waste.
* **Faster growth:** Plants grown in hydroponic systems often grow faster than plants grown in soil.
* **Higher yields:** Vertical systems can produce higher yields than traditional methods.
* **Cleanliness:** Soil-free growing is cleaner and less messy than soil-based growing.
Is vertical cabbage growing, soil-free, more expensive than traditional methods?
The initial investment for vertical cabbage growing, soil-free, may be higher than for traditional methods, as you’ll need to purchase a hydroponic system or build your own. However, the long-term costs may be lower, as you’ll save money on soil, fertilizers, and pesticides. Additionally, the higher yields and faster growth rates of vertical systems can offset the initial investment.

Leave a Comment